Home>Home Maintenance>How To Reroute A Dryer Vent

Home Maintenance
How To Reroute A Dryer Vent
Modified: October 28, 2024
Learn how to reroute a dryer vent with our step-by-step guide. Improve your home maintenance skills and ensure proper ventilation.
(Many of the links in this article redirect to a specific reviewed product. Your purchase of these products through affiliate links helps to generate commission for Storables.com, at no extra cost. Learn more)
Introduction
Welcome to our comprehensive guide on how to reroute a dryer vent. If you’re experiencing issues with your current dryer vent setup or simply want to change its location for convenience, this article is here to help. Rerouting a dryer vent may seem like a daunting task, but with the right knowledge and tools, you can successfully complete the project.
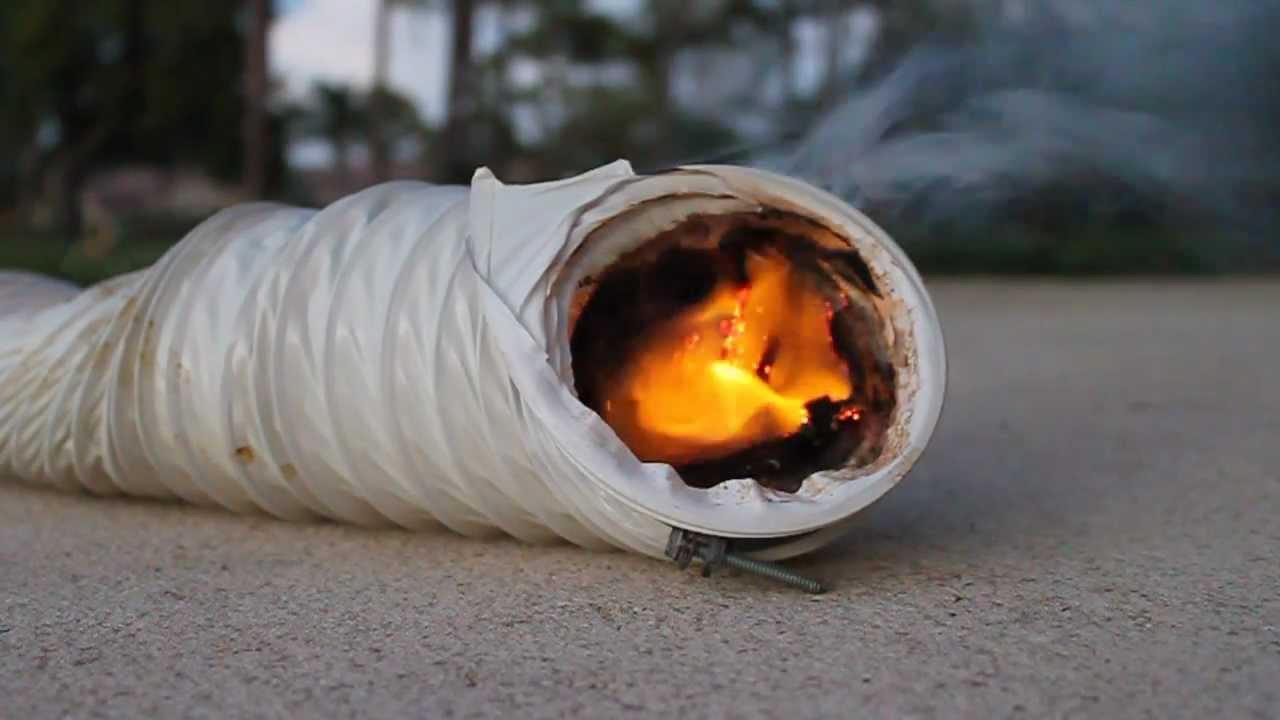
Before we dive into the step-by-step process, it’s important to understand the importance of maintaining a properly functioning dryer vent system. Your dryer generates heat and moisture as it operates, and it needs a clear pathway to vent those byproducts safely outdoors. A clogged or inefficient dryer vent can lead to a range of problems, including increased drying times, decreased energy efficiency, and even potential fire hazards.
Rerouting your dryer vent can address any existing issues and provide an opportunity to optimize its performance. Whether you’re relocating your dryer to a more convenient spot or need to reroute due to structural changes in your home, this guide will help you through the process.
Before we get started, let’s go over some important safety precautions to ensure that you stay protected throughout the project.
Key Takeaways:
- Rerouting a dryer vent is crucial for safety and efficiency. Follow safety precautions, plan the new path, and test the system for proper operation to ensure a smooth and safe process.
- Proper installation and maintenance of the new dryer vent are essential. Regularly clean the lint trap and schedule vent cleaning to prevent blockages and maintain optimal airflow for improved dryer performance.
Read more: How To Vent A Dryer
Safety Precautions
As with any home maintenance project, safety should be your top priority when rerouting a dryer vent. Follow these important precautions to prevent accidents and ensure a smooth and safe process:
- Turn off and unplug the dryer: Before you begin working on the dryer vent, make sure the appliance is turned off and disconnected from the power source. This will minimize the risk of electric shock or injury.
- Wear protective gear: It’s essential to protect yourself while working on the dryer vent. Wear safety goggles to shield your eyes from debris, gloves to protect your hands, and a dust mask to prevent inhaling dust or lint particles.
- Use a sturdy ladder: If you need to access the vent from a higher location, make sure to use a stable and secure ladder. Never overreach or stand on an unstable surface to reach the vent.
- Be cautious of sharp edges: Dryer vents often have sharp edges that can cause cuts or injuries. Use caution when handling the vent pieces and consider wearing protective gloves.
- Mind the electrical wiring: When rerouting the vent, be mindful of any electrical wiring or connections in the area. Avoid damaging or disrupting the electrical components to prevent electrical hazards.
- Clear the work area: Remove any obstacles or clutter from the work area to prevent accidents or tripping hazards. Keep the area well-lit to enhance visibility.
- Work with a buddy: If possible, enlist the help of a friend or family member to assist you during the project. They can provide support and assistance, making the process safer and more efficient.
- Follow manufacturer guidelines: Always consult your dryer’s manufacturer guidelines and instructions for specific safety precautions and recommendations.
By following these safety precautions, you can minimize the risk of accidents and ensure a safe working environment as you reroute your dryer vent.
Tools and Materials Needed
Before you begin rerouting your dryer vent, gather the necessary tools and materials to ensure a smooth and efficient process. Here’s a list of what you’ll need:
Tools:
- Tape measure
- Pencil or marker
- Rotary tool or reciprocating saw
- Screwdriver or drill
- Tin snips
- Sandpaper or deburring tool
- Level
- Caulking gun
- Utility knife
Materials:
- New dryer vent kit
- Flexible aluminum duct or rigid metal duct
- Metal clamps
- Metal vent hood or cap
- High-temperature silicone caulk
- Wood screws or masonry screws
- Caulking or weatherstripping
- Duct tape (optional)
Read more: How To Replace Dryer Vent
Additional Supplies:
- Ladder or step stool
- Drop cloth or protective sheet
- Vacuum cleaner or broom
- Rag or sponge
- Bucket or trash bag
Make sure you have all the necessary tools and materials on hand before you begin the project. This will save you time and prevent unnecessary delays as you reroute your dryer vent.
Step 1: Assess the Current Dryer Vent Setup
Before you start rerouting your dryer vent, it’s crucial to assess the current setup and understand how it is currently installed. This will help you determine the best course of action and ensure a successful rerouting process. Follow these steps to assess your current dryer vent setup:
- Turn off and unplug the dryer: Safety should always come first. Before you begin, turn off your dryer and unplug it from the power source. This will prevent any accidents while you work on the vent.
- Locate the existing dryer vent: Identify the current location of the dryer vent on the exterior wall of your home. Take note of its position and any obstructions surrounding it, such as shrubs or furniture.
- Inspect the vent duct: Examine the vent duct that connects your dryer to the vent opening on the wall or floor. Check for any signs of damage, such as tears, loose connections, or accumulated lint. Make sure the duct is securely attached to both the dryer and the vent opening.
- Measure the length of the vent duct: Using a tape measure, determine the length of the current vent duct. This measurement will help you determine whether you need to purchase additional duct material when rerouting.
- Check the vent hood or cap: Take a close look at the vent hood or cap on the exterior of your home. Ensure it is in good condition and not blocked by debris or lint. Make note of its size and shape, as you may need to replace it if it doesn’t match the new vent location.
- Assess potential rerouting options: Consider possible alternative locations for your dryer vent. Look for areas that provide a clear and unobstructed pathway to the outside, such as an adjacent exterior wall or through the roof. Ensure the new location is accessible and complies with local building codes.
By carefully assessing the current dryer vent setup, you’ll have a clear understanding of the existing system and be better equipped to plan and execute the rerouting process. Once you’ve completed this step, you can move on to finding an alternate location for your dryer vent.
Step 2: Find an Alternate Location for the Dryer Vent
Now that you’ve assessed the current dryer vent setup, it’s time to find a suitable alternate location for the vent. This step is crucial to ensure that the new pathway provides effective ventilation while adhering to safety regulations. Follow these steps to find an alternate location for your dryer vent:
- Consider proximity to the dryer: Look for potential locations that are within a reasonable distance from your dryer. It’s important to maintain a short and straight vent duct to minimize airflow restrictions and improve dryer efficiency.
- Check for obstructions: Make sure the new location doesn’t have any physical obstructions, such as walls, furniture, or electrical conduit, that could hinder the installation of the vent duct. This will ensure a smooth and straightforward rerouting process.
- Inspect the exterior space: If you’re considering an exterior wall for the new vent location, examine the available space outside. Ensure there are no obstacles like windows, doors, or pipes that could interfere with the installation of the vent hood or cap.
- Comply with building codes: Familiarize yourself with local building codes and regulations regarding dryer vent installations. Some areas have specific requirements, such as vent distance from windows or electrical outlets. Make sure the new location complies with these guidelines.
- Consider aesthetics: While functionality is important, it’s also worth considering the aesthetic impact of the new vent location. Choose a spot that blends well with the exterior of your home to maintain its visual appeal.
- Plan the vent path: Visualize the path the new vent duct will take from the dryer to the chosen location. Aim for the shortest and most direct route, avoiding sharp bends or unnecessary obstacles.
- Measure distances: Using a tape measure, measure the distance from your dryer to the proposed vent location. This will help you determine the amount of duct material needed for the rerouting process.
By carefully considering these factors, you’ll be able to find an alternate location for your dryer vent that meets safety requirements and provides efficient ventilation. Once you’ve identified the new location, you can move on to the next step: determining the new path for the dryer vent.
Step 3: Determine the New Path for the Dryer Vent
With the alternate location for your dryer vent in mind, it’s time to determine the new path that the vent duct will take. This step is crucial for ensuring proper airflow and a smooth installation. Follow these steps to determine the new path for your dryer vent:
- Measure the distance: Measure the distance between your dryer and the new vent location. This will give you an idea of how much duct material you’ll need to connect the two points.
- Choose the type of vent duct: Depending on your specific situation, you’ll need to select either flexible aluminum duct or rigid metal duct. Flexible aluminum duct is suitable for short distances with no obstructions, while rigid metal duct provides a more secure and permanent solution. Choose the duct type that best suits your needs.
- Avoid sharp bends: Aim for a straight and direct path for your vent duct. Avoid sharp bends or excessive twists, as they can restrict airflow and cause lint to accumulate in the duct, leading to potential hazards.
- Consider vertical routes: If rerouting the vent vertically through the roof, make sure to measure the distance from the dryer to the roof, taking into account any obstructions like attics or floors between the two points. Consult local building codes regarding venting through the roof.
- Avoid long horizontal runs: Long horizontal runs can lead to increased resistance and reduced airflow. If possible, limit the length of horizontal portions of the vent duct and prioritize vertical sections where applicable.
- Plan for access points: Keep in mind that the vent duct may require access points for cleaning or maintenance. Plan for access panels or easy-to-reach segments to ensure proper maintenance of the vent system in the future.
- Consider insulation: Depending on the climate in your area, you may want to consider insulating the vent duct to prevent condensation buildup and energy loss. Insulated duct wrap or sleeves are available for this purpose.
By carefully determining the new path for your dryer vent, you’ll ensure optimal airflow and reduce the risk of obstructions or lint buildup. Once you have planned the path, you’re ready to move on to the next step: removing the existing dryer vent.
Read more: How To Connect A Dryer Vent
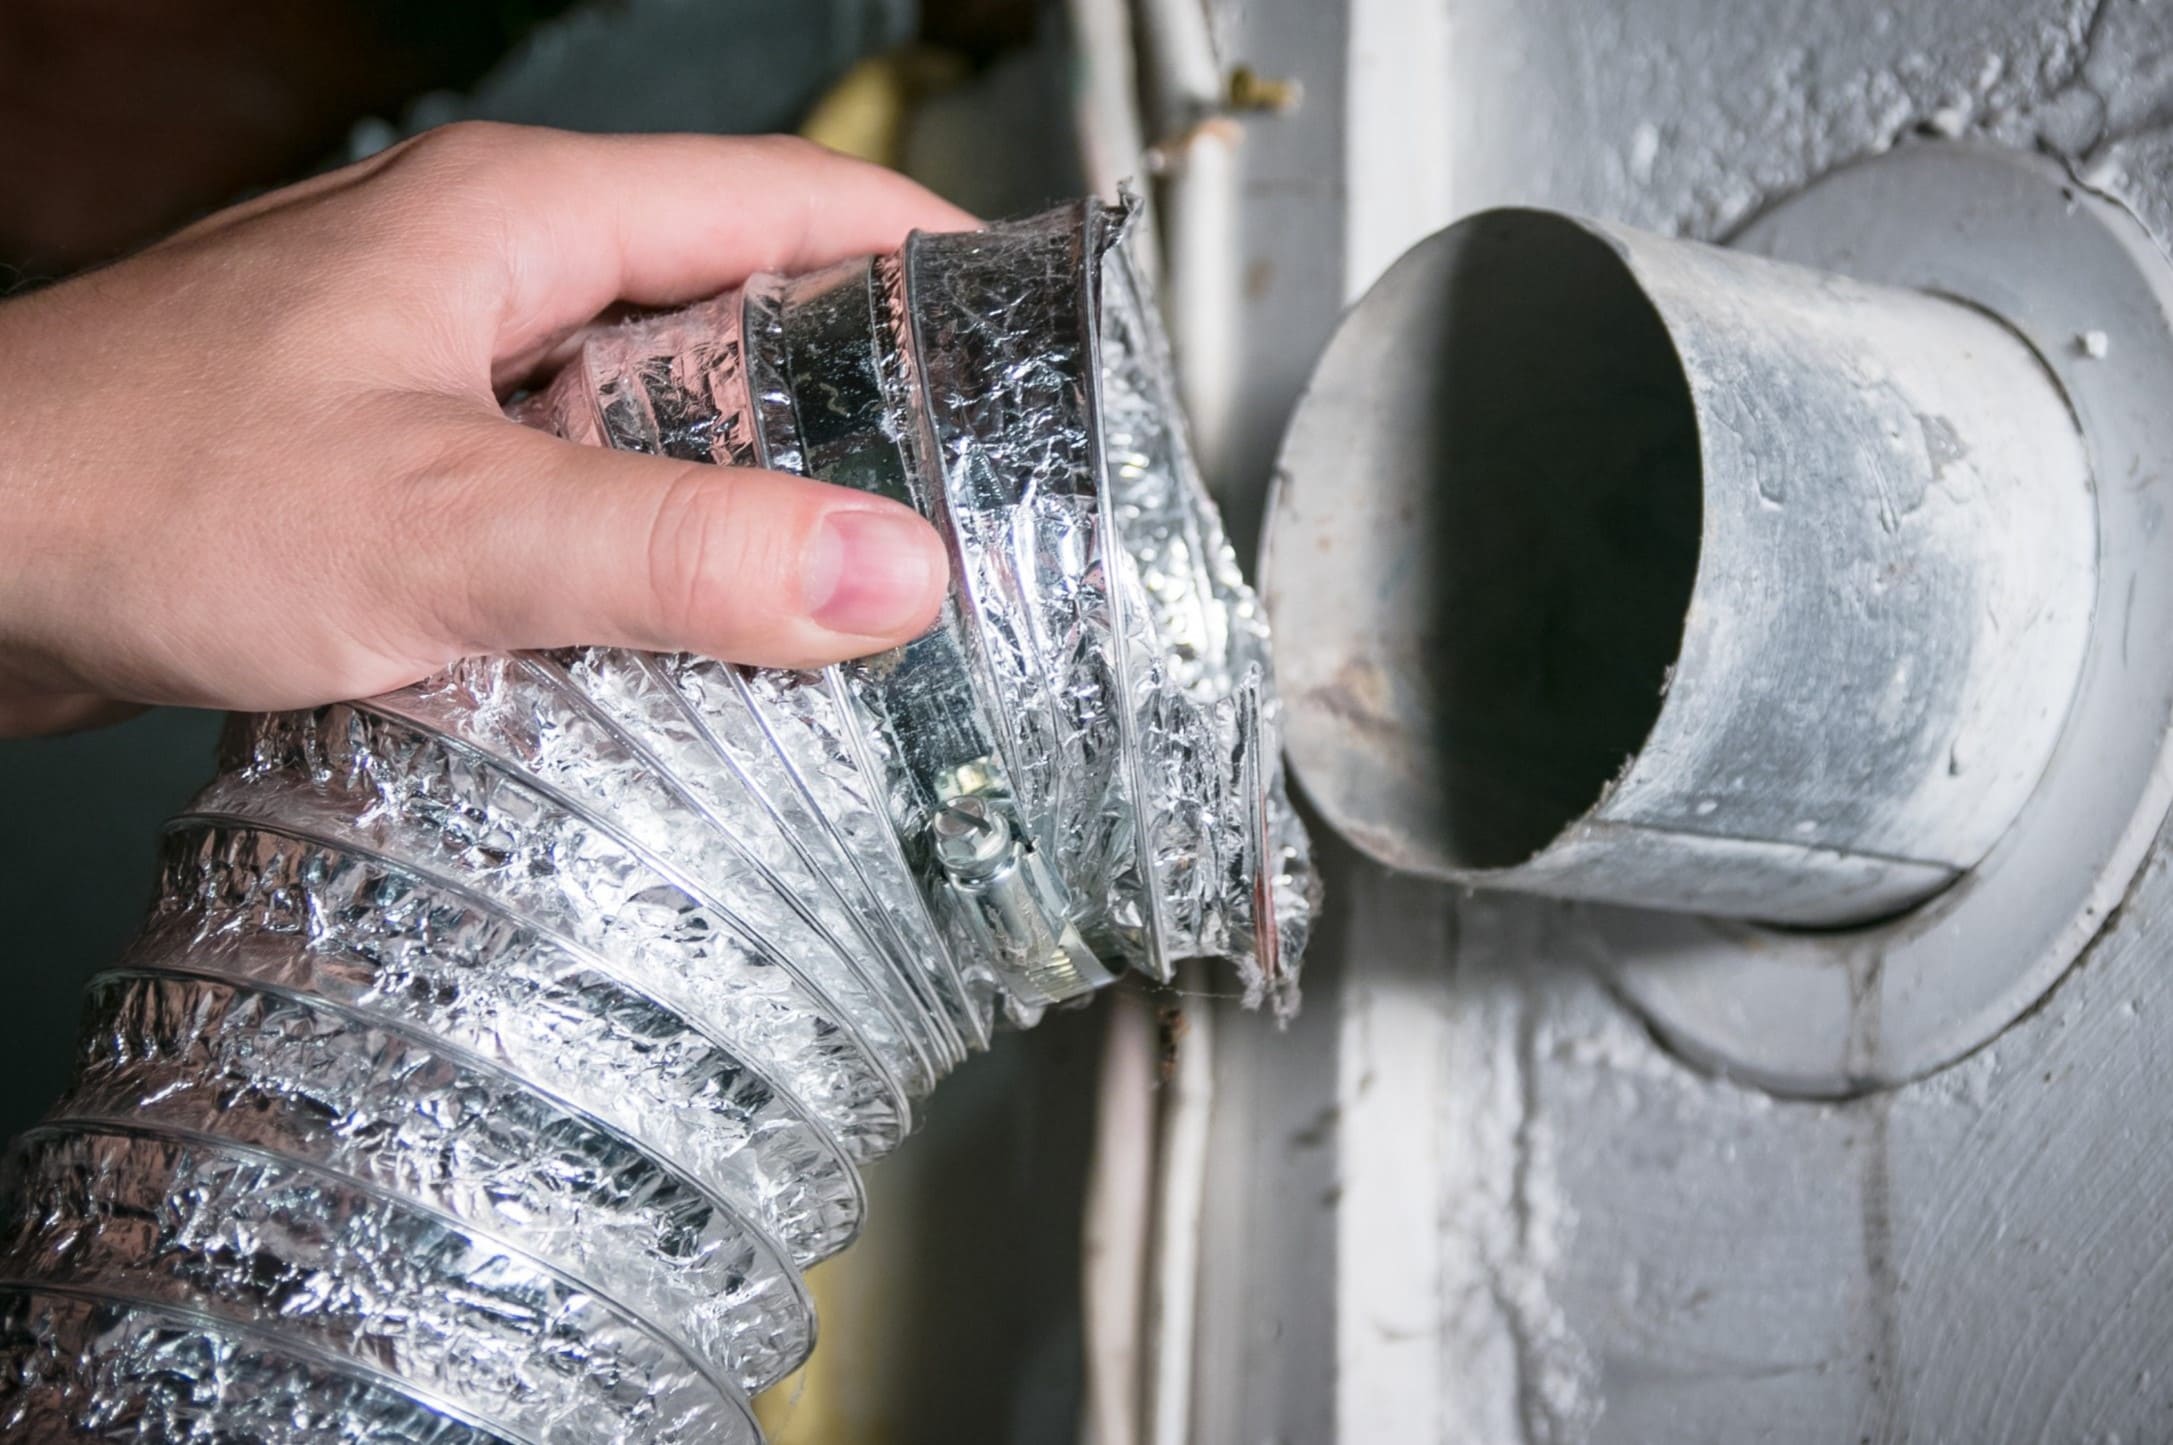
Step 4: Remove the Existing Dryer Vent
Now that you’ve assessed the current setup and planned the new path for your dryer vent, it’s time to remove the existing vent. Removing the old vent is an important step to ensure a clean and smooth installation of the new vent. Follow these steps to remove the existing dryer vent:
- Turn off the dryer: Before you begin, turn off the dryer and unplug it from the power source for safety purposes. This will prevent any accidental activation while you work on removing the vent.
- Disconnect the vent duct from the dryer: Pull the dryer away from the wall, if necessary, to access the back of the machine. Locate the connection point between the dryer and the vent duct. Depending on the setup, you may find screws, clamps, or a simple friction fit. Loosen or remove any fasteners and carefully detach the vent duct from the dryer.
- Remove the fasteners securing the vent hood or cap: On the exterior of your home, locate the vent hood or cap. Use a screwdriver or drill to remove any screws or fasteners that secure it in place. Set the fasteners aside for later use if they are in good condition.
- Disconnect the vent duct from the vent opening: With the vent hood or cap removed, you’ll see the vent opening on the wall or floor. Depending on the setup, you may need to unscrew or detach any clamps holding the vent duct in place. Carefully disconnect the vent duct from the vent opening.
- Inspect and clean the area: Once the vent duct is removed, take a moment to inspect the area for any damage or debris. Clean any lint or dust that may have accumulated around the vent opening using a vacuum cleaner or a brush. This will ensure a clean and smooth installation of the new vent.
By following these steps, you’ll successfully remove the existing dryer vent and prepare the space for the installation of the new vent. With the old vent out of the way, you’re ready to move on to the next step: installing the new dryer vent.
When rerouting a dryer vent, make sure to use smooth metal ducting to reduce the risk of lint buildup and potential fire hazards. Also, keep the vent as short and straight as possible to ensure proper airflow.
Step 5: Install the New Dryer Vent
With the old dryer vent removed, it’s time to install the new vent that will reroute the airflow from your dryer. Proper installation is essential to ensure efficient and safe ventilation of your dryer. Follow these steps to install the new dryer vent:
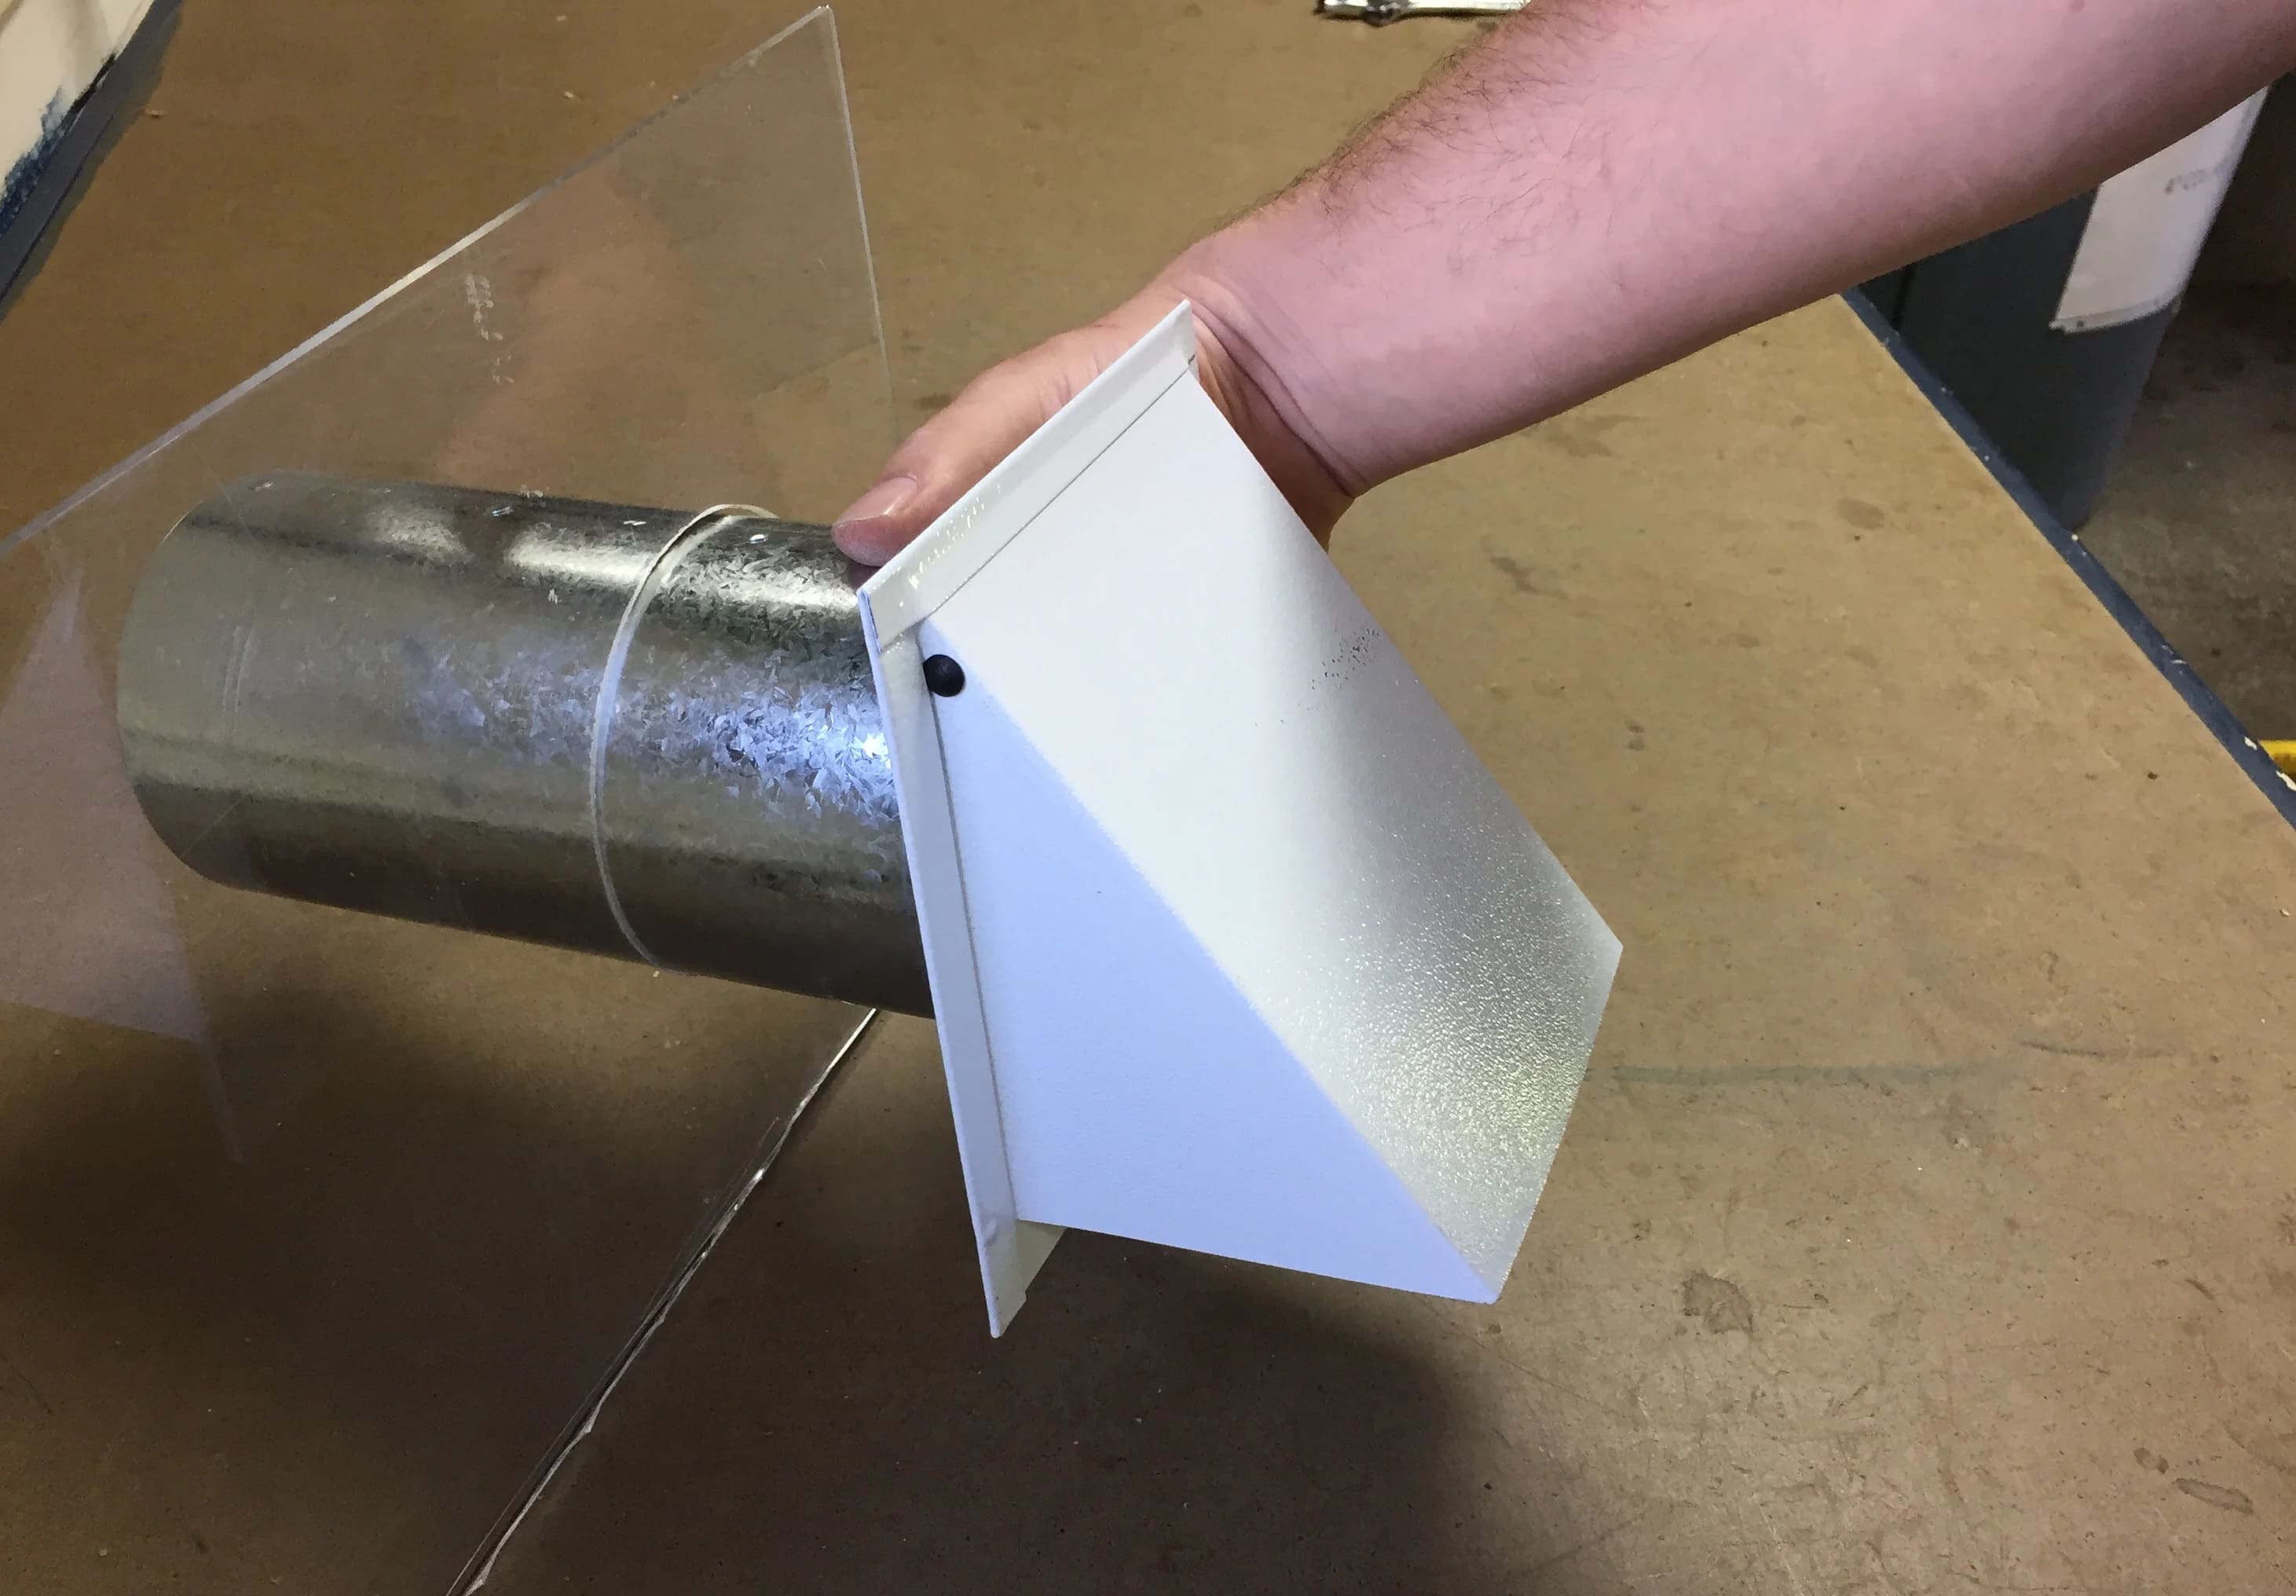
- Position the vent hood or cap: Begin by positioning the vent hood or cap over the vent opening on the exterior of your home. Align it properly to ensure a secure fit and proper airflow. Use the screws or fasteners that you removed earlier to attach the vent hood or cap to the wall.
- Measure and cut the vent duct: Using a tape measure, measure the distance between the new vent location and the dryer. Add a few inches to the measurement for flexibility. Use tin snips or a similar tool to cut the vent duct to the required length. Ensure that the cut is clean and straight.
- Attach the vent duct to the vent hood or cap: Slide one end of the vent duct onto the vent opening of the hood or cap. Secure it in place using metal clamps or screws, ensuring a tight and secure connection. Make sure the connection is airtight to prevent any leakage.
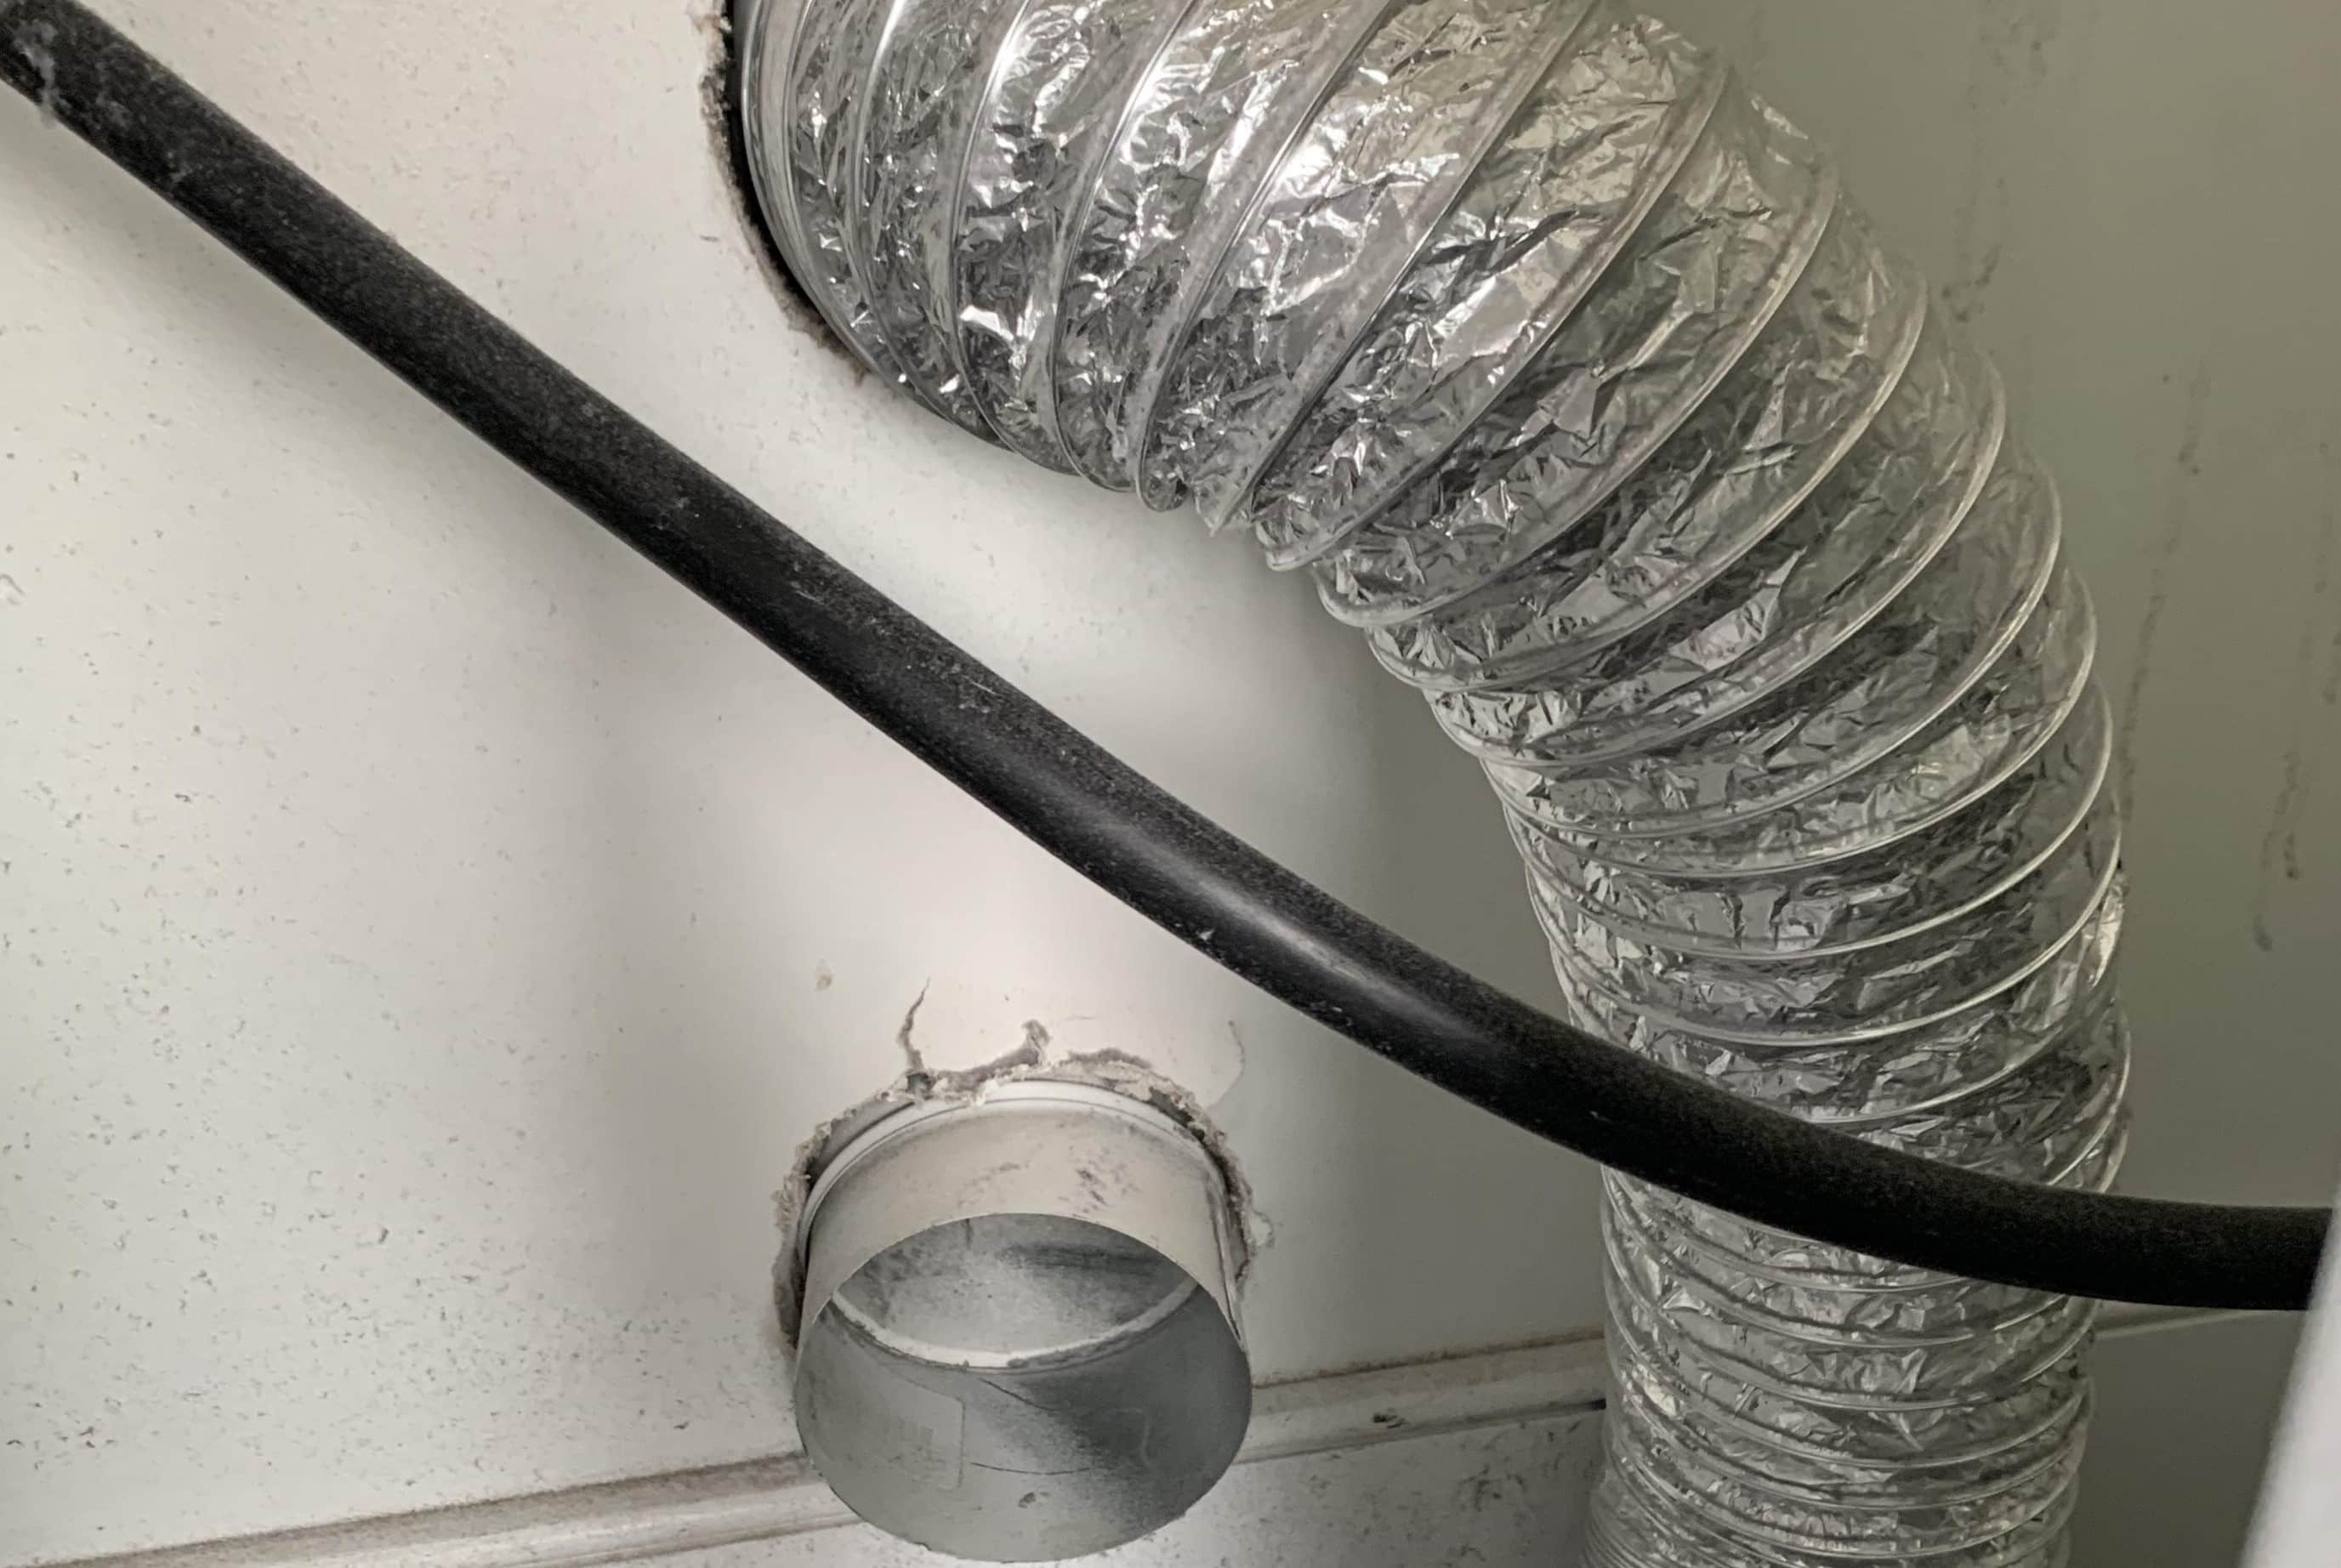
- Route the vent duct to the dryer: Carefully route the vent duct from the vent hood or cap to the back of the dryer, following the planned path you determined earlier. Avoid sharp bends or kinks in the duct, as they can restrict airflow. Use metal clamps or duct tape to secure the duct along the chosen path.
- Secure the vent duct to the dryer: Once the vent duct is properly routed to the dryer, attach it securely to the dryer’s exhaust port. Use the appropriate fasteners or clamps to ensure a tight and stable connection. Double-check that the connection is secure and airtight.
- Seal any gaps or joints: Inspect the connections between the vent duct and the vent hood/cap and between the vent duct and the dryer. Apply high-temperature silicone caulk or use metal foil tape to seal any gaps or joints. This will prevent any air leaks and ensure proper airflow.
- Test the installation: With the new dryer vent installed, turn on your dryer and let it run for a few minutes. Monitor the vent hood or cap on the exterior of your home to ensure that there is a steady flow of warm air and that the vent is functioning properly.
By following these steps, you’ll successfully install the new dryer vent, rerouting the airflow from your dryer to a new location. Proper installation is essential to ensure optimal dryer performance and safety. Once the vent is properly installed, you can move on to the next step: connecting the dryer to the new vent.
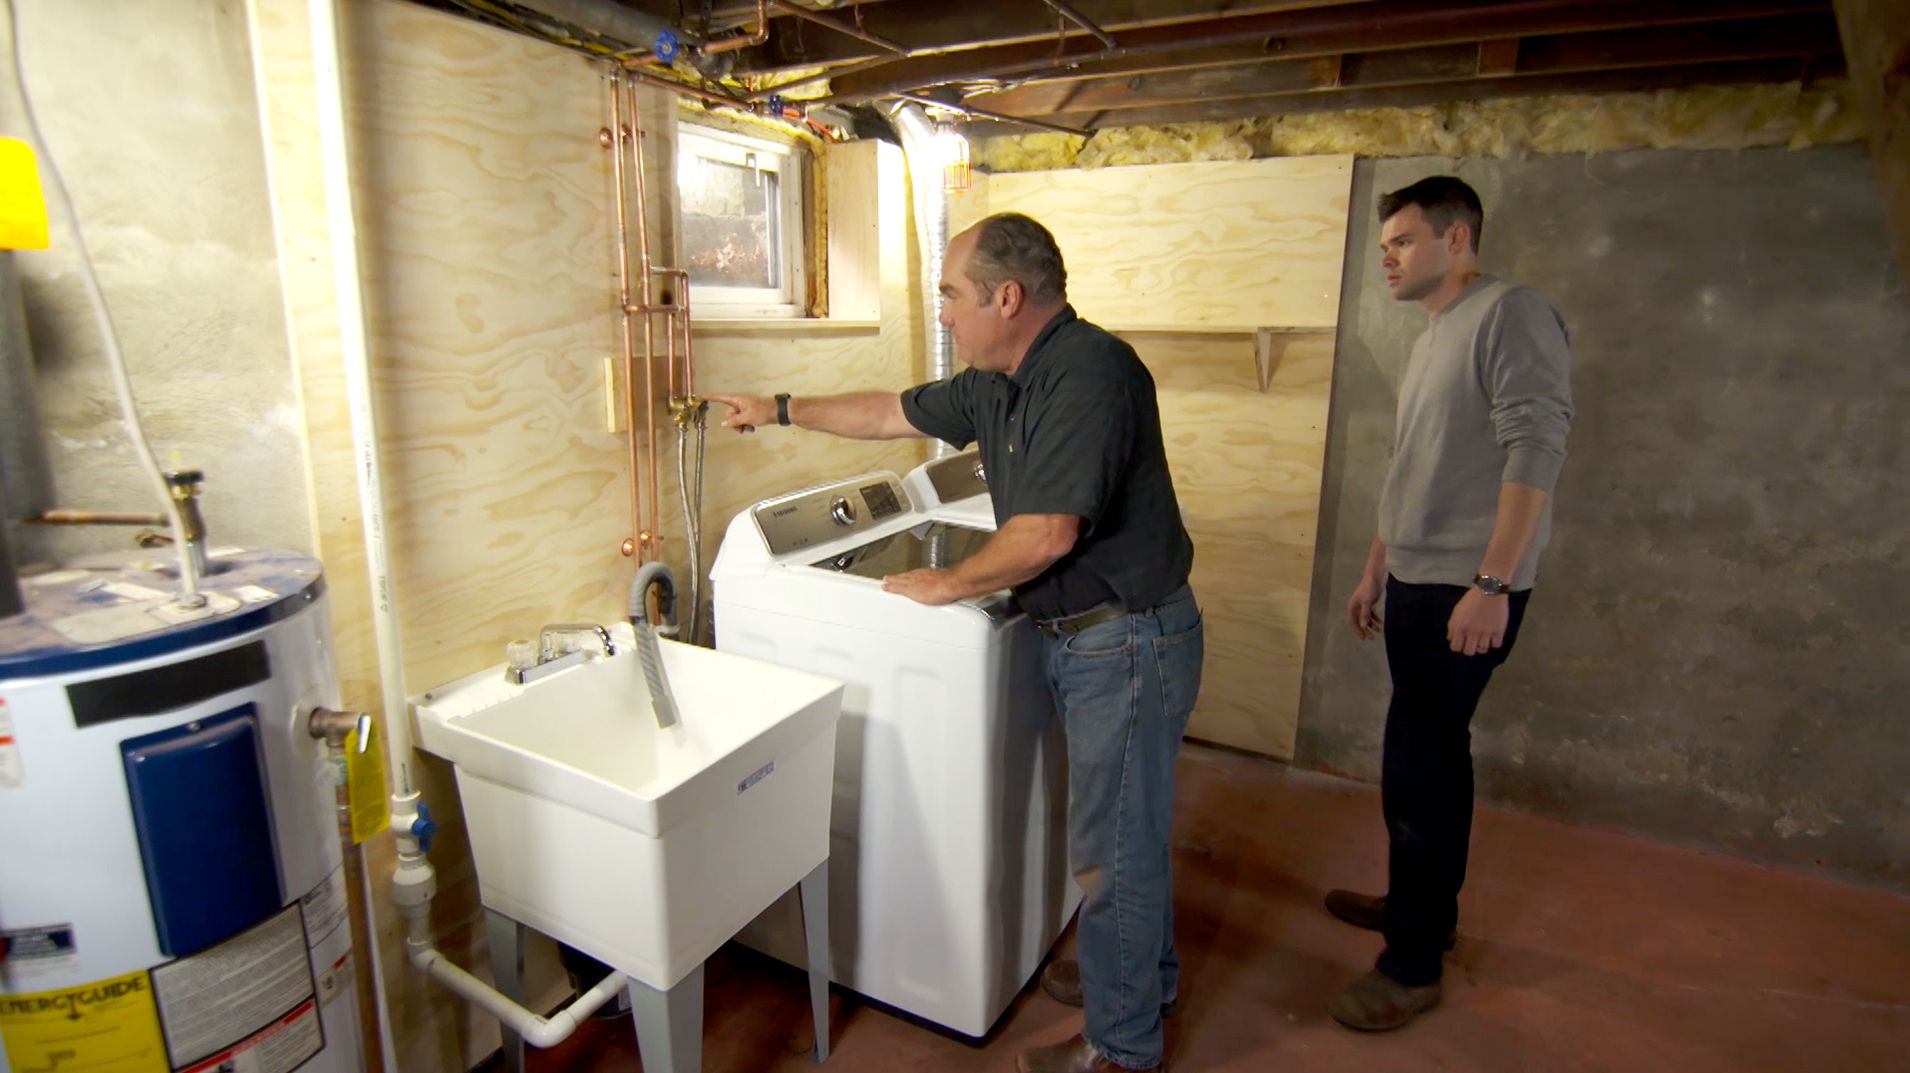
Step 6: Connect the Dryer to the New Vent
With the new dryer vent installed, it’s time to connect your dryer to the new vent system. This step ensures that the dryer is properly connected to the vent for efficient airflow and safe operation. Follow these steps to connect your dryer to the new vent:
- Position the dryer: Move the dryer back into its designated spot, ensuring that there is enough space for the vent duct to connect without kinks or bends.
- Align the dryer’s exhaust port: Locate the exhaust port at the back of your dryer. Align it with the open end of the vent duct, ensuring a straight and direct connection.
- Secure the connection: Once aligned, securely attach the vent duct to the dryer’s exhaust port. Use metal clamps or fasteners to ensure a tight and secure connection. Make sure there are no gaps or leaks between the duct and the dryer.
- Ensure proper airflow: Double-check that the vent duct is not obstructed and that there are no kinks or bends that can restrict airflow. Ensure that the duct is supported along its length to maintain a smooth and consistent path to the vent hood or cap.
- Test the connection: Turn on your dryer and let it run for a few minutes. Monitor the vent hood or cap on the exterior of your home to check if there is a steady flow of warm air. Make sure there are no signs of lint accumulation or air leaks around the connections.
- Make adjustments if needed: If you notice any issues with the connection or airflow, make any necessary adjustments. Ensure that the duct is properly aligned and securely attached to the dryer’s exhaust port and the vent hood or cap.
- Clean up and restore: Once you are satisfied with the connection and airflow, clean up any debris or dust around the dryer and the vent area. Put away your tools and materials, and restore the surrounding area to its original condition.
By following these steps, you’ll successfully connect your dryer to the new vent and ensure proper airflow from the appliance to the exterior of your home. This step completes the installation process, and you’re now ready to move on to the final step: testing the dryer vent for proper operation.
Step 7: Test the Dryer Vent for Proper Operation
After completing the installation of the new dryer vent and connecting it to your dryer, it’s crucial to test the system for proper operation. This final step ensures that the vent is functioning efficiently and that your dryer is operating safely. Follow these steps to test the dryer vent:
- Close all access panels: If you installed any access panels during the installation process, make sure they are securely closed.
- Turn on the dryer: Plug in your dryer and turn it on as you normally would. Make sure it is in the appropriate settings for a regular cycle.
- Monitor the vent airflow: Go to the exterior of your home and observe the vent hood or cap. Check for a steady flow of warm air coming from the vent. This indicates that the vent is properly connected and allowing the dryer to expel hot air and moisture.
- Check for any obstructions: While the dryer is running, inspect the surrounding area for any signs of lint or debris accumulation. Ensure that there are no blockages or restrictions that may hinder the airflow.
- Listen for unusual sounds: Pay attention to any unusual sounds coming from the dryer or the vent. Strange noises could indicate a problem with the vent system, such as a loose connection or debris causing a blockage.
- Monitor drying performance: Run a load of laundry through your dryer and observe its drying performance. Check if the clothes are drying efficiently within a reasonable amount of time. If you notice any issues, such as extended drying times or damp clothes, it may indicate a problem with the vent system that requires further investigation.
- Maintain regular maintenance: To ensure continued proper operation, it’s essential to perform regular maintenance tasks, such as cleaning the lint trap after every use and scheduling periodic vent cleaning to prevent buildup and blockage. Consult your dryer’s manual for specific maintenance guidelines.
By following these steps and testing the dryer vent for proper operation, you’ll ensure that your dryer is functioning efficiently and the vent system is allowing for effective airflow. Regularly monitor the vent to ensure it remains free of obstructions and promptly address any issues that arise. This concludes the process of rerouting your dryer vent and ensuring its proper operation.
Remember, if you encounter any difficulties during the installation or testing process, it’s always advisable to consult a professional for assistance.
Read more: How To Relocate A Dryer Vent
Conclusion
Congratulations! You have successfully rerouted your dryer vent, ensuring efficient airflow and safe operation of your dryer. By following the step-by-step process outlined in this guide, you have taken important steps to improve the performance and safety of your dryer vent system.
Rerouting a dryer vent may initially seem like a daunting task, but with careful planning, the right tools, and a focus on safety, you have accomplished this home maintenance project with ease. You have assessed the current dryer vent setup, found an alternate location, determined the new path, removed the existing vent, installed the new vent, connected the dryer, and tested the system for proper operation. Well done!
Remember, maintaining a properly functioning dryer vent is crucial for several reasons. It improves the efficiency of your dryer, reduces drying times, and saves energy. It also prevents potential fire hazards by eliminating the buildup of lint, which is highly flammable.
To keep your newly rerouted vent system working effectively, make it a habit to clean the lint trap after each use and schedule regular maintenance, including vent cleaning, to remove any accumulated lint or debris. This will help maintain optimal airflow and prevent blockages.
Thank you for following this comprehensive guide on how to reroute a dryer vent. We hope this information has been helpful in your home maintenance endeavors. Enjoy the improved performance of your dryer and the peace of mind that comes with a properly functioning dryer vent system!
Frequently Asked Questions about How To Reroute A Dryer Vent
Was this page helpful?
At Storables.com, we guarantee accurate and reliable information. Our content, validated by Expert Board Contributors, is crafted following stringent Editorial Policies. We're committed to providing you with well-researched, expert-backed insights for all your informational needs.