Home>Home Security and Surveillance>How To Create A Motion Detector With Arduino On A Breadboard

Home Security and Surveillance
How To Create A Motion Detector With Arduino On A Breadboard
Modified: March 6, 2024
Learn how to create a home security motion detector using Arduino and a breadboard. Enhance your surveillance system with this DIY tutorial.
(Many of the links in this article redirect to a specific reviewed product. Your purchase of these products through affiliate links helps to generate commission for Storables.com, at no extra cost. Learn more)
Introduction
Keeping our homes and loved ones safe is a top priority for many of us. With advancements in technology, home security and surveillance systems have become more accessible and affordable. One popular method of securing our homes is through the use of motion detectors. These devices can detect any movement within a specified area and trigger an alarm or notify us through our smartphones.
In this article, we will explore how to create a motion detector using an Arduino microcontroller and a breadboard. Arduino is a versatile platform that allows us to connect various sensors and components to build custom electronic projects. By following the steps outlined here, you will be able to create your very own motion detector and enhance the security of your home.
Before we dive into the technical details, let’s take a look at the components required for this project.
Key Takeaways:
- You can create a motion detector for your home using an Arduino and a breadboard. It’s a fun and rewarding project that enhances home security and can be customized to fit your needs.
- By following simple steps, you can build a motion detector that alerts you to any unexpected movement. It’s a great way to learn about technology and add a cool feature to your home!
Components Required
To create a motion detector with Arduino on a breadboard, you will need the following components:
- Arduino Uno: This is a popular microcontroller board that serves as the brain of our motion detector. It comes with built-in analog and digital pins, which we will utilize to connect the various components.
- Passive Infrared (PIR) Motion Sensor: This sensor detects infrared radiation emitted by moving objects. It has a wide detection range and is commonly used in security systems.
- Breadboard: A breadboard allows us to create a temporary circuit without the need for soldering. It has a grid of holes where we can insert and connect the components using jumper wires.
- Jumper Wires: These wires help establish electrical connections between the components on the breadboard, making it easy to prototype and modify the circuit.
- LED (optional): An LED can be used as a visual indicator to show when motion is detected. It adds an extra layer of feedback to our motion detector.
- Resistor (optional): If you decide to use an LED, you will need a current-limiting resistor to protect the LED from burning out. The value of the resistor will depend on the specific LED you use.
With these components in hand, let’s move on to setting up our breadboard.
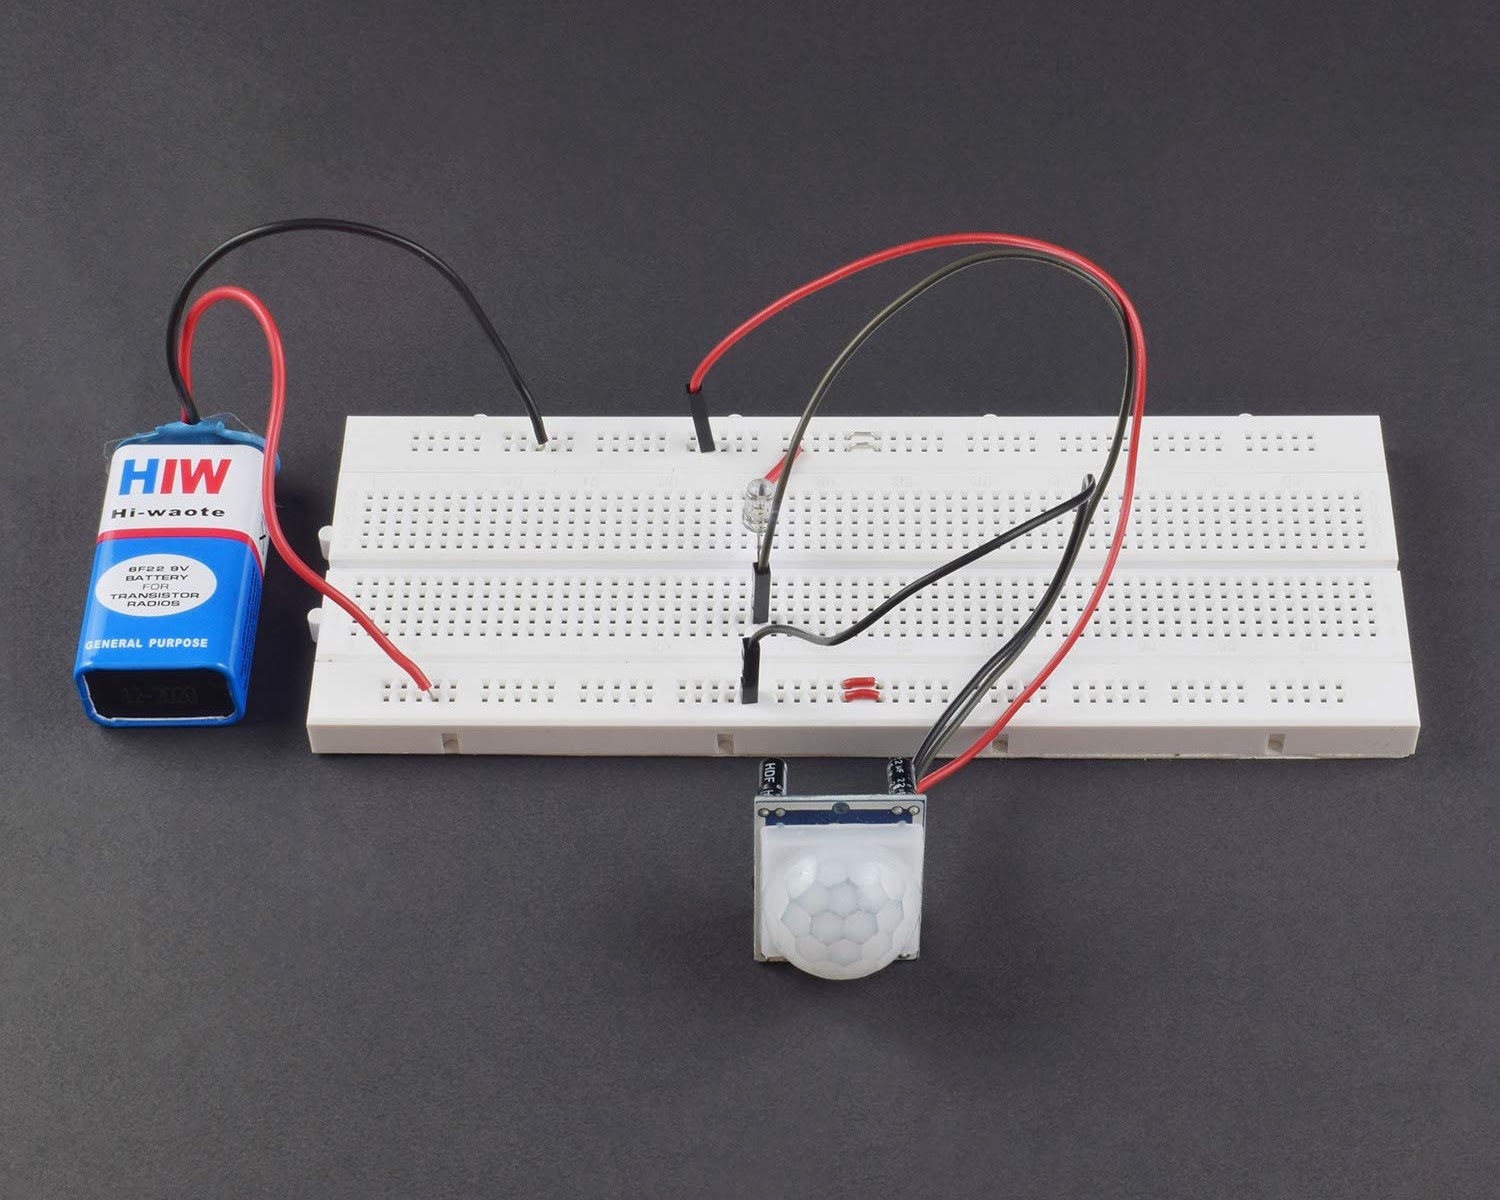
Breadboard Setup
Setting up the breadboard correctly is crucial for creating a well-functioning motion detector. Follow these steps to ensure the components are connected properly:
- Place the breadboard on a flat surface, making sure it is clean and free from any debris.
- Identify the power rails on the breadboard. These are the long strips running vertically on both sides of the board, usually color-coded red and blue. The red rail is the positive power rail (+5V) and the blue rail is the ground rail (GND).
- Connect the Arduino to the breadboard by inserting its pins into the corresponding rows on the board. Make sure the Arduino spans the center ditch, with its pins positioned in separate rows on each side.
- Connect a jumper wire from the Arduino’s 5V pin to the positive power rail on the breadboard (red rail).
- Connect another jumper wire from any of the Arduino’s GND pins to the ground rail on the breadboard (blue rail).
Your breadboard setup should now have a proper power connection. Next, we will connect the motion sensor to the breadboard.
Connecting the Motion Sensor
Now that our breadboard is set up with power connections, we can proceed to connect the PIR motion sensor to the breadboard. Follow these steps:
- Take the PIR motion sensor and identify its three pins: VCC, OUT, and GND.
- Connect the VCC pin of the motion sensor to the positive power rail on the breadboard using a jumper wire.
- Connect the GND pin of the motion sensor to the ground rail on the breadboard using another jumper wire.
- Now, connect the OUT pin of the motion sensor to any of the digital pins on the Arduino. For this example, let’s use digital pin 2. Insert one end of a jumper wire into the OUT pin of the motion sensor and the other end into the digital pin 2 on the Arduino.
Your motion sensor is now properly connected to the breadboard and Arduino. We can move on to connecting the LED, if desired, and writing the code for our motion detector.
Connecting the Arduino
Now that we have connected the motion sensor to the breadboard, it’s time to connect the Arduino to the computer and establish the necessary communication. Here’s how you can do it:
- Take a USB cable and connect one end to the USB port on the Arduino board.
- Connect the other end of the USB cable to an available USB port on your computer.
- Ensure that the Arduino board is properly powered. The board should receive power from the USB connection.
- If this is your first time connecting the Arduino board to your computer, you may need to install the Arduino software (IDE) from the official Arduino website. Follow the instructions provided on the website to download and install the software for your operating system.
- Once the software is installed, open the Arduino IDE on your computer.
- Select the correct board and port from the Tools menu in the Arduino IDE. Choose the Arduino board model you are using (e.g., Arduino Uno) and the port that it is connected to.
- Make sure that the port selected corresponds to the port to which the Arduino board is connected.
- The Arduino is now connected and ready for programming.
With the Arduino connected, we can now proceed to write the code for our motion detector.
When building a motion detector with Arduino on a breadboard, make sure to carefully follow the wiring diagram and double-check your connections to ensure everything is properly connected before testing.
Read more: How To Deactivate A Motion Detector
Writing the Code
Now that the hardware is set up and the Arduino is connected to the computer, it’s time to write the code for our motion detector. The code will instruct the Arduino on how to interpret the input from the motion sensor and trigger an action accordingly. Here’s an example code to get you started:
/* Motion Detector Code */
const int pirPin = 2; // Motion sensor output pin
const int ledPin = 13; // LED pin
void setup() {
pinMode(pirPin, INPUT); // Set the motion sensor pin as input
pinMode(ledPin, OUTPUT); // Set the LED pin as output
}
void loop() {
if (digitalRead(pirPin) == HIGH) { // If motion is detected
digitalWrite(ledPin, HIGH); // Turn on the LED
delay(1000); // Delay for 1 second
digitalWrite(ledPin, LOW); // Turn off the LED
} else {
digitalWrite(ledPin, LOW); // Turn off the LED
}
}
The code begins by defining two constants: `pirPin` represents the digital pin connected to the motion sensor, and `ledPin` represents the digital pin connected to the optional LED. In the `setup()` function, we set the pinMode for `pirPin` as input and `ledPin` as output.
In the `loop()` function, we check if motion is detected by reading the value from the motion sensor pin. If the value is `HIGH`, indicating motion is detected, we turn on the LED, wait for 1 second using the `delay()` function, and then turn off the LED. If no motion is detected, the LED remains off.
This is a basic code example, but you can modify it to suit your specific needs. You can add more functionality, such as triggering an alarm, sending notifications, or integrating with other home automation systems.
Now that we have the code, let’s move on to uploading it to the Arduino board.
Uploading the Code to Arduino
Now that we have written the code for our motion detector, it’s time to upload it to the Arduino board. Follow these steps to upload the code using the Arduino IDE:
- Make sure the Arduino board is still connected to your computer via the USB cable.
- Open the Arduino IDE on your computer if it’s not already open.
- In the Arduino IDE, click on the File menu and select New to create a new sketch.
- Copy and paste the motion detector code into the new sketch window.
- Verify that the Arduino board and port settings in the Tools menu are still correct.
- Click on the Upload button (the right-pointing arrow) in the Arduino IDE to upload the code to the Arduino board.
- Wait for the upload process to complete. You will see the progress in the bottom section of the Arduino IDE.
- Once the upload is successful, you will see the message “Done uploading” in the Arduino IDE.
That’s it! You have successfully uploaded the code to the Arduino board. The board will now execute the code and start functioning as a motion detector.
Now, it’s time to test our motion detector and see it in action.
Testing the Motion Detector
Now that we have uploaded the code to the Arduino board, it’s time to test our motion detector and see if it’s working correctly. Follow these steps to test the motion detector:
- Ensure that the motion sensor is set up in a suitable location and has a clear line of sight to the area you want to monitor.
- Connect the Arduino board to a power source, either through the USB connection to your computer or using an external power supply if available.
- Observe the LED connected to the Arduino board. When motion is detected, the LED should turn on for a brief moment before turning off again.
- To simulate motion, simply move within the detection range of the motion sensor or wave your hand in front of it.
- Observe the behavior of the LED each time motion is detected. It should turn on briefly and then turn off again.
If the LED behaves as expected, congratulations! Your motion detector is working properly. You can now proceed to fine-tuning its placement and sensitivity based on your specific needs.
If the LED does not turn on or does not respond to motion, double-check your connections and make sure that the code has been uploaded successfully to the Arduino board. Check for any errors or typos in the code, and review the wiring to ensure all components are properly connected.
Remember that the motion detector may have a specified detection range and angle, so ensure that it is properly positioned to cover the desired area. Also, consider adjusting the sensitivity of the motion sensor by referring to its datasheet and adjusting any available potentiometers or trimmers.
With the motion detector working correctly, you can now consider integrating it into a larger home security or automation system, adding features such as sending notifications to your smartphone, activating alarms, or controlling other connected devices.
Have fun experimenting with your motion detector and exploring the various possibilities it offers!
Conclusion
Creating a motion detector using an Arduino microcontroller and a breadboard is an exciting and rewarding project that can enhance the security of your home. By following the steps outlined in this article, you have learned how to connect the necessary components, write the code, and upload it to the Arduino board.
A motion detector can be a valuable addition to your home security system, alerting you to any unexpected movement and providing peace of mind. With the ability to customize and expand the functionality of the motion detector, you can integrate it into a larger home automation system or enhance it with additional features.
Remember to test and fine-tune your motion detector to ensure it is properly calibrated for your specific needs. Position the motion sensor in a strategic location and adjust its sensitivity to achieve optimal results.
Furthermore, don’t be afraid to experiment with different ideas and explore the possibilities of your motion detector. You may consider connecting it to other sensors, adding wireless communication capabilities, or integrating it with a smartphone application for remote monitoring.
Building your own motion detector not only gives you a deeper understanding of how these systems work but also allows for customization and creativity. With the flexibility of the Arduino platform, you can expand your motion detector project to fit your unique requirements.
We hope that this article has provided you with a valuable introduction to creating a motion detector with Arduino on a breadboard. Remember to have fun with your project, continue learning, and explore the endless possibilities of home security and surveillance systems.
Stay curious, stay innovative, and keep creating!
Frequently Asked Questions about How To Create A Motion Detector With Arduino On A Breadboard
Was this page helpful?
At Storables.com, we guarantee accurate and reliable information. Our content, validated by Expert Board Contributors, is crafted following stringent Editorial Policies. We're committed to providing you with well-researched, expert-backed insights for all your informational needs.