Home>Ideas and Tips>DIY Guide To Installing A Kitchen Backsplash With Mother Of Pearl Tiles

Ideas and Tips
DIY Guide To Installing A Kitchen Backsplash With Mother Of Pearl Tiles
Published: September 17, 2024
Learn how to install a stunning mother of pearl tile backsplash in your kitchen with our step-by-step DIY guide. Enhance your space with ease!
(Many of the links in this article redirect to a specific reviewed product. Your purchase of these products through affiliate links helps to generate commission for Storables.com, at no extra cost. Learn more)
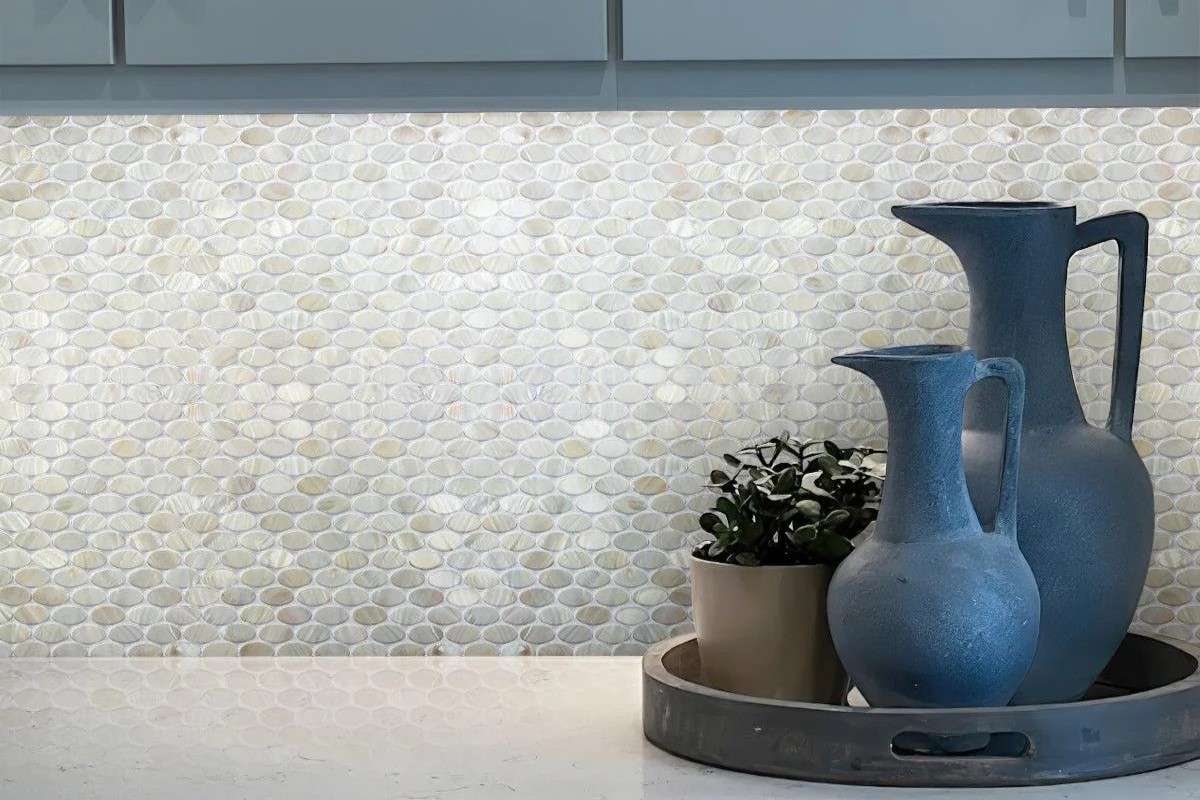
Installing a kitchen backsplash is a fantastic way to enhance the aesthetic and functionality of your kitchen. One of the most beautiful and unique options for a backsplash is using mother of pearl (MOP) tiles. These tiles offer a luxurious, iridescent sheen that can add a touch of elegance to any kitchen. In this article, we will guide you through the process of installing a kitchen backsplash using mother of pearl tiles, covering all the necessary steps from preparation to completion.
Why Choose Mother of Pearl Tiles?
Mother of pearl tiles are made from genuine mother of pearl, which is a natural material known for its strength and durability. These tiles are incredibly thin, making them lightweight and easy to handle. Their unique iridescent sheen adds a touch of sophistication to any kitchen, making them an excellent choice for those looking to upgrade their space.
Advantages of Using Mother of Pearl Tiles
- Aesthetic Appeal: The iridescent sheen of mother of pearl tiles creates a stunning visual effect that can elevate the overall look of your kitchen.
- Durability: Despite their thinness, mother of pearl tiles are strong and resistant to wear and tear.
- Easy Installation: The thin nature of these tiles makes them relatively easy to cut and fit around outlets and other obstructions.
- Versatility: They can be used in various patterns, from simple to intricate designs, allowing for a high degree of customization.
Preparing Your Kitchen for the Installation
Before you start installing your mother of pearl backsplash, it's essential to prepare your kitchen thoroughly. This includes clearing the area, repairing any necessary walls, and protecting surfaces you don't want to get grout on.
Clearing the Area
- Remove Outlet Covers and Switch Plates: Turn off the power to the outlets in the backsplash area and remove any outlet covers and switch plates.
- Protect Surfaces: Use tape or drop cloths to protect countertops, cabinets, and any other surfaces you don't want to get grout on.
Repairing Walls
- Check for Holes or Gouges: Inspect your walls for any holes or gouges that need to be repaired.
- Apply Drywall Repair Compound: If necessary, apply drywall repair compound to fill in any holes or gouges.
- Sand Smoothly: Once the compound is dry, sand it smooth to create a flat surface.
Cleaning Walls
- Wipe Down Walls: Clean your walls thoroughly with a damp cloth to remove any dirt or dust.
Planning Your Tile Layout
Planning your tile layout is crucial to ensure that your backsplash looks even and well-organized. Here’s how you can plan your layout:
Measuring the Area
- Measure Length and Width: Measure the length and width of your backsplash area.
- Draw a Layout Plan: Draw a layout plan on a piece of scrap wood to visualize how the tiles will fit together.
Finding the Center
- Mark Center Line: Find the center of the area and mark a vertical line.
- Dry Lay Tiles: Dry lay your tiles vertically and horizontally to ensure that everything will fit properly without leaving any small slivers of tile.
Read more: DIY Guide To Installing A Kitchen Tile Backsplash With Photocatalytic Self-Cleaning Tiles
Applying Adhesive to the Wall
Once you are confident in your layout, it's time to apply adhesive to the wall. You can use thinset or mortar, but for mother of pearl tiles, it's often recommended to use a smooth mastic adhesive.
Applying Adhesive
- Apply Adhesive: Apply a thin layer of adhesive to the wall, following the manufacturer's instructions.
- Spread Evenly: Use a notched trowel to spread the adhesive evenly across the wall.
Installing Mother of Pearl Tiles
Now it's time to install your mother of pearl tiles. Here’s how you can do it:
Cutting Tiles
- Use Glass Snippers: Because mother of pearl tiles are so thin, you can use glass snippers to cut them instead of a wet saw.
- Cut Around Outlets: Cut the tiles carefully around outlets and other obstructions.
Laying Tiles
- Start with First Section: Begin by laying the first section of tiles, ensuring they are evenly spaced.
- Tamp Down Tiles: Use a tamping tool to ensure the tiles are securely attached to the wall.
- Cut Additional Tiles: Cut additional tiles as needed and lay them in place.
Grouting the Tiles
Grouting is an essential step in completing your backsplash installation. Here’s how you can grout your mother of pearl tiles:
Preparing Grout
- Choose Grout Color: Select a grout color that complements the iridescent sheen of your mother of pearl tiles.
- Apply Grout: Apply the grout between the tiles using a grout float, pressing it firmly into the gaps.
Cleaning Grout
- Wipe Excess Grout: Use a damp cloth to wipe away excess grout from the surface of the tiles.
- Allow Grout to Dry: Let the grout dry completely before sealing.
Sealing the Grout
Sealing the grout helps protect it from stains and makes cleaning easier. Here’s how you can seal your grout:
Choosing Sealant
- Select Sealant Type: Choose a sealant that is suitable for your grout type.
- Apply Sealant: Apply the sealant according to the manufacturer’s instructions.
Additional Tips and Considerations
Using a Backboard
If you're concerned about the thinness of the mother of pearl tiles, you can use a backboard like HardieBacker cement board to provide additional depth and support. This is especially useful if you have gaps between the counter and wall that need to be covered.
Outlet Issues
Mother of pearl tiles are so thin that they might not require outlet extenders, but it's always a good idea to check if there’s enough space above and below the tiles for grout to fill in any gaps.
Cutting Outlets
If you need to cut outlets, score the cement board or tile where you want to cut it and use a hammer or utility knife to break it out.
Conclusion
Installing a kitchen backsplash with mother of pearl tiles is a rewarding DIY project that can add significant value to your kitchen. By following these steps and tips, you can achieve a beautiful, professional-looking result without breaking the bank. Remember to plan carefully, prepare thoroughly, and enjoy the process of transforming your kitchen into a stunning space that reflects your personal style.
References
- YouTube Video: "Kitchen Backsplash Installation – Mother of Pearl Shell DIY How To" (2014)
- Artsy Chicks Rule: "Kitchen Tile Backsplash (Do-It-Yourself)" (n.d.)
- Confession of a Serial DIYer: "How to Install a Mother of Pearl Tile Backsplash" (2018)
- Kaleidoscope Living: "How to Install a Tile Backsplash (The Easy Way)" (2023)
- Erin Zubot Design: "DIY Backsplash Tiling – An Easy Project for Beginners!" (2023)
By following this comprehensive guide, you'll be well on your way to creating a stunning kitchen backsplash using mother of pearl tiles that will enhance both the beauty and functionality of your kitchen. Happy DIY-ing
Was this page helpful?
At Storables.com, we guarantee accurate and reliable information. Our content, validated by Expert Board Contributors, is crafted following stringent Editorial Policies. We're committed to providing you with well-researched, expert-backed insights for all your informational needs.

0 thoughts on “DIY Guide To Installing A Kitchen Backsplash With Mother Of Pearl Tiles”