Home>Renovation & DIY>Home Renovation Guides>How To Take Off Backsplash Without Damaging Dry
Home Renovation Guides
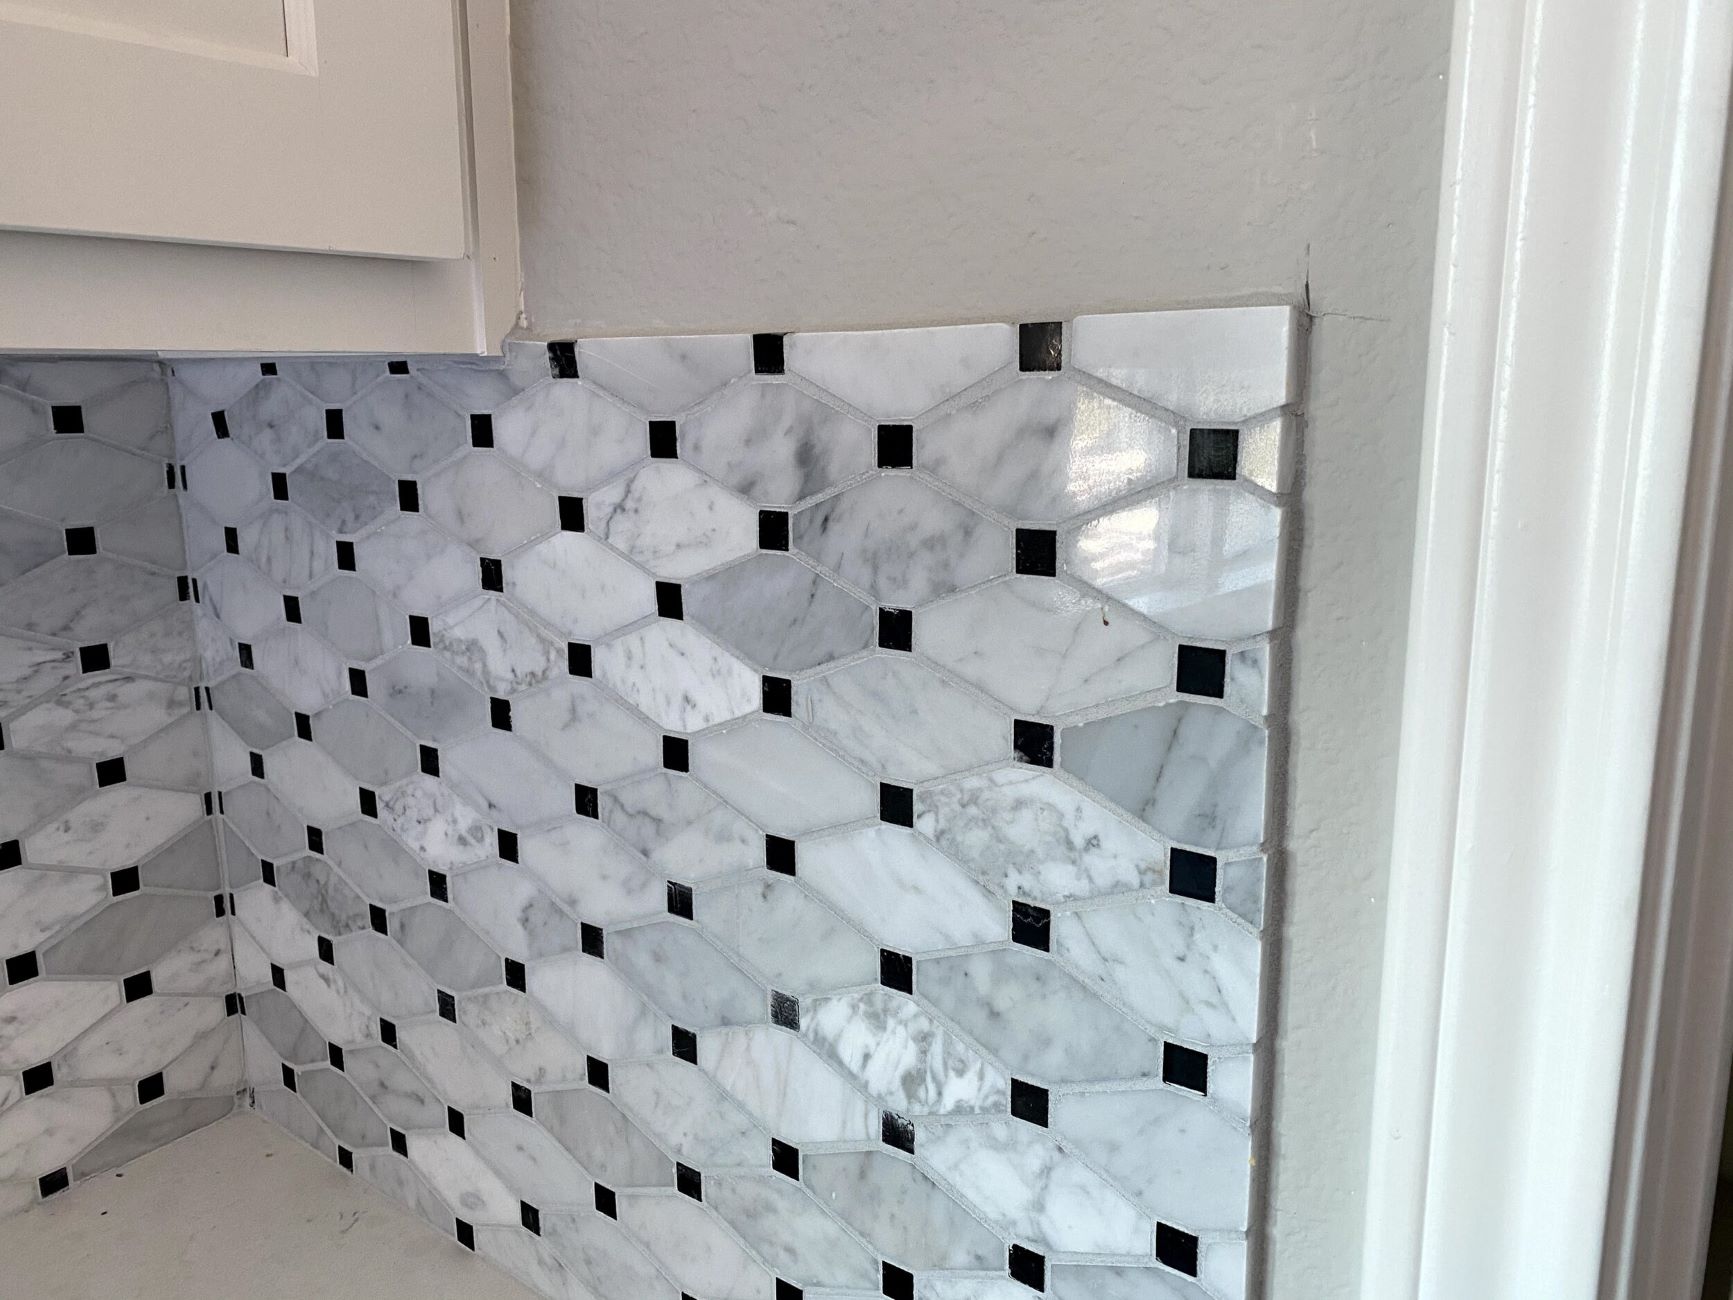
How To Take Off Backsplash Without Damaging Dry
Modified: October 20, 2024
Learn how to safely remove a backsplash during a home renovation without causing damage to the drywall. Follow these expert guides for a seamless and hassle-free process. Ideal for DIY enthusiasts and homeowners.
(Many of the links in this article redirect to a specific reviewed product. Your purchase of these products through affiliate links helps to generate commission for Storables.com, at no extra cost. Learn more)
Introduction
Removing a backsplash without causing damage to the drywall can be a daunting task, especially if you're new to home renovation projects. Whether you're looking to update your kitchen or bathroom, taking off the backsplash is often the first step in the process. However, it's crucial to approach this task with care and precision to avoid any unintended harm to the underlying drywall.
In this comprehensive guide, we'll walk you through the step-by-step process of safely removing a backsplash without compromising the integrity of the drywall. By following these instructions and using the right tools, you can successfully tackle this project with confidence and achieve a smooth, damage-free surface for your upcoming renovation.
Let's dive into the essential steps and tips for a successful backsplash removal, ensuring that your walls remain intact and ready for the next phase of your home improvement journey.
Key Takeaways:
- Safely remove a backsplash without damaging drywall by using the right tools, protecting the surrounding area, and loosening the adhesive with patience and precision.
- After removal, clean the wall thoroughly to prepare for the next renovation phase, ensuring a seamless transition and a pristine canvas for your home improvement project.
Read more: How Long Does Grout Take To Dry Backsplash
Step 1: Gather the necessary tools
Before embarking on the task of removing a backsplash, it's essential to gather the right tools to ensure a smooth and efficient process. Here's a comprehensive list of the necessary tools you'll need:
-
Protective Gear: Start by ensuring your safety with protective gear such as gloves and safety goggles. These will shield your hands and eyes from any debris or sharp edges during the removal process.
-
Putty Knife: A putty knife with a flexible yet sturdy blade is indispensable for prying the backsplash away from the wall. Look for a putty knife with a wide blade to provide ample leverage and minimize the risk of damaging the drywall.
-
Utility Knife: A sharp utility knife will come in handy for cutting through any caulking or adhesive securing the backsplash to the wall. Opt for a retractable utility knife for easy and safe handling.
-
Pry Bar: A pry bar, also known as a crowbar, is useful for gently separating the backsplash from the wall. Choose a pry bar with a flat, wide edge to distribute pressure evenly and prevent damage to the drywall.
-
Hammer: A lightweight hammer can aid in tapping the putty knife or pry bar into tight spaces, facilitating the loosening of the backsplash without causing excessive force on the wall.
-
Drop Cloth or Plastic Sheeting: To protect the surrounding area from debris and dust, lay down a drop cloth or plastic sheeting to create a barrier. This will help maintain cleanliness and prevent any damage to countertops or flooring.
-
Adhesive Remover: Depending on the type of adhesive used to install the backsplash, you may need an adhesive remover to dissolve and loosen the bond between the backsplash and the wall. Choose a remover suitable for the specific adhesive to ensure effective results.
-
Container for Debris: Have a container or trash bag on hand to collect the removed backsplash pieces and any debris, keeping the work area tidy and organized.
By ensuring you have these essential tools at your disposal, you'll be well-prepared to tackle the task of removing the backsplash without causing any damage to the underlying drywall. With the right tools and a methodical approach, you can proceed to the next steps with confidence, knowing that you're equipped for a successful backsplash removal project.
Step 2: Protect the surrounding area
Before initiating the process of removing the backsplash, it's crucial to safeguard the surrounding area to prevent any potential damage or mess. Taking proactive measures to protect countertops, cabinets, and floors will not only maintain the cleanliness of your space but also minimize the risk of accidental scratches or spills during the removal process.
Here's a detailed guide on how to protect the surrounding area effectively:
1. Clear the Workspace:
Begin by clearing the area around the backsplash. Remove any items, such as small appliances, utensils, or decorative pieces, from the countertops and ensure that the immediate vicinity of the backsplash is free of any obstructions. This will create a clear and unobstructed workspace for the removal process.
2. Cover Countertops and Cabinets:
Use a durable drop cloth or plastic sheeting to cover the countertops and cabinets adjacent to the backsplash. Secure the protective covering in place using painter's tape to prevent it from shifting during the removal process. This will shield the surfaces from debris, scratches, or accidental damage caused by tools or falling materials.
3. Protect Flooring:
Lay down additional drop cloths or plastic sheeting to safeguard the flooring beneath the backsplash area. Extend the protective covering to create a generous buffer zone around the work area, ensuring that any debris or adhesive remnants are contained and do not spread to other parts of the room.
4. Mask Off Appliances and Fixtures:
If there are appliances, outlets, or fixtures in close proximity to the backsplash, use painter's tape and plastic sheeting to mask off and protect these elements. Covering electrical outlets and appliances with plastic sheeting will prevent dust and debris from infiltrating sensitive components, ensuring that they remain clean and undamaged throughout the removal process.
By meticulously protecting the surrounding area, you can embark on the backsplash removal with confidence, knowing that your countertops, cabinets, and flooring are shielded from potential harm. These proactive measures will not only streamline the removal process but also contribute to a tidy and organized workspace, setting the stage for a successful and damage-free backsplash removal endeavor.
Step 3: Loosen the adhesive
Loosening the adhesive is a critical phase in the process of removing a backsplash without causing damage to the underlying drywall. The adhesive securing the backsplash to the wall plays a pivotal role in its stability, and effectively loosening this bond is essential for a successful removal. Here's a detailed guide on how to effectively loosen the adhesive without compromising the integrity of the drywall.
-
Assess the Type of Adhesive: Begin by identifying the type of adhesive used to install the backsplash. Common adhesives include mastic, silicone, or construction adhesive. Understanding the specific adhesive type will guide your approach to loosening it effectively.
-
Heat Application: If the backsplash is secured with mastic or silicone adhesive, heat can be a valuable ally in softening the bond. Use a heat gun or hairdryer to apply gentle heat to the edges and seams of the backsplash. The heat will help soften the adhesive, making it easier to pry the backsplash away from the wall without exerting excessive force.
-
Cautious Prying: With the adhesive warmed and softened, carefully insert a putty knife or pry bar between the backsplash and the wall. Exercise patience and gentle pressure to avoid damaging the drywall. Gradually work the tool along the edges, incrementally loosening the backsplash from the wall.
-
Utilize Adhesive Remover: For stubborn or construction adhesives, applying a specialized adhesive remover can aid in dissolving the bond. Follow the manufacturer's instructions for the adhesive remover, ensuring that it is compatible with the specific type of adhesive used. Apply the remover as directed, allowing it to penetrate the adhesive and facilitate easier removal of the backsplash.
-
Incremental Progress: Work methodically, focusing on small sections at a time. Avoid attempting to remove the entire backsplash in one forceful motion, as this can increase the risk of damaging the drywall. By gradually loosening the adhesive and lifting the backsplash in manageable segments, you can maintain control and minimize the potential for unintended harm to the wall.
By following these steps and exercising patience, you can effectively loosen the adhesive securing the backsplash, setting the stage for its safe removal without compromising the integrity of the underlying drywall. This meticulous approach will pave the way for a successful backsplash removal, ensuring that the wall remains unscathed and ready for the next phase of your renovation project.
Use a heat gun or hair dryer to soften the adhesive behind the backsplash. Gently pry it off with a putty knife to avoid damaging the drywall.
Step 4: Remove the backsplash
With the adhesive effectively loosened, it's time to proceed with the careful removal of the backsplash. This phase requires precision and patience to ensure that the drywall remains undamaged throughout the process. Here's a detailed guide on how to remove the backsplash without compromising the integrity of the underlying wall.
-
Gradual Disengagement: Begin by gently lifting the edges of the backsplash using a putty knife or pry bar. Exercise caution and avoid applying excessive force, allowing the loosened adhesive to facilitate the separation. Work methodically along the edges, gradually disengaging the backsplash from the wall.
-
Supporting the Backsplash: As you lift the backsplash, provide support with your free hand to prevent it from abruptly detaching and potentially causing damage. Maintain a steady and controlled motion, ensuring that the backsplash is lifted away from the wall in a smooth and deliberate manner.
-
Segmented Removal: If the backsplash is large or intricately designed, consider removing it in smaller sections to maintain better control. By dividing the removal process into manageable segments, you can minimize the risk of accidental damage to the drywall and handle the backsplash with greater precision.
-
Inspecting for Resistance: As you proceed with the removal, be attentive to any areas where the backsplash exhibits resistance. If certain sections are stubbornly adhered to the wall, revisit the loosening techniques, such as applying additional heat or adhesive remover, to address these areas without compromising the overall removal process.
-
Careful Maneuvering: Throughout the removal, prioritize careful maneuvering to avoid sudden jerks or movements that could impact the underlying drywall. By maintaining a steady and deliberate approach, you can safeguard the integrity of the wall and ensure a smooth removal of the backsplash.
-
Debris Management: As the backsplash is lifted away from the wall, promptly collect any loose debris or adhesive remnants to prevent them from falling onto the countertops or flooring. Utilize a container or trash bag to contain the removed pieces, maintaining cleanliness and organization in the workspace.
By following these detailed steps and exercising precision, you can successfully remove the backsplash without causing damage to the underlying drywall. This meticulous approach ensures that the wall remains intact and ready for the next phase of your renovation project.
Step 5: Clean the wall
After successfully removing the backsplash, the final step involves thoroughly cleaning the wall to prepare it for the next phase of your renovation project. This crucial step ensures that the wall surface is free from any residual adhesive, debris, or contaminants, setting the stage for a seamless transition to the subsequent renovation tasks.
Here's a comprehensive guide on how to effectively clean the wall following the removal of the backsplash:
-
Remove Residual Adhesive: Begin by inspecting the wall for any remaining adhesive or adhesive residue. Use a putty knife or adhesive remover to gently scrape off any stubborn adhesive remnants. Exercise caution to avoid damaging the drywall while ensuring that the surface is free from any adhesive buildup.
-
Clean with Mild Detergent: Prepare a solution of warm water and mild detergent in a bucket. Use a clean sponge or soft cloth to apply the soapy solution to the wall, gently scrubbing to remove any lingering dirt, grease, or grime. This gentle cleaning process will help restore the wall to a clean and smooth state, ready for the next phase of your renovation.
-
Rinse and Dry: After cleaning the wall with the soapy solution, rinse the area thoroughly with clean water to remove any detergent residue. Use a separate sponge or cloth dampened with water to ensure that all traces of the cleaning solution are effectively removed. Once rinsed, use a dry cloth or towel to pat the wall dry, ensuring that no moisture remains on the surface.
-
Inspect for Imperfections: Take a close look at the cleaned wall to identify any imperfections or areas that may require further attention. Address any remaining debris, stains, or irregularities by employing targeted cleaning methods or, if necessary, gentle sanding to achieve a uniformly smooth and clean surface.
-
Allow for Drying Time: Before proceeding with the next phase of your renovation, allow the cleaned wall to dry completely. Adequate drying time ensures that the wall is free from moisture, allowing for optimal adhesion of any subsequent materials or treatments that will be applied as part of your renovation project.
By meticulously cleaning the wall following the removal of the backsplash, you can ensure that the surface is primed and ready for the next steps in your renovation journey. This thorough cleaning process sets the foundation for a successful and seamless transition to the subsequent phases of your home improvement project, allowing you to proceed with confidence and a pristine canvas for your desired renovations.
Conclusion
Successfully removing a backsplash without damaging the drywall is a significant achievement in any home renovation project. By following the comprehensive steps outlined in this guide and employing the right tools and techniques, you can accomplish this task with confidence and precision. The careful approach to protecting the surrounding area, loosening the adhesive, and removing the backsplash ensures that the underlying drywall remains unscathed and ready for the next phase of your renovation.
As you conclude the backsplash removal process, take a moment to appreciate the meticulous effort and attention to detail that went into safeguarding the integrity of the wall. The proactive measures taken to protect countertops, cabinets, and flooring not only preserved the cleanliness of your space but also minimized the risk of accidental damage during the removal process. This thoughtful approach sets the stage for a seamless transition to the subsequent renovation tasks, allowing you to proceed with confidence and peace of mind.
The careful loosening of the adhesive and the gradual removal of the backsplash exemplify the precision and patience required to achieve a damage-free outcome. By exercising caution and methodical maneuvering, you successfully preserved the integrity of the drywall, ensuring that it remains a pristine canvas for your future renovation endeavors. The thorough cleaning of the wall following the backsplash removal further underscores your commitment to excellence, setting the foundation for a flawless transition to the next phase of your home improvement project.
As you reflect on the successful removal of the backsplash, take pride in the skills and knowledge you've acquired throughout this process. The ability to navigate a challenging task with finesse and care speaks volumes about your dedication to creating a beautiful and well-maintained living space. With the backsplash removed and the wall meticulously cleaned, you're now poised to embark on the next stages of your renovation journey, equipped with a pristine canvas and a wealth of experience to guide you forward.
In conclusion, the successful removal of a backsplash without damaging the drywall is a testament to your commitment to excellence and your ability to execute intricate home renovation tasks with precision. As you proceed with your project, carry forward the confidence and expertise gained from this endeavor, knowing that you have the skills and knowledge to achieve outstanding results in your home improvement pursuits.
Frequently Asked Questions about How To Take Off Backsplash Without Damaging Dry
Was this page helpful?
At Storables.com, we guarantee accurate and reliable information. Our content, validated by Expert Board Contributors, is crafted following stringent Editorial Policies. We're committed to providing you with well-researched, expert-backed insights for all your informational needs.


0 thoughts on “How To Take Off Backsplash Without Damaging Dry”