Articles
How To Take Showerhead Off
Modified: October 19, 2024
Learn the step-by-step process of removing a showerhead with this informative article. Get expert tips and tricks to upgrade your bathroom easily.
(Many of the links in this article redirect to a specific reviewed product. Your purchase of these products through affiliate links helps to generate commission for Storables.com, at no extra cost. Learn more)
Introduction
When it comes to upgrading your bathroom, one simple yet effective change you can make is replacing your showerhead. Whether you’re looking for a new design, improved water pressure, or just a cleaner showering experience, removing the old showerhead is the first step. By following a few simple steps, you can take your showerhead off and replace it with a new one in no time.
In this article, we will guide you through the process of removing a showerhead. We will cover the necessary tools and materials you’ll need, as well as the step-by-step instructions to ensure a successful removal. So, let’s get started on transforming your shower experience!
Key Takeaways:
- Upgrade your shower experience by easily removing and replacing your showerhead with the right tools and steps. Enjoy a cleaner, more efficient shower in just a few simple steps!
- Ensure a successful showerhead removal and reattachment by following step-by-step instructions, from turning off the water supply to testing the water flow. Transform your shower experience with ease!
Tools and Materials Required
Before beginning the process, gather the following tools and materials:
- Adjustable wrench
- Plumber’s tape (also known as Teflon tape)
- Soft cloth or sponge
These items are essential for the removal and reinstallation of the showerhead, as well as ensuring a watertight connection. Once you have everything ready, you can proceed to the next step.
Key Takeaways:
- Upgrade your shower experience by easily removing and replacing your showerhead with the right tools and steps. Enjoy a cleaner, more efficient shower in just a few simple steps!
- Ensure a successful showerhead removal and reattachment by following step-by-step instructions, from turning off the water supply to testing the water flow. Transform your shower experience with ease!
Tools and Materials Required
Before starting the process of taking off your showerhead, it’s important to gather the necessary tools and materials to ensure a smooth removal. Here’s what you’ll need:
- Adjustable wrench: This tool will allow you to loosen and tighten the showerhead without causing any damage. Make sure you have an adjustable wrench that fits the size of your showerhead.
- Plumber’s tape: Also known as Teflon tape, this thin, white tape is used to create a tight seal between the showerhead and the pipe. It helps prevent any leaks by filling in any gaps or spaces.
- Soft cloth or sponge: You’ll need a soft cloth or sponge to clean the showerhead and the surrounding area. This will help remove any dirt, grime, or mineral buildup.
Having these tools and materials ready will make the process much easier and more efficient. Now that you’re prepared, let’s move on to the step-by-step instructions for removing your showerhead.
Step 1: Turn off the water supply
Before you begin removing the showerhead, it’s important to turn off the water supply to prevent any water leakage or accidents. Here’s how you can do it:
- Locate the water valve: Typically, the water valve is located near your shower or bathtub. Look for a lever or knob that controls the water supply to the shower.
- Turn off the water supply: Use your hand or a wrench to turn the lever or knob counterclockwise until it is fully closed. This will shut off the water supply to the showerhead.
- Verify the water supply is off: To ensure that the water supply is indeed turned off, go to your shower and turn on the faucet. If no water comes out, it means the water supply is successfully shut off.
It’s important to turn off the water supply before proceeding with the removal process to avoid any unnecessary mess or damage. Once you’ve confirmed that the water supply is off, you can move on to the next step.
Step 2: Remove any attachments or accessories
Before you can remove the showerhead, it’s essential to remove any attachments or accessories that may be connected to it. This includes items like handheld showerheads, showerhead filters, or any other additional features. Here’s how to do it:
- Inspect the showerhead: Take a close look at the showerhead to identify any attachments or accessories that may be installed. These can often be detached from the main showerhead.
- Unscrew the attachments: Using your hand or pliers, carefully unscrew the attachments or accessories in a counterclockwise direction. Be gentle and ensure you have a firm grip to prevent any damage or breakage.
- Set the attachments aside: Once detached, place the attachments in a safe spot to avoid misplacing them. You may choose to clean them or replace them later, depending on their condition.
Removing any additional attachments or accessories will make the removal process for the showerhead itself much simpler. It’s important to handle these items with care to avoid any damage. Once you’ve taken off all the attachments, you’re ready to move on to the next step.
To take a showerhead off, start by turning off the water supply. Then, use a wrench to loosen the connection between the shower arm and the showerhead. Once it’s loose, you can easily remove the showerhead by hand.
Read more: How To Take Off A Chandelier
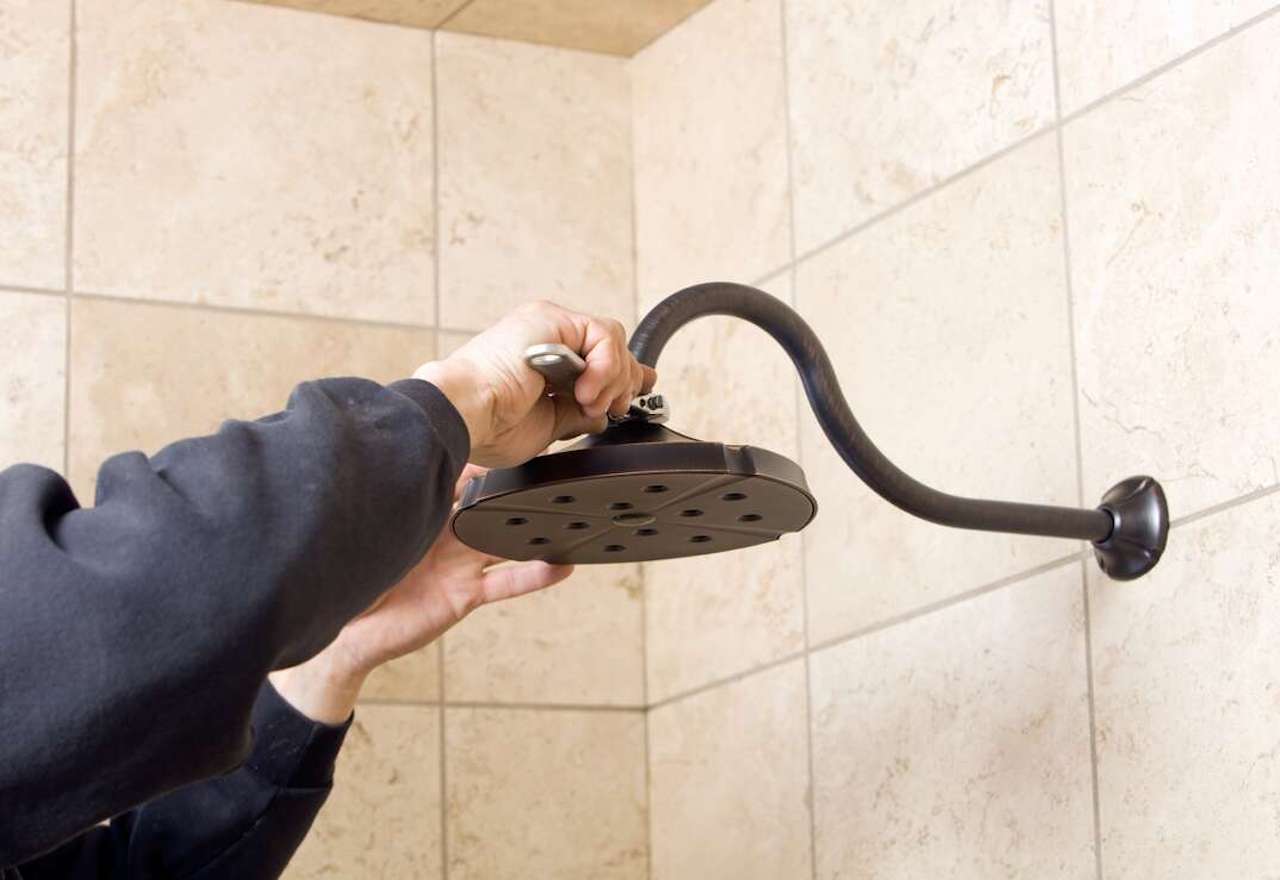
Step 3: Unscrew the showerhead
Now that you’ve removed any attachments or accessories, it’s time to unscrew the showerhead itself. Follow these steps to successfully remove the showerhead:
- Locate the connection point: The showerhead is connected to the water supply pipe via a threaded connection. Locate this connection point where the showerhead meets the pipe.
- Use an adjustable wrench: Grab your adjustable wrench and position it onto the flat sides of the showerhead’s connection nut. Make sure the wrench is securely in place.
- Turn counterclockwise: Using gentle force, turn the wrench counterclockwise to loosen the connection. You may need to exert a bit more pressure if the showerhead was installed tightly.
- Unscrew by hand: Once the connection is loosened, you can proceed to unscrew the showerhead by hand. Twist it in a counterclockwise direction until it is completely removed from the pipe.
Be careful not to twist or force the showerhead too forcefully, as it may cause damage to the pipe or the showerhead itself. If you encounter any difficulties, you can use a pair of pliers covered with a cloth to provide a better grip while unscrewing.
Once the showerhead is completely unscrewed, set it aside and prepare for the next step of the process.
Step 4: Clean the showerhead and pipes
Now that you have successfully removed the showerhead, it’s essential to clean both the showerhead and the pipes to ensure optimal performance and prevent any buildup or blockages. Follow these steps to clean them effectively:
- Inspect the showerhead: Take a close look at the showerhead for any mineral deposits, dirt, or debris. This is especially common if you live in an area with hard water.
- Soak in vinegar solution: To remove mineral deposits, prepare a solution of equal parts white vinegar and water. Fill a bowl or sink with the solution and place the showerhead inside, ensuring it is completely submerged.
- Let it soak: Allow the showerhead to soak in the vinegar solution for about 30 minutes to loosen any buildup. This will help dissolve the mineral deposits and make them easier to remove.
- Scrub with a brush: After soaking, use a soft brush, like an old toothbrush, to scrub the showerhead gently. Focus on the nozzles and other areas where buildup is visible. This will help dislodge any remaining deposits.
- Rinse thoroughly: Once scrubbed, rinse the showerhead with clean water to remove any vinegar residue or loosened debris. Make sure all the nozzles are clear and free of obstructions.
- Clean the pipes: While the showerhead is off, take the opportunity to clean the exposed end of the pipe that connects to the showerhead. Use a cloth or sponge to wipe away any dirt or residue.
Cleaning the showerhead and pipes will not only improve water flow but also extend the lifespan of your new showerhead. Regular maintenance and cleaning will prevent clogs and ensure efficient water distribution. Once everything is cleaned and rinsed, move on to the next step.
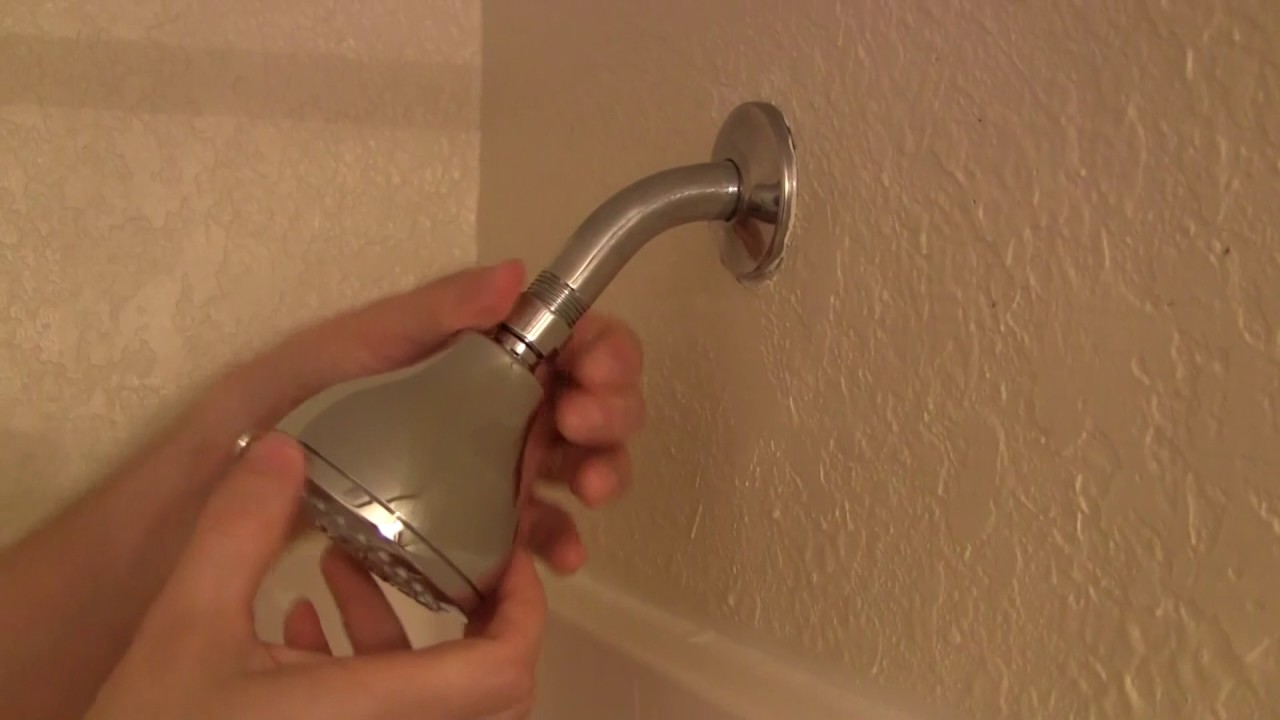
Step 5: Reattach the showerhead
Now that the showerhead and pipes are clean, it’s time to reattach the showerhead and restore your showering experience. Follow these steps to ensure a secure and watertight connection:
- Apply plumber’s tape: Take the plumber’s tape and wrap it around the threads of the exposed pipe in a clockwise direction. This tape helps create a tight seal and prevents any potential leaks.
- Position the showerhead: Line up the showerhead with the pipe and carefully hand-screw it onto the threaded connection. Rotate it in a clockwise direction to tighten it, ensuring a snug fit.
- Use the adjustable wrench: Once the showerhead is hand-tightened, use the adjustable wrench to give it an extra quarter turn, making sure it is securely fastened.
Make sure not to overtighten the showerhead, as this can damage the threads or cause leaks. Use the wrench with caution and stop tightening when you feel resistance. The plumber’s tape should provide a sufficient seal to prevent any water leakage.
With the showerhead securely attached, you’re almost done. Now it’s time to test the showerhead and ensure everything is working as expected.
Step 6: Turn on the water supply and test the showerhead
Now that you’ve reattached the showerhead, it’s time to turn on the water supply and test its functionality. Follow these steps to ensure everything is working smoothly:
- Slowly turn on the water supply: Gradually open the water valve by turning it in a clockwise direction. This will allow water to flow back into the showerhead.
- Check for leaks: As the water begins to flow, carefully inspect the area around the showerhead and the pipe for any signs of leaks. Look for dripping water or any moisture that may indicate an improper seal.
- Test the water flow: Step into the shower area and turn on the showerhead. Make sure the water is flowing evenly from all the nozzles and that the water pressure is satisfactory. Adjust the showerhead settings if necessary.
- Check for consistent temperature: Adjust the hot and cold water controls to ensure that the shower provides a consistent and comfortable temperature. Make sure there are no sudden changes or fluctuations.
- Confirm proper functionality: Run the shower for a few minutes to ensure that the water flow remains consistent and that there are no further leaks or issues. Pay attention to any unusual sounds or malfunctions.
If you notice any leaks or problems with the water flow or temperature, you may need to tighten the showerhead further or check for any potential plumbing issues. Consider seeking professional assistance if necessary.
Once you are satisfied with the performance of your newly reattached showerhead, congratulations! You have successfully completed the process of removing, cleaning, and reattaching your showerhead. Enjoy your refreshed showering experience!
Conclusion
Taking off a showerhead may seem like a daunting task, but with the right tools and steps, it can be a straightforward process. By following the step-by-step instructions outlined in this article, you can easily remove your old showerhead, clean it thoroughly, and reattach it for an improved showering experience.
Remember to gather the necessary tools, including an adjustable wrench and plumber’s tape, before starting the removal process. Take the time to turn off the water supply and remove any attachments or accessories connected to the showerhead. Once the showerhead is removed, clean it and the exposed pipe to remove any mineral deposits or debris.
When reattaching the showerhead, use plumber’s tape to create a secure seal and hand-screw it onto the threaded connection. Use an adjustable wrench for a final tightening without overtightening. Finally, turn on the water supply and test the showerhead for leaks, proper water flow, and consistent temperature.
By following these steps, you can successfully take off and reattach a showerhead, transforming your shower experience in a matter of minutes. Don’t hesitate to upgrade your bathroom with a new showerhead design or improved water pressure to enjoy a refreshing and invigorating shower every day.
Remember, if you encounter any difficulties or are unsure about any step, it’s always a good idea to consult a professional plumber to ensure the job gets done correctly and safely. Now, go ahead and take the first step towards your upgraded showerhead and enjoy the benefits it brings!
Frequently Asked Questions about How To Take Showerhead Off
Was this page helpful?
At Storables.com, we guarantee accurate and reliable information. Our content, validated by Expert Board Contributors, is crafted following stringent Editorial Policies. We're committed to providing you with well-researched, expert-backed insights for all your informational needs.


0 thoughts on “How To Take Showerhead Off”