Home>Furniture & Design>Bathroom Accessories>How To Take Off Bidet
Bathroom Accessories
How To Take Off Bidet
Modified: October 19, 2024
Learn how to remove a bidet and other bathroom accessories with our step-by-step guide. Find out the best techniques for a hassle-free removal process.
(Many of the links in this article redirect to a specific reviewed product. Your purchase of these products through affiliate links helps to generate commission for Storables.com, at no extra cost. Learn more)
Introduction
Removing a bidet may seem like a daunting task, but with the right guidance, it can be a straightforward process. Whether you're looking to replace your bidet with a new model or simply need to remove it for maintenance, understanding the necessary steps is essential. By following a systematic approach, you can effectively take off the bidet without encountering unnecessary complications.
In this comprehensive guide, we will walk you through the step-by-step process of removing a bidet from your toilet. From turning off the water supply to cleaning the area post-removal, each stage is crucial for a successful bidet removal. By familiarizing yourself with these steps, you can confidently tackle this task and ensure a smooth transition.
Bidets come in various designs and configurations, so it's important to approach the removal process with a clear understanding of your specific bidet model. Whether you have a standalone bidet or a bidet attachment, the fundamental steps for removal remain consistent. By gaining insight into these steps, you can adapt the process to suit your bidet's unique features and connections.
As we delve into the intricacies of bidet removal, it's important to approach this task with patience and attention to detail. While the process may vary slightly depending on the type of bidet you have, the overarching principles remain constant. By following the guidelines outlined in this article, you can navigate the bidet removal process with confidence and precision.
Now, let's embark on this journey together as we explore the essential steps for taking off a bidet from your toilet. With a clear understanding of the process, you'll be well-equipped to tackle this task and achieve a successful bidet removal.
Key Takeaways:
- Removing a bidet involves turning off the water supply, disconnecting it, and lifting it off the toilet. Then, clean the area thoroughly for a smooth transition to the next fixture.
- By following the step-by-step guide, you can confidently remove a bidet and prepare the area for a new fixture or alternative use. This process emphasizes precision and attention to detail for a successful outcome.
Read more: How To Take Off A Chandelier
Step 1: Turn off the water supply
Before initiating the bidet removal process, it is crucial to start by turning off the water supply to the bidet. This step is essential to prevent any potential leaks or water-related mishaps during the removal process. By shutting off the water supply, you can create a safe and controlled environment for the subsequent steps.
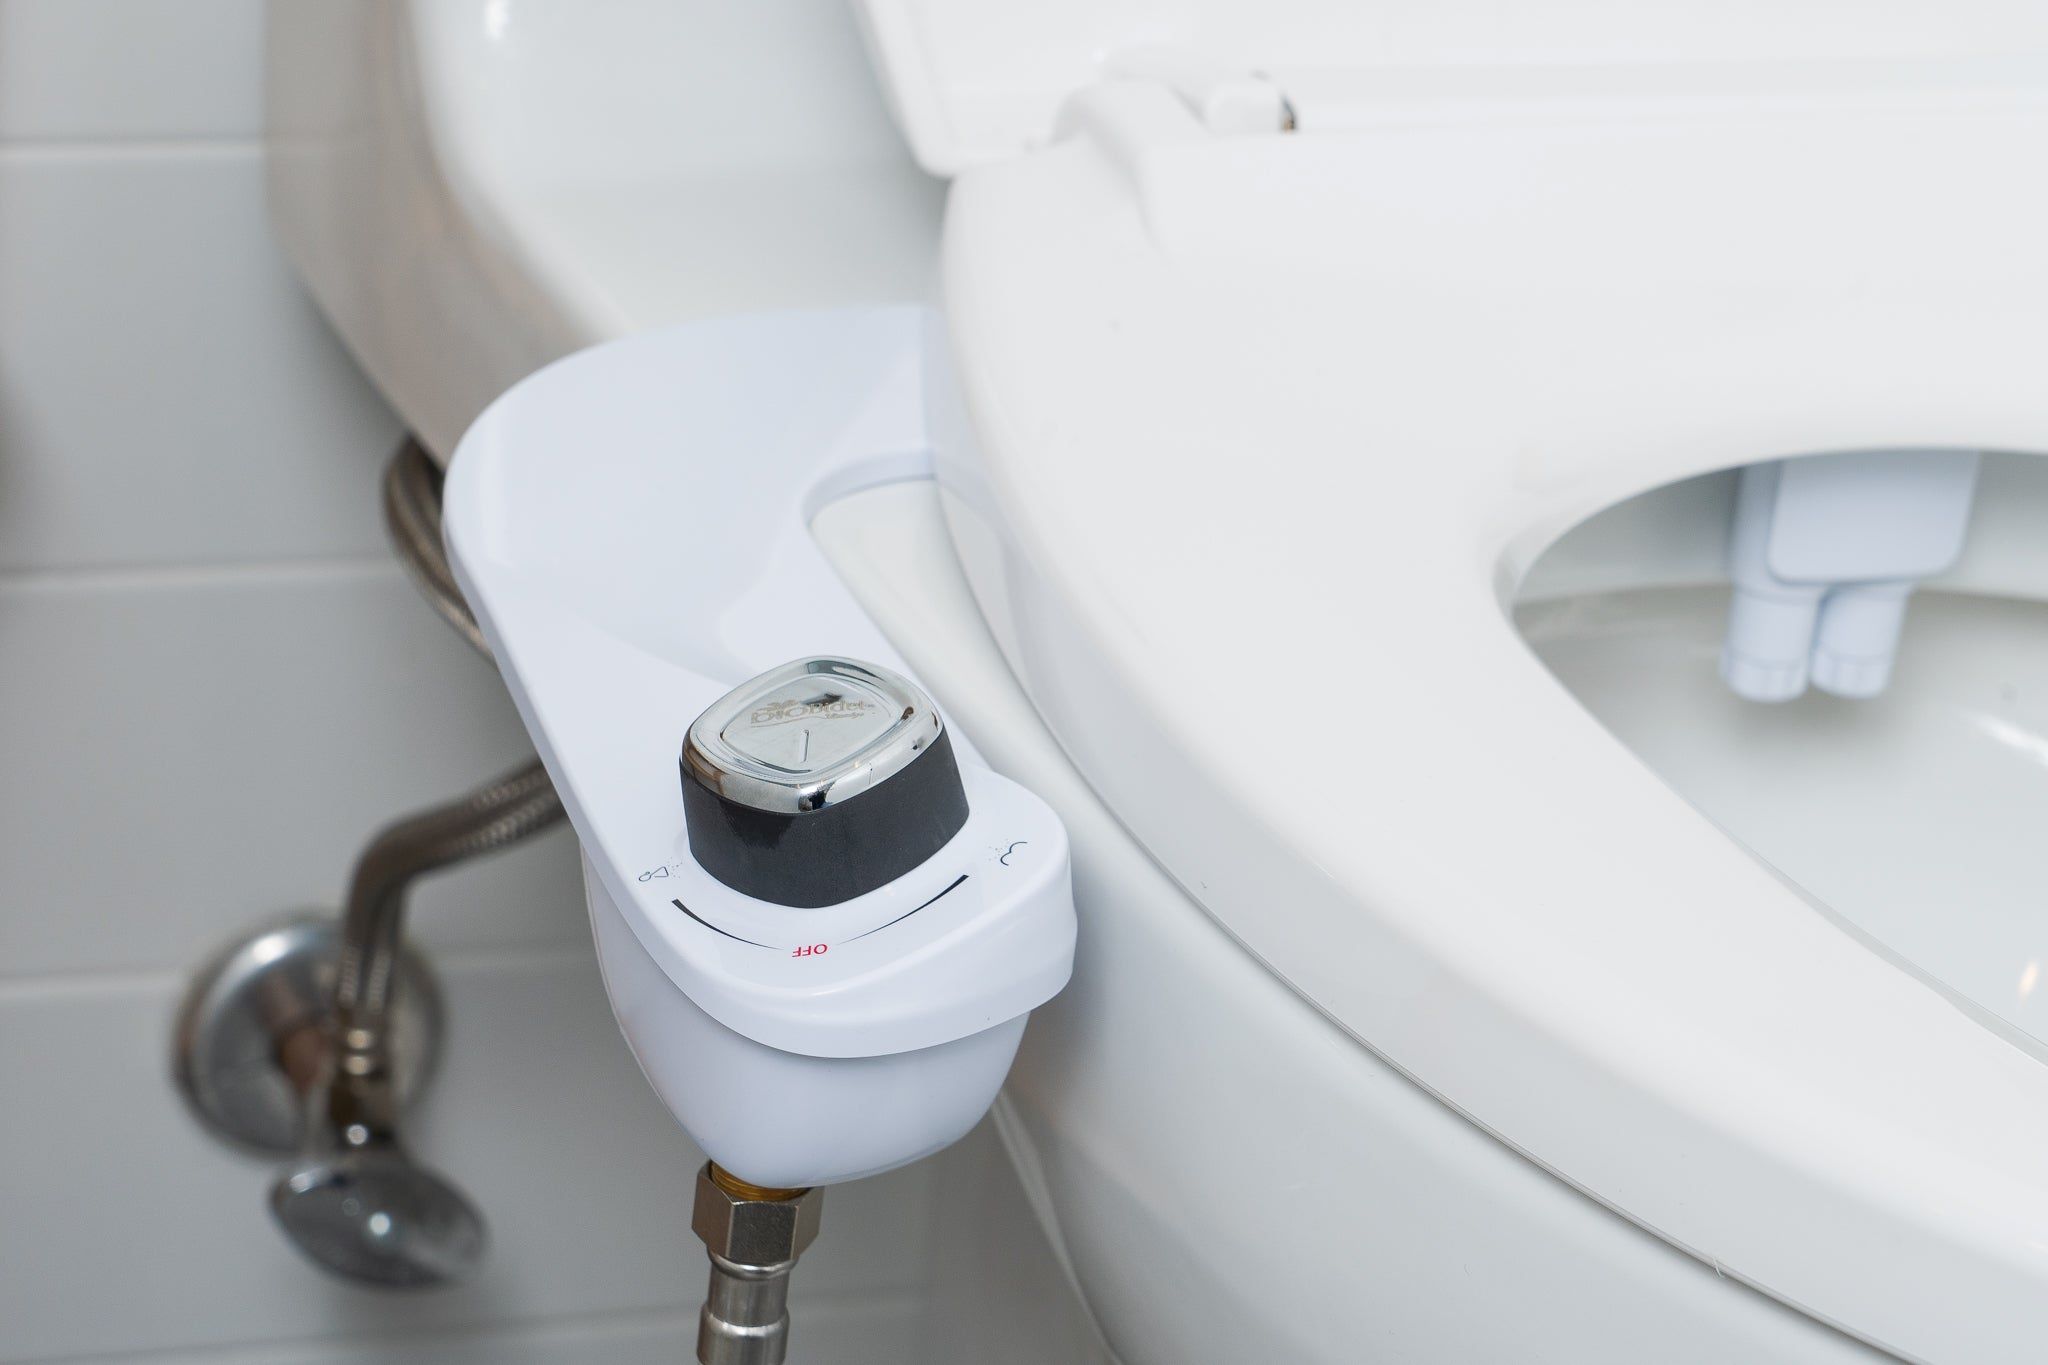
To begin, locate the water shut-off valve connected to the bidet. This valve is typically situated along the water line leading to the bidet. Depending on the bidet's installation, the shut-off valve may be positioned on the wall or the floor near the toilet. Once you've identified the shut-off valve, turn it clockwise to close off the water supply. This action effectively stops the flow of water to the bidet, minimizing the risk of leaks or spills during the removal process.
After shutting off the water supply, it's advisable to flush the bidet to release any remaining water in the system. This step helps to alleviate pressure within the bidet's water lines, reducing the likelihood of water leakage when disconnecting the bidet from the water supply.
It's important to exercise caution and ensure that the water supply is completely turned off before proceeding to the next step. Verifying that the shut-off valve has effectively stopped the flow of water is essential for a safe and seamless bidet removal process.
By diligently following this initial step and turning off the water supply, you establish a secure foundation for the subsequent stages of bidet removal. This proactive measure minimizes the risk of water-related complications and sets the stage for a smooth and efficient removal process.
With the water supply successfully turned off, you are now ready to proceed to the next step in the bidet removal process, which involves disconnecting the bidet from the water supply.
This step is a critical starting point in the bidet removal process, laying the groundwork for a safe and controlled environment as you progress through the subsequent stages of bidet removal.
Step 2: Disconnect the bidet from the water supply
With the water supply successfully turned off, the next pivotal step in the bidet removal process involves disconnecting the bidet from the water supply. This phase requires careful attention to detail and a systematic approach to ensure a seamless disconnection.
Begin by identifying the water supply line connected to the bidet. This line is typically located at the rear or bottom of the bidet, depending on the specific model and installation configuration. Once you've located the water supply line, use an adjustable wrench or pliers to carefully loosen the connection nut securing the line to the bidet. It's essential to exercise caution and precision during this step to avoid damaging the water supply line or the bidet's connections.
As you loosen the connection nut, be prepared for residual water to drain from the line. Placing a small container or towel beneath the connection point can help to catch any dripping water, minimizing potential mess and ensuring a tidy removal process. Once the connection nut is sufficiently loosened, carefully detach the water supply line from the bidet, taking care to avoid any abrupt movements that could lead to water spillage.
After disconnecting the water supply line, it's advisable to inspect the line and the bidet's connection point for any signs of damage or wear. This visual assessment can help identify any potential issues that may require attention before reinstalling a bidet or implementing alternative solutions. Additionally, wiping down the disconnected water supply line and the bidet's connection point with a clean cloth can help remove any accumulated debris or residue, preparing the area for the next steps in the bidet removal process.
By methodically disconnecting the bidet from the water supply, you establish a crucial foundation for the subsequent stages of bidet removal. This meticulous approach minimizes the risk of damage to the water supply line and the bidet's connections, setting the stage for a smooth and efficient bidet removal process. With the bidet successfully disconnected from the water supply, you are now prepared to proceed to the next phase of bidet removal, which involves removing the bidet from the toilet.
To take off a bidet, first turn off the water supply. Then, disconnect the water hose and unscrew the mounting bolts. Carefully lift the bidet off the floor and remove any remaining connections.
Step 3: Remove the bidet from the toilet
As you embark on the pivotal stage of removing the bidet from the toilet, it's essential to approach this step with precision and attentiveness. The process of detaching the bidet from the toilet involves careful maneuvering and systematic disconnection to ensure a seamless removal.
Begin by identifying the mounting hardware securing the bidet to the toilet. This hardware typically includes bolts or screws that fasten the bidet to the toilet bowl or seat. Using a suitable tool, such as a wrench or screwdriver, carefully loosen and remove the mounting hardware to release the bidet from its attachment to the toilet. It's important to exercise caution and avoid applying excessive force to prevent any damage to the toilet or bidet during this step.
Once the mounting hardware is removed, gently lift the bidet from its position on the toilet. Depending on the bidet's design and installation, it may be necessary to wiggle or rock the bidet slightly to detach it from any remaining connections. Take care to lift the bidet evenly and steadily to maintain balance and prevent any sudden movements that could lead to accidental damage.
As you lift the bidet, be mindful of any remaining water within the bidet's internal components or water lines. Tilting the bidet slightly can help drain any residual water, reducing the likelihood of spills during the removal process. Additionally, placing a towel or container beneath the bidet as it is lifted can help catch any dripping water, ensuring a tidy and controlled removal.
Once the bidet is successfully lifted from the toilet, place it in a secure and designated area for further inspection or storage. It's advisable to assess the underside of the bidet and the toilet mounting area for any signs of debris, residue, or damage. Wiping down the toilet mounting area with a clean cloth can help prepare it for potential reinstallation or alternative use.
By meticulously removing the bidet from the toilet, you establish a pivotal milestone in the bidet removal process. This careful approach minimizes the risk of damage to the toilet and bidet, setting the stage for a smooth and efficient bidet removal. With the bidet successfully detached from the toilet, you are now prepared to proceed to the subsequent steps, which involve cleaning the area and addressing any remaining considerations related to the bidet removal process.
Step 4: Clean the area
After successfully removing the bidet from the toilet, it is essential to focus on cleaning the surrounding area to ensure a hygienic and visually appealing environment. This step involves thorough cleaning and inspection to address any residual debris, water, or marks left behind by the bidet's previous installation. By dedicating attention to this crucial phase, you can prepare the area for potential reinstallation, alternative use, or simply restore it to its pristine condition.
Begin by inspecting the toilet mounting area for any signs of accumulated residue, water stains, or debris. Using a mild cleaning solution and a clean cloth, gently wipe down the mounting area to remove any lingering marks or dirt. Pay close attention to the areas previously concealed by the bidet, ensuring that all surfaces are thoroughly cleaned and dried to prevent any potential issues in the future.
In addition to cleaning the toilet mounting area, it's important to address the surrounding floor space. Check for any water spills or splashes that may have occurred during the bidet removal process. Wipe down the floor with a suitable cleaning solution to eliminate any moisture or marks, restoring the area to its original cleanliness.
As part of the cleaning process, it's advisable to inspect the removed bidet for any residual water or debris. Depending on the bidet's design, there may be internal components or water lines that require attention. Carefully drain any remaining water from the bidet and wipe down its surfaces to ensure it is clean and free of any debris before storage or further assessment.
Once the cleaning process is complete, take a moment to assess the overall area for any overlooked details. Ensure that all surfaces are dry, free of marks, and ready for the next steps, whether it involves reinstallation, alternative use, or preparation for a new fixture.
By meticulously cleaning the area following the bidet removal, you establish a pristine foundation for future endeavors. This diligent approach not only promotes hygiene and cleanliness but also sets the stage for a seamless transition to the next phase, whether it involves installing a new bidet or exploring alternative options for the space previously occupied by the bidet.
With the area thoroughly cleaned and prepared, you have successfully navigated through the essential steps of bidet removal, culminating in a well-maintained and pristine environment ready for the next chapter.
Read more: How To Take Off Gutters
Conclusion
In conclusion, the process of taking off a bidet from your toilet encompasses a series of essential steps that require careful attention to detail and a methodical approach. By following the systematic guidelines outlined in this comprehensive guide, you can confidently navigate the bidet removal process and achieve a successful outcome.
From the initial step of turning off the water supply to the meticulous disconnection of the bidet from the water supply and the subsequent removal from the toilet, each stage plays a crucial role in ensuring a smooth and efficient bidet removal. By approaching each step with patience and precision, you can minimize the risk of potential complications and establish a secure foundation for the subsequent phases of bidet removal.
The emphasis on thorough cleaning and inspection following the bidet removal underscores the importance of maintaining a hygienic and visually appealing environment. By dedicating attention to this final phase, you can prepare the area for potential reinstallation, alternative use, or simply restore it to its pristine condition.
As you reflect on the journey of bidet removal, it's important to acknowledge the knowledge and confidence gained through this process. By familiarizing yourself with the intricacies of bidet removal, you have equipped yourself with valuable insights that can be applied to future maintenance or renovation endeavors.
Whether you are preparing to install a new bidet, explore alternative fixtures, or simply revitalize the space previously occupied by the bidet, the successful completion of the bidet removal process sets the stage for a seamless transition to the next chapter.
In essence, the process of taking off a bidet from your toilet is not only a practical task but also an opportunity to exercise precision, attention to detail, and a proactive approach to maintenance. By embracing these principles, you can confidently tackle similar endeavors in the future, knowing that you have the knowledge and expertise to navigate through the intricacies of fixture removal and maintenance.
With the bidet successfully removed and the area meticulously cleaned and prepared, you have demonstrated a commendable level of proficiency and diligence in managing this task. As you embark on future projects, may the insights gained from this experience serve as a valuable foundation for your continued success in maintenance and renovation endeavors.
Frequently Asked Questions about How To Take Off Bidet
Was this page helpful?
At Storables.com, we guarantee accurate and reliable information. Our content, validated by Expert Board Contributors, is crafted following stringent Editorial Policies. We're committed to providing you with well-researched, expert-backed insights for all your informational needs.


0 thoughts on “How To Take Off Bidet”