Home>Storage & Organization>Living Room Organization>How High Should I Hang A Coat Rack?
Living Room Organization
How High Should I Hang A Coat Rack?
Modified: April 22, 2024
Discover the ideal height for hanging a coat rack in your living room for efficient organization and functionality. Learn how to optimize your space with our expert tips.
(Many of the links in this article redirect to a specific reviewed product. Your purchase of these products through affiliate links helps to generate commission for Storables.com, at no extra cost. Learn more)
Introduction
When it comes to organizing a living room, every detail matters. From the arrangement of furniture to the placement of decor, each element contributes to the overall ambiance and functionality of the space. One often overlooked yet essential aspect of living room organization is the placement of a coat rack. The question of how high to hang a coat rack may seem simple at first glance, but it involves several considerations that can significantly impact the room's aesthetic and practicality.
In this comprehensive guide, we will delve into the factors to consider when determining the ideal height for a coat rack in your living room. By understanding the standard height guidelines and exploring the influence of personal preference and accessibility, you will gain valuable insights to make an informed decision. Whether you are aiming for a sleek and modern look or prioritizing convenience and ease of use, finding the optimal height for your coat rack is a crucial step in achieving a well-organized and visually appealing living space.
Key Takeaways:
- Finding the perfect height for a coat rack in your living room involves considering factors like ceiling height, visual harmony, and practicality. It’s all about creating a space that’s both functional and visually appealing!
- Standard height guidelines offer valuable starting points, but personal preference and accessibility are key. Tailoring the coat rack’s height to fit your unique style and household needs ensures a personalized and purposeful addition to your living space.
Read more: How High To Hang Towel Rack
Factors to Consider
When determining the ideal height for hanging a coat rack in your living room, several factors come into play. Understanding these considerations is essential to ensure that the placement of the coat rack aligns with both aesthetic and functional aspects of the space.
-
Ceiling Height: The first factor to consider is the ceiling height of the living room. Taller ceilings provide the opportunity to hang the coat rack higher, creating a sense of spaciousness and visual balance. Conversely, in rooms with lower ceilings, hanging the coat rack too high may make the space feel cramped. Therefore, it's crucial to strike a harmonious balance between the coat rack's height and the room's vertical dimensions.
-
Wall Space and Proximity to Furniture: Assessing the available wall space and the proximity of furniture is another vital consideration. If the living room has limited wall space due to large windows, doorways, or other fixtures, it's essential to choose a height for the coat rack that maximizes the use of the available area without overcrowding the room. Additionally, considering the proximity of nearby furniture, such as sofas or console tables, is crucial to ensure that the coat rack's placement complements the overall layout of the room.
-
Household Members and Guests: Taking into account the height variations among household members and frequent guests is a thoughtful consideration. A coat rack positioned at a height accessible to all individuals, including children and individuals with mobility considerations, promotes convenience and inclusivity. By accommodating the diverse needs of household members and guests, the living room becomes more welcoming and functional.
-
Visual Harmony and Focal Points: The coat rack's height should harmonize with the room's visual elements and focal points. Whether it's aligning the coat rack with other wall-mounted decor or ensuring that it complements the room's architectural features, maintaining visual harmony is essential. Additionally, considering the coat rack's position in relation to focal points, such as artwork or a fireplace, contributes to a cohesive and balanced aesthetic within the living room.
-
Usage and Practicality: Lastly, the intended usage and practicality of the coat rack play a significant role in determining its ideal height. If the coat rack primarily serves as a decorative accent, the height may be adjusted to enhance the room's visual appeal. Conversely, if practical functionality is a priority, positioning the coat rack at a height that allows for easy access to coats, hats, and other items is paramount.
By carefully considering these factors, you can make an informed decision regarding the optimal height for hanging a coat rack in your living room. Each consideration contributes to creating a harmonious, functional, and visually appealing living space that caters to the diverse needs of its occupants.
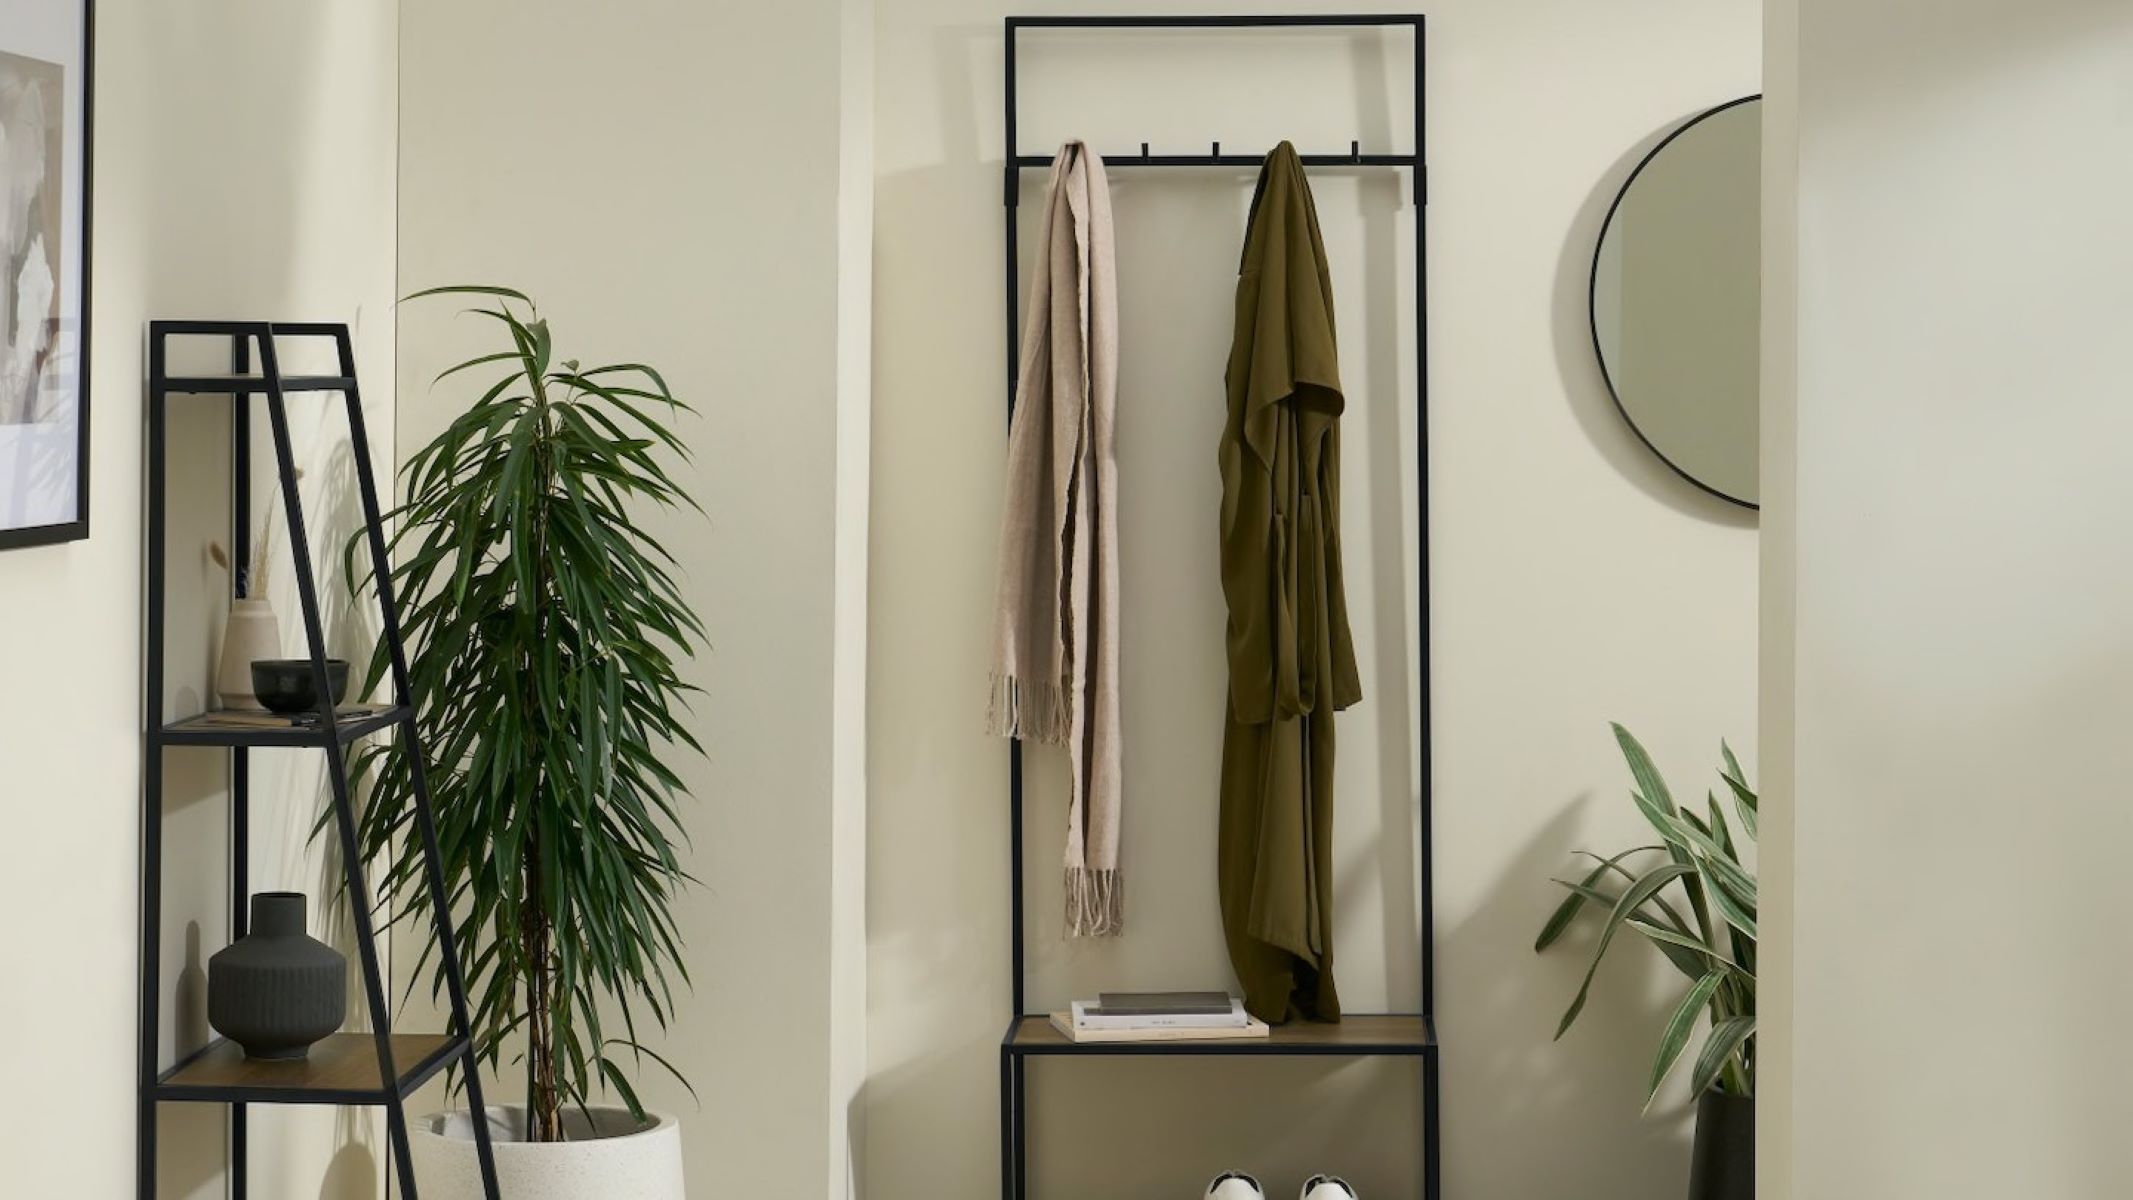
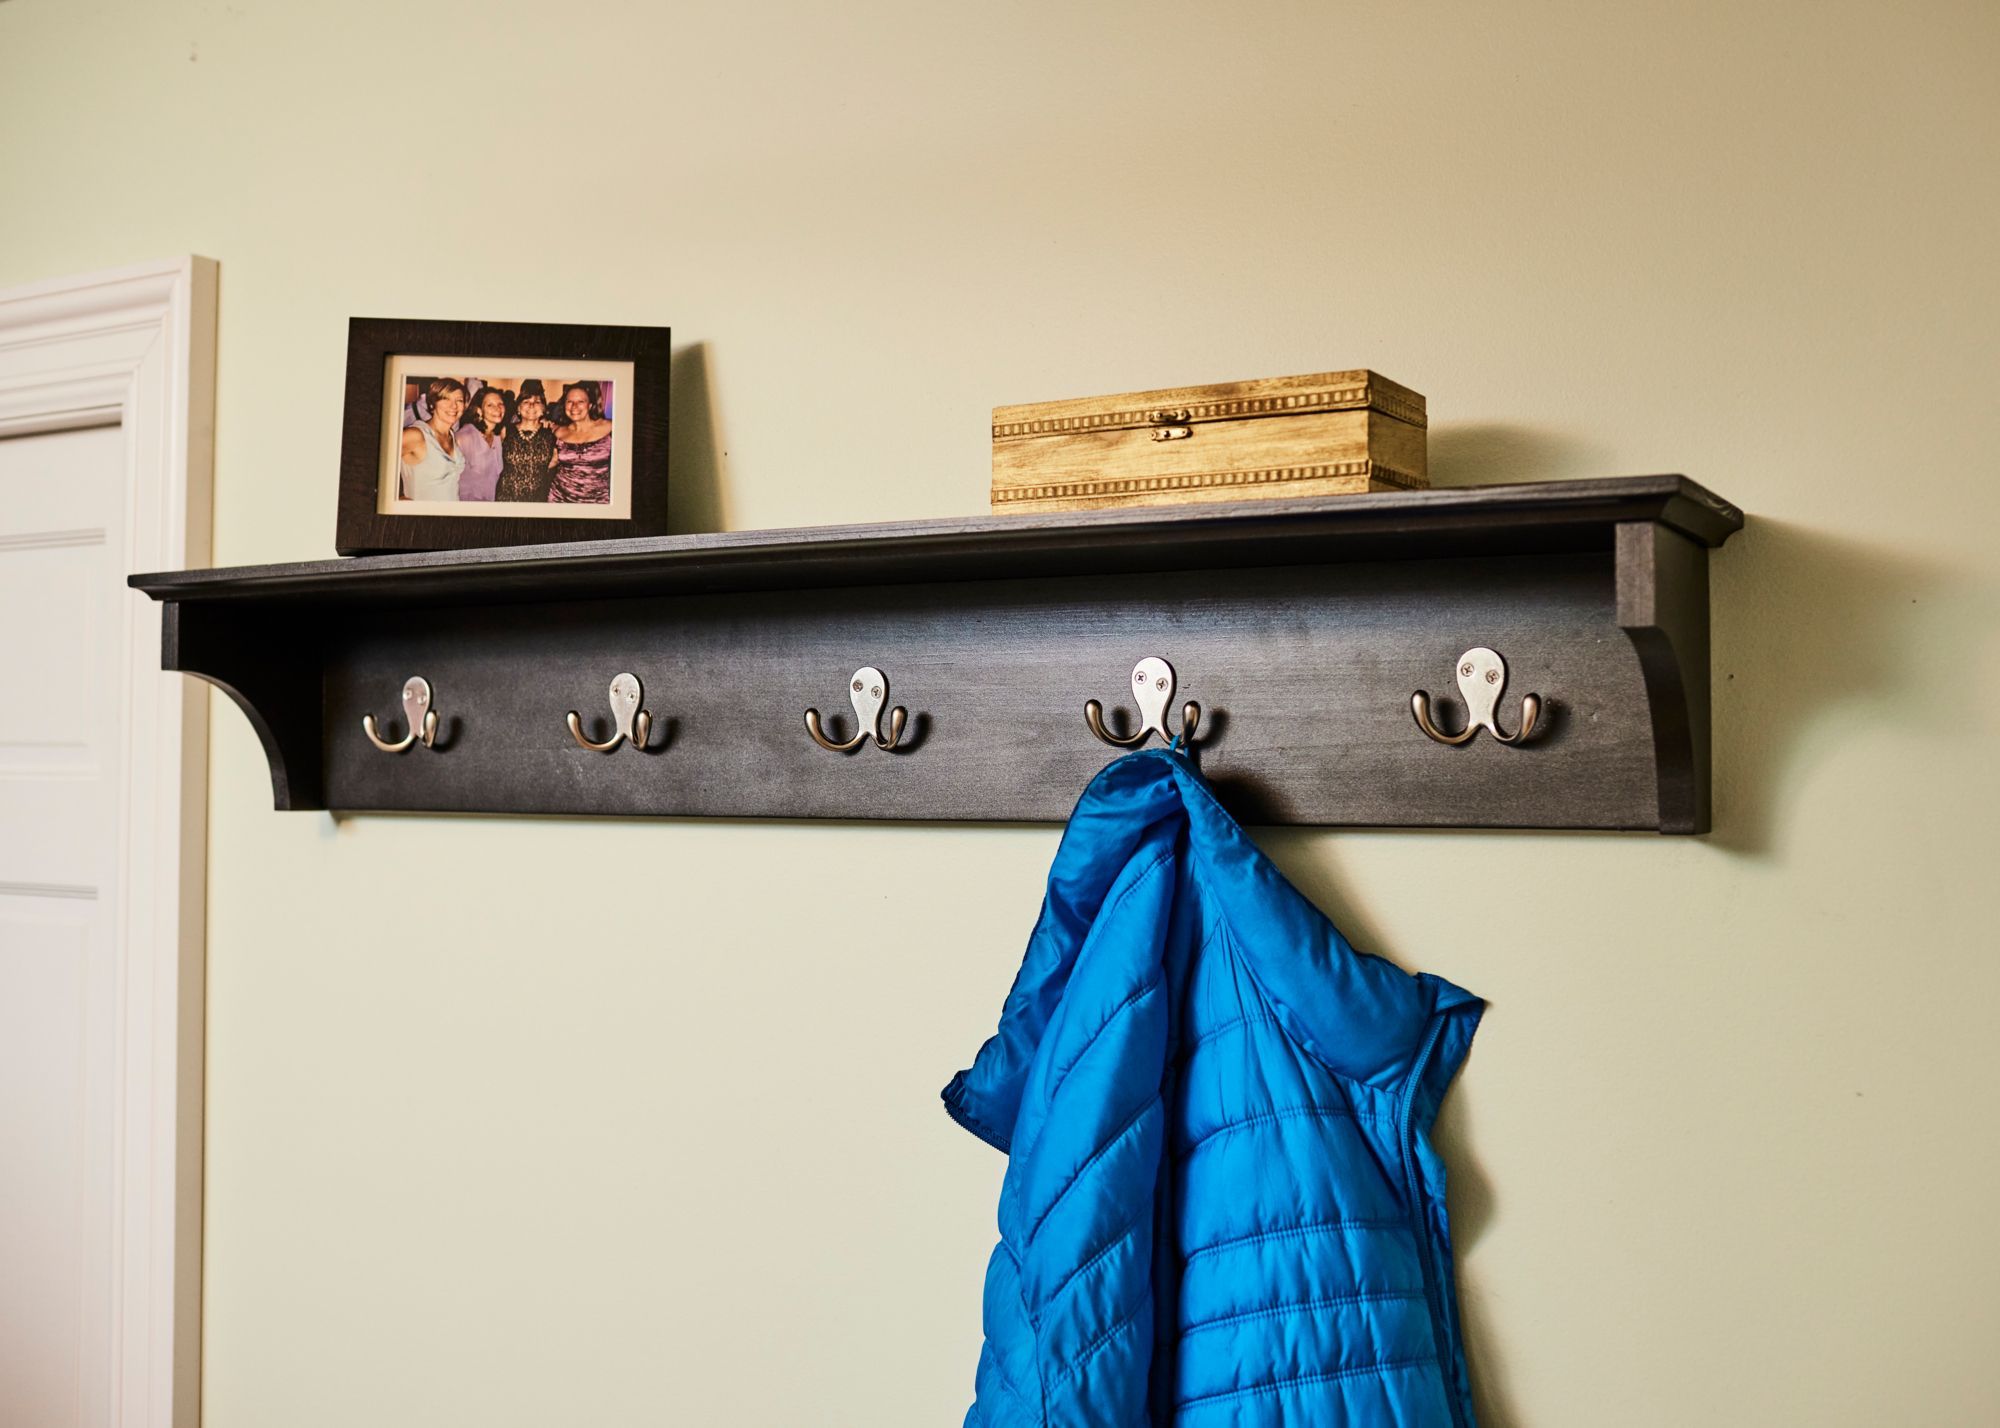
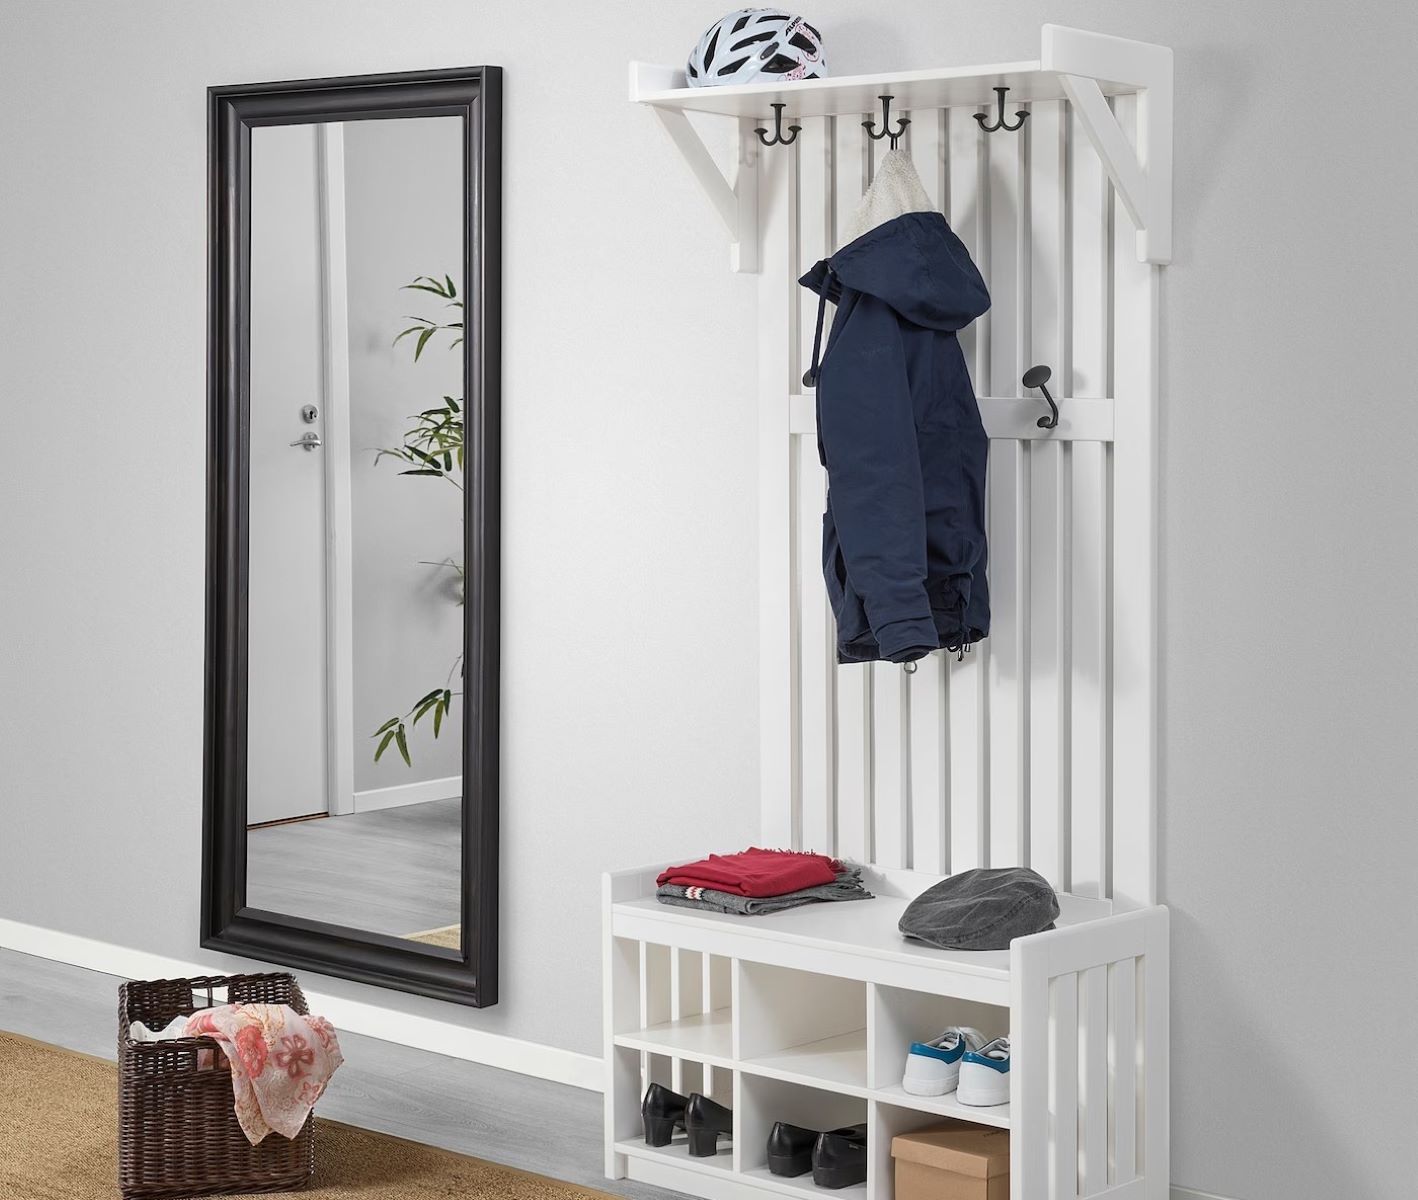
Standard Height Guidelines
When it comes to determining the standard height for hanging a coat rack in a living room, several guidelines can serve as valuable reference points. While these guidelines provide a starting framework, it's important to remember that personal preferences and specific room dynamics may warrant adjustments to these standard recommendations. Here are the typical height guidelines to consider:
-
Average Adult Height: A commonly referenced standard suggests positioning the coat rack at a height that allows the average adult to comfortably reach the hooks or pegs. This typically translates to a height range of 60 to 68 inches (152 to 173 cm) from the floor. Placing the coat rack within this range ensures that coats and accessories are easily accessible without requiring excessive reaching or bending.
-
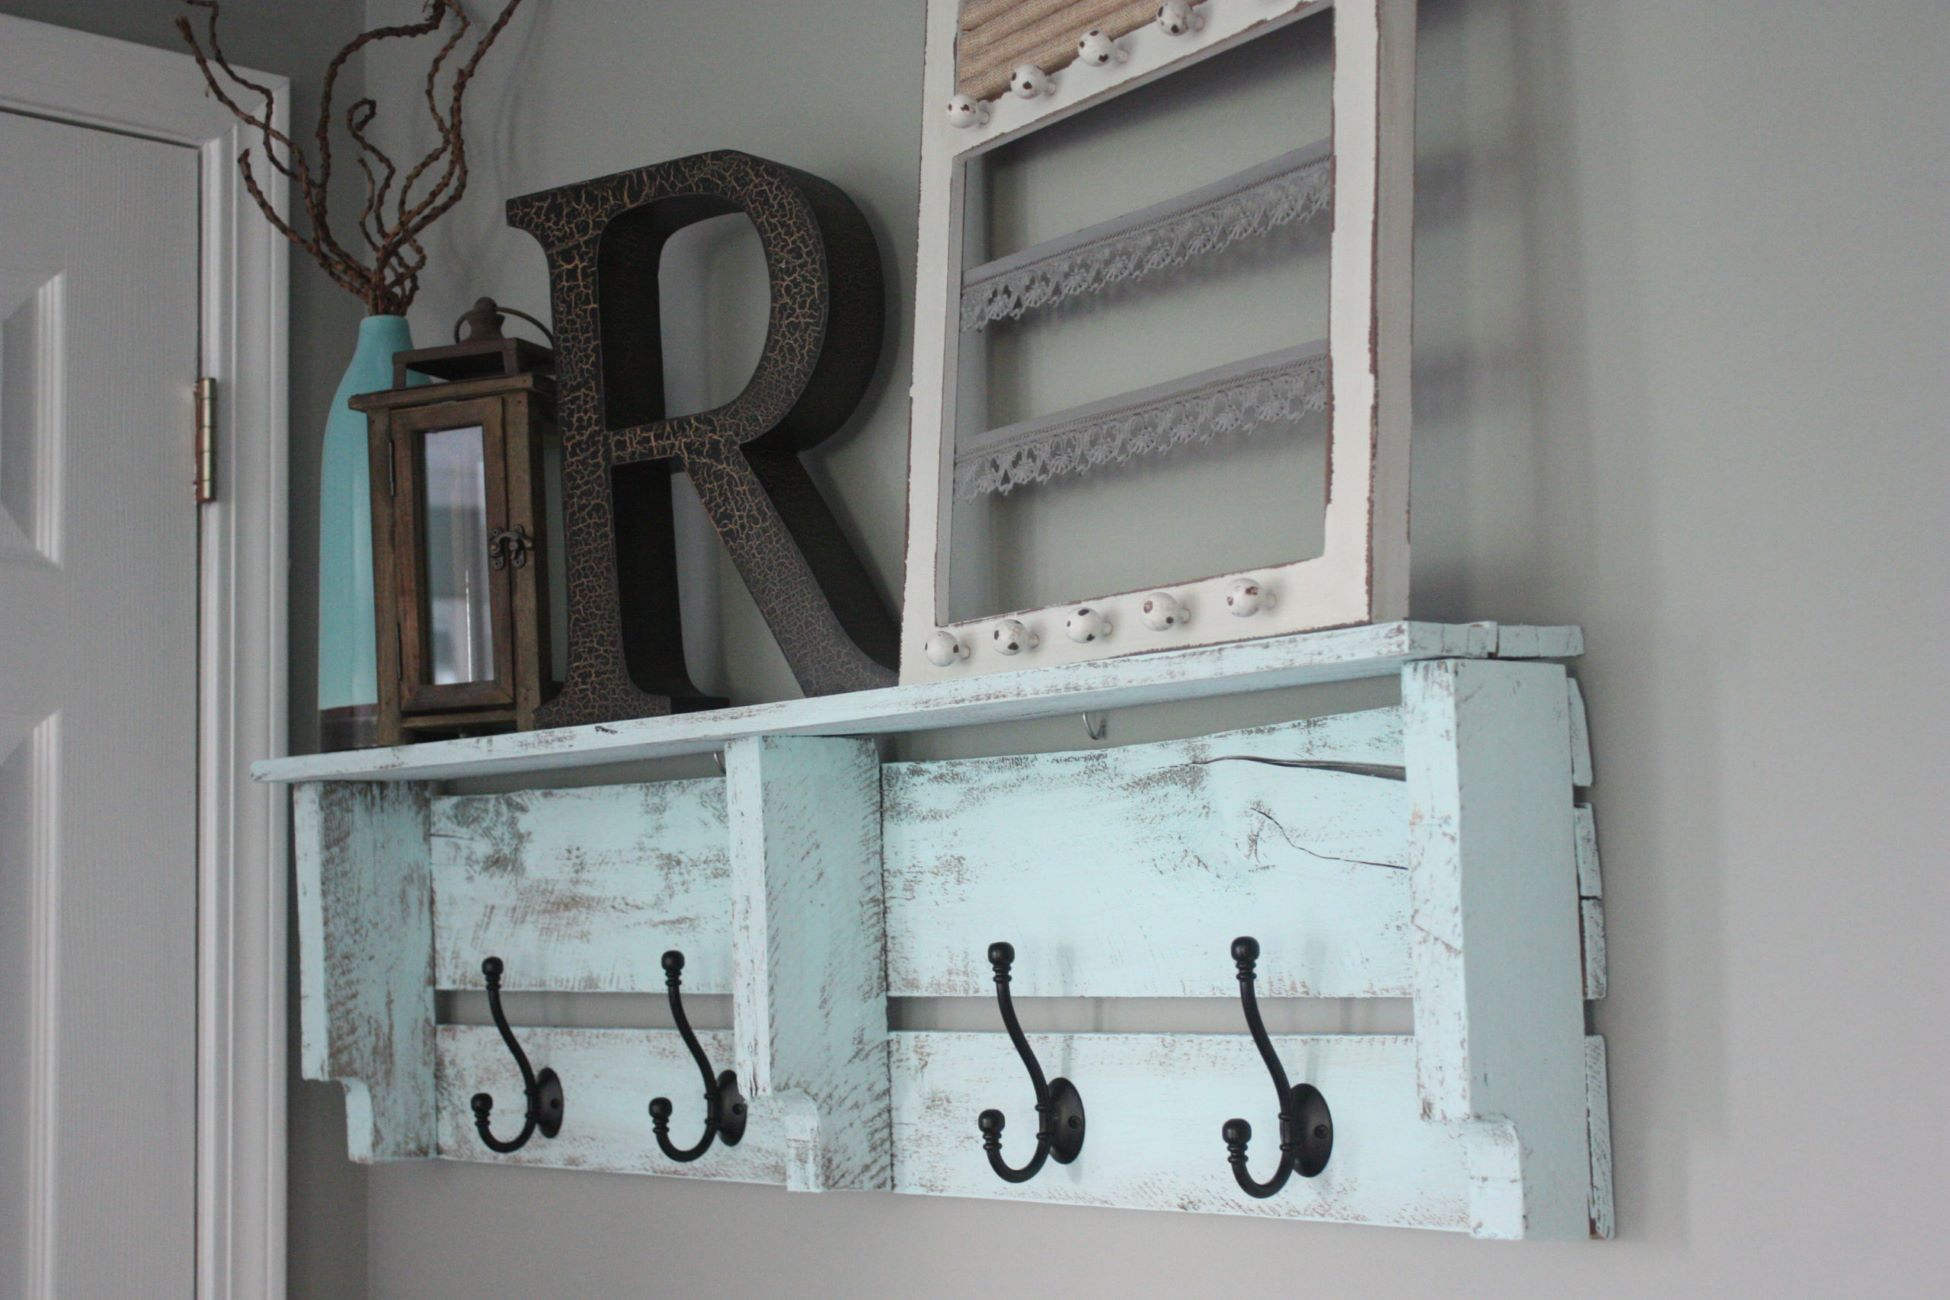
Child-Friendly Accessibility: For households with children, incorporating lower hooks or pegs at a height accessible to younger members fosters independence and encourages them to take responsibility for their belongings. A lower tier of hooks, positioned around 36 to 48 inches (91 to 122 cm) from the floor, provides a designated space for children's coats and bags, promoting organization and accessibility tailored to their needs.
-
Visual Balance and Proportion: Considering the visual impact of the coat rack within the living room is crucial. In spaces with standard ceiling heights, positioning the coat rack at a height that aligns with other wall-mounted elements, such as artwork or mirrors, contributes to a sense of visual harmony and proportion. This often translates to a height range of 60 to 72 inches (152 to 183 cm) from the floor, allowing the coat rack to integrate seamlessly with the room's aesthetic.
-
Accommodating Outerwear Length: Factoring in the length of the outerwear to be hung on the rack is essential. Coats, jackets, and longer garments require adequate vertical clearance to prevent them from touching the floor or other furniture. Positioning the coat rack at a height that accommodates the longest outerwear, typically around 70 to 78 inches (178 to 198 cm) from the floor, ensures that these garments hang freely without causing clutter or obstruction.
By considering these standard height guidelines, you can establish a starting point for determining the ideal placement of a coat rack in your living room. While these recommendations offer valuable insights, it's important to adapt them to suit the specific needs and dynamics of your living space, ultimately creating a functional and visually appealing organization solution tailored to your preferences and lifestyle.
For adults, the standard height to hang a coat rack is around 5 to 6 feet from the ground. For children, it should be lower, around 3 to 4 feet. This allows for easy access and organization.
Personal Preference and Accessibility
Personal preference plays a significant role in the placement of a coat rack within the living room. While standard height guidelines offer valuable reference points, individual tastes and lifestyle considerations often influence the ultimate decision. Understanding the impact of personal preference on the coat rack's height is essential for creating a space that reflects your unique style and functional needs.
Accessibility is a key aspect of personal preference when it comes to the height of a coat rack. Tailoring the placement of the coat rack to accommodate the specific needs of household members and frequent guests fosters a sense of inclusivity and convenience. For individuals with mobility considerations, positioning the coat rack at a height that allows for easy reach without excessive bending or stretching is paramount. This consideration extends to children as well, as incorporating lower hooks or pegs at accessible heights empowers them to independently manage their belongings, promoting a sense of ownership and organization from a young age.
Moreover, personal preference encompasses the visual impact and stylistic coherence of the coat rack within the living room. Some individuals may prefer a sleek, minimalist aesthetic, opting to position the coat rack at a height that aligns with other wall-mounted decor, creating a cohesive and balanced visual composition. In contrast, those with a penchant for eclectic or unconventional design may choose to experiment with varying heights, creating an artistic and dynamic display of coats and accessories.
Considering the daily routines and habits of household members is also integral to personal preference. If the living room serves as a bustling hub of activity, with frequent comings and goings, positioning the coat rack at a height that allows for quick and effortless access to outerwear becomes a practical priority. Conversely, in spaces where the coat rack primarily serves as a decorative accent, personal preference may lean towards a height that complements the room's overall aesthetic without compromising functionality.
Ultimately, personal preference and accessibility intertwine to shape the ideal height for a coat rack in the living room. By considering the diverse needs, visual preferences, and lifestyle dynamics of the household, the placement of the coat rack becomes a personalized and purposeful addition to the living space, reflecting the unique identity and functionality of the home.
Conclusion
In conclusion, the placement of a coat rack in the living room is a nuanced decision that encompasses a blend of practical considerations, aesthetic preferences, and individual lifestyles. By carefully evaluating the factors that influence the ideal height for a coat rack, homeowners can create a living room space that is both visually appealing and functionally efficient.
Standard height guidelines provide valuable reference points, offering insights into accommodating the diverse needs of household members and guests. From considering the average adult height for convenient access to outerwear to incorporating child-friendly accessibility, these guidelines serve as a starting framework for determining the optimal placement of a coat rack. Additionally, aligning the coat rack's height with visual balance and proportion within the living room contributes to a cohesive and harmonious aesthetic.
Personal preference and accessibility play a pivotal role in tailoring the height of the coat rack to suit the unique dynamics of the household. By considering the specific needs of individuals, including children and those with mobility considerations, homeowners can create an inclusive and convenient solution that promotes independence and organization. Furthermore, integrating personal stylistic preferences and daily routines into the decision-making process ensures that the coat rack becomes a purposeful and personalized addition to the living room, reflecting the individuality and functionality of the home.
Ultimately, the ideal height for hanging a coat rack in the living room is a balance between practicality and visual coherence. Whether it's optimizing accessibility for household members, aligning the coat rack with the room's aesthetic elements, or accommodating the length of outerwear, each consideration contributes to a well-organized and visually appealing living space.
By embracing the interplay of standard guidelines, personal preferences, and practical needs, homeowners can confidently determine the perfect height for a coat rack, elevating the functionality and visual allure of their living room while creating a welcoming and organized environment for all who enter.
Frequently Asked Questions about How High Should I Hang A Coat Rack?
Was this page helpful?
At Storables.com, we guarantee accurate and reliable information. Our content, validated by Expert Board Contributors, is crafted following stringent Editorial Policies. We're committed to providing you with well-researched, expert-backed insights for all your informational needs.


0 thoughts on “How High Should I Hang A Coat Rack?”