Home>Storage Ideas>Kitchen Storage>Homemade Cleaners You Can Make With Ingredients From Your Pantry
Kitchen Storage
Homemade Cleaners You Can Make With Ingredients From Your Pantry
Modified: October 20, 2024
Discover easy and cost-effective kitchen storage ideas with our collection of homemade cleaners made from ingredients found in your pantry.
(Many of the links in this article redirect to a specific reviewed product. Your purchase of these products through affiliate links helps to generate commission for Storables.com, at no extra cost. Learn more)
Introduction
Welcome to the world of homemade cleaners! If you’re looking to transform your cleaning routine and reduce your reliance on harsh, chemical-laden store-bought products, then you’ve come to the right place. In this article, we will explore a variety of homemade cleaner recipes made with simple ingredients that you can find in your pantry.
Using homemade cleaners offers numerous benefits. First and foremost, it allows you to have full control over the ingredients used in your cleaning products. By utilizing natural and non-toxic substances, you can create a clean and healthy living space without exposing yourself, your family, or the environment to harmful chemicals.
Another advantage of DIY cleaners is their cost-effectiveness. Many commercial cleaning products are expensive, and their pricing can quickly add up over time. By making your own cleaners, you can save money and allocate it towards other household expenses.
Furthermore, homemade cleaners are customizable. You can adjust the scent, strength, and ingredients to fit your preferences and cleaning needs. Whether you’re looking for a gentle solution for delicate surfaces, a heavy-duty cleaner for stubborn stains, or a refreshing fragrance for your home, you can tailor your homemade cleaners accordingly.
Before we dive into the recipes, it’s essential to consider safety. While homemade cleaners are generally safe to use, it’s still important to handle them with care. Always label your bottles, keep them out of reach of children and pets, and avoid mixing certain ingredients that can create harmful reactions.
Now, let’s take a look at the basic ingredients you’ll need to get started with making your own homemade cleaners.
Key Takeaways:
- Transform your cleaning routine with eco-friendly homemade cleaners using pantry staples. Enjoy cost savings, customization, and a healthier home environment while reducing your carbon footprint.
- Embrace the versatility of DIY cleaners with customizable scents and powerful cleaning abilities. Prioritize safety, experiment with different recipes, and enjoy a cleaner, greener home.
Benefits of Homemade Cleaners
There are several compelling reasons to incorporate homemade cleaners into your cleaning routine. Let’s explore some of the key benefits:
- Environmental Friendly: One of the primary advantages of homemade cleaners is their positive impact on the environment. By utilizing natural ingredients, you can reduce your carbon footprint and minimize the release of harmful chemicals into the air and water.
- Healthier Home: Most store-bought cleaners contain harsh chemicals that can potentially harm your health. By opting for homemade cleaners, you can avoid exposure to toxic substances while still achieving a clean and sanitized home.
- Cost Savings: Commercial cleaning products can be expensive, and their frequent purchase can quickly add up. Making your own cleaners with ingredients from your pantry is much more budget-friendly. You’ll save money in the long run while still maintaining a clean and organized living space.
- Versatility: Homemade cleaners can be highly versatile, allowing you to tackle a wide range of cleaning tasks. With a few basic ingredients, you can create multiple cleaners for various surfaces, eliminating the need for multiple store-bought products.
- Customization: Another benefit is the ability to customize your homemade cleaners. You can control the scent, strength, and ingredients to suit your preferences and specific cleaning needs. Plus, you can experiment with different combinations to find the perfect solution for different surfaces and messes.
- Reduced Packaging Waste: By making your own cleaners, you eliminate the need for excessive plastic containers and packaging associated with store-bought products. This, in turn, reduces the amount of waste that ends up in landfills.
Overall, choosing homemade cleaners is a step towards a healthier, greener, and more sustainable lifestyle. It allows you to have control over what goes into your cleaning products, save money, and contribute to a cleaner and safer environment.
Safety Considerations
While homemade cleaners are generally safe to use, it’s important to keep a few safety considerations in mind to ensure the well-being of yourself, your family, and your home. Here are some key points to consider:
- Proper Labeling: It’s essential to label all homemade cleaner bottles clearly and appropriately. This will help prevent any confusion and ensure that the contents are easily identifiable.
- Keep Out of Reach: Homemade cleaners should always be stored out of reach of children and pets. Many ingredients used in homemade cleaners, although safe in small quantities, can be harmful if ingested or mishandled. Store them in a secure, high place or locked cabinet.
- Avoid Mixing Certain Ingredients: Some ingredients should not be mixed together, as they can create potentially hazardous reactions. For example, mixing bleach with vinegar or ammonia can release toxic fumes. Always follow the specific recipes and avoid any combinations that are not recommended.
- Protective Gear: When working with homemade cleaners, it’s a good practice to wear gloves to protect your hands and avoid any potential skin irritation. Additionally, using goggles or eye protection can be beneficial, especially when handling ingredients that may cause eye irritation or splashes.
- Test on Small Areas: Before using a homemade cleaner on a large or visible area, it’s advisable to test it on a small, inconspicuous spot to ensure compatibility with the surface. This will help avoid any unwanted damage or staining.
- Ventilation: If you’re using cleaners with strong odors or potentially irritating ingredients, ensure proper ventilation by opening windows or using fans. This will help circulate fresh air and reduce any potential respiratory irritation.
- Follow Instructions: Always follow the instructions provided in the recipe carefully. Pay attention to recommended dilution ratios, application methods, and safety precautions mentioned. This will ensure proper usage and reduce any risk of accidents or negative effects.
By following these safety considerations, you can confidently incorporate homemade cleaners into your cleaning routine while safeguarding your well-being and the well-being of your home and loved ones. Enjoy the benefits of a cleaner and safer environment with peace of mind.
Basic Ingredients for Homemade Cleaners
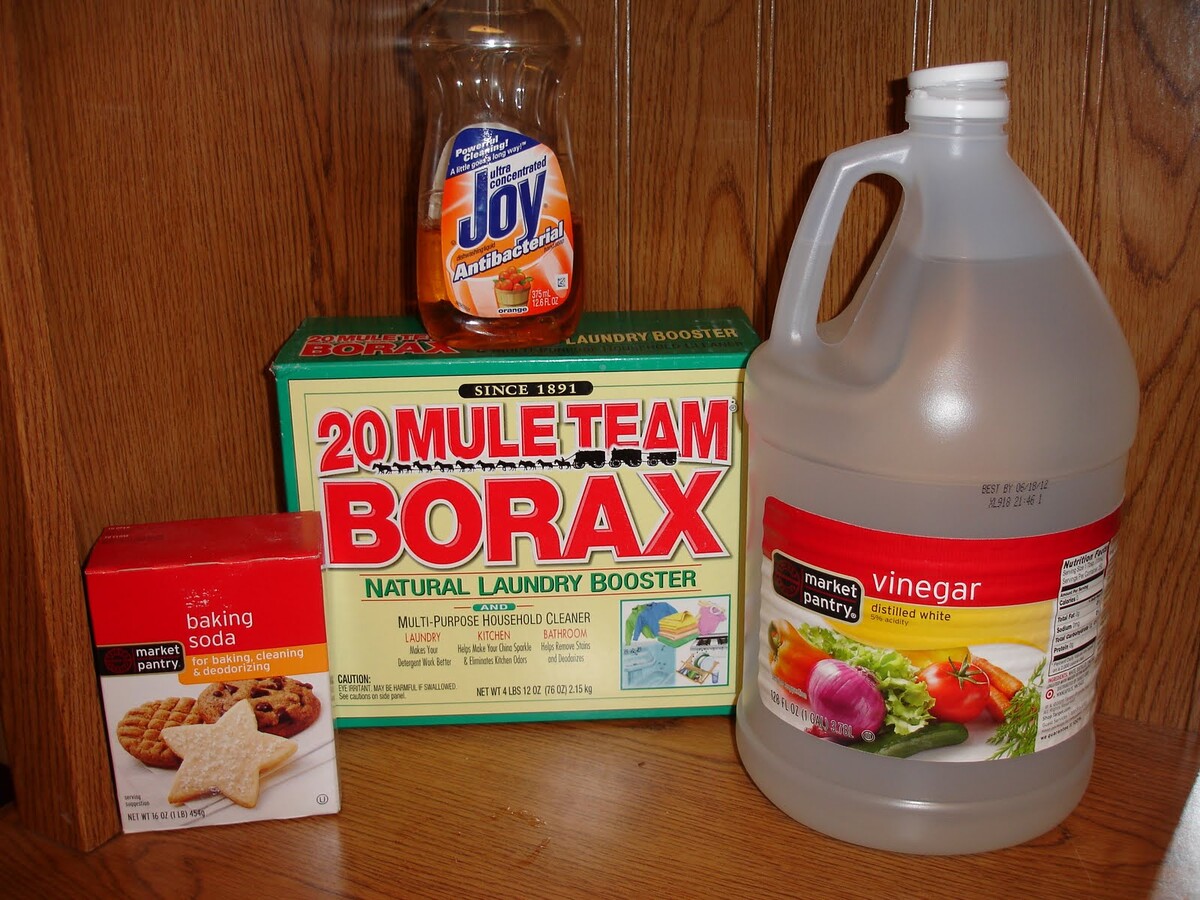
Creating homemade cleaners is incredibly easy, thanks to the simple and readily available ingredients found in your pantry. Let’s take a look at some of the basic ingredients you’ll frequently come across when making your own cleaning products:
- Vinegar: Distilled white vinegar is a versatile ingredient that acts as a powerful natural cleaner and disinfectant. Its acidic properties make it effective in removing grease, grime, and mineral deposits.
- Baking Soda: Baking soda, also known as sodium bicarbonate, is a gentle yet effective cleaning agent. It works wonders in deodorizing, removing stains, and gently scrubbing various surfaces.
- Lemon Juice: Lemon juice’s acidity makes it a fantastic natural cleaner and stain remover. Its fresh scent also adds a pleasant fragrance to your homemade cleaners.
- Hydrogen Peroxide: Hydrogen peroxide is a powerful disinfectant and stain remover. It works well on surfaces, fabrics, and even as a mouthwash or wound cleaner.
- Essential Oils: Essential oils not only add a delightful fragrance to your homemade cleaners but also offer antimicrobial properties. Popular choices include lavender, tea tree, eucalyptus, and citrus oils.
- Citrus Peels: Don’t toss those orange, lemon, or lime peels! They can be repurposed as a natural cleaning agent. The oils in the peels can help remove grease and leave behind a fresh scent.
- Castile Soap: Castile soap is a gentle, biodegradable soap made from vegetable oils. It’s an excellent ingredient for creating homemade dish soap, hand soap, and all-purpose cleaners.
- Cornstarch: Cornstarch is a natural, fine powder that works well as a degreaser and can be used for homemade window cleaner and furniture polish.
- Salt: Salt acts as a gentle abrasive and is useful for cleaning stubborn stains and grime. It can be combined with other ingredients to create effective scrubbing cleansers.
- Olive Oil: Olive oil is not just for cooking! It’s a natural ingredient that adds shine and vitality to wood surfaces when used in homemade furniture polish.
These basic ingredients form the foundation of countless homemade cleaner recipes. Once you have them stocked in your pantry, you’ll have a wide range of possibilities to create all-natural and effective cleaners for every corner of your home.
All-Purpose Cleaner Recipes
An all-purpose cleaner is a versatile addition to your cleaning arsenal, capable of tackling various surfaces and messes. Here are a few simple and effective recipes to create your own homemade all-purpose cleaners:
- Vinegar and Water: Mix equal parts of distilled white vinegar and water in a spray bottle. This combination is excellent for cleaning countertops, windows, mirrors, and appliances. The vinegar helps eliminate bacteria and dissolve tough stains, while the water dilutes its acidity for safe usage.
- Lemon Juice and Water: Combine the juice of one lemon with two cups of water in a spray bottle. This mixture works well for cutting through grease and grime on kitchen surfaces, including countertops and stovetops. The natural acidity in lemon juice helps remove stains and leaves a fresh scent.
- Baking Soda and Water: Create a paste by mixing baking soda with enough water to form a spreadable consistency. This paste is perfect for scrubbing sinks, showers, and bathtubs. It acts as a gentle abrasive that helps remove stains and soap scum.
- Vinegar, Water, and Essential Oils: In a spray bottle, combine one cup of vinegar, one cup of water, and a few drops of your favorite essential oil. This recipe not only creates an effective all-purpose cleaner but also adds a pleasant scent to your cleaning routine. The essential oil helps mask the vinegary smell.
- Hydrogen Peroxide and Water: Mix equal parts of hydrogen peroxide and water in a spray bottle. This solution is ideal for disinfecting surfaces, such as kitchen countertops, cutting boards, and bathroom fixtures. It effectively kills bacteria and viruses, leaving your home clean and germ-free.
Remember, always shake the spray bottle before using these homemade all-purpose cleaners. Spray the solution onto the surface you wish to clean and wipe with a microfiber cloth or sponge. For tougher stains or dirt, let the cleaner sit for a few minutes before wiping.
These homemade all-purpose cleaner recipes are simple, effective, and safe for most surfaces. Experiment with different combinations and adjust the proportions as per your cleaning needs. Enjoy the flexibility and satisfaction of using homemade cleaners to keep your home fresh and clean!
Read more: What Can You Use As Glass Cleaner
Glass Cleaner Recipes
When it comes to cleaning glass surfaces, it’s essential to use a solution that leaves them streak-free and crystal clear. Here are a few easy DIY glass cleaner recipes that will make your windows, mirrors, and glass surfaces shine:
- Vinegar and Water: Mix equal parts of distilled white vinegar and water in a spray bottle. This simple yet effective recipe is excellent for cleaning glass surfaces. Spray the solution onto the glass and wipe with a lint-free cloth or newspaper for a streak-free shine. The vinegar helps dissolve dirt and remove fingerprints, leaving your glass surfaces sparkling clean.
- Ammonia and Water: Combine one tablespoon of ammonia with one cup of water in a spray bottle. Be sure to open windows or work in a well-ventilated area when using ammonia. This recipe is perfect for removing stubborn grime and grease from glass surfaces. It’s particularly effective for cleaning outdoor windows and patio doors.
- Lemon Juice and Water: Squeeze the juice of one lemon into a spray bottle and fill it with water. This natural glass cleaner not only leaves a fresh citrus scent but also effectively cuts through grease and grime. Spray it onto the glass surface and wipe it clean for a streak-free shine.
- Cornstarch and Water: Make a paste by mixing two tablespoons of cornstarch with one cup of water. This recipe is ideal for deep cleaning and polishing glass surfaces. Apply the paste to the glass using a microfiber cloth or sponge, then buff it away with a clean cloth. This method helps remove water spots, stubborn stains, and residue, leaving your glass surfaces crystal clear.
- Vinegar, Rubbing Alcohol, and Water: In a spray bottle, combine one cup of vinegar, one cup of rubbing alcohol, and one cup of water. This powerful recipe is great for cutting through tough grime and leaving your glass surfaces streak-free. The alcohol helps the solution evaporate quickly, minimizing streaking.
For best results, spray the glass cleaner directly onto the surface you want to clean, and use a lint-free cloth or paper towel to wipe it clean. For larger windows, you may find it helpful to use a squeegee to remove excess cleaning solution and achieve an even finish.
With these homemade glass cleaner recipes, you can achieve sparkling, streak-free glass surfaces without the use of harsh chemicals. Enjoy the clear view and the satisfaction of making your own effective and environmentally friendly glass cleaners!
Bathroom Cleaner Recipes
The bathroom is an area that requires regular cleaning to maintain cleanliness and hygiene. Instead of relying on store-bought chemical cleaners, you can create effective and safe bathroom cleaners using simple ingredients found in your pantry. Here are a few DIY bathroom cleaner recipes:
- Vinegar and Baking Soda: Sprinkle baking soda on surfaces such as the bathtub, toilet, or sink. Spray vinegar on top of the baking soda and let the mixture fizz for a few minutes. Scrub the surfaces with a brush or sponge, then rinse with water. This powerful combination helps remove stubborn stains, soap scum, and grime from bathroom surfaces.
- Lemon Juice and Borax: In a bowl, mix lemon juice and borax to form a paste. Apply the paste to surfaces such as tiles, grout, or toilet bowls. Let it sit for a few minutes, then scrub with a brush or sponge. Rinse with water to reveal clean and fresh-smelling surfaces.
- Vinegar and Water Spray: Mix equal parts of distilled white vinegar and water in a spray bottle. This solution is excellent for cleaning bathroom fixtures, countertops, and mirrors. Spray the mixture onto the surfaces and wipe clean with a cloth or paper towel. The vinegar cuts through grime and leaves your bathroom sparkling clean.
- Baking Soda and Hydrogen Peroxide: Create a paste by mixing baking soda and hydrogen peroxide to form a thick consistency. Apply the paste to the grout lines in your bathroom and let it sit for a few minutes. Scrub with a brush or toothbrush to remove dirt and mildew. Rinse with water and enjoy refreshed and clean grout lines.
- Castile Soap and Essential Oils: In a spray bottle, combine water, a few drops of castile soap, and a few drops of your favorite essential oil. Shake well to mix. This gentle yet effective cleaner is ideal for wiping down bathroom surfaces, including countertops, cabinets, and walls. The castile soap cleans while the essential oils provide a fresh scent.
For stubborn stains or areas that require extra attention, you may need to repeat the cleaning process or let the cleaner sit for a longer period before scrubbing. Remember to always test the cleaner on a small, inconspicuous area before using it on the entire surface to ensure compatibility.
By using these homemade bathroom cleaner recipes, you can effectively clean and disinfect your bathroom without exposing yourself to harsh chemicals. Enjoy a fresh and sparkling bathroom with the satisfaction of using safe and eco-friendly cleaning solutions.
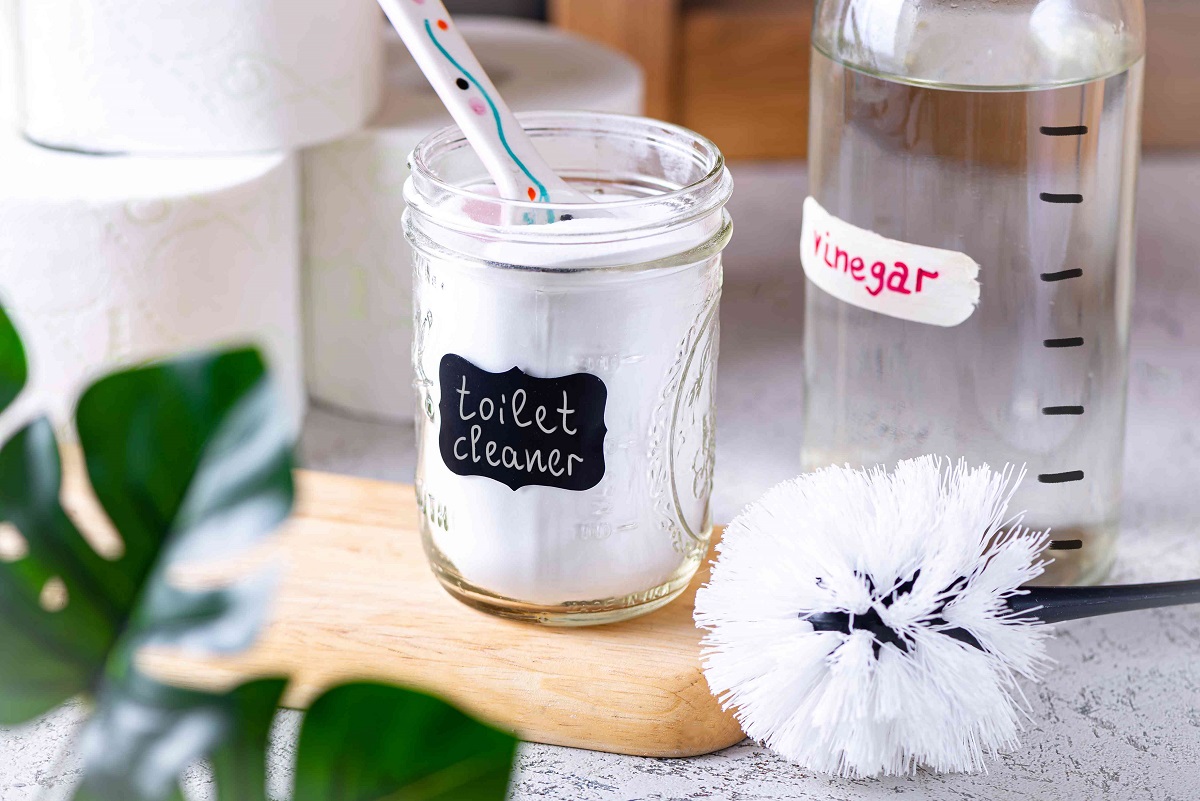
To make an all-purpose cleaner, mix equal parts water and white vinegar in a spray bottle. This solution can be used to clean countertops, windows, and other surfaces around the house.
Kitchen Cleaner Recipes
The kitchen is a busy area that often requires regular cleaning to keep it hygienic and free from grease and grime. Luckily, you can create effective and safe kitchen cleaners using common pantry ingredients. Here are a few DIY kitchen cleaner recipes:
- Vinegar and Water: Mix equal parts of distilled white vinegar and water in a spray bottle. This versatile cleaning solution is perfect for wiping down kitchen countertops, stovetops, and appliances. The vinegar helps cut through grease, disinfects surfaces, and leaves them sparkling clean.
- Lemon and Salt Scrub: Cut a lemon in half and dip the cut side into salt. Scrub the surface of stainless steel sinks, faucets, or pots and pans with the lemon, using the salt as an abrasive. This natural scrubbing combination helps remove stains, hard water deposits, and grime, leaving your kitchen fixtures and cookware looking brand new.
- Baking Soda and Water Paste: Create a paste by mixing baking soda and water until it forms a thick consistency. This paste is fantastic for tackling tough stains and baked-on food residue in your oven, microwave, or on baking sheets. Apply the paste to the problem area, let it sit for a while, then scrub with a sponge or brush. Rinse with water for a fresh and clean surface.
- Hydrogen Peroxide and Water: Combine hydrogen peroxide and water in a spray bottle. This solution is excellent for disinfecting cutting boards and countertops in your kitchen. Spray the mixture onto the surface, let it sit for a few minutes, then wipe clean. Hydrogen peroxide has natural antibacterial properties that help eliminate harmful bacteria in your kitchen.
- Vinegar and Olive Oil Wood Polish: Mix equal parts of distilled white vinegar and olive oil to create a natural wood polish. This mixture is perfect for cleaning and shining wooden cutting boards, countertops, and furniture in your kitchen. Apply a small amount to a cloth and gently rub it onto the wood surface. Buff it with a clean cloth to bring out the natural beauty of the wood.
These homemade kitchen cleaner recipes are incredibly effective and safe to use. They not only clean and sanitize your kitchen but also eliminate the need for harsh chemicals. Enjoy a fresh and clean kitchen while promoting a healthier environment for you and your family.
Floor Cleaner Recipes
When it comes to keeping your floors clean and free from dirt and grime, homemade floor cleaners can be a great solution. Not only are they cost-effective, but they also allow you to avoid harsh chemicals that can be present in many store-bought floor cleaners. Here are a few DIY floor cleaner recipes to help you maintain spotless floors:
- Vinegar and Water: Mix equal parts of distilled white vinegar and warm water in a bucket. This simple yet effective solution works well on various types of floors, including tile, laminate, and linoleum. Vinegar helps to cut through dirt and grease, leaving your floors clean and shiny.
- Essential Oil and Water: In a spray bottle, combine water with a few drops of your favorite essential oil. Shake well and mist the solution onto your wood, tile, or laminate floors. Essential oils not only provide a pleasant aroma but also offer antibacterial and antiviral properties, leaving your floors fresh and clean.
- Baking Soda and Vinegar: Sprinkle baking soda liberally on your carpet or rugs and let it sit for about 15 minutes to absorb odors. Then, create a mixture of equal parts vinegar and warm water and use it in a carpet cleaning machine or spray it onto the affected area. Baking soda helps eliminate odors, while vinegar helps break down stains and freshen up your carpets.
- Lemon Juice, Rubbing Alcohol, and Water: Combine 1/2 cup of lemon juice, 1/4 cup of rubbing alcohol, and 1 gallon of warm water. This solution is excellent for cleaning and disinfecting sealed hardwood floors. Lemon juice helps cut through dirt and grime, while rubbing alcohol assists in disinfecting and drying quickly.
- Ammonia, Dish Soap, and Water: In a bucket, mix 1 gallon of warm water with 1/2 cup of ammonia and 1/4 cup of dish soap. This powerful solution is suitable for cutting through grease and grime on tile or vinyl floors. Be cautious when using ammonia and ensure proper ventilation.
Remember to test any homemade floor cleaner solution in a small inconspicuous area before applying it to the entire floor. It’s also essential to follow the manufacturer’s care instructions for your specific type of flooring.
These homemade floor cleaner recipes offer effective and natural alternatives to commercial products, allowing you to maintain clean and spotless floors while minimizing environmental impact. Enjoy cleaner and healthier floors in your home!
Read more: How To Store Homemade Sauces
Carpet Cleaner Recipes
Carpets can easily accumulate dirt, stains, and odors over time, requiring regular cleaning to keep them fresh and looking their best. Instead of relying on commercial carpet cleaners, which can contain harsh chemicals, you can create your own carpet cleaner solutions using simple ingredients. Here are a few DIY carpet cleaner recipes:
- Baking Soda and Vinegar: Sprinkle baking soda liberally on your carpet and let it sit for about 15 minutes to absorb odors. Then, create a mixture of equal parts vinegar and warm water in a spray bottle. Lightly mist the solution onto the carpet and scrub it gently with a brush or sponge. This combination helps break down stains and freshen up your carpets.
- Hydrogen Peroxide and Dish Soap: In a spray bottle, combine 2 tablespoons of hydrogen peroxide and 1 tablespoon of dish soap. Fill the rest of the bottle with warm water. Shake well to mix the ingredients. This solution is ideal for removing tough stains from carpets. Apply the solution to the stained area and gently blot with a clean cloth until the stain is lifted.
- Salt and Borax: Create a mixture of equal parts salt and borax. Sprinkle the mixture onto the stained area and let it sit for a few hours or overnight. Vacuum thoroughly to remove the salt and borax. This method is effective for tackling greasy or oily stains on carpets.
- Vinegar and Dish Soap: In a spray bottle, combine 1 cup of vinegar, 1 cup of warm water, and a few drops of dish soap. Shake well to mix the solution. Spray the mixture onto the stained area and let it sit for a few minutes. Gently blot the area with a clean cloth until the stain is removed.
- Club Soda: Club soda is a fantastic natural carpet cleaner for fresh stains. Simply pour club soda onto the stained area and blot with a clean cloth. The carbonation in the club soda helps lift the stain to the surface, making it easier to remove.
It’s essential to treat carpet stains promptly and avoid saturating the carpet with excessive liquid. Always test any carpet cleaner solution on a small, inconspicuous area before applying it to the entire stain to ensure it doesn’t cause any adverse effects.
These homemade carpet cleaner recipes offer effective and eco-friendly alternatives to commercial cleaners while helping you maintain clean and stain-free carpets. With these DIY solutions, you can keep your carpets looking fresh and inviting!
Laundry Stain Remover Recipes
Dealing with stubborn stains on your clothes can be frustrating, but with the right homemade stain removers, you can effectively remove them without relying on harsh chemicals. Here are a few easy-to-make DIY laundry stain remover recipes:
- Baking Soda and Hydrogen Peroxide: Create a paste by mixing baking soda and hydrogen peroxide to form a thick consistency. Apply the paste directly to the stained area and let it sit for 15-30 minutes. Gently scrub the stain with a brush or toothbrush, then rinse with water. This powerful combination helps lift and remove tough stains like coffee, wine, and food.
- Lemon Juice and Salt: Squeeze fresh lemon juice onto the stained area, then sprinkle salt over the juice. Rub the fabric together to work the salt and lemon juice into the stain. Let it sit for 30 minutes, then rinse with water. Lemon juice acts as a natural bleaching agent, while salt helps absorb the stain and lift it from the fabric.
- Vinegar and Dish Soap: In a bowl, mix equal parts of vinegar and dish soap to create a stain-fighting solution. Apply the mixture to the stained area and let it sit for 15-30 minutes. Use a brush or cloth to scrub the stain gently, then rinse with water. Vinegar helps break down stains, while dish soap aids in removing oil and grease-based stains.
- Club Soda: Club soda works wonders for fresh stains. Simply pour club soda directly onto the stain and gently blot with a cloth. The bubbling action of the club soda helps lift the stain to the surface, making it easier to remove. Once you’ve soaked up the stain, launder the garment as usual.
- Hydrogen Peroxide and Liquid Dish Detergent: Mix equal parts of hydrogen peroxide and liquid dish detergent in a spray bottle. Spray the solution directly onto the stain and let it sit for 10-15 minutes. Gently scrub the stain with a brush or cloth, then rinse with water. This combination effectively tackles a wide range of stains, including grass, blood, and sweat.
Always remember to check the fabric care label and do a patch test on a small, inconspicuous area of the garment before applying any stain remover solution. It’s also essential to rinse the area thoroughly after treating the stain to prevent any residue from setting in.
These DIY laundry stain remover recipes offer effective alternatives to commercial stain removers, allowing you to treat stains naturally and effectively. With these homemade solutions, you can restore your clothes to their pristine condition and extend their lifespan.
Air Freshener Recipes
Creating your own air fresheners is a wonderful way to fill your home with pleasant scents without relying on synthetic fragrances. These DIY air fresheners are easy to make and can be customized to suit your preferred scents. Here are a few simple and natural air freshener recipes:
- Essential Oil Spray: In a spray bottle, combine water with a few drops of your favorite essential oil. Shake well before each use, then spray it into the air to freshen up any room. Essential oils like lavender, citrus, or eucalyptus can provide a refreshing and relaxing aroma.
- Citrus Simmer Pot: Fill a pot with water and add citrus peels, such as orange or lemon. Add a few cinnamon sticks, cloves, or other spices if desired. Simmer the mixture on a low heat setting, and as it warms up, it will release a delightful fragrance throughout your home.
- Baking Soda Deodorizer: Place an open container filled with baking soda in areas where odors are a concern, such as near trash cans or in closets. Baking soda acts as a natural deodorizer, absorbing unpleasant smells. For an added fragrance boost, you can mix in a few drops of essential oil into the baking soda before placing it in the container.
- Gel Air Freshener: In a heat-proof container, mix gelatin, water, and a few drops of essential oil. Heat the mixture until the gelatin is completely dissolved. Let it cool and solidify, then place the gel air freshener in any room to release a gentle fragrance. This method allows for long-lasting scent and can be easily customized with different essential oil combinations.
- Herb Sachets: Create small sachets using muslin or cotton bags. Fill them with dried herbs such as lavender, rosemary, or mint. Hang or place these sachets in drawers, closets, or anywhere you want a subtle and natural fragrance.
Remember to adjust the quantity of essential oils used based on personal preference and the size of the space you intend to freshen up. Essential oils are potent, so a little goes a long way.
These homemade air freshener recipes provide a natural and chemical-free way to add a pleasant scent to your living space. Enjoy the delightful aromas without worrying about synthetic fragrances or harmful chemicals!
Conclusion
Congratulations! You’ve now discovered a treasure trove of homemade cleaner recipes that will transform your cleaning routine and enhance your living space. By using simple ingredients found in your pantry, you can create effective and eco-friendly cleaners for various areas of your home.
Choosing homemade cleaners offers a multitude of benefits. Not only are you reducing your exposure to harsh chemicals, but you’re also contributing to a healthier environment. Homemade cleaners are customizable, cost-effective, and versatile, allowing you to tailor your cleaning products to your specific needs.
From all-purpose cleaners to glass cleaners, bathroom cleaners to kitchen cleaners, floor cleaner recipes, carpet stain removers, and air fresheners, you have a plethora of options to tackle every cleaning task. Experiment with different combinations and scents to find what works best for you.
As you embark on your DIY cleaning adventure, it’s essential to prioritize safety considerations. Always label your homemade cleaners properly, keep them out of the reach of children and pets, and avoid mixing certain ingredients that can create potentially harmful reactions.
Remember to test any new cleaner on a small, inconspicuous area before applying it to larger surfaces to ensure compatibility. Additionally, make sure to follow the manufacturer’s care instructions for your specific materials and fabrics.
By utilizing these homemade cleaner recipes, you’re not only taking control of what goes into your cleaning products but also making a positive impact on your health, your home, and the environment.
So, roll up your sleeves, grab your ingredients, and get started on your journey towards a cleaner, greener, and healthier home. Have fun exploring the world of homemade cleaners and enjoy the satisfaction of a fresh and welcoming living space!
Frequently Asked Questions about Homemade Cleaners You Can Make With Ingredients From Your Pantry
Was this page helpful?
At Storables.com, we guarantee accurate and reliable information. Our content, validated by Expert Board Contributors, is crafted following stringent Editorial Policies. We're committed to providing you with well-researched, expert-backed insights for all your informational needs.


0 thoughts on “Homemade Cleaners You Can Make With Ingredients From Your Pantry”