Home>Technology>Smart Home Devices>How To Fix A Zebra Label Printer
Smart Home Devices
How To Fix A Zebra Label Printer
Modified: August 17, 2024
Learn how to troubleshoot and fix common issues with your Zebra label printer. Get expert tips for resolving problems with smart home devices.
(Many of the links in this article redirect to a specific reviewed product. Your purchase of these products through affiliate links helps to generate commission for Storables.com, at no extra cost. Learn more)
Introduction
Welcome to the world of smart home devices, where convenience and efficiency are seamlessly integrated into our daily lives. One essential component of this ecosystem is the Zebra label printer, a reliable and versatile device that simplifies the task of printing labels for various purposes. However, as with any technological equipment, issues may arise that can disrupt its functionality. In this comprehensive guide, we will explore the common problems associated with Zebra label printers and provide practical solutions to address them effectively.
Whether you are a business owner utilizing the printer for inventory management, shipping labels, or any other labeling needs, or a tech-savvy individual managing a home office, understanding how to troubleshoot and resolve issues with your Zebra label printer is crucial. By following the troubleshooting steps outlined in this article, you can regain control over the printing process, minimize downtime, and ensure that your labeling tasks are completed with precision and reliability.
Let's embark on this journey to unravel the intricacies of Zebra label printers, empowering you to overcome challenges and optimize the performance of this indispensable smart home device. Whether you are a seasoned user or a newcomer to the world of Zebra label printers, this guide will equip you with the knowledge and strategies needed to address common issues effectively. Get ready to dive into the world of troubleshooting and emerge with the confidence to conquer any printing obstacle that comes your way.
Key Takeaways:
- Regular cleaning and maintenance of your Zebra label printer is crucial for consistent print quality and long-term reliability, ensuring smooth operation within your smart home environment.
- Updating printer drivers and adjusting printer settings can optimize performance, resolve software-related issues, and tailor the printing experience to your unique labeling needs.
Read more: How To Clean A Zebra Printer
Understanding the Issue
Before delving into the troubleshooting process, it is essential to grasp the common issues that may afflict Zebra label printers. By understanding the nature of these challenges, you can approach the troubleshooting steps with clarity and purpose.
One prevalent issue that users encounter is print quality degradation. This manifests as faded, streaked, or illegible labels, which can significantly impact the functionality of the printed materials. Additionally, connectivity problems may arise, leading to the printer being unrecognized by the computer or network. This can disrupt the printing process and hinder the seamless operation of the device within the smart home ecosystem.
Furthermore, error messages and malfunctions related to the printer’s hardware components, such as the printhead or sensors, can impede its performance. These issues may manifest as blinking indicator lights, unusual sounds during operation, or persistent error codes displayed on the printer’s interface.
Understanding the root causes of these issues is pivotal in formulating an effective troubleshooting approach. Whether the problem stems from software-related issues, connectivity challenges, or hardware malfunctions, a systematic and informed strategy is crucial for resolving the issues and restoring the printer to its optimal functionality.
By gaining insight into the common issues that plague Zebra label printers, you are better equipped to navigate the troubleshooting process with confidence. The subsequent sections will delve into actionable steps to address these issues, empowering you to overcome challenges and harness the full potential of your Zebra label printer within your smart home environment.
Troubleshooting Steps
When encountering issues with your Zebra label printer, a systematic approach to troubleshooting can help identify and resolve the underlying problems effectively. By following these steps, you can navigate the troubleshooting process with clarity and precision, ultimately restoring the printer to its optimal functionality.
1. Identify the Specific Issue: Begin by pinpointing the exact nature of the problem. Is it related to print quality, connectivity, error messages, or hardware malfunctions? Understanding the specific issue will guide your troubleshooting efforts.
2. Review Error Messages: If the printer displays error messages, take note of the codes or messages shown. These can provide valuable insights into the nature of the issue and serve as a starting point for troubleshooting.
3. Check Connectivity: Ensure that the printer is properly connected to the computer or network. Verify the integrity of the cables and connections, and consider testing the printer on a different computer or network to isolate connectivity-related issues.
4. Inspect Print Quality: If the issue pertains to print quality, examine the labels produced by the printer. Look for signs of fading, streaking, or illegibility, and take note of any specific patterns or areas where the print quality is compromised.
5. Update Printer Drivers: Outdated or incompatible printer drivers can contribute to operational issues. Visit the manufacturer’s website to download and install the latest drivers for your Zebra label printer, ensuring compatibility with your operating system.
6. Perform Test Prints: Initiate test prints to assess the printer’s performance. This can help identify specific patterns or recurring issues, providing valuable diagnostic information for troubleshooting.
7. Reset the Printer: In some cases, a simple reset can resolve transient issues. Power off the printer, wait for a few minutes, and then power it back on to see if the issue persists.
8. Consult User Manual and Support Resources: Refer to the printer’s user manual for troubleshooting guidance specific to your model. Additionally, explore online support resources provided by the manufacturer for comprehensive troubleshooting assistance.
By systematically following these troubleshooting steps, you can methodically address the issues affecting your Zebra label printer. The subsequent sections will delve deeper into specific strategies for cleaning the printer, updating printer drivers, adjusting printer settings, and checking for hardware issues, providing targeted solutions to common problems encountered by users.
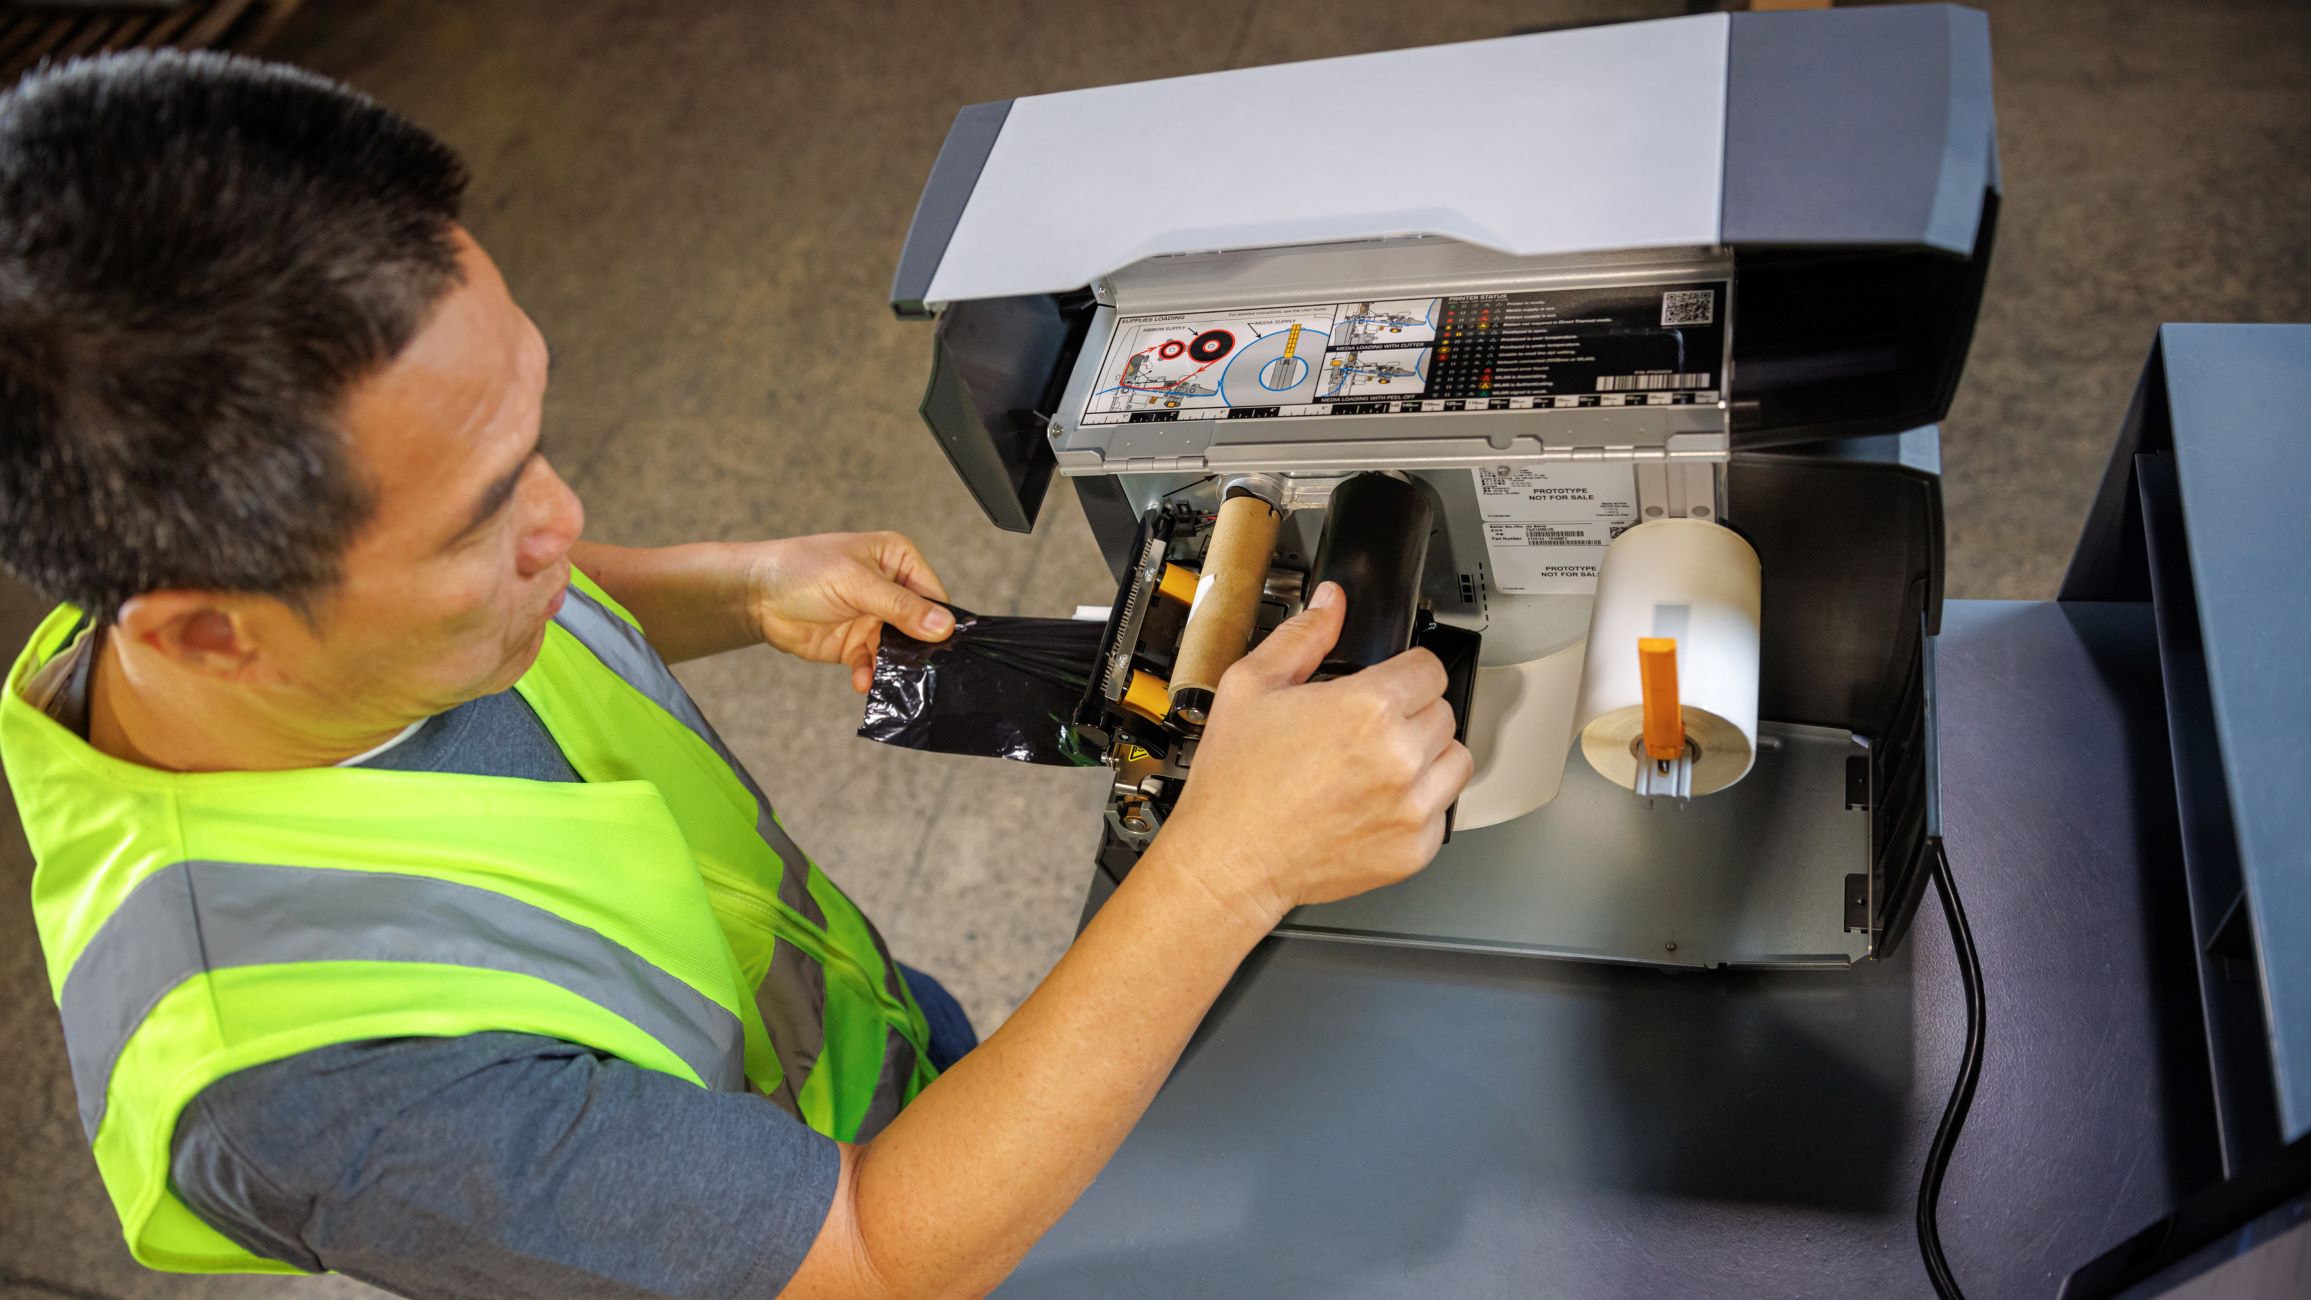
Cleaning the Printer
Maintaining a clean and well-maintained Zebra label printer is essential for ensuring consistent print quality and optimal performance. Over time, dust, debris, and residue can accumulate within the printer, potentially leading to print quality issues and operational disruptions. By incorporating regular cleaning into your maintenance routine, you can mitigate these challenges and prolong the longevity of your printer.
Here are the key steps to effectively clean your Zebra label printer:
- Power Off and Unplug: Before initiating the cleaning process, power off the printer and disconnect it from the power source to ensure safety.
- Use Compressed Air: Utilize compressed air to gently blow away dust and debris from the printer’s exterior, vents, and accessible internal components. This helps prevent the accumulation of particles that can affect print quality and internal mechanisms.
- Clean the Printhead: Carefully clean the printhead using specialized cleaning swabs or lint-free cloths moistened with isopropyl alcohol. Gently wipe the printhead to remove any residue or buildup that may impede its functionality.
- Inspect Label Path and Rollers: Examine the label path and rollers for any adhesive residue, debris, or obstructions. Clean the label path and rollers using approved cleaning solutions and lint-free cloths to ensure smooth label feeding and printing.
- Remove Residue and Debris: Thoroughly inspect the interior of the printer for any residual adhesive, dust, or debris. Use appropriate cleaning tools and solutions to carefully remove any buildup that may affect the printer’s performance.
- Reassemble and Test: Once the cleaning process is complete, reassemble the printer components and perform test prints to verify that the print quality and operational performance have been restored.
By incorporating regular cleaning and maintenance practices, you can uphold the integrity of your Zebra label printer, minimize print quality issues, and optimize its long-term reliability. Additionally, adhering to the manufacturer’s recommended cleaning guidelines and schedules can contribute to the sustained performance and longevity of your printer, ensuring seamless operation within your smart home environment.
Make sure the label roll is loaded correctly and the labels are aligned. Clean the printhead regularly to prevent smudging. Calibrate the printer to ensure accurate printing.
Updating Printer Drivers
Ensuring that your Zebra label printer has the latest and compatible drivers is crucial for optimizing its performance and resolving potential software-related issues. Printer drivers act as the bridge between the printer and your computer’s operating system, facilitating seamless communication and enabling the execution of print jobs with precision. By updating the printer drivers, you can address compatibility issues, enhance functionality, and mitigate common printing challenges.
Here’s a step-by-step guide to updating your Zebra label printer drivers:
- Identify the Current Driver Version: Access the device manager or printer settings on your computer to identify the currently installed printer driver version. Note the driver details for reference.
- Visit the Manufacturer’s Website: Navigate to the official website of Zebra Technologies or the specific support page for your printer model. Locate the “Support” or “Downloads” section.
- Download the Latest Drivers: Search for the latest printer drivers compatible with your operating system. Ensure that you select the appropriate driver version for your specific printer model and operating system.
- Install the Updated Drivers: Once the latest drivers are downloaded, proceed to install them following the manufacturer’s provided instructions. This typically involves running the driver installation package and following the on-screen prompts.
- Restart the Printer and Computer: After installing the updated drivers, restart both the printer and your computer to ensure that the changes take effect.
- Verify Compatibility and Functionality: Test the printer by initiating sample print jobs to verify that the updated drivers have resolved any previous issues and improved the overall functionality.
By proactively updating your Zebra label printer drivers, you can harness the full capabilities of the printer while addressing software-related issues that may have hindered its performance. Additionally, staying informed about driver updates and compatibility considerations is essential for maintaining a seamless printing experience within your smart home environment.
Read more: What Is A Zebra Printer
Adjusting Printer Settings
Optimizing the settings of your Zebra label printer is essential for achieving consistent print quality, efficient operation, and seamless integration within your smart home environment. By adjusting the printer settings to align with your specific labeling requirements and operational preferences, you can enhance the overall printing experience while addressing potential issues related to print quality and performance.
Here are the key considerations and steps for adjusting the printer settings:
- Label Calibration: Ensure that the printer is calibrated to accommodate the specific label dimensions and media type being used. Access the printer’s settings menu or interface to initiate the calibration process, following the manufacturer’s guidelines for precise calibration.
- Print Density and Speed: Adjust the print density and speed settings based on the desired print quality and operational efficiency. Fine-tune these settings to achieve optimal print clarity and speed without compromising on the quality of the printed labels.
- Media Type Selection: Verify that the printer settings reflect the correct media type being utilized, whether it is labels, tags, or other forms of media. Selecting the appropriate media type ensures that the printer applies the optimal printing parameters for the specific media being used.
- Interface and Connectivity Settings: Review and configure the interface and connectivity settings to ensure seamless communication between the printer and your computer or network. Verify that the connectivity parameters align with your network configuration and operational requirements.
- Power Management and Sleep Settings: Adjust the power management and sleep settings to align with your usage patterns and energy-saving preferences. Optimizing these settings can contribute to the efficient operation of the printer while minimizing energy consumption.
- Color and Contrast Adjustments: If applicable to your printer model, consider adjusting color and contrast settings to enhance the visual impact and readability of the printed labels, especially for color-coded or visually distinctive labeling requirements.
By customizing and fine-tuning the printer settings to suit your specific needs, you can optimize the performance and functionality of your Zebra label printer within your smart home environment. Regularly reviewing and adjusting these settings based on evolving requirements and operational feedback can contribute to a seamless and tailored printing experience, aligning the printer’s capabilities with your unique labeling and operational demands.
Checking for Hardware Issues
Thoroughly examining the hardware components of your Zebra label printer is crucial for identifying and resolving potential issues that may impact its performance and operational integrity. By conducting a comprehensive assessment of the printer’s hardware, you can proactively address malfunctions, component wear, and other physical factors that could hinder the printer’s functionality within your smart home environment.
Here are the essential steps for checking for hardware issues and ensuring the optimal condition of your Zebra label printer:
- Visual Inspection: Begin by visually inspecting the exterior and interior of the printer for any signs of physical damage, loose components, or foreign objects that may impede its operation. Pay particular attention to the printhead, label path, rollers, and connectivity ports.
- Printhead Examination: Inspect the printhead for any signs of wear, damage, or residue buildup. Clean the printhead using approved methods and materials to ensure optimal print quality and consistent performance.
- Label Path and Rollers: Evaluate the label path and rollers for any adhesive residue, debris, or misalignment that could affect label feeding and printing. Clean the label path and rollers as needed to maintain smooth operation.
- Connectivity and Cabling: Verify the integrity of the cables and connections, ensuring that they are securely attached and free from damage. Address any loose or damaged cables to maintain reliable connectivity between the printer and your computer or network.
- Printhead Pressure and Alignment: Check the printhead pressure and alignment to ensure proper contact with the labels during printing. Adjust the printhead pressure and alignment settings based on the manufacturer’s recommendations to optimize print quality and consistency.
- Component Functionality: Test the functionality of critical components such as sensors, motors, and control mechanisms to ensure that they operate as intended. Address any anomalies or malfunctions by referring to the manufacturer’s troubleshooting resources.
By systematically checking for hardware issues and addressing potential concerns, you can uphold the operational reliability and longevity of your Zebra label printer. Regular maintenance, inspection, and proactive intervention can contribute to a seamless printing experience within your smart home environment, ensuring that the printer remains a dependable asset for your labeling needs.
Conclusion
As we conclude this comprehensive guide to troubleshooting and optimizing your Zebra label printer within the smart home environment, it is essential to emphasize the significance of proactive maintenance, informed troubleshooting, and tailored adjustments to ensure the seamless operation of this indispensable device. By understanding the common issues, implementing targeted solutions, and adopting best practices for maintenance and optimization, you can harness the full potential of your Zebra label printer while minimizing disruptions and maximizing print quality.
Through a systematic approach to troubleshooting, encompassing steps such as identifying specific issues, updating printer drivers, adjusting printer settings, and conducting thorough hardware inspections, you can address a diverse range of challenges that may affect the printer’s performance. Additionally, integrating regular cleaning and maintenance practices into your routine can contribute to sustained reliability and consistent print quality.
Furthermore, staying informed about the latest developments, firmware updates, and manufacturer recommendations for your specific printer model is essential for maintaining compatibility, functionality, and performance. By actively engaging with support resources and staying attuned to evolving operational requirements, you can adapt the printer’s settings and configurations to align with your unique labeling needs and operational preferences.
As you navigate the dynamic landscape of smart home devices, including the pivotal role of the Zebra label printer in facilitating efficient labeling and operational workflows, embracing a proactive and informed approach to troubleshooting and optimization is key. By implementing the strategies and insights shared in this guide, you can confidently address issues, maintain peak performance, and seamlessly integrate the printer into your smart home environment, unlocking its full potential as a reliable and efficient labeling solution.
Armed with a deeper understanding of troubleshooting methods, maintenance best practices, and optimization strategies, you are empowered to conquer challenges, elevate the printing experience, and ensure that your Zebra label printer remains a steadfast ally in your smart home journey.
Frequently Asked Questions about How To Fix A Zebra Label Printer
Was this page helpful?
At Storables.com, we guarantee accurate and reliable information. Our content, validated by Expert Board Contributors, is crafted following stringent Editorial Policies. We're committed to providing you with well-researched, expert-backed insights for all your informational needs.

0 thoughts on “How To Fix A Zebra Label Printer”