Home>Articles>How To Build A Garden Fence To Keep Animals Out
Articles
How To Build A Garden Fence To Keep Animals Out
Modified: October 20, 2024
Learn how to build a garden fence to keep animals out with our informative articles. Protect your plants and enjoy a pest-free garden.
(Many of the links in this article redirect to a specific reviewed product. Your purchase of these products through affiliate links helps to generate commission for Storables.com, at no extra cost. Learn more)
Introduction
Welcome to our comprehensive guide on how to build a garden fence to keep animals out! If you have a beautiful garden that you’ve put endless hours of work into, the last thing you want is for it to be destroyed by pesky critters. Whether you’re dealing with nibbling rabbits, digging groundhogs, or soaring deer, a well-built garden fence can be your best defense.
In this article, you’ll find a step-by-step guide to help you construct a sturdy and reliable garden fence that will effectively keep unwanted animals out. We’ll go through everything from assessing your garden and identifying potential threats to choosing the right materials for your fence and maintaining it in the long run.
Building a garden fence may seem like a daunting task, especially if you have little to no experience in construction. However, with the right information, tools, and a little patience, you’ll be well-equipped to turn your garden into an animal-free sanctuary.
Before we dive into the nitty-gritty of fence construction, let’s take a moment to understand the importance of assessing your garden and identifying potential threats. By doing so, you’ll be able to tailor your fence design to specifically address the animals that are causing havoc in your garden.
So, grab your notepad and pen, put on your gardening gloves, and let’s get started on building your dream garden fence!
Key Takeaways:
- Building a garden fence to keep animals out involves assessing threats, choosing the right materials, and planning the layout. It’s a fulfilling journey that protects your garden and enhances its aesthetic appeal.
- Maintaining your garden fence is crucial for long-term effectiveness. Regular inspections, repairs, and protective coatings will ensure ongoing protection for your plants and a beautiful, animal-free outdoor space.
Read more: How To Keep Animals Out Of Garden
Step 1: Assessing your garden and identifying potential threats
Before you start building your garden fence, it’s crucial to assess your garden and identify the specific animals that are causing damage. Different animals have different behaviors, and understanding their habits will help you design a fence that effectively deters them.
Start by observing your garden during different times of the day. Look for signs of animal activity such as chewed leaves, dug-up soil, or trampled plants. This will give you an idea of the types of animals you need to protect your garden from.
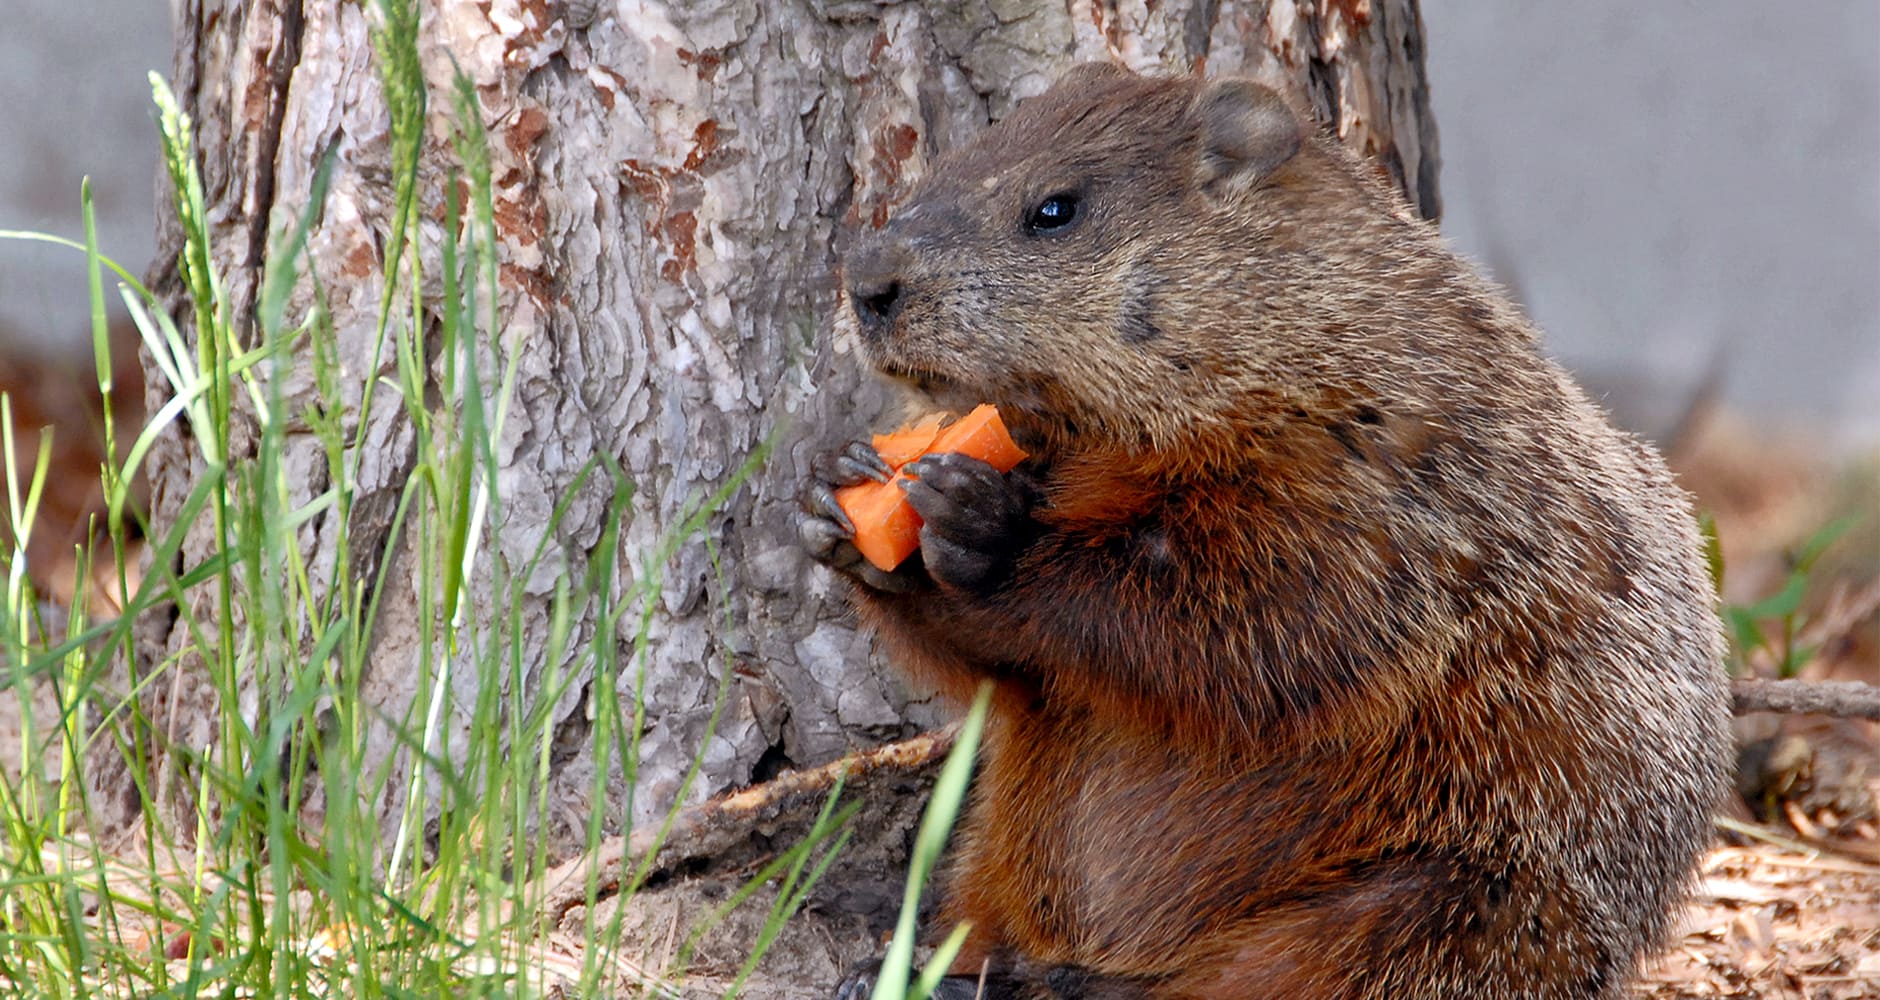
Some common garden intruders include rabbits, deer, squirrels, groundhogs, and even birds. Each of these animals has particular behaviors and preferences, so it’s important to gather information about their habits.
If you’re unsure about the specific animals causing damage, you can set up motion-activated cameras or talk to local gardeners or wildlife experts in your area. They can provide insights into the most common garden pests and the best ways to deter them.
Once you have identified the animals, take note of their typical entry points into your garden. Are they climbing over a low fence, burrowing under a gap, or simply walking through an open gate?
Understanding the entry points will help you determine the height and strength of your garden fence, as well as any additional deterrents you may need to incorporate.
Keep in mind that some animals, like deer, are excellent jumpers. They can easily clear a low fence. In this case, you may need to consider a taller fence or other methods such as installing netting or spiky deterrents on top of the fence.
By thoroughly assessing your garden and identifying the potential threats, you’ll be well-prepared to design a garden fence that specifically addresses the needs of your garden and keeps unwanted animals at bay.
Step 2: Choosing the right materials for your garden fence
Now that you’ve assessed your garden and identified the potential threats, it’s time to choose the right materials for your garden fence. The materials you select will depend on various factors including your budget, the aesthetic appeal you desire, and the level of security you need.
Here are a few popular options for garden fence materials:
- Wood: Wood is a classic and versatile choice for garden fences. It offers a natural and rustic look that can blend seamlessly with your garden landscape. Popular wood options include cedar, redwood, and pressure-treated pine. Make sure to choose a durable wood species that can withstand the elements and resist decay.
- Chain Link: Chain link fences are known for their durability and affordability. They consist of a woven steel wire mesh that provides a strong barrier against intruders. While chain link fences may not offer as much visual appeal as other materials, you can enhance their appearance by attaching vines or decorative elements.
- Vinyl: Vinyl fences are low-maintenance and come in a variety of styles and colors. They have a sleek and modern look that can complement both traditional and contemporary garden designs. Vinyl fences are resistant to rot, decay, and fading, making them a long-lasting option.
- Wrought Iron: If you’re looking for an elegant and sophisticated garden fence, wrought iron is a great choice. It is known for its strength and durability. Wrought iron fences often feature intricate designs and can add a touch of timeless elegance to your garden.
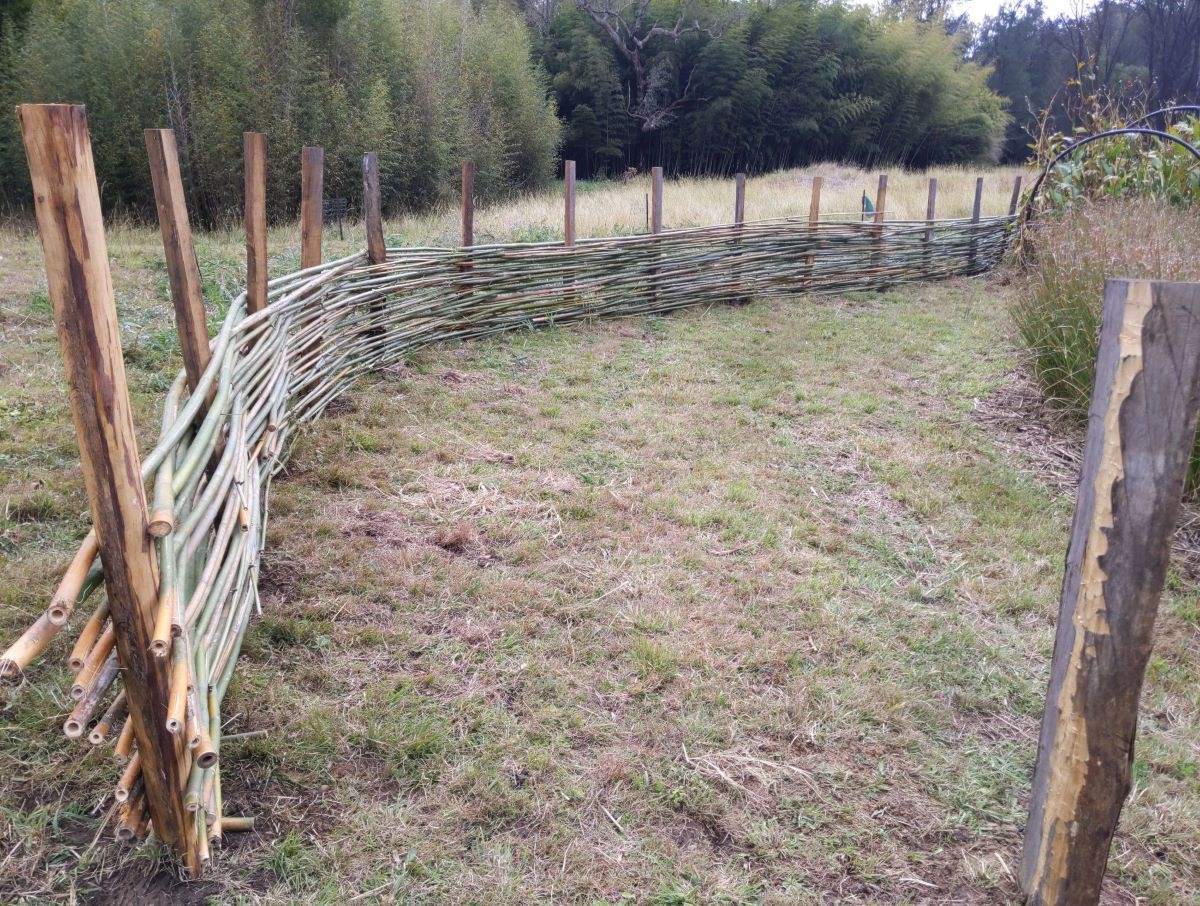
- Bamboo: Bamboo fences are eco-friendly and provide a natural, tropical look to your garden. They are lightweight, easy to install, and resistant to pests and decay. Bamboo fences can be an excellent option if you’re going for a Zen or Asian-inspired garden design.
Consider your specific needs, budget, and personal preferences when choosing the materials for your garden fence. It’s also essential to check local building codes and regulations to ensure you comply with any restrictions regarding fence materials and heights.
Remember, the materials you choose will impact not only the appearance of your garden fence but also its functionality and longevity. So, take your time to select the right materials that will best suit your garden needs and provide the necessary protection against animal intruders.
Step 3: Planning the layout and dimensions of your garden fence
Before you start building your garden fence, it’s essential to carefully plan the layout and dimensions to ensure that it effectively encloses your garden and keeps animals out. Consider the following key factors when planning your fence:
- Garden Size: Measure the perimeter of your garden to determine the length of fencing you’ll need. Take into account any irregularities or corners in the layout. It’s a good idea to add a little extra length to account for any errors or adjustments during installation.
- Fence Height: The height of your fence will depend on the type of animals you’re trying to deter. For small animals like rabbits, a fence height of 2 to 3 feet may be sufficient. However, for larger animals like deer, a taller fence of 6 to 8 feet may be necessary. Make sure to check local regulations regarding fence heights before finalizing your decision.
- Spacing Between Fence Posts: Determine the spacing between your fence posts based on the material you’re using and the desired level of stability. For wooden fences, a spacing of 6 to 8 feet is common. If you’re using vinyl or chain link, check the manufacturer’s recommendations for post spacing.
- Gate Placement: Decide where you’ll place gates for easy access to your garden. Consider the size and type of gates you’ll need to accommodate wheelbarrows, lawnmowers, and any other garden equipment. It’s advisable to have at least one gate large enough for you to walk through comfortably.
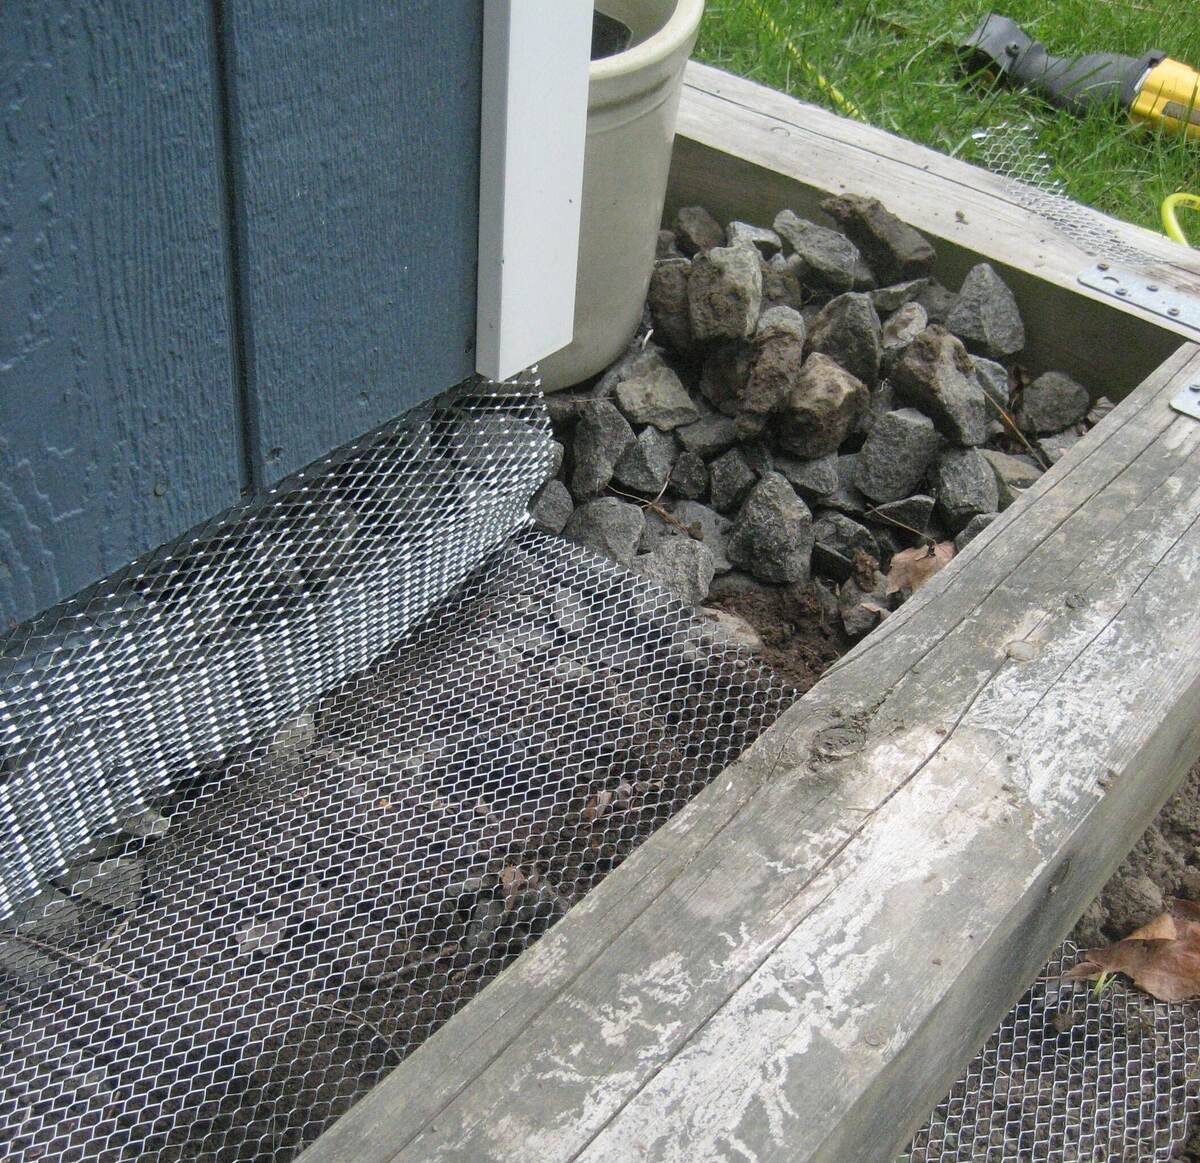
- Additional Deterrents: If you’re dealing with agile animals or specific threats, such as burrowing rodents, consider incorporating additional deterrents into your fence design. This may include burying the bottom of the fence a few inches underground or adding mesh netting to prevent animals from squeezing through.
Once you have a clear plan for the layout and dimensions of your garden fence, you can mark out the perimeter using stakes and string or spray paint. This will give you a visual representation of how your fence will look and help you make any necessary adjustments before starting the construction process.
Remember, careful planning is key to ensuring that your garden fence effectively serves its purpose. Take the time to evaluate your garden’s needs and design a fence that best suits your requirements and style preferences.
Step 4: Preparing the ground for fence installation
Before you begin installing your garden fence, it’s important to properly prepare the ground to ensure a stable and long-lasting foundation. Follow these steps to ensure a smooth installation process:
- Clear the area: Remove any rocks, debris, or vegetation that could obstruct the fence installation. Clearing the area will provide a clean surface and prevent any interference with the fence posts.
- Mark the post locations: Use stakes and string to mark the exact locations where your fence posts will be installed. Space the posts evenly according to the spacing determined in the planning stage.
- Dig the post holes: Using a post hole digger or a shovel, start digging the post holes according to the depth and width required for your fence posts. The depth should be based on the frost line in your area, usually around 2 feet deep. The width should be wider than the diameter of the post and allow space for concrete or gravel for stability.
- Add gravel or concrete: To ensure stability, it’s recommended to add either gravel or concrete to the bottom of each post hole. Gravel provides drainage, while concrete offers a solid foundation. Follow the instructions on the bag to mix and pour the concrete correctly, or simply fill the post hole with gravel.
- Set the fence posts: Carefully place each fence post into its respective hole, ensuring they are straight and level. Use a post level to double-check. If you’re using concrete, allow it to dry and cure completely before moving on to the next step.
Preparing the ground properly is crucial to the stability and overall success of your garden fence. By clearing the area, marking the post locations, digging the post holes, and adding gravel or concrete, you’ll create a solid foundation for your fence posts.
Take your time to ensure that each post is set correctly and securely. This will not only contribute to the longevity of your fence but also provide a strong barrier against any potential intruders.
Step 5: Building the fence framework
With your fence posts securely set in the ground, it’s time to move on to building the framework of your garden fence. This step involves attaching horizontal rails or braces to connect the fence posts and create a sturdy structure.
- Measure and cut the rails: Measure the distance between each pair of fence posts and cut the horizontal rails to the appropriate length. Ensure that the rails are long enough to securely overlap the fence posts but not too long that they extend beyond the desired fence height.
- Attach the rails to the posts: Starting at one end of the fence, use nails, screws, or brackets to attach the rails to the fence posts. Place the rails horizontally and evenly spaced between the posts. Use a level to ensure that the rails are straight and level.
- Secure the rails: Once the rails are attached, use additional nails, screws, or brackets to secure them firmly in place. Make sure they are snug against the fence posts and won’t easily come loose.
- Repeat for multiple layers: If you’re planning to have a fence with multiple layers, repeat the measurement, cutting, and attachment process for each layer. Ensure that each layer is properly aligned and securely fastened to the fence posts.
Building the framework of your fence is an essential step in creating a strong and stable structure. By correctly measuring and cutting the rails, attaching them securely to the fence posts, and repeating the process for multiple layers if necessary, you’ll ensure that your fence framework is well-built and capable of withstanding any potential challenges.
Next, we’ll move on to the installation of the fence posts, which will play a crucial role in the overall stability and durability of your garden fence.
When building a garden fence to keep animals out, make sure to bury the bottom of the fence at least 12 inches underground to prevent animals from digging underneath.
Step 6: Installing the fence posts
Now that you’ve built the framework for your garden fence, it’s time to move on to installing the fence posts. The fence posts are the vertical supports that anchor the fence and provide structural integrity.
- Align the first post: Start by aligning the first fence post with the marked post location. Ensure that it is perfectly plumb (vertically straight) and level (horizontally even). You can use a level to verify its alignment.
- Secure the first post: Once aligned, brace the post in place using temporary stakes or supports. This will keep it steady while you continue the installation process.
- Align and install the remaining posts: Move along the fence line, aligning each fence post with its designated location. Check for plumb and level at each step. Use temporary bracing to hold each post in place as you move forward.
- Backfill the post holes: With all the posts in place, backfill the post holes with soil, firmly packing it around the posts. This will provide stability and support for the fence structure.
- Secure the posts: Once the post holes are backfilled and the posts are secure, reinforce the connection between the posts and rails using nails, screws, or brackets. This will further strengthen the overall fence structure.
Properly installing the fence posts is crucial for the stability and durability of your garden fence. Take the time to ensure that each post is aligned, plumb, and secure before moving on to the next one.
By following these steps and achieving a strong foundation with securely installed fence posts, you’re well on your way to creating a reliable and long-lasting garden fence. Next, we’ll cover the process of attaching the fence panels to complete your fence construction.
Step 7: Attaching the fence panels
With the fence posts securely in place, it’s time to attach the fence panels to complete the construction of your garden fence. The fence panels are the vertical elements that provide the actual barrier and privacy for your garden.
- Measure and cut the fence panels: Measure the distance between each pair of fence posts to determine the length needed for the fence panels. Use a saw or appropriate cutting tool to trim the panels to the correct size.
- Align the first fence panel: Begin at one end of the fence and align the first panel with the bottom rail of the fence framework. Ensure that it is level and fits snugly between the fence posts.
- Secure the first fence panel: Use nails, screws, or brackets to attach the first panel to the fence posts. Place the fasteners evenly across the panel, ensuring a secure and stable connection.
- Attach the remaining fence panels: Move along the fence line, attaching each fence panel to the fence posts with the chosen fasteners. Make sure to check the alignment and levelness of each panel before securing it.
- Overlap or connect panels: If necessary, overlap the edges of adjacent fence panels to ensure a continuous and seamless look. Connect the panels using appropriate connectors or fasteners to create a uniform appearance.
Attaching the fence panels is a crucial step in completing your garden fence construction. Take care to align each panel correctly, ensuring that they are level and securely attached to the fence posts.
Remember to consider any design preferences or requirements for your fence panels, such as spacing for visibility or decorative elements. Taking the time to properly attach each panel will result in a well-built garden fence that not only provides security but also enhances the aesthetic appeal of your garden.
Now that the fence panels are in place, we’ll move on to step 8, which involves adding additional deterrents to keep animals out of your garden.
Step 8: Adding additional deterrents to keep animals out
While a well-constructed fence can serve as a primary barrier for keeping animals out of your garden, adding additional deterrents can further enhance its effectiveness. Different animals may require specific measures to prevent them from accessing your garden.
- Netting or mesh: To prevent birds and smaller animals from entering your garden, consider installing netting or mesh along the top of your fence. This will create an additional layer of protection and prevent animals from flying or climbing over the fence.
- Electric fencing: For larger animals such as deer or raccoons, electric fencing can be an effective deterrent. It delivers a mild electric shock when touched, discouraging animals from attempting to breach the fence. However, be sure to follow local regulations and safety guidelines when installing electric fencing.
- Scare devices: Scare devices like motion-activated sprinklers, noise-making devices, or reflective materials can help deter animals from approaching your garden. They work by surprising and scaring off animals that come too close, creating a sense of fear or discomfort.
- Plant deterrents: Certain plants have natural repellent properties that can deter animals. Consider planting herbs like lavender, rosemary, and mint, as well as flowers like marigolds or alliums, which animals may find unappealing. Additionally, various homemade or store-bought animal repellents can be applied to your garden plants to discourage animals from eating them.
- Barriers and traps: In some cases, physical barriers like low fences or mesh cages can be placed around specific plants that are particularly attractive to animals. Additionally, traps can be used to capture and relocate smaller animals that become persistent garden intruders.
When selecting additional deterrents, consider the specific animals that are causing trouble in your garden and their behaviors. What works for deterring deer may not be as effective for rabbits or groundhogs. Use a combination of techniques to create a comprehensive approach tailored to the specific threats you face.
Keep in mind that some animal deterrents, such as electric fencing or trapping, may have legal restrictions or ethical considerations. Research and adhere to the regulations and guidelines in your area to ensure that you are using appropriate and humane methods.
By adding additional deterrents to your garden fence, you can significantly reduce the chances of animals accessing and damaging your plants, ensuring a safer and more protected garden environment.
Next, we’ll cover step 9, the importance of maintaining your garden fence for long-term effectiveness.
Read more: How High A Fence To Keep Rabbits Out
Step 9: Maintaining your garden fence
Once your garden fence is installed and your plants are protected, it’s important to maintain your fence to ensure its long-term effectiveness. Regular maintenance will help prolong the life of your fence and keep it in optimal condition. Here are a few key maintenance tasks to consider:
- Inspect for damage: Regularly inspect your fence for any signs of damage, such as loose boards, broken panels, or rusted hardware. Addressing these issues promptly will help prevent further damage and maintain the structural integrity of your fence.
- Repair or replace damaged components: If you do notice any damage, make the necessary repairs or replacements. This may involve reattaching loose boards, replacing broken panels, or tightening screws and nails. Use the appropriate tools and materials to ensure a secure and sturdy fence.
- Trim vegetation around the fence: Over time, plants and vines might grow and start intertwining with your fence. Regularly trim away any vegetation that is in direct contact with the fence, as it can cause moisture buildup, rotting, or even damage. Trimming also prevents animals from using the plants as a pathway over or through the fence.
- Apply protective coatings: If you have a wooden fence, consider applying protective coatings such as paint, stain, or sealant to protect it from moisture, UV rays, and insects. Follow the manufacturer’s instructions for proper application and reapplication intervals.
- Check and strengthen fence attachments: Periodically check the attachments between the fence panels, rails, and posts. Tighten any loose hardware, such as screws, bolts, or brackets, to ensure a secure connection. This will prevent panels from coming loose and compromising the integrity of your fence.
- Address soil erosion: If you notice any areas where soil erosion has occurred near the fence, take steps to address it. Erosion can undermine the stability of your fence posts over time. Consider using erosion control methods such as adding gravel, mulch, or retaining walls to prevent further erosion.
Regular maintenance of your garden fence will help extend its lifespan and ensure ongoing protection for your plants. By inspecting for damage, making timely repairs, trimming vegetation, applying protective coatings, checking attachments, and addressing soil erosion, you’ll keep your fence in optimal condition and maintain its functionality.
Remember to keep an eye on your fence throughout the year and perform maintenance tasks as needed. Routine maintenance will not only keep unwanted animals out of your garden but also enhance the overall aesthetic appeal of your outdoor space.
Congratulations! You have successfully completed all the steps to build and maintain a garden fence to keep animals out. With your well-constructed fence, you can now enjoy your beautiful garden without the worry of pesky critters wreaking havoc on your plants.
Conclusion
Congratulations on completing the journey of building a garden fence to keep animals out! You’ve learned the key steps necessary to create a sturdy and effective barrier for protecting your precious plants. By assessing your garden, choosing the right materials, planning the layout, preparing the ground, building the framework, installing the fence posts, attaching the fence panels, adding additional deterrents, and maintaining your fence, you’ve equipped yourself with the knowledge and skills to create a safer and more secure garden environment.
A well-built garden fence not only provides protection against unwanted animal intruders but also adds a touch of charm and aesthetic appeal to your outdoor space. It allows you to enjoy the fruits of your labor without the frustration of constant damage and destruction.
Remember, when assessing your garden, identify the specific animals causing trouble and design your fence accordingly. Choose materials that suit your budget and style preferences, ensuring durability and longevity. Plan the layout and dimensions of your fence to enclose your garden effectively. Prepare the ground and install fence posts securely, providing a solid foundation. Build the framework and attach fence panels, creating a strong and attractive barrier. Consider adding additional deterrents tailored to the specific animals you’re dealing with. And, of course, don’t forget to maintain your fence regularly to ensure its ongoing effectiveness.
Your garden fence is more than just a physical barrier; it’s an investment in the protection of your garden, the preservation of your hard work, and the enjoyment of a peaceful and thriving outdoor space. So, take pride in your accomplishment and revel in the beauty and tranquility of your garden, free from the interruptions of unwanted animal visitors.
Now that you have the tools and knowledge to build a garden fence, it’s time to put them into action. Gather your materials, get your hands dirty, and embark on the fulfilling journey of constructing a garden fence that will safeguard your plants and elevate your gardening experience.
Happy gardening and may your newly built fence bring you years of joy, security, and flourishing garden beds!
Now that you've mastered building a garden fence to safeguard your green space, why not tackle other pests that might lurk closer to home? For instance, pantry moths can turn your kitchen into a nightmare without warning. Our expert guide on effective pest control strategies will show you secure methods to rid your pantry of these unwelcome guests. Keep your home safe and serene by learning more today!
Frequently Asked Questions about How To Build A Garden Fence To Keep Animals Out
Was this page helpful?
At Storables.com, we guarantee accurate and reliable information. Our content, validated by Expert Board Contributors, is crafted following stringent Editorial Policies. We're committed to providing you with well-researched, expert-backed insights for all your informational needs.


0 thoughts on “How To Build A Garden Fence To Keep Animals Out”