Articles
How To Build A Wattle Fence
Modified: December 7, 2023
Learn how to build a durable and sustainable wattle fence with our informative articles. Discover expert tips and techniques for creating a beautiful and functional fence for your garden or property.
(Many of the links in this article redirect to a specific reviewed product. Your purchase of these products through affiliate links helps to generate commission for Storables.com, at no extra cost. Learn more)
Introduction
Welcome to the world of wattle fencing! If you’re looking for a natural and rustic way to define your outdoor space, wattle fencing is an excellent option. This traditional method of fence construction has been used for centuries and continues to be valued for its simplicity and charm. In this article, we will guide you through the process of building your own wattle fence, from choosing the right location to adding those finishing touches.
Wattle fencing is a type of fence made from woven wooden stakes and flexible branches or saplings. It is a sustainable and eco-friendly way to fence off an area, as it uses natural materials that can be easily sourced. The result is a visually appealing fence that blends seamlessly into its surroundings, adding both beauty and functionality to your property.
Not only does wattle fencing offer privacy and security, but it also provides a habitat for small animals and birds. The intertwining branches create a barrier while still allowing light and air to pass through, making it a versatile option for various outdoor settings.
Building a wattle fence requires some basic woodworking skills and a bit of patience. It is a labor-intensive process, but the end result is well worth the effort. So, gather your tools and get ready to embark on this exciting journey of creating your own wattle fence.
In the following sections, we will walk you through the step-by-step process of building a wattle fence. Before we delve into the details, let’s first gather the materials you’ll need for this project.
Key Takeaways:
- Embrace the natural beauty and sustainability of wattle fencing to create a visually appealing, eco-friendly, and functional fence that adds charm and character to your outdoor space.
- Building a wattle fence is a labor-intensive yet rewarding endeavor that allows you to unleash your creativity, showcase woodworking skills, and enjoy the sense of accomplishment that comes with a handmade, unique, and durable fence.
Read more: How To Build A Brick Fence
Materials Needed
Before you begin building your wattle fence, it’s important to gather all the necessary materials. Here’s a list of what you’ll need:
- Wooden stakes – These will serve as the upright posts of your fence. Choose stakes that are sturdy and long enough to sink securely into the ground.
- Flexible branches or saplings – These will be used to weave between the stakes, creating the horizontal and vertical components of the fence. Look for branches or saplings that are pliable and easy to work with.
- Pruning shears or a small saw – You’ll need these tools to trim the branches or saplings to the desired length.
- Measuring tape or ruler – This will come in handy for ensuring consistent spacing between the upright stakes.
- Hammer or mallet – You’ll use this to drive the wooden stakes into the ground.
- Twine or wire – This will be used to secure the branches or saplings to the posts while you weave them together.
- Gloves – Protect your hands from splinters and scratches by wearing a sturdy pair of gloves throughout the construction process.
- Safety goggles – It’s important to protect your eyes when working with sharp tools or pruning branches.
These are the basic materials you’ll need to get started with your wattle fence project. Depending on the size and design of your fence, you may require additional materials such as stakes for reinforcing corners or extra twine for securing the branches more securely.
Now that you have all the necessary materials, let’s move on to the next step: choosing the right location for your wattle fence.
Step 1: Choosing the Location
Choosing the right location for your wattle fence is crucial to its success and long-term durability. Here are some factors to consider when selecting the location:
- Property boundaries: Determine where your property boundaries are and ensure that your fence is built within those limits.
- Functionality: Consider the purpose of your fence. Are you looking to create privacy, delineate a specific area, or simply add aesthetic appeal? This will help determine the dimensions and design of your fence.
- Land contours: Take note of any slopes or uneven terrain in the area where you plan to build your fence. Adjustments may need to be made to accommodate the natural contours of the land.
- Sun exposure: Think about how much sunlight the area receives throughout the day. If you’re planning to grow plants or create a garden near the fence, ensure that it gets adequate sunlight.
- Wind direction: Consider the prevailing wind direction in your area. If your location is prone to strong winds, you may want to position the fence in a way that provides some protection.
- Neighboring structures: Take into account neighboring buildings, trees, or structures that may impact the location or design of your fence. Ensure that there is enough space between the fence and these structures.
- Aesthetics: Finally, consider how the wattle fence will complement the overall aesthetic of your property. Choose a location that enhances the beauty of the surrounding landscape.
Once you have taken these factors into consideration, mark out the boundaries of your fence using stakes and string. This will give you a visual representation of the fence’s position and allow you to make any necessary adjustments.
With the location chosen and marked out, you’re now ready to move on to the next step: gathering the materials for your wattle fence.
Step 2: Gathering the Materials
Now that you have chosen the location for your wattle fence, it’s time to gather all the materials you’ll need for the construction. Here is a step-by-step guide to help you gather the necessary materials:
- Wooden Stakes: Begin by selecting the wooden stakes for your fence. Look for stakes that are sturdy, straight, and long enough to sink securely into the ground. You can use materials such as wooden dowels, bamboo, or even branches from fallen trees.
- Flexible Branches or Saplings: Next, find branches or saplings that are flexible and easy to work with. Ideally, these should be fresh or green wood to ensure pliability. Look for materials such as willow, hazel, or any other type of flexible wood that is readily available in your area.
- Pruning Shears or Small Saw: Prepare your pruning shears or small saw to trim the branches or saplings to the desired length. This will facilitate the weaving process and make it easier to create a neat and cohesive fence.
- Measuring Tape or Ruler: Use a measuring tape or ruler to ensure consistent spacing between the upright stakes. This will help maintain an even and aesthetically pleasing design for your wattle fence.
- Hammer or Mallet: You’ll need a hammer or mallet to drive the wooden stakes into the ground. This will ensure that the fence remains stable and secure once constructed.
- Twine or Wire: Prepare twine or wire to secure the branches or saplings to the posts as you weave them together. This will help keep the fence structure intact and prevent any loose ends.
- Gloves: It’s important to protect your hands from splinters and scratches throughout the construction process. Wear a sturdy pair of gloves to keep your hands safe.
- Safety Goggles: Lastly, don’t forget to wear safety goggles to protect your eyes from any flying wood chips or debris while working with the branches and saplings.
Once you have gathered all of these materials, you are ready to move on to the next step: preparing the posts for your wattle fence.
Step 3: Preparing the Posts
With the materials gathered, it’s time to prepare the posts for your wattle fence. The posts will serve as the upright supports that hold the fence together. Here’s how to prepare the posts:
- Trim the posts: Start by trimming the wooden stakes to the desired height. It’s recommended to have them at least 2-3 feet above ground level to provide stability and support for the wattle fence.
- Sharpen the ends: Use a saw or a sharp knife to create a point at the bottom end of each stake. This will make it easier to drive them into the ground.
- Remove any rough edges or splinters: Check the posts for any rough edges or splinters that could cause injury or damage to the branches. Sand down any rough areas and ensure the posts are smooth.
- Apply preservative (optional): If desired, you can apply a wood preservative to the posts to protect them from weathering and decay. Follow the instructions on the preservative product for application guidelines.
Once the posts are trimmed, sharpened, and prepared, you’re ready to move on to the next step: setting the posts in the ground.
Note: If you prefer a less traditional approach, you can also use pre-made fence posts or recycled materials for your wattle fence. Just make sure they are strong and sturdy enough to support the weight of the woven branches.
When building a wattle fence, make sure to use flexible and durable materials such as willow or hazel branches, and weave them tightly for a strong and long-lasting structure.
Read more: How To Build An Electric Fence
Step 4: Setting the Posts
Now that you have prepared the posts for your wattle fence, it’s time to set them in the ground. Setting the posts securely will provide the foundation for your fence and ensure its stability. Here’s how to set the posts:
- Measure the spacing: Start by measuring the desired spacing between each post. This will depend on your preferred design and the length of your branches or saplings. Typically, spacing between 1.5 to 2 feet apart works well.
- Mark the locations: Use a measuring tape or ruler to mark the exact positions where the posts will be placed. You can use a small stake or spray paint to clearly mark these spots.
- Start with the first post: Begin by inserting the first post into the ground at the marked location. Use a hammer or mallet to drive the post firmly into the soil, ensuring it is stable and straight.
- Continue with the other posts: Repeat the process for the remaining posts, ensuring consistent spacing between them. Use a level or straightedge to ensure that the posts are vertically aligned.
- Check for stability: Once all the posts are in place, give them a gentle shake to check for stability. If any posts feel loose, adjust and compact the soil around them to provide better support.
- Double-check the alignment: Take a step back and visually inspect the alignment of the posts. Make any necessary adjustments to ensure that they are straight and aligned before proceeding to the next step.
With the posts securely set in the ground, you have created the framework for your wattle fence. Now, it’s time to move on to the next step: adding the horizontal branches.
Note: If you prefer a more temporary or portable fence, you can use pots or containers filled with soil to hold the posts in place. This can be useful for areas where you may need to move or adjust the fence in the future.
Step 5: Adding the Horizontals
Now that the posts are securely in place, it’s time to add the horizontal branches to your wattle fence. These branches will provide the framework for weaving the vertical elements. Follow these steps to add the horizontals:
- Select the horizontal branches: Choose branches or saplings that are flexible and long enough to span between the posts. Ideally, the branches should be slightly thicker than the vertical branches to provide stability.
- Place the first horizontal branch: Start by laying the first horizontal branch across the top of the first two posts. Ensure that it is centered and evenly aligned.
- Secure the branch: Use twine or wire to secure the horizontal branch to the posts. Wrap the twine around the branch and tie it tightly to the posts, ensuring that it is firmly held in place.
- Add more horizontal branches: Continue adding horizontal branches, spacing them evenly between the posts. Aim for a consistent height and alignment to create a visually pleasing and sturdy fence structure.
- Secure all the branches: Once all the horizontal branches are in place, go back and double-check the security of each branch. Ensure that they are tightly secured to the posts and held firmly in position.
It’s important to note that the spacing of the horizontal branches can vary depending on your desired design and level of privacy. You can have them placed closer together for a denser fence or further apart for a more open and airy look.
With the horizontal branches securely in place, you’re ready to move on to the next step: weaving the vertical branches through the fence.
Note: As an alternative, you can also pre-drill holes in the posts and insert the horizontal branches into the holes for added stability and a neat appearance.
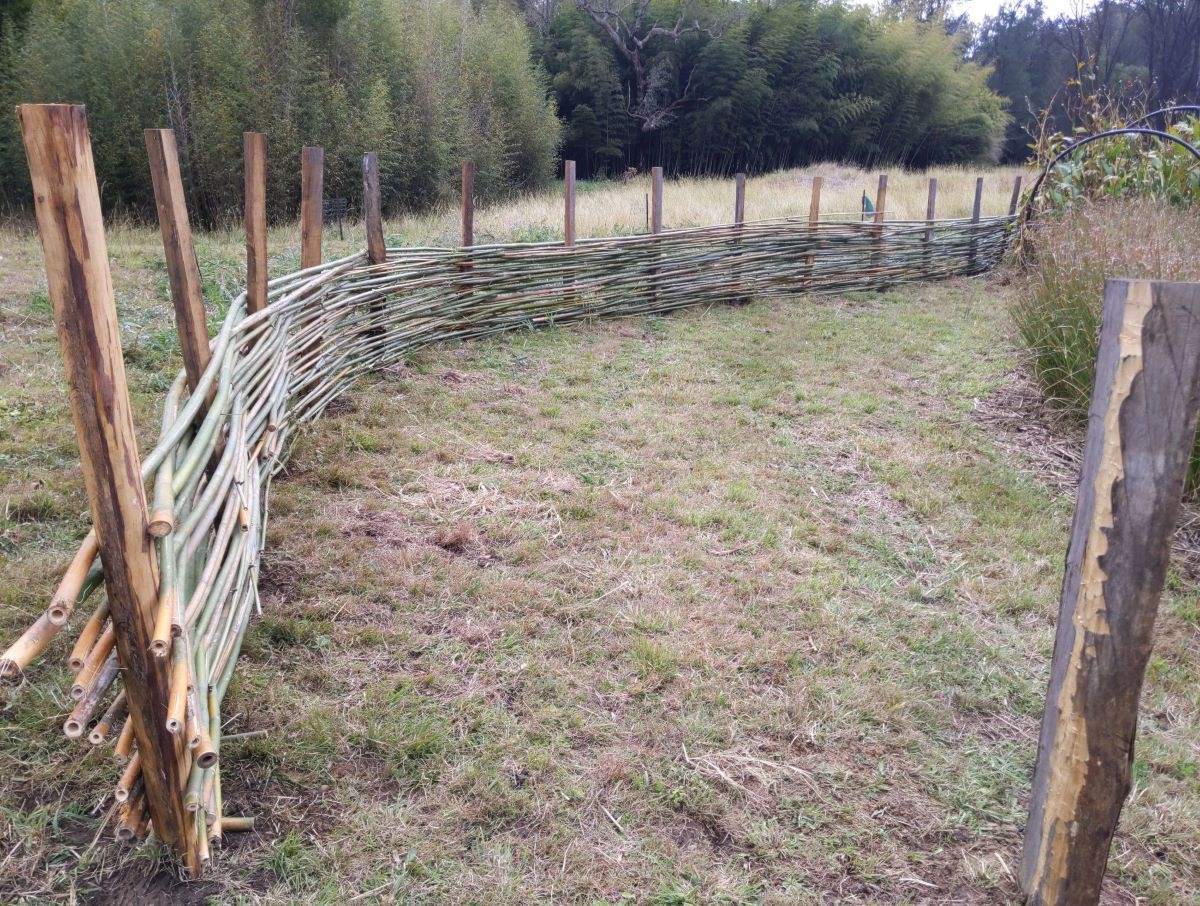
Step 6: Weaving the Verticals
With the horizontal branches securely in place, it’s time to weave the vertical branches through the fence structure. This step will add the intricate and decorative pattern to your wattle fence. Follow these steps to weave the verticals:
- Select the vertical branches: Choose flexible branches or saplings that are long enough to reach from the top to the bottom of the fence. These branches will be woven between the horizontal branches.
- Start at the bottom: Begin weaving the first vertical branch at the bottom of the fence. Insert the branch under the first two horizontal branches, then over the third, under the fourth, and so on, creating a weaving pattern.
- Weave through: Continue weaving the vertical branches, alternating the over and under pattern, until you reach the top of the fence. Push the branches close together as you weave to create a tight and cohesive structure.
- Secure the ends: Once you reach the top of the fence, secure the ends of the vertical branches by tucking them under the top horizontal branch or using twine or wire to fasten them to the posts.
- Repeat the process: Repeat the weaving process for each section of the fence, working your way from bottom to top. Ensure that the weaving pattern remains consistent and evenly spaced.
- Trim any excess: Once all the vertical branches are woven through, trim any excess branches that stick out beyond the top or bottom of the fence. This will give your wattle fence a clean and finished look.
As you weave the branches, you can choose to create different patterns or designs to add visual interest and creativity to your fence. Feel free to experiment with different weaving techniques to achieve the desired aesthetic effect.
With the vertical branches woven through and securely in place, your wattle fence is almost complete. Let’s move on to the final step: adding the finishing touches.
Step 7: Finishing Touches
Congratulations! You’re in the final step of building your wattle fence. This step involves adding some finishing touches to enhance the overall look and durability of your fence. Here’s what you need to do:
- Check for stability: Take a moment to inspect the entire fence structure for stability. Ensure that all the branches are securely woven and fastened in place. Make any necessary adjustments or reinforcements to ensure the fence is solid.
- Trim any protruding branches: Carefully trim any branches that are sticking out beyond the desired shape of the fence. Use pruning shears or a small saw to remove any excess branches that may hinder the appearance or functionality.
- Apply a protective finish (optional): If desired, you can apply a protective finish to your wattle fence. This can help prolong its lifespan and enhance its resistance to weathering. Consider using a natural wood preservative or exterior sealant to protect the branches from moisture and UV damage.
- Add decorative elements (optional): If you wish to add some visual interest or personalize your fence, consider incorporating decorative elements. These can include hanging baskets, climbing plants, or even outdoor lights that can be attached to the wattle fence.
- Maintain your wattle fence: Regularly inspect your wattle fence for any signs of damage or wear. Make any necessary repairs promptly to ensure its longevity. Additionally, periodically check for any invasive plants or unwanted growth that may affect the structure of your fence.
By following these steps and adding the finishing touches, you have successfully built your own wattle fence. Take a step back and admire your handiwork, as you have created a unique and beautiful addition to your outdoor space.
Remember that wattle fencing is a natural and sustainable option, so it will require some maintenance over time. Proper care and upkeep will help ensure that your fence remains sturdy and attractive for years to come.
Enjoy the beauty of your wattle fence and the sense of accomplishment that comes with building it yourself. Now you can sit back, relax, and take pleasure in the privacy and charm that your wattle fence provides.
Thank you for joining us on this journey of building a wattle fence. We hope you found this guide helpful and inspiring. Happy fencing!
Read more: How To Build Deer Fence
Conclusion
Building a wattle fence is an exciting and rewarding project that adds a touch of natural beauty to your outdoor space. Throughout this article, we have covered the step-by-step process of creating your own wattle fence, from choosing the location to adding the finishing touches.
By utilizing materials like wooden stakes and flexible branches, you can create a sustainable and eco-friendly fence that seamlessly blends into its surroundings. Wattle fencing not only offers privacy and security but also provides a habitat for wildlife and adds an aesthetic appeal to your property.
Throughout the process, it is important to consider the functionality, aesthetics, and natural factors of your chosen location. Gathering the necessary materials, preparing the posts, setting them securely in the ground, and adding the horizontal and vertical branches require patience and attention to detail. By weaving the branches together in a consistent and visually pleasing pattern, you create a unique and charming fence that will be the envy of your neighbors.
Remember to take care of your wattle fence by monitoring its stability, trimming any excess branches, and considering applying a protective finish if desired. Routine maintenance and upkeep will help ensure the longevity of your fence and preserve its natural beauty for years to come.
Building a wattle fence is not just a practical endeavor but an opportunity to unleash your creativity and showcase your woodworking skills. The sense of accomplishment and the joy of having a handmade fence that adds value and character to your property is truly special.
We hope that this comprehensive guide has provided you with the knowledge and inspiration to build your own wattle fence. Embrace the traditional craftsmanship and enjoy the benefits of this rustic and eco-friendly fencing option. So gather your materials, roll up your sleeves, and let your imagination flow as you embark on this fulfilling journey of building your own wattle fence.
Frequently Asked Questions about How To Build A Wattle Fence
Was this page helpful?
At Storables.com, we guarantee accurate and reliable information. Our content, validated by Expert Board Contributors, is crafted following stringent Editorial Policies. We're committed to providing you with well-researched, expert-backed insights for all your informational needs.


0 thoughts on “How To Build A Wattle Fence”