
Articles
How To Build Rain Garden
Modified: January 19, 2024
Learn how to build a gorgeous rain garden with our expert gardening tips and techniques. Enhance your outdoor space and help the environment at the same time.
(Many of the links in this article redirect to a specific reviewed product. Your purchase of these products through affiliate links helps to generate commission for Storables.com, at no extra cost. Learn more)
Introduction
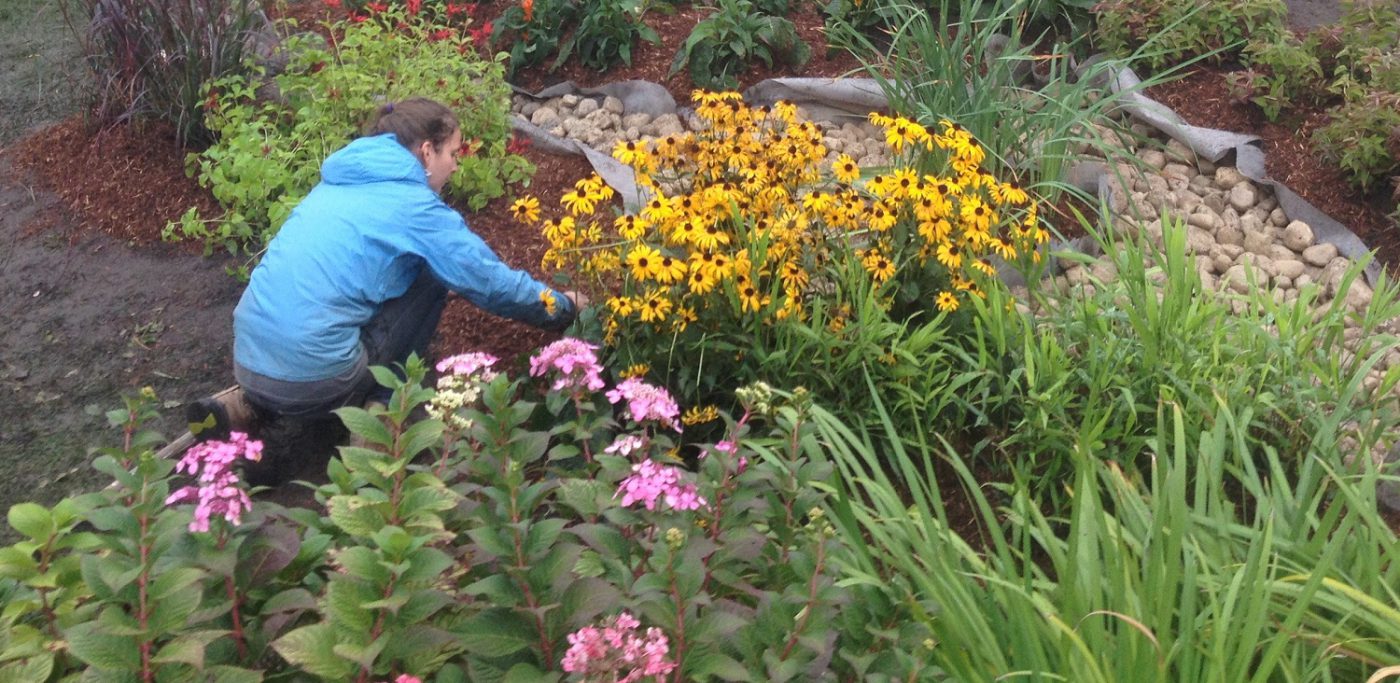
Welcome to the world of rain gardening! Whether you’re an avid gardener or someone looking to make a positive impact on the environment, building a rain garden is a fantastic way to combine your love for plants with sustainable practices. Rain gardens are not only beautiful additions to your outdoor space but also serve a crucial role in managing stormwater runoff and preventing water pollution.
So, what exactly is a rain garden? A rain garden is a specially designed garden bed that captures and filters rainwater, allowing it to naturally infiltrate the soil instead of flowing into storm drains or other bodies of water. By doing so, rain gardens help to reduce erosion, recharge groundwater, and filter out pollutants that would otherwise harm our rivers, lakes, and streams.
In addition to its environmental benefits, a rain garden also adds aesthetic value to your property. With the right selections of native plants, a rain garden can be a vibrant and attractive feature, attracting birds, butterflies, and other pollinators. It creates a mini-ecosystem that contributes to the overall health and biodiversity of your garden.
Building a rain garden may seem like a daunting task, but fear not! In this article, we will guide you through the step-by-step process of creating your very own rain garden. Whether you have a small backyard or a spacious garden, these steps will help you transform any area into a beautiful and functional rain garden.
Before we dive into the details, it’s important to note that planning and preparation are key to a successful rain garden project. By following the steps in this article, you’ll be equipped with the knowledge and skills to build a rain garden that suits your specific needs and local conditions.
So, let’s roll up our sleeves, put on our gardening gloves, and embark on this exciting journey to create a rain garden that will make both Mother Nature and your neighbors green with envy!
Key Takeaways:
- Building a rain garden not only enhances the beauty of your outdoor space but also plays a crucial role in managing stormwater runoff, reducing water pollution, and providing habitat for wildlife.
- By incorporating sustainable practices and native plants, you can create a thriving ecosystem that contributes to the conservation of water, preservation of natural ecosystems, and a healthier environment for all.
Step 1: Site Selection
The first step in building a rain garden is selecting the ideal location for it. A well-chosen site will ensure that your rain garden functions effectively and enhances the overall aesthetics of your landscape. Here are a few factors to consider when selecting a site for your rain garden:
- Drainage Area: Look for a spot in your yard where water naturally collects during rainfall. This can be along a slope, near a downspout, or at the bottom of a gently sloping area. Avoid areas prone to standing water, as this indicates poor drainage and may lead to the failure of your rain garden.
- Proximity to Structures: Keep a safe distance from any structures, such as your home, garage, or outbuildings. It’s recommended that your rain garden is at least 10 feet away from buildings to prevent any potential water damage.
- Sun Exposure: Determine the amount of sunlight the area receives throughout the day. Most rain garden plants prefer full to partial sun, so choose a site that receives at least 6 hours of sunlight per day. However, if your site is in a shaded area, there are also plants that thrive in shade or part shade.
- Underground Utilities: Contact your local utility company to mark any underground utilities, such as gas, water, or electric lines, before you start digging. This will help you avoid any potential accidents or disruptions during the excavation process.
- Soil Type: Assess the soil composition of the site. Rain gardens work best in well-drained soils, such as sandy loam or loamy soil. Avoid areas with heavy clay soils or compacted soils, as they may hinder water infiltration. If your site has poor soil, don’t worry – we’ll address this in the next steps.
Once you’ve considered these factors, mark the boundaries of your rain garden using stakes and string or a garden hose. Keep in mind that the size of your rain garden should be proportional to the size of your drainage area. As a general rule, the rain garden’s surface area should be about 20% of the impervious surface area that drains into it.
A well-selected site will ensure that your rain garden efficiently collects and filters stormwater runoff. Take your time in choosing the perfect location, and remember to consider both the functional and aesthetic aspects of your rain garden.
Step 2: Designing the Rain Garden
Designing your rain garden is an important step that involves determining its shape, depth, and overall layout. A well-designed rain garden will not only be visually appealing but also effectively manage stormwater runoff. Here are the key considerations when designing your rain garden:
- Shape and Size: Start by deciding on the shape and size of your rain garden. Common shapes include oval, kidney-shaped, or irregular. Choose a shape that complements your existing landscape and allows for easy maintenance. As for size, refer back to the drainage area calculation we discussed in the site selection step.
- Depth: The depth of your rain garden is crucial to ensure proper water infiltration and plant growth. Typically, rain gardens are designed to be between 6 to 12 inches deep. Avoid making them too shallow, as this can lead to inadequate water storage, or too deep, as it may cause water to pond for an extended period.
- Inflow and Outflow: Plan how water will flow into and out of your rain garden. The most common method is directing water from downspouts or gutter extensions into the rain garden. You can also consider incorporating swales or French drains to channel water towards the rain garden. To prevent overflow, include an overflow outlet or design your rain garden to handle excess water by allowing it to slowly percolate into the surrounding soil.
- Plant Selection: Research and select native plants that are suited to your local climate and soil conditions. Native plants are adapted to the environment and require less maintenance, making them perfect for rain gardens. Consider including a mix of grasses, flowering perennials, shrubs, and even small trees to create biodiversity and attract pollinators.
- Mulch and Edging: Incorporate mulch around the plants to conserve moisture and suppress weed growth. Use organic mulch, such as wood chips or shredded bark. Additionally, consider adding edging materials, such as stones or bricks, to define the boundaries of your rain garden and prevent soil erosion.
When designing your rain garden, it’s essential to strike a balance between aesthetics and functionality. A well-designed rain garden will not only enhance the beauty of your landscape but also effectively manage stormwater runoff in a sustainable manner.
Once you’ve finalized your rain garden design, create a detailed plan or sketch to guide you during the construction process. This will help ensure that you stay on track and achieve your desired results.
Step 3: Excavating the Area
With your rain garden design in hand, it’s time to roll up your sleeves and start excavating the area. Excavation is a crucial step in creating the right conditions for water infiltration and plant growth. Follow these steps to excavate your rain garden:
- Mark the Boundaries: Begin by marking the boundaries of your rain garden using the stakes and string or garden hose you used during the site selection step. This will serve as a guide and ensure that you stay within the designated area.
- Remove Existing Vegetation: Clear away any existing vegetation, such as grass or weeds, within the marked area. Use a shovel, rake, or garden hoe to loosen and remove the vegetation, ensuring that the area is bare and ready for excavation.
- Excavate the Soil: Start digging within the marked boundaries, removing the top layer of soil to the desired depth for your rain garden. Remember the recommended depth from the design step, typically between 6 to 12 inches. Keep the soil you excavate nearby, as it will be used later to backfill the rain garden.
- Shape the Bottom and Sides: Create a gentle slope at the bottom of your rain garden to help with water flow and prevent erosion. Smooth out the sides of the rain garden as well, ensuring they are sloped inward for added stability.
- Check the Slope: Use a level or a measuring tool to check the slope from different angles within your rain garden. Aim for a gentle slope of about 2-3% to facilitate proper drainage without causing water to pool in any particular area.
- Remove Roots and Debris: Take the time to eliminate any excess roots, rocks, or debris that may obstruct water flow or hinder plant growth. Rake the bottom and sides of the rain garden to remove any remaining debris.
Once you’ve finished excavating the area, take a moment to admire your hard work! You now have a blank canvas ready to be transformed into a beautiful rain garden.
Remember to take breaks as needed and stay hydrated throughout the excavation process. It may be physically demanding, but the end result will be well worth the effort.
Step 4: Creating Infiltration Trenches
Infiltration trenches are an essential component of a rain garden as they help facilitate proper water drainage and distribution. These trenches allow water to percolate into the surrounding soil, preventing waterlogging and promoting healthy plant growth. Here’s how to create infiltration trenches for your rain garden:
- Position the Trenches: Determine the location and size of the trenches within your rain garden. Ideally, they should be evenly spaced and extend from the center of the rain garden towards the edges.
- Excavate the Trenches: Use a shovel or spade to dig trenches within the designated locations. The trenches should be about 6-12 inches wide and extend approximately one-third of the width of the rain garden. The depth of the trenches should match the depth of your rain garden, ensuring that water can flow freely into the surrounding soil.
- Loosen the Bottom of the Trenches: Use a garden fork or a similar tool to loosen the soil at the bottom of the trenches. This will create pockets of permeability that allow water to infiltrate more effectively.
- Fill the Trenches: Fill the bottom portion of the trenches with a layer of coarse gravel or crushed stone. This will aid in water distribution and prevent soil erosion within the trenches.
- Add Perforated Pipes (Optional): In some cases, it may be beneficial to include perforated pipes in the trenches to help manage excessive water flow. These pipes should be placed on top of the gravel layer, allowing water to drain away from the rain garden.
- Cover the Trenches: Once the gravel and pipes (if used) are in place, cover them with a geotextile fabric to prevent soil from filtering into the trenches. This fabric will allow water to pass through while keeping the trenches clear.
- Backfill the Rain Garden: With the infiltration trenches in place, use the soil you excavated earlier to backfill the rain garden, ensuring that the soil is evenly distributed and properly packed.
Creating infiltration trenches in your rain garden is a vital step in ensuring proper drainage and water management. These trenches will contribute to the overall functionality and effectiveness of your rain garden, allowing it to effectively capture and filter stormwater runoff.
Take your time when creating the infiltration trenches, paying attention to the size, placement, and materials used. This will help guarantee the long-term success and functionality of your rain garden.
When building a rain garden, make sure to choose native plants that can tolerate both wet and dry conditions. This will help the garden thrive and support local wildlife.
Read more: How To Store Rain Water For Plants
Step 5: Installing Native Plants
Now that the groundwork is laid, it’s time to bring life to your rain garden by installing a variety of native plants. Native plants are well-adapted to the local climate and soil conditions, making them ideal for rain gardens. They require less maintenance, provide habitat for wildlife, and contribute to the overall beauty and health of your garden. Here’s how to install native plants in your rain garden:
- Select Suitable Plants: Consider the specific requirements of each plant, such as sun exposure, soil moisture, and height. Choose a combination of grasses, flowering perennials, shrubs, and even small trees to create a diverse and visually pleasing rain garden. Opt for species that can tolerate occasional flooding and drought periods.
- Prepare the Planting Holes: Dig planting holes in the prepared soil, making them slightly wider and deeper than the root ball of the plants. Ensure that the holes are evenly spaced within the rain garden, allowing your chosen plants to grow and thrive without overcrowding each other.
- Planting Technique: Carefully remove each plant from its container, gently loosening the roots if necessary. Place the plant in the prepared hole, making sure the top of the root ball is level with or slightly above the surrounding soil. Backfill the hole, firming the soil gently around the plant to eliminate air pockets.
- Watering: After planting, thoroughly water each plant to settle the soil around its roots. Use a gentle stream of water to avoid displacing the soil. Water regularly during the establishment period to promote healthy growth, adjusting the frequency based on the rainfall and moisture levels in your region.
- Mulching: Apply a layer of organic mulch around each plant, leaving a small gap around the base to prevent moisture buildup. This mulch will help retain moisture, suppress weed growth, and regulate soil temperature. Keep the mulch a few inches away from the plant stems to prevent rotting or disease.
- Staking and Support (if needed): In some cases, taller plants may require staking or support to prevent bending or breaking. Install stakes or plant supports near the base of the plant and gently tie them to provide stability without causing damage. Monitor these plants regularly and adjust the support as necessary.
- Consider Planting in Waves: To create a more natural and visually appealing rain garden, consider planting the native plants in waves or clusters. This mimics how plants grow in nature and adds depth and dimension to your rain garden.
Remember, native plants play a crucial role in attracting pollinators, providing habitat for beneficial insects, and contributing to the overall biodiversity of your garden. Choose plants that complement each other in terms of color, texture, and blooming times to ensure year-round interest and beauty.
With the installation of native plants, your rain garden will come alive as a thriving ecosystem, adding not only functionality but also visual appeal to your outdoor space.
Step 6: Adding Mulch and Gravel
To enhance the functionality and aesthetics of your rain garden, adding mulch and gravel is an important step. Mulch helps retain moisture, suppresses weed growth, and adds a finished look to your garden. Gravel, on the other hand, aids with water infiltration and provides stability. Here’s how to add mulch and gravel to your rain garden:
- Mulching: Start by applying a layer of organic mulch around the base of your native plants. Use a thickness of around 2-3 inches, ensuring the mulch extends to the outer edges of each plant’s canopy. Mulch helps retain soil moisture, moderates temperature fluctuations, and inhibits weed growth. Common types of mulch include wood chips, shredded bark, or compost.
- Even Distribution: Spread the mulch evenly, making sure not to bury the stems of the plants. Keep a small gap around the base of the plant to prevent moisture buildup and potential rot. Avoid piling the mulch too close to the stems, as it can create a moist, favorable environment for pests and diseases.
- Gravel Placement: After mulching, consider adding a layer of gravel to certain areas of your rain garden, particularly around the inflow points or along the bottom of the garden. This gravel layer helps with water distribution and prevents erosion. Spread a layer of pea gravel or small stones evenly, around 1-2 inches thick.
- Transition Areas: Use gravel as a transition between the mulched areas and the periphery of your rain garden. This can create a defined boundary and help with overall aesthetics. Choose a gravel size and color that complements the surrounding landscape.
- Maintenance: Monitor the mulch and gravel over time, replenishing as needed. Mulch may break down or decompose over time, so periodically adding more mulch will help maintain its effectiveness. Likewise, if the gravel gets displaced or washed away, topping it up can ensure continued functionality.
Adding mulch and gravel to your rain garden not only provides practical benefits but also enhances its visual appeal. The mulch will create a cohesive look while conserving moisture and promoting healthy plant growth. The gravel layer helps with water distribution and provides a finishing touch to the overall design.
Remember to choose organic mulch and avoid using artificial materials that may leach harmful chemicals into the soil. With proper maintenance, your rain garden will continue to thrive and contribute to a sustainable and beautiful outdoor space.
Step 7: Watering and Maintaining the Rain Garden
Congratulations on creating your beautiful rain garden! Now that it’s established, it’s important to properly water and maintain it to ensure its longevity and effectiveness. Here are essential tips for watering and maintaining your rain garden:
- Watering: In the early stages after installation, water your rain garden regularly to help the plants establish their roots. Monitor the soil moisture and adjust the frequency of watering based on the rainfall and the needs of the plants. As native plants are generally adapted to local conditions, they may require less watering once established.
- Monitor Soil Moisture: Regularly check the soil moisture in your rain garden to avoid over or under-watering. Stick your finger into the soil to determine its moisture level. Ideally, the soil should be moist but not waterlogged. Over-watering can lead to root rot and other issues, while under-watering can cause stress and poor plant growth.
- Weeding: As with any garden, weeds may occasionally appear in your rain garden. Regularly inspect and remove any weeds that sprout up, ensuring they don’t compete with your native plants for nutrients and water. Be careful when pulling weeds to avoid damaging the roots of your desired plants.
- Pruning: Trim back any dead or damaged foliage and flowers as needed. Pruning helps promote healthy growth and encourages the development of new blooms. Remove any overgrown or straggly branches to maintain the desired shape and density of the plants.
- Fertilizing: Native plants in a rain garden do not typically require heavy fertilization. However, you may choose to apply a slow-release, organic fertilizer once or twice a year to provide additional nutrients. Consult with a local nursery or garden center to determine the appropriate fertilizer for your specific native plant species.
- Maintaining Infiltration Trenches: Regularly inspect and clear any debris that may accumulate within the infiltration trenches. Remove leaves, twigs, or other materials that could hinder water flow and infiltration. Additionally, check the geotextile fabric covering the trenches to ensure it is intact and not clogged with sediment.
- Monitor Drainage: Keep an eye on the functionality of your rain garden’s drainage system. During heavy rain events, observe how the water flows into and out of the rain garden. Make any necessary adjustments to ensure proper drainage and prevent overflow.
- Observation and Adaptation: Take the time to observe your rain garden throughout the seasons. Notice how the plants grow and bloom, and how water flows during rain events. Use this information to make any necessary adjustments or additions to enhance the effectiveness and beauty of your rain garden.
Maintaining your rain garden is an ongoing process, but the effort is well worth the rewards. Regular care and attention will ensure that your rain garden continues to provide environmental benefits, attract wildlife, and enhance the overall aesthetics of your outdoor space.
Remember, each rain garden is unique, so adapt these maintenance tips to suit the specific requirements of your plants and local environment. With proper care, your rain garden will thrive for years to come!
Conclusion
Congratulations on successfully building your own rain garden! By incorporating sustainable practices and native plants, you have not only created a beautiful and functional outdoor space but also made a positive impact on the environment. Rain gardens play a crucial role in managing stormwater runoff, reducing water pollution, and providing habitat for wildlife.
Throughout this guide, we have covered the essential steps of building a rain garden, from site selection and design to excavation, plant installation, and maintenance. Each step was carefully crafted to ensure the success and longevity of your rain garden, allowing you to enjoy its benefits for years to come.
As you continue to tend to your rain garden, remember to monitor its water needs, regularly maintain and prune the plants, and provide any necessary fertilization. Keep an eye on the functionality of the infiltration trenches and ensure that the drainage system is working effectively. With your attentiveness, your rain garden will thrive and create a haven for native plants, birds, butterflies, and other beneficial insects.
By building a rain garden, you have combined your love for gardening with sustainable practices. You have contributed to the conservation of water, preservation of natural ecosystems, and creation of a healthier environment for all. Your rain garden serves as an inspiration to others, showcasing the beauty and power of gardening in harmony with nature.
Thank you for embarking on this rain garden journey with us. May your rain garden bring you joy, tranquility, and a sense of fulfillment knowing you have made a positive difference in the world.
Frequently Asked Questions about How To Build Rain Garden
Was this page helpful?
At Storables.com, we guarantee accurate and reliable information. Our content, validated by Expert Board Contributors, is crafted following stringent Editorial Policies. We're committed to providing you with well-researched, expert-backed insights for all your informational needs.



0 thoughts on “How To Build Rain Garden”