Articles
How To Clean RCA Ice Maker
Modified: October 27, 2024
Looking for articles on how to clean your RCA ice maker? Find step-by-step guides and expert tips to keep your ice maker clean and functioning smoothly.
(Many of the links in this article redirect to a specific reviewed product. Your purchase of these products through affiliate links helps to generate commission for Storables.com, at no extra cost. Learn more)
Introduction
Welcome to this comprehensive guide on how to clean your RCA ice maker. An ice maker is a convenient appliance that provides you with a steady supply of ice cubes for all your beverage needs. However, over time, mineral deposits, mold, and bacteria can build up in the ice maker, affecting the taste and quality of the ice. Cleaning your ice maker regularly is essential to ensure it continues to produce clean and refreshing ice cubes.
In this article, we will walk you through a step-by-step process to effectively clean your RCA ice maker. We will cover everything from gathering the necessary materials to sanitizing the ice maker, ensuring that you have all the information needed to maintain a clean and efficient ice maker.
Before we dive into the cleaning process, it’s important to note that safety should be your top priority. Always make sure to follow the manufacturer’s instructions and turn off the ice maker before starting the cleaning procedure. Additionally, take precautions to protect yourself from any potential hazards.
Now that we have the basics covered, let’s move on to the first step – gathering the necessary materials.
Key Takeaways:
- Regularly cleaning and sanitizing your RCA ice maker, along with proper maintenance, ensures a continuous supply of clean and refreshing ice cubes for your favorite beverages.
- Following safety precautions, gathering necessary materials, and reassembling the ice maker correctly are crucial steps in maintaining a clean and efficient RCA ice maker.
Read also: 15 Amazing Rca Ice Maker for 2025
Safety Precautions
Prior to cleaning your RCA ice maker, it’s important to take some safety precautions to ensure your well-being and to avoid any damage to the appliance. Here are some key safety measures to keep in mind:
- Read the manufacturer’s instructions: Familiarize yourself with the specific safety guidelines provided by RCA for your ice maker model. This will ensure that you follow the correct procedures and avoid any potential issues.
- Turn off and unplug the ice maker: Before starting the cleaning process, make sure to turn off the ice maker and unplug it from the power source. This will prevent any accidents or electrical hazards.
- Wear protective gloves and goggles: Cleaning agents or chemicals may be used during the cleaning process, so it’s essential to protect your hands and eyes. Wear rubber gloves and safety goggles to avoid any contact with potentially harmful substances.
- Work in a well-ventilated area: Ensure that the area where you’re cleaning the ice maker is well-ventilated. This will help to dissipate any fumes from cleaning agents and provide fresh air while you work.
- Avoid using sharp objects: When cleaning the ice maker, refrain from using sharp objects that could damage the appliance or cause injury. Utilize soft brushes, sponges, or cloth for cleaning.
- Keep children and pets away: As you clean your ice maker, it’s best to keep children and pets at a safe distance. This will prevent any accidents and maintain a focused cleaning environment.
By following these safety precautions, you can ensure a safe and efficient cleaning process for your RCA ice maker. Now that we have the necessary safety measures in place, let’s move on to the next step – gathering the materials needed for the cleaning process.
Gathering the Necessary Materials
Before you begin cleaning your RCA ice maker, it’s important to gather all the necessary materials. Having these items on hand will make the cleaning process more efficient and ensure that you have everything you need. Here’s a list of the essential materials:
- Mild detergent or ice maker cleaner: You will need a mild detergent or a specialized ice maker cleaner. Avoid using harsh chemicals or abrasive cleaners, as they can damage the ice maker.
- Warm water: Warm water will be used as the cleaning solution to remove any buildup or residue from the ice maker.
- Soft cloth or sponge: A soft cloth or sponge is ideal for cleaning the exterior surfaces of the ice maker. Make sure it’s not abrasive to prevent scratching the Ice maker.
- Toothbrush or soft brush: A toothbrush or a soft brush can be used to clean smaller components or hard-to-reach areas of the ice maker.
- Vinegar: Vinegar is a natural cleaning agent that can help to remove mineral deposits and disinfect the ice maker.
- Lemon juice: Lemon juice can be used as an alternative to vinegar. It also helps to eliminate odors and freshen up the ice maker.
- New water filter (if applicable): If your RCA ice maker has a water filter, check if it needs replacement. It’s recommended to have a new filter on hand to ensure clean and filtered water.
Having all these materials ready before you begin cleaning will save you time and allow for a smoother process. Once you have gathered all the necessary materials, you’re ready to move on to the next step – turning off and emptying the ice maker.
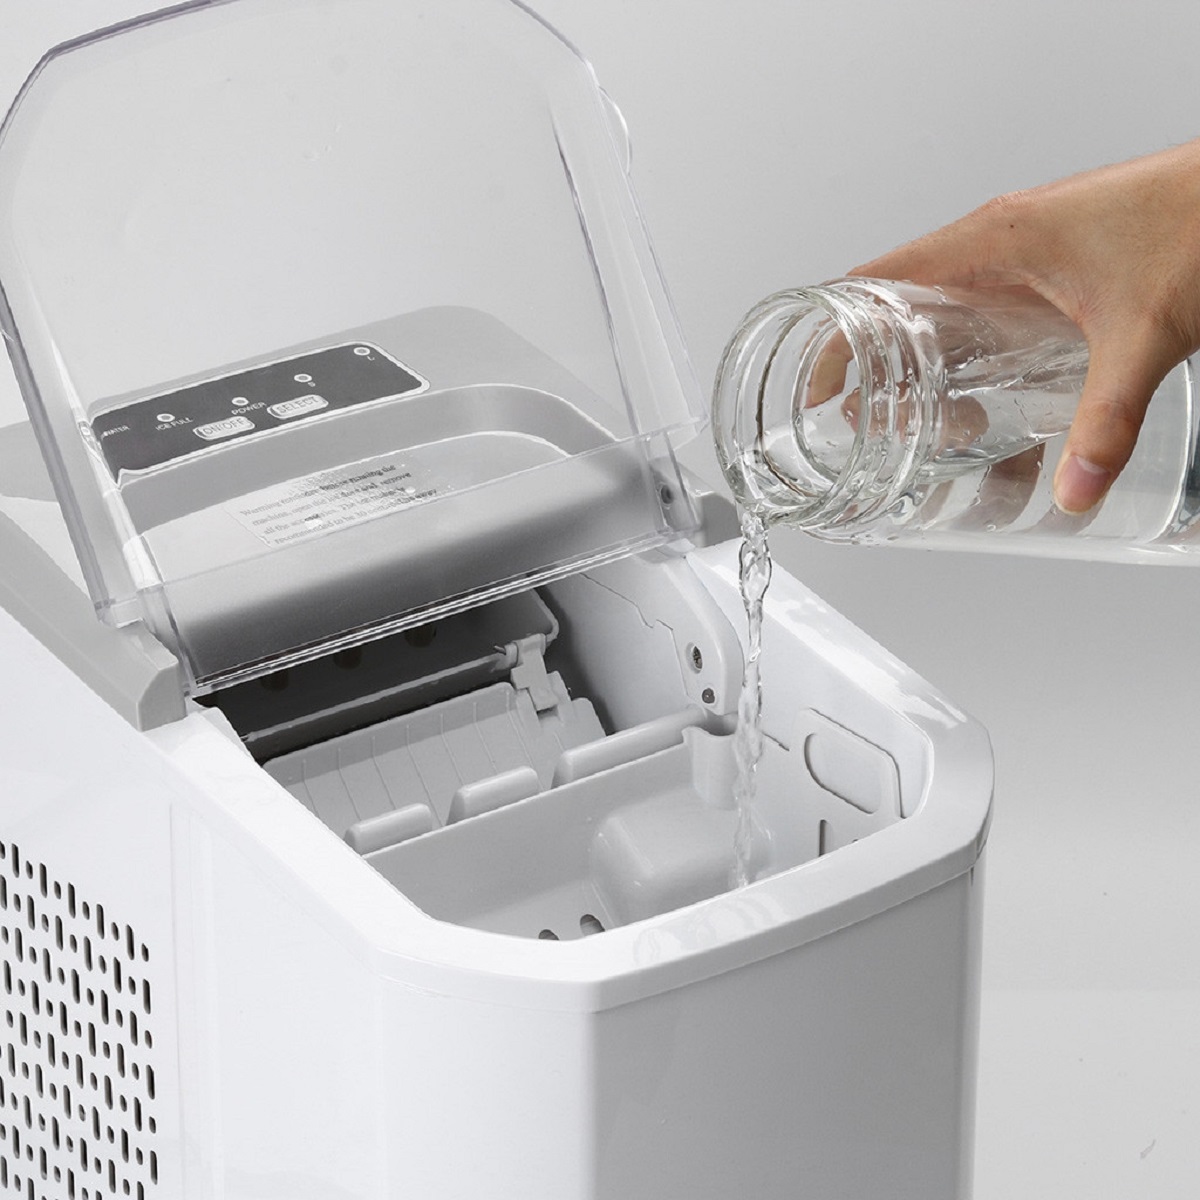
Turning off and Emptying the Ice Maker
Before you start cleaning your RCA ice maker, it’s important to turn off the appliance and empty its ice storage bin. This will prevent any water leakage or potential injuries during the cleaning process. Follow these steps to turn off and empty your ice maker:
- Locate the power switch or button: Check your RCA ice maker for the power switch or button. This is typically located on the front or side of the appliance.
- Turn off the ice maker: Switch off the power by pressing or flipping the designated button or switch. This will deactivate the ice-making function.
- Open the ice storage bin: Locate the ice storage bin, which is where the ice cubes are stored. Gently pull or slide the bin open to access the ice cubes.
- Empty the ice cubes: Carefully scoop out all the ice cubes from the bin using a scooper or a clean container. Transfer the ice cubes to a separate freezer or use them immediately.
- Dispose of any excess water: Check for any remaining water in the ice bin. If there is any, pour it out into a sink or drain. This will ensure that the ice maker is empty and ready for cleaning.
Once you have completed these steps, you can proceed with the cleaning process. Emptying the ice maker and turning off the power will minimize the risk of water spillage and allow for a more effective cleaning. In the next step, we will discuss how to clean the ice maker tray and bin.
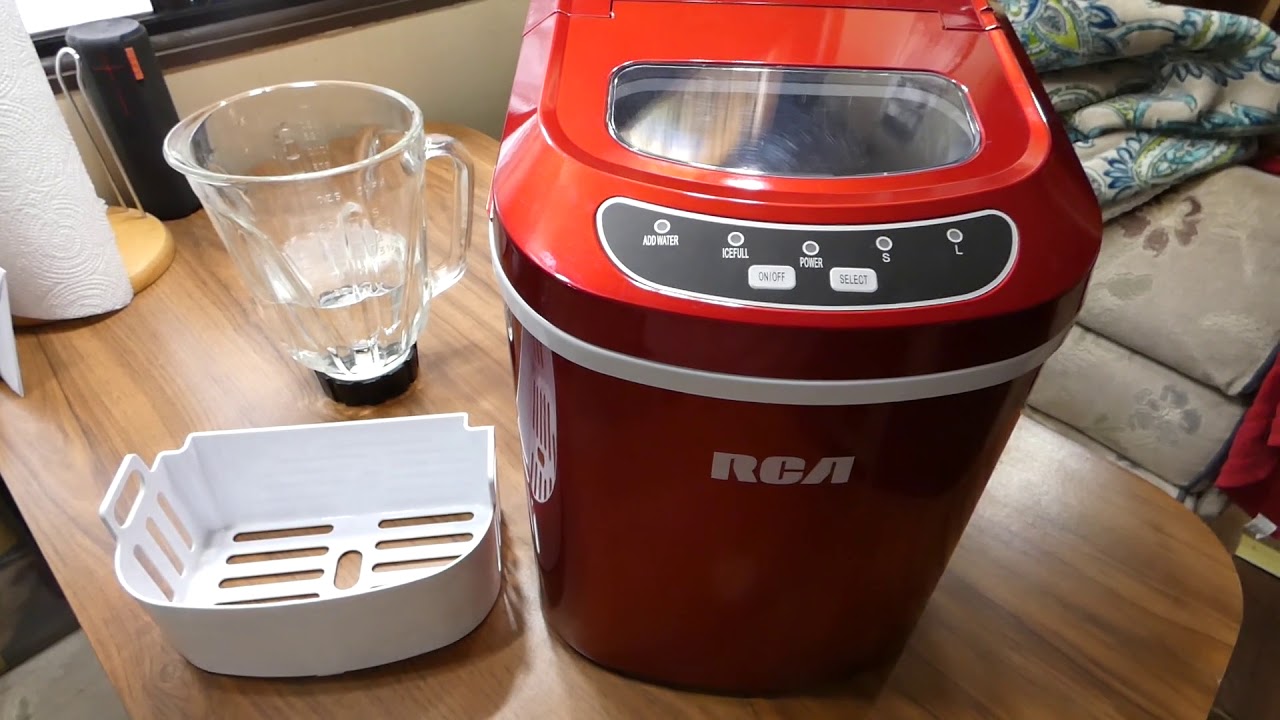
Cleaning the Ice Maker Tray and Bin
Now that you have turned off and emptied your RCA ice maker, it’s time to focus on cleaning the ice maker tray and bin. The ice maker tray and bin can accumulate residue, mineral deposits, and even mold over time. Follow these steps to effectively clean them:
- Remove the ice maker tray and bin: Carefully remove the ice maker tray and bin from your RCA ice maker. Refer to the manufacturer’s instructions for specific removal instructions, as the process may vary depending on the model.
- Prepare a cleaning solution: In a bucket or sink, mix a mild detergent or ice maker cleaner with warm water. Follow the instructions on the product label for the appropriate measurements.
- Scrub the ice maker tray and bin: Dip a soft cloth or sponge into the cleaning solution, then gently scrub the surfaces of the ice maker tray and bin. Pay special attention to any stains or buildup, using a toothbrush or soft brush if needed to reach tight corners.
- Rinse with clean water: Once you have thoroughly scrubbed the tray and bin, rinse them with clean water to remove any soapy residue.
- Dry the tray and bin: Wipe the tray and bin dry with a clean towel or allow them to air dry completely before reassembling the ice maker.
It’s important to note that some ice maker trays and bins are dishwasher safe. If your RCA ice maker tray and bin are listed as dishwasher safe in the manual, you can choose to place them in the dishwasher for cleaning instead. However, ensure that you follow the dishwasher’s guidelines and use a gentle cycle.
By cleaning the ice maker tray and bin, you will remove any contaminants and ensure that the ice you produce is clean and safe to consume. Once the tray and bin are clean and dry, you can move on to the next step – cleaning the ice maker water lines.
Read more: How To Clean A Igloo Ice Maker
Cleaning the Ice Maker Water Lines
As you continue to clean your RCA ice maker, it’s crucial to focus on cleaning the water lines. Over time, mineral deposits and impurities can accumulate in the water lines, affecting the quality of the ice produced. Here’s how you can effectively clean the ice maker water lines:
- Locate the water inlet valve: The water inlet valve is typically located at the back of the ice maker or inside the unit. Refer to your RCA ice maker’s manual to find the exact location.
- Turn off the water supply: Before you start cleaning the water lines, shut off the water supply to the ice maker. This can be done by turning off the water valve connected to the ice maker.
- Disconnect the water line: Carefully disconnect the water line from the inlet valve. You may need to use pliers or a wrench to loosen the connection.
- Flush the water lines: Once the water line is disconnected, place the end of the line into a bucket or sink. Turn on the water supply for a few seconds to flush out any debris or mineral build-up from the lines.
- Clean the water line: Use a soft brush or cloth soaked in a mixture of warm water and mild detergent to clean the water line thoroughly. Gently scrub along the length of the line to remove any residue.
- Rinse and reconnect: After cleaning, rinse the water line with clean water to remove any soap residue. Then, reconnect the water line to the inlet valve and tighten the connection.
It’s important to note that if your ice maker has a filter, it may also require cleaning or replacement. Refer to your RCA ice maker’s manual for specific instructions on cleaning or replacing the filter.
By cleaning the ice maker water lines, you’ll ensure that the water flowing into the ice maker is free from impurities, resulting in cleaner and better-tasting ice. Now that you’ve cleaned the water lines, let’s move on to the next step – cleaning the ice maker filter (if applicable).
To clean an RCA ice maker, mix a solution of equal parts water and vinegar, then use a soft cloth to wipe down the interior and exterior of the ice maker. Be sure to also clean the ice basket and any removable parts.
Cleaning the Ice Maker Filter
If your RCA ice maker is equipped with a water filter, it’s essential to clean or replace it regularly to maintain the quality of the ice produced. The filter helps remove impurities and contaminants from the water, ensuring clean and fresh-tasting ice. Follow these steps to clean the ice maker filter:
- Locate the filter: Check your RCA ice maker’s manual to find the location of the water filter. It is typically situated near the water inlet valve or inside the ice maker itself.
- Turn off the water supply: Before you start cleaning the filter, turn off the water supply to the ice maker. This can be done by shutting off the water valve connected to the ice maker.
- Remove the filter: Depending on the type of filter, you may need to twist it counterclockwise, push a release button, or follow specific instructions provided in the manual to remove it.
- Clean the filter: Rinse the filter under warm water to remove any debris or sediment. You can also use a soft brush to gently scrub the filter to remove any stubborn impurities. Avoid using soap or detergents, as they can damage the filter.
- Inspect the filter: Examine the filter for any signs of wear or damage. If the filter is damaged or worn out, it’s recommended to replace it with a new one according to the manufacturer’s instructions.
- Reinstall the filter: Once the filter is clean and in good condition, reinsert it back into the ice maker. Follow the instructions provided in the manual for proper installation.
Regularly cleaning or replacing the ice maker filter will ensure that the water flowing into the ice maker is filtered and free from impurities, resulting in clean and refreshing ice cubes. Now that you’ve cleaned the filter, let’s move on to the next step – sanitizing the ice maker.
Sanitizing the Ice Maker
Sanitizing your RCA ice maker is an important step in the cleaning process as it helps eliminate bacteria, mold, and any lingering odors. Sanitizing the ice maker ensures that the ice produced is not only clean but also safe to consume. Follow these steps to sanitize your ice maker:
- Prepare a sanitizing solution: In a bucket or sink, mix a solution of equal parts water and either white vinegar or lemon juice. Both vinegar and lemon juice have natural cleaning and sanitizing properties.
- Wipe down the interior surfaces: Dip a clean cloth into the sanitizing solution and thoroughly wipe down the interior surfaces of the ice maker. Pay close attention to areas that come into contact with water, such as the ice tray and water lines.
- Scrub hard-to-reach areas: For hard-to-reach areas or stubborn stains, use a soft brush or toothbrush soaked in the sanitizing solution to scrub the surfaces gently.
- Let the solution sit: Allow the sanitizing solution to sit in the ice maker for at least 5-10 minutes. This will give it time to effectively kill any bacteria or mold present.
- Rinse with clean water: After the sanitizing solution has had time to work, thoroughly rinse the interior surfaces of the ice maker with clean water to remove any traces of the solution.
- Dry the ice maker: Use a clean towel or allow the ice maker to air dry completely before reassembling and restarting it.
By properly sanitizing your ice maker, you’ll ensure that it remains clean and free from harmful bacteria. Regular sanitization should be performed as part of your routine ice maker maintenance to keep the ice cubes fresh and safe for consumption.
Now that your ice maker is clean and sanitized, let’s move on to the next step – reassembling and restarting the ice maker.
Reassembling and Restarting the Ice Maker
Now that you have cleaned, sanitized, and allowed your RCA ice maker to dry, it’s time to reassemble the components and restart the appliance. Follow these steps to ensure you correctly reassemble and restart your ice maker:
- Reinsert the ice maker tray and bin: Carefully place the ice maker tray and bin back into their respective positions in the ice maker. Make sure they fit snugly and securely.
- Connect the water line (if disconnected): If you had disconnected the water line during the cleaning process, reattach it to the water inlet valve. Ensure it is securely connected.
- Turn on the water supply: Open the water valve to restore the water supply to the ice maker. This will allow water to flow into the ice maker for ice production.
- Plug in the ice maker: Connect the ice maker to the power source and ensure it is securely plugged in.
- Turn on the ice maker: Locate the power switch or button and turn on the ice maker. Refer to the manufacturer’s instructions for the specific process, as it may vary depending on the model.
- Allow the ice maker to cycle: Give the ice maker some time to cycle and begin producing ice. This may take several hours, so be patient and wait for the ice-making process to kick in.
- Discard the first batch of ice: To ensure the ice produced is clean and free from any residual cleaning solution, it’s advised to discard the first batch of ice cubes.
By reassembling and restarting your RCA ice maker correctly, you can enjoy a fresh supply of clean and clear ice cubes. Now that you’ve successfully restarted the ice maker, let’s move on to the next step – maintenance tips for a clean ice maker.
Read more: How To Clean Out An Ice Maker
Maintenance Tips for a Clean Ice Maker
Regular maintenance is key to keeping your RCA ice maker clean and in optimal condition. Here are some helpful maintenance tips to ensure your ice maker continues to produce clean and refreshing ice:
- Regularly clean the ice maker: Set a schedule to clean your ice maker at least every 3-6 months. This will prevent mineral buildup, mold, and bacteria from affecting the quality of the ice.
- Keep the ice maker dry: After each use or cleaning, make sure to thoroughly dry the ice maker’s interior surfaces to prevent the growth of mold and bacteria.
- Replace the water filter (if applicable): If your RCA ice maker has a water filter, follow the manufacturer’s recommendations on when to replace it. This will ensure that the water used for ice production is properly filtered.
- Monitor the ice maker’s water quality: Regularly check the quality of the water being used by the ice maker. If you notice any unusual odors, tastes, or discoloration, it may be a sign that the water needs to be filtered or purified.
- Empty the ice bin regularly: Avoid allowing ice to sit in the ice bin for long periods. Empty the ice bin regularly and use or transfer the ice to prevent odors and contamination.
- Avoid overfilling the ice maker: Follow the manufacturer’s instructions regarding the maximum ice production capacity. Overfilling the ice maker can lead to ice cubes sticking together and impeding the proper functioning of the appliance.
- Inspect and clean exterior surfaces: Wipe down the exterior surfaces of the ice maker regularly with a damp cloth to remove dust, dirt, and spills. This will help maintain the appliance’s overall cleanliness and appearance.
- Keep the surrounding area clean: Ensure that the area around the ice maker is clean and free from debris. This helps prevent dirt or contaminants from entering the ice maker, ensuring the ice remains clean and safe to consume.
- Check for leaks or unusual sounds: Periodically inspect the ice maker for any leaks or unusual sounds. If you notice any issues, address them promptly to prevent further damage and ensure the ice maker functions properly.
By following these maintenance tips, you can enjoy a consistently clean and efficient RCA ice maker. Regular cleaning and upkeep will prolong the lifespan of your appliance and ensure a continuous supply of high-quality ice.
Now that we’ve covered the maintenance tips, let’s conclude this article in the next section.
Conclusion
Congratulations! You have successfully learned how to clean your RCA ice maker and keep it in optimal condition. By following the step-by-step instructions provided in this guide, you can ensure that your ice maker produces clean, refreshing, and safe-to-consume ice cubes.
Remember, regular cleaning and maintenance are essential to prevent the buildup of mineral deposits, mold, and bacteria that can affect the quality of the ice. By maintaining a clean ice maker, you can enjoy ice cubes that enhance the taste of your favorite beverages.
Throughout the cleaning process, we highlighted the importance of safety precautions, gathering the necessary materials, and following proper reassembly and maintenance steps. It’s crucial to refer to your RCA ice maker’s manual for specific instructions and recommendations as they may vary based on the model.
By regularly cleaning, sanitizing, and maintaining your ice maker, you can prolong its lifespan and ensure continuous and reliable ice production. So don’t forget to set a cleaning schedule and stay proactive in taking care of your ice maker.
We hope this guide has been informative and helpful in guiding you through the cleaning process of your RCA ice maker. Enjoy your clean and refreshing ice cubes!
Remember to always refer to the manufacturer’s instructions and guidelines for your specific model to ensure the best care and maintenance practices.
Frequently Asked Questions about How To Clean RCA Ice Maker
Was this page helpful?
At Storables.com, we guarantee accurate and reliable information. Our content, validated by Expert Board Contributors, is crafted following stringent Editorial Policies. We're committed to providing you with well-researched, expert-backed insights for all your informational needs.
0 thoughts on “How To Clean RCA Ice Maker”