Home>Articles>How To Cut 45 Degree Angles For Picture Frames
Articles
How To Cut 45 Degree Angles For Picture Frames
Modified: October 18, 2024
Learn how to cut precise 45 degree angles for picture frames with our comprehensive articles. Master the art of framing with step-by-step tutorials and expert tips.
(Many of the links in this article redirect to a specific reviewed product. Your purchase of these products through affiliate links helps to generate commission for Storables.com, at no extra cost. Learn more)
Introduction
Picture frames can be a great way to showcase your favorite photographs or artwork, adding a touch of elegance to any room. However, achieving those perfect 45-degree angles for your picture frame corners can be a bit tricky if you’re not familiar with the process. But fear not! In this article, we will guide you through the steps to cut 45-degree angles for picture frames with ease.
Whether you are a seasoned DIY enthusiast or a beginner looking to take on a new project, this article will provide you with the necessary information and guidance to complete this task successfully. So, gather your tools, roll up your sleeves, and let’s get started!

Before we jump into the process of cutting 45-degree angles for picture frames, let’s take a look at the essential tools and materials you’ll need:
Key Takeaways:
- Master the art of cutting 45-degree angles for picture frames with precision and confidence, creating visually stunning and professional-looking custom frames for your cherished artwork and photographs.
- Prioritize safety, attention to detail, and patience throughout the process, ensuring seamless corners and a tight fit for your picture frame joints. Embrace your creativity and showcase your favorite memories with pride!
Tools and Materials Needed
- Miter saw
- Tape measure
- Pencil
- Clamps
- Safety goggles
- Protective gloves
- Picture frame molding
Now that you have your tools and materials ready, let’s dive into the step-by-step process of cutting 45-degree angles for picture frames.
Key Takeaways:
- Master the art of cutting 45-degree angles for picture frames with precision and confidence, creating visually stunning and professional-looking custom frames for your cherished artwork and photographs.
- Prioritize safety, attention to detail, and patience throughout the process, ensuring seamless corners and a tight fit for your picture frame joints. Embrace your creativity and showcase your favorite memories with pride!
Tools and Materials Needed
Before you embark on cutting 45-degree angles for picture frames, make sure you have the following tools and materials on hand:
- Miter saw: This is the most crucial tool for achieving precise and accurate cuts. Invest in a high-quality miter saw with a sharp blade and adjustable angles.
- Tape measure: Accurate measurements are essential for ensuring a perfect fit. Use a tape measure to measure the length and width of your picture frame.
- Pencil: Marking the length and angle measurements on the molding will help guide your cuts.
- Clamps: Clamps will hold the molding securely in place on the miter saw, preventing any movement during cutting.
- Safety goggles: Always prioritize safety when working with power tools. Protect your eyes from debris and potential flying pieces by wearing safety goggles.
- Protective gloves: It’s a good practice to wear protective gloves to safeguard your hands while handling sharp objects and working with the miter saw.
- Picture frame molding: Choose your preferred molding material, such as wood or composite, for creating the frame. Make sure it’s wide enough to accommodate the depth of your artwork or photograph.
Having these tools and materials ready before you begin will ensure smooth progress and an efficient cutting process.
Now that you have acquired the necessary tools and materials, it’s time to move on to the step-by-step process of cutting 45-degree angles for picture frames.
Step 1: Measure and Mark
Before you make any cuts, it’s crucial to measure and mark the length and angles on your picture frame molding. Follow these steps:
- Place your picture or artwork on a flat surface and measure the length and width. This will help determine the dimensions of your picture frame.
- Using a tape measure, mark the desired length and width on the molding material. Make sure to add a few extra inches to each measurement to allow for the 45-degree angle cuts.
- Next, decide on the orientation of your picture frame. Are you going for a landscape or portrait orientation?
- Based on your chosen orientation, mark the top and bottom edges of the molding with a pencil.
- Now, it’s time to mark the angles for the corners. Measure and mark a 45-degree angle starting from the top edge of the molding towards the inside.
- Repeat this process for the other end of the molding, ensuring that the angles are opposite to create a seamless corner joint.
Taking accurate measurements and marking the angles beforehand will ensure that your picture frame comes together perfectly. Double-check your measurements and markings to eliminate any mistakes or inconsistencies.
Once you have completed step 1, you’re ready to move on to setting up the miter saw for cutting the 45-degree angles.
Step 2: Set Up the Miter Saw
Now that you have measured and marked your picture frame molding, it’s time to set up your miter saw for the precise 45-degree angle cuts. Follow these steps:
- Ensure that your miter saw is placed on a stable and level surface. This will provide stability during the cutting process and contribute to accurate cuts.
- Adjust the miter saw’s angle to 45 degrees. Most miter saws have a rotating base that allows you to set the angle according to your markings.
- Refer to the manufacturer’s instructions for your specific miter saw model to learn how to adjust the angle properly.
- Use a protractor or angle guide for precise angle measurement, if necessary.
- Secure the miter saw tightly in place to avoid any movement while cutting. Some miter saws come with clamps or can be attached to a workbench for added stability.
- Check that the saw’s blade is sharp and in good condition. Dull blades can result in uneven and rough cuts.
- Put on your safety goggles and protective gloves before proceeding.
By setting up your miter saw correctly, you’ll ensure that your cuts are accurate and aligned with the 45-degree angles marked on your picture frame molding. Now that your miter saw is ready, it’s time to move on to adjusting the miter angle for precise cutting.
Step 3: Adjust the Miter Angle
With your miter saw set up and ready to go, it’s time to adjust the miter angle to ensure precise and clean cuts for your picture frame corners. Follow these steps:
- Refer to your markings on the picture frame molding to determine the direction of the angle cuts.
- Place the molding on the miter saw’s base, making sure that the bottom edge aligns with the saw’s fence.
- Adjust the miter angle by rotating the miter saw’s blade according to the angle markings on the molding. For example, if you marked a 45-degree angle, set the miter saw to match that angle.
- Double-check the angle using a protractor or angle guide if necessary to ensure accuracy.
- If your miter saw has preset detents for common angles, make use of them to facilitate the adjustment process.
- Once the miter angle is adjusted, tighten any knobs or locks to secure the angle in place.
By adjusting the miter angle properly, you’ll ensure that your cuts are perfectly aligned with the 45-degree angles marked on your picture frame molding. This step is crucial for achieving seamless corners and a professional-looking picture frame. With the miter angle set, you’re ready to move on to the next step: positioning the molding for cutting.
Step 4: Position the Molding
Now that you have adjusted the miter angle on your saw, it’s time to position the picture frame molding for cutting. Follow these steps:
- Place the piece of molding on the miter saw’s base, ensuring that the bottom edge is flush against the fence.
- Hold the molding firmly in place to prevent any movement during cutting. You can use clamps to secure it if necessary.
- Inspect the alignment of the molding with the miter saw’s blade to ensure that it matches the intended angle for the corner cut.
- Take a moment to double-check the positioning and alignment before proceeding with the cuts.
- Ensure that your hands are positioned safely away from the blade, and avoid positioning your body directly in front of the saw to minimize any potential risks.
Properly positioning the molding is crucial for achieving accurate and clean cuts. Take your time to carefully align the molding with the saw’s blade to ensure that your picture frame corners will be seamless and precise. Once you are satisfied with the positioning, you can move on to making the first cut.
Remember to always prioritize safety when working with power tools. Use protective gloves and safety goggles, and follow all safety guidelines provided by the manufacturer. With the molding securely positioned, it’s time to tackle the first 45-degree angle cut!
When cutting 45-degree angles for picture frames, always measure and mark the exact points for the cuts to ensure accuracy. Use a miter saw or miter box for precise and clean cuts. Double-check the angle before cutting to avoid mistakes.
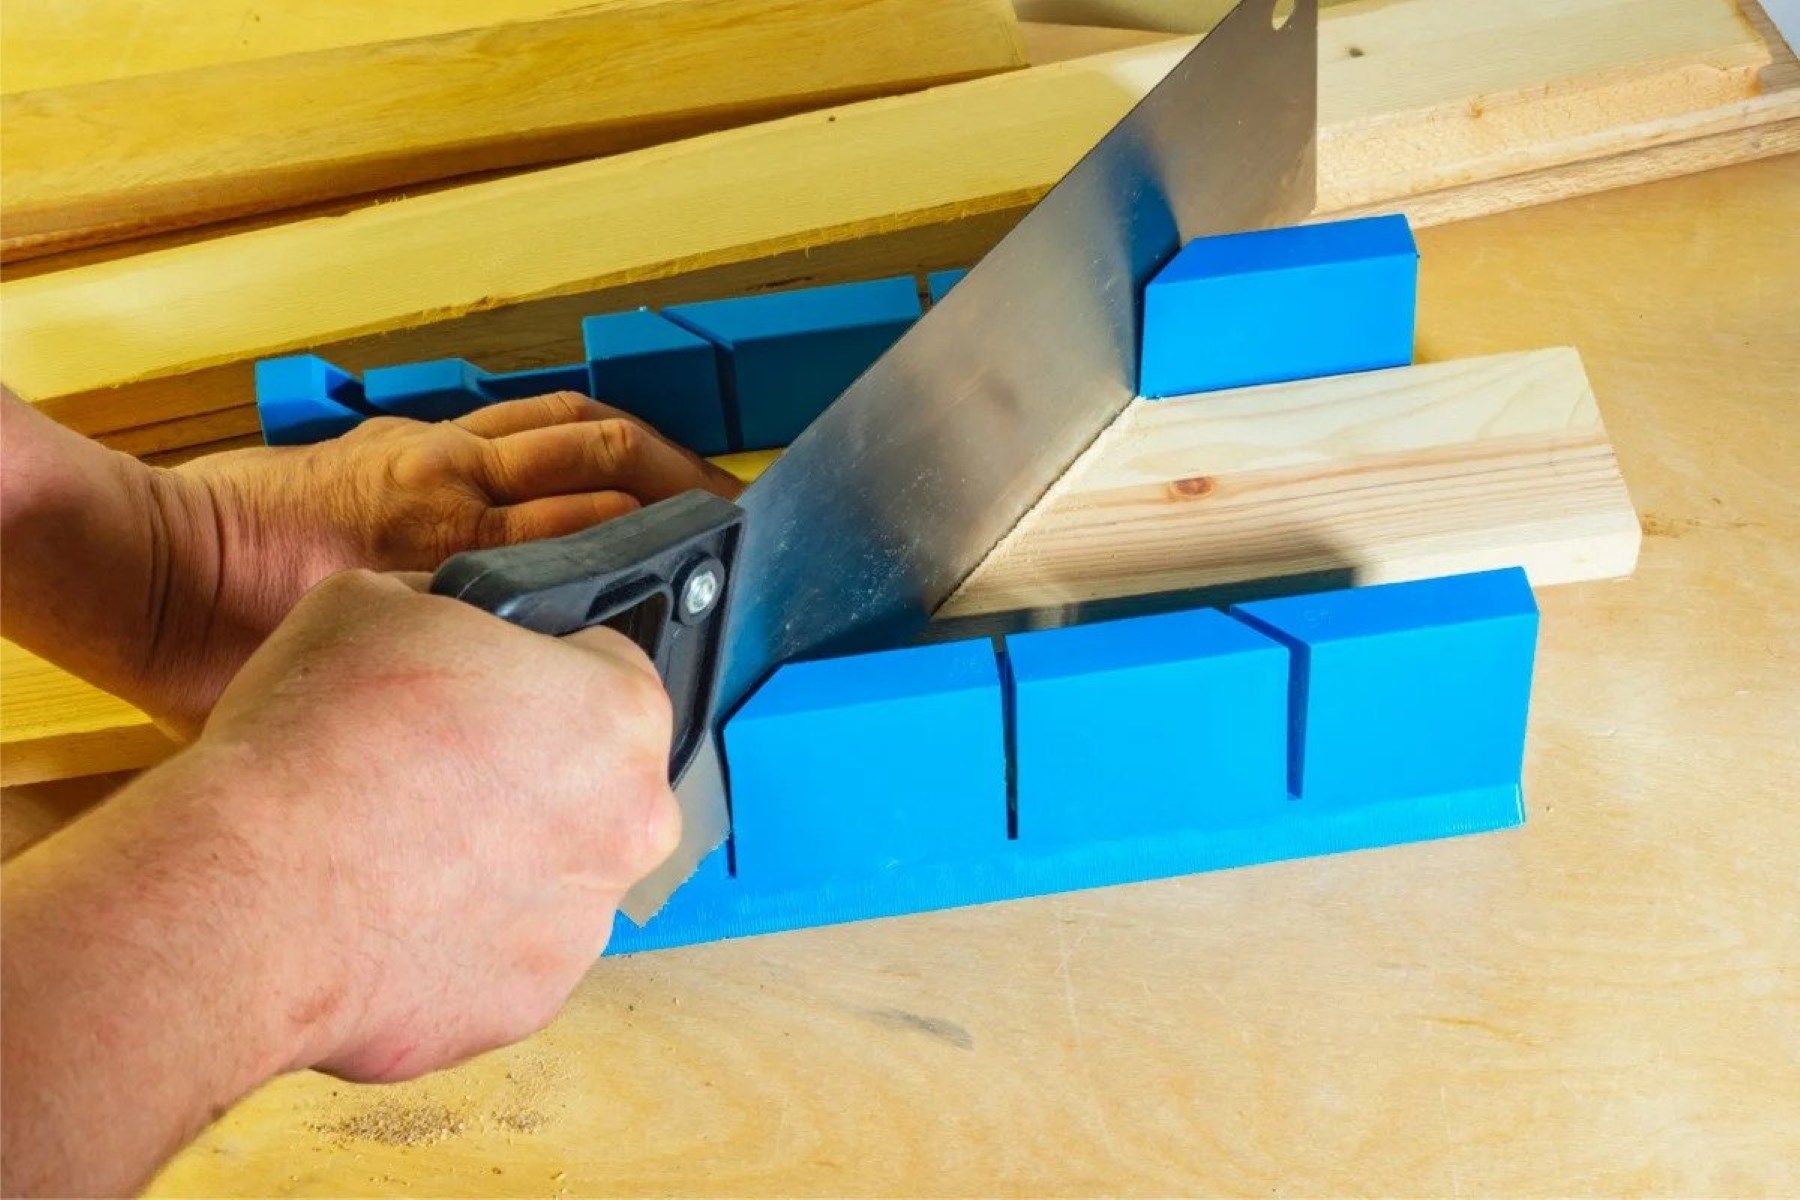
Step 5: Make the First Cut
Now that everything is properly set up and the molding is positioned, it’s time to make the first cut for your picture frame corner. Follow these steps:
- Ensure that your hands are positioned safely away from the blade, and double-check that your body is not directly in front of the saw.
- Turn on the miter saw and allow the blade to reach its full speed before making the cut.
- Gently lower the saw’s blade onto the molding, keeping it aligned with the marked 45-degree angle.
- Apply a consistent and controlled downward pressure as the saw cuts through the molding.
- Continue cutting until the blade has passed completely through the molding, ensuring a smooth and precise cut.
- Once the cut is complete, raise the blade back to its initial position and turn off the saw.
- Take a moment to inspect the cut for any rough edges or imperfections. If necessary, lightly sand the cut surface to ensure a clean and smooth finish.
Remember to always exercise caution and maintain focus while making the cut. Keep your fingers clear of the blade and avoid any sudden movements that could lead to accidents. By following these steps, you will achieve a clean and accurate cut for your picture frame corner.
With the first cut successfully made, it’s time to move on to the next step: flipping the molding to prepare for the second cut.
Step 6: Flip the Molding
After making the first cut for your picture frame corner, it’s time to flip the molding to prepare for the second cut. Follow these steps:
- Release any clamps holding the molding in place on the miter saw.
- Carefully lift and flip the molding over, so the freshly cut end is now positioned against the fence of the miter saw.
- Align the molding with the marked 45-degree angle and ensure that it is securely positioned, either by using clamps or holding it in place with your hand.
- Double-check the alignment of the molding with the saw’s blade to ensure that the second cut will mirror the first cut and create a seamless corner.
Flipping the molding allows you to cut the second side of the picture frame corner, completing the 45-degree angle. Take care not to damage the freshly cut surface when flipping the molding, and ensure that it is held securely in place before proceeding to make the second cut.
By following these steps, you’ll be well on your way to achieving a professional and seamless picture frame corner. With the molding properly flipped, it’s time to move on to making the second cut.
Read more: How To Distress Picture Frames
Step 7: Make the Second Cut
Having flipped the molding and ensured its proper alignment, it’s time to make the second cut for your picture frame corner. Follow these steps:
- Verify that your hands are positioned safely away from the blade, and double-check your body position to ensure it is not directly in front of the saw.
- Start the miter saw and allow the blade to reach its full speed.
- Gently lower the saw’s blade onto the molding, ensuring that it aligns with the 45-degree angle marking.
- Apply a consistent and controlled downward pressure as the saw cuts through the molding.
- Continue cutting until the blade has passed completely through the molding, creating a clean and precise second cut.
- Once the cut is complete, raise the blade back to its initial position and turn off the saw.
- Take a moment to inspect the cut for any rough edges or imperfections. If necessary, lightly sand the cut surface to achieve a smooth and seamless finish.
As with the first cut, it is essential to exercise caution and maintain focus while making the second cut. By following these steps, you will achieve a clean and accurate angle cut, ensuring a professional look for your picture frame corner.
With the second cut complete, it’s time to move on to the next step: checking the fit of your picture frame corner.
Step 8: Check the Fit
After making the two 45-degree cuts, it’s crucial to check the fit of your picture frame corner to ensure a seamless and tight joint. Follow these steps:
- Hold the two pieces of molding together, aligning the cut ends.
- Inspect the joint to ensure that the two pieces fit together snugly without any gaps or misalignment.
- If you notice any inconsistencies, adjust the angles of the miter saw slightly to fine-tune the fit.
- You can also use sandpaper to lightly sand the cut ends of the molding for a smoother fit.
- Ensure that all corners are checked for a proper fit, as each corner angle should be cut at 45 degrees.
- Make any necessary adjustments until you achieve a precise and seamless fit.
Checking the fit of your picture frame corner is vital for creating a professional and visually pleasing result. Take your time during this step and make any adjustments needed to achieve a tight joint. Remember, a well-fitted corner joint will enhance the overall appearance and structural integrity of your picture frame.
Once you are satisfied with the fit of your picture frame corner, it’s time to repeat the process for the remaining angles.
Step 9: Repeat for Remaining Angles
With one picture frame corner successfully cut and fitted, it’s time to repeat the process for the remaining angles. Follow these steps to complete the remaining corners:
- Measure and mark the length and angles on the remaining pieces of picture frame molding.
- Set up the miter saw as before, adjusting the miter angle to 45 degrees.
- Position the molding on the miter saw, ensuring the bottom edge is flush against the fence.
- Make the first cut, following the same procedure as before.
- Flip the molding and align it for the second cut, ensuring the correct angle.
- Make the second cut, maintaining precision and control throughout.
- Check the fit of the corner and make any necessary adjustments.
- Repeat this process for the remaining angles, following each step carefully.
By repeating this process for each corner, you will achieve uniform and seamless picture frame joints. Take your time and maintain consistency in your measurements, cuts, and fit checks to ensure a professional result.
Once all corners are cut and fitted, you can proceed to assemble your picture frame using suitable methods such as glue, nails, or other joining techniques. Follow the instructions provided by your chosen picture frame assembly method to complete the project and proudly display your artwork or photographs.
Congratulations! You have successfully learned how to cut 45-degree angles for picture frames. This valuable skill will enable you to create custom frames that add a touch of elegance and sophistication to your favorite pieces of art or cherished memories.
Remember to always prioritize safety when using power tools. Wear protective gear, follow the manufacturer’s instructions, and exercise caution during each step of the process.
Now it’s time to put your newfound knowledge to use and start creating beautiful picture frames that will showcase your treasured moments or artwork for years to come!
Conclusion
Creating custom picture frames with perfectly cut 45-degree angles can seem like a daunting task, but with the right tools, materials, and techniques, it becomes an achievable and rewarding project. In this article, we have provided a comprehensive step-by-step guide to help you master the art of cutting 45-degree angles for picture frames.
By following the instructions outlined in this article, you will be able to measure and mark your molding, set up the miter saw, adjust the miter angle, position the molding, make the cuts, check the fit, and repeat the process for the remaining angles. With each step carefully executed, you will achieve seamless corners and create visually stunning picture frames.
It is important to remember that precision and attention to detail are key in cutting 45-degree angles. Take the time to measure accurately, double-check your angles, and ensure a tight fit between the molding pieces. Don’t hesitate to make adjustments as needed to achieve the desired results.
Additionally, prioritize your safety throughout the process. Wear safety goggles and protective gloves, secure the molding with clamps when necessary, and exercise caution when operating the miter saw.
With the knowledge and skills gained from this article, you are now equipped to embark on your picture frame projects. Whether you are framing artwork, photographs, or other cherished memories, you can now confidently create customized picture frames that will enhance and display your pieces beautifully.
So, gather your tools and materials, set up your miter saw, and start cutting those perfect 45-degree angles for your picture frames. Let your creativity shine as you showcase your favorite moments and artwork with pride!
Now that you've mastered cutting perfect angles for picture frames, why not broaden your crafting skills with some exciting woodworking projects? Whether you're looking to spruce up your home decor or create unique gifts, woodworking offers endless possibilities. Our latest guide dives into the most rewarding and creative woodworking projects you can tackle in the upcoming year. Don't miss out on this chance to enhance your craftsmanship and bring those inspiring ideas to life!
Frequently Asked Questions about How To Cut 45 Degree Angles For Picture Frames
Was this page helpful?
At Storables.com, we guarantee accurate and reliable information. Our content, validated by Expert Board Contributors, is crafted following stringent Editorial Policies. We're committed to providing you with well-researched, expert-backed insights for all your informational needs.


0 thoughts on “How To Cut 45 Degree Angles For Picture Frames”