Articles
How To Install Ryobi Table Saw Blade Guard
Modified: December 7, 2023
Learn how to safely install the blade guard on your Ryobi table saw with our step-by-step guide. Read more articles on table saw maintenance and safety tips.
(Many of the links in this article redirect to a specific reviewed product. Your purchase of these products through affiliate links helps to generate commission for Storables.com, at no extra cost. Learn more)
Introduction
Welcome to our guide on how to install the Ryobi table saw blade guard. Safety is of utmost importance when using power tools, and the blade guard is a crucial component that helps protect you from potential accidents and injuries. The blade guard acts as a barrier between you and the spinning blade, preventing contact and minimizing the risk of accidents.
In this article, we will walk you through the step-by-step process of installing the blade guard on your Ryobi table saw. We will also provide some essential safety precautions to keep in mind while working with power tools.
Before we dive into the installation process, it’s important to acknowledge that the instructions provided here are specific to the Ryobi table saw. However, many other table saw models have a similar blade guard installation process, so you can still find this guide helpful even if you own a different brand or model.
Remember to always consult your table saw’s user manual for model-specific instructions and safety guidelines. Let’s get started with the required safety precautions to ensure a smooth and secure installation process.
Key Takeaways:
- Prioritize safety by following the step-by-step guide to install the Ryobi table saw blade guard, ensuring a safer woodworking experience. Remember to consult the user manual for model-specific instructions and maintenance tips.
- Adjust the guard height and angle to customize it for your cutting needs, and perform thorough testing to ensure smooth and effective operation. By following these steps, you’re creating a safer working environment for woodworking projects.
Safety Precautions
Before you begin the installation process, it’s crucial to prioritize safety. Working with power tools can be hazardous, so it’s essential to follow these safety precautions:
- Read the User Manual: Familiarize yourself with the user manual provided by Ryobi specifically for your table saw model. It contains crucial safety information and guidelines that you must follow.
- Wear Personal Protective Equipment (PPE): Always wear appropriate PPE, including safety glasses or goggles to protect your eyes from flying debris and dust. Additionally, wearing ear protection, gloves, and a dust mask is recommended to protect your hands, ears, and lungs from potential harm.
- Ensure a Clean and Well-lit Workspace: Clear your workspace of any clutter, debris, or obstacles that could impede your work or cause accidents. Ensure proper lighting to have a clear view of your work area and to prevent any mistakes or mishaps.
- Disconnect Power: Before starting any installation or adjustment, always disconnect the power cord from the power source. This will help prevent accidental startups and ensure your safety.
- Secure the Workpiece: Before operating the table saw or performing any adjustments, make sure your workpiece is securely positioned and clamped down. This will prevent it from moving or shifting during the installation process.
- Use Proper Technique: Follow correct cutting techniques and positioning to maintain control and reduce the risk of accidents. Always keep your hands and other body parts away from the blade and the cutting area.
By following these safety precautions, you are taking important steps to protect yourself from potential accidents and injuries. Now that we’ve covered the necessary safety measures, let’s move on to the tools and materials you will need for the installation process.
Tools and Materials Needed
Before you begin installing the blade guard on your Ryobi table saw, make sure you have the following tools and materials:
- Ryobi table saw blade guard assembly (specific to your model)
- Phillips screwdriver
- Adjustable wrench
- Allen wrench (if required by your model)
- Clean cloth or rag
- Mild soap and water
- Optional: Lubricant for moving parts
Having these tools and materials ready will ensure a smooth and efficient installation process. Clean cloth, mild soap, and water are handy for cleaning and maintaining the blade guard assembly. Some models may require the use of an Allen wrench for specific adjustments. If you want to ensure smooth movement of the blade guard, you can also use a lubricant on the necessary parts, but it’s optional.
With everything prepared, you are now ready to move on to the step-by-step process of installing the blade guard assembly on your Ryobi table saw. In the next section, we will guide you through the process of unpacking the blade guard and preparing it for installation. Let’s get started!
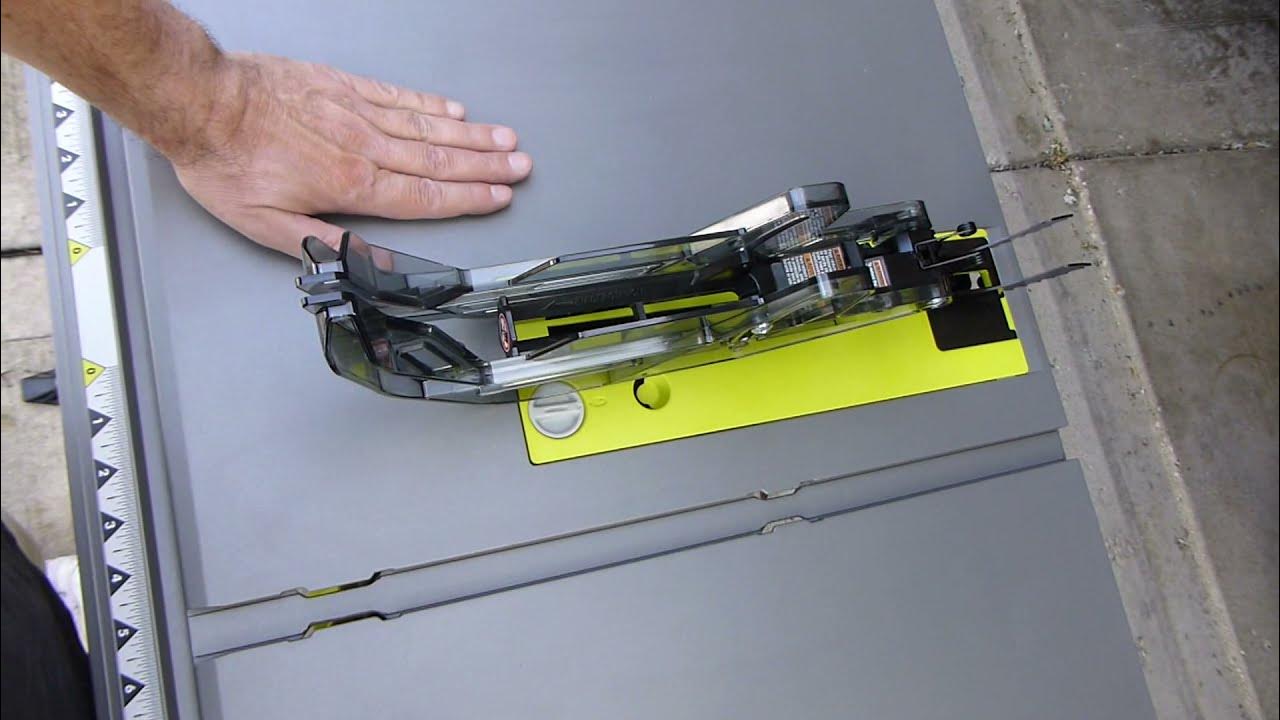
Step 1: Unpacking the Blade Guard
The first step in installing the blade guard on your Ryobi table saw is to unpack the blade guard assembly. Follow these steps to ensure a smooth process:
- Begin by locating the box or packaging containing the blade guard assembly. Carefully remove any packaging materials, such as bubble wrap or foam, to reveal the components.
- Inspect the contents of the package and ensure that you have received all the necessary components for the installation. This typically includes the blade guard housing, splitter, anti-kickback pawls, attaching screws, and any additional parts specific to your model.
- Place the unpacked components on a clean and flat surface. Check for any signs of damage or defects and contact Ryobi’s customer support if you notice any issues.
- Use a clean cloth or rag dampened with mild soap and water to clean any dirt or residue off the blade guard assembly. Gently wipe down the components, ensuring that they are free from debris or any contaminants that could affect their performance.
- Inspect the blade guard housing for any signs of wear or damage. Check that the guard mechanism moves smoothly, without any obstructions or stiffness. Lubricate the moving parts if necessary, following the manufacturer’s instructions.
By carefully unpacking and inspecting the blade guard assembly, you are ensuring that all components are present and in proper condition. Cleaning the assembly will help maintain its functionality and ensure a smooth installation process. Once you have completed these steps, you are ready to move on to the next step: mounting the blade guard assembly onto your Ryobi table saw.
When installing the Ryobi table saw blade guard, make sure to carefully follow the manufacturer’s instructions and use the appropriate tools for a safe and secure installation. Always double-check that the guard is properly aligned and functioning before using the table saw.
Step 2: Mounting the Blade Guard Assembly
Now that you have unpacked and prepared the blade guard assembly, it’s time to mount it onto your Ryobi table saw. Follow these steps to ensure a secure installation:
- Start by locating the attachment points on your table saw where the blade guard assembly will be mounted. These attachment points are typically located near the rear of the blade, closer to the motor housing.
- Align the blade guard assembly with the attachment points on your table saw, ensuring that it is positioned correctly and parallel to the blade. Take note of any mounting holes or slots in the guard housing that match up with the attachment points.
- Using a screwdriver, insert the attaching screws through the mounting holes or slots on the blade guard housing and into the corresponding attachment points on the table saw. Tighten the screws securely but avoid over-tightening, as this may cause damage to the components.
- If your table saw model requires additional mounting brackets or fasteners, consult the user manual to ensure you install them correctly. Follow the provided instructions to secure the blade guard assembly in place.
- Double-check that the blade guard assembly is firmly attached to your table saw. Gently tug on the guard to ensure it is securely in place and doesn’t wobble or shift. If any adjustments are necessary, refer to the user manual for guidance on how to tighten or align the blade guard assembly.
Once you have completed these steps, you have successfully mounted the blade guard assembly onto your Ryobi table saw. In the next step, we will guide you through adjusting the guard height and angle to ensure it functions optimally for your cutting tasks. Keep reading to learn more!
Read more: How To Change The Blade On A Ryobi Table Saw
Step 3: Adjusting the Guard Height and Angle
After you have successfully mounted the blade guard assembly onto your Ryobi table saw, it’s important to adjust the guard height and angle to ensure optimal functionality. Follow these steps to make the necessary adjustments:
- Locate the adjustment mechanism for the blade guard height on your table saw. This may be a knob, lever, or other types of controls. Refer to the user manual if you are unsure about the specific location on your model.
- Rotate or move the adjustment mechanism to raise or lower the guard to the desired height. It’s recommended to position the guard slightly above the height of the workpiece to provide ample clearance while still offering protection.
- Check that the guard does not interfere with the blade during operation. Slowly rotate the blade by hand to ensure that it can freely pass through the guard without any obstructions or contact.
- Next, adjust the angle of the blade guard to ensure it aligns properly with the direction of the blade. This is especially important when making bevel cuts or angled cuts. Use the adjustment mechanism provided by your table saw model to set the desired angle.
- Test the guard at different angles to ensure it remains properly aligned and does not interfere with the cutting operation. Make any necessary adjustments until you are satisfied with the guard’s positioning.
By adjusting the guard height and angle, you are customizing it to accommodate your specific cutting needs and ensure optimal functionality. Remember, the goal is to have the guard provide adequate protection while allowing smooth and unobstructed operation of the blade. Take your time to make precise adjustments to achieve the desired positioning.
With the guard height and angle properly adjusted, you’re now ready to move on to the next step: testing the blade guard to ensure it operates smoothly and effectively. Let’s proceed!
Step 4: Testing the Blade Guard
Once you have installed and adjusted the blade guard on your Ryobi table saw, it’s important to perform a thorough test to ensure that it operates smoothly and effectively. Follow these steps to test the functionality of the blade guard:
- Before testing, ensure that the table saw is powered off and disconnected from the power source. Safety should always be your top priority.
- Remove any obstructions or debris from the table saw and the area around it. This will help prevent any interference or accidents during the testing process.
- Turn on the table saw and observe the movement of the blade guard as you make test cuts. Verify that the guard automatically adjusts and stays clear of the blade during the cutting operation.
- Perform various cutting tasks, including straight cuts and angled cuts, to evaluate the guard’s performance. Take note of any instances where the guard obstructs the cutting process or causes any inconvenience.
- Check for smooth and effortless movement of the blade guard throughout the cutting process. Ensure that it retracts easily when not in use and extends to cover the blade when necessary.
- As you complete the testing process, pay close attention to any unusual noises, vibrations, or signs of malfunctions. If you notice any issues, stop using the table saw immediately and consult the user manual or contact Ryobi’s customer support for assistance.
Testing the blade guard is a crucial step in ensuring your safety and the overall functionality of the guard. By observing its movement during different cutting tasks, you can identify any potential issues and make any necessary adjustments or repairs before proceeding with your woodworking projects.
Congratulations! You have successfully installed and tested the blade guard on your Ryobi table saw. By following these steps, you have taken an important step towards creating a safer working environment. Remember to always adhere to the manufacturer’s instructions and prioritize safety whenever you use your table saw.
With the blade guard properly installed and functioning, you can now confidently continue your woodworking projects with peace of mind. Happy woodworking!
Conclusion
Installing the blade guard on your Ryobi table saw is a critical step in ensuring your safety while using the tool. By following the step-by-step process outlined in this guide, you have successfully installed the blade guard and made necessary adjustments for optimal functionality.
Throughout this guide, we emphasized the importance of safety precautions, including the use of personal protective equipment, maintaining a clean workspace, and securing the workpiece. These precautions, along with the proper installation and adjustment of the blade guard, contribute to a safer woodworking experience.
Remember to regularly inspect and maintain your blade guard to ensure it remains in proper working condition. Cleaning the guard and lubricating moving parts, if necessary, will help prolong its lifespan and ensure smooth operation.
Additionally, it’s essential to stay informed about the specific instructions and guidelines provided in the user manual for your Ryobi table saw model. Always consult the manual for any model-specific instructions or safety information.
By installing and testing the blade guard, you have taken a significant step towards creating a safer working environment and reducing the risk of accidents or injuries. Ensure you follow safe practices and prioritize your well-being every time you use your table saw.
Thank you for following our guide on how to install the Ryobi table saw blade guard. We hope this article has been informative and helpful in enhancing your woodworking safety. Happy and safe woodworking!
Frequently Asked Questions about How To Install Ryobi Table Saw Blade Guard
Was this page helpful?
At Storables.com, we guarantee accurate and reliable information. Our content, validated by Expert Board Contributors, is crafted following stringent Editorial Policies. We're committed to providing you with well-researched, expert-backed insights for all your informational needs.


0 thoughts on “How To Install Ryobi Table Saw Blade Guard”