Home>Articles>How To Install The Wood Plank Wall Of Your Dreams
Articles
How To Install The Wood Plank Wall Of Your Dreams
Modified: December 7, 2023
Discover step-by-step articles on creating the wood plank wall you've always envisioned. Get expert guidance on installation techniques and design inspiration for stunning results.
(Many of the links in this article redirect to a specific reviewed product. Your purchase of these products through affiliate links helps to generate commission for Storables.com, at no extra cost. Learn more)
Introduction
Adding a wood plank wall to your home can instantly transform any room into a warm and inviting space. Whether you’re looking to create a rustic feature wall in your living room or add a touch of charm to your bedroom, installing a wood plank wall is a great DIY project that can be both rewarding and cost-effective.
In this guide, we will take you through the step-by-step process of installing the wood plank wall of your dreams. From preparing the wall to sanding and finishing, we will cover all the essential steps to help you achieve a professional-looking result.
Before we dive into the installation process, let’s take a look at the materials you’ll need to gather beforehand.
Key Takeaways:
- Transform any room with a warm and inviting wood plank wall. Follow the step-by-step guide for a professional-looking DIY installation and enjoy the creative process.
- Prioritize safety, get creative with design, and take your time for a high-quality finish. Embrace DIY and create a stunning wood plank wall that adds charm to your home.
Read more: How To Install Wood Ceiling Planks
Materials Needed
Before you get started, it’s important to have all the necessary materials on hand. Here’s a list of what you’ll need:
- Wood planks: Choose the type of wood that suits your aesthetic preferences. Common options include pine, cedar, or reclaimed wood.
- Adhesive: Opt for a strong construction adhesive that is specifically designed for bonding wood to walls.
- Nails or brad nails: These will be used to secure the planks to the wall. Depending on your preference, you can use a hammer and nails or a nail gun.
- Saw: A circular saw or a miter saw will come in handy for cutting the planks to size.
- Measuring tape: Ensure accurate measurements by having a measuring tape at hand.
- Pencil: Use a pencil to mark the measurements and cuts on the wood planks.
- Sandpaper: Invest in sandpaper with different grits to prepare the planks and smooth out any rough edges.
- Putty or wood filler: This will be used to fill in nail holes and any other imperfections.
- Lacquer or paint (optional): If you prefer a finished look, you can choose to apply a lacquer or paint of your choice.
- Protective gear: It’s important to prioritize safety, so don’t forget to wear safety goggles and gloves when working with tools and adhesives.
Once you’ve gathered all the necessary materials, you’re ready to start preparing the wall for the wood plank installation.
Preparing the Wall
Before you begin installing the wood plank wall, it’s essential to properly prepare the wall surface. Follow these steps to ensure a smooth and secure installation:
- Clean the wall: Remove any dust, dirt, or debris from the wall surface using a broom or vacuum cleaner. This will ensure that the adhesive adheres properly to the wall.
- Repair any damages: Inspect the wall for any noticeable cracks, holes, or uneven surfaces. Use spackle or drywall compound to fill in any imperfections and sand them down until smooth.
- Prime the wall (optional): If you’re installing the wood plank wall in a high-moisture area like a kitchen or bathroom, consider applying a primer to the wall surface. This will help prevent moisture from seeping into the wood and prolong the life of your installation.
Once you’ve cleaned, repaired, and primed the wall (if desired), you’re ready to move on to the next step: measuring and cutting the wood planks.
Measuring and Cutting the Planks
Accurate measurements are crucial for a successful wood plank wall installation. Here’s how you can measure and cut the planks:
- Measure the wall: Use a measuring tape to determine the height and width of the wall. This will help you calculate the number of planks you’ll need and the length of each plank.
- Calculate the spacing: Decide on the spacing between the planks. Depending on your desired look, you can opt for a tight fit or leave a small gap between each plank.
- Mark the planks: Using a pencil, mark the measurements and the spacing on each wood plank. Double-check your measurements to avoid any errors.
- Cut the planks: Using a circular saw or miter saw, carefully cut the planks according to the marked measurements. Ensure that the cuts are clean and precise.
Remember to take necessary safety precautions while cutting the planks. Wear protective goggles and gloves, and be mindful of your fingers and body position.
Once you’ve measured and cut the planks, the next step is to apply adhesive to the back of the planks and install the first row on the wall.
Applying Adhesive
Applying adhesive is a crucial step in ensuring a strong and secure bond between the wood planks and the wall. Here’s how to properly apply adhesive for your wood plank wall:
- Read the instructions: Before using the adhesive, carefully read the manufacturer’s instructions to understand the specific application process and any safety precautions.
- Prepare the adhesive: Follow the instructions to mix or prepare the adhesive, if necessary. Some adhesives may need to be stirred or shaken before use.
- Apply the adhesive: Starting with the first plank, apply a generous amount of adhesive to the backside of the plank using a trowel or putty knife. Make sure the adhesive is evenly spread across the entire surface.
- Press the plank onto the wall: Carefully press the plank onto the wall in the desired position, ensuring that it is level and aligned with the markings or guidelines you have made earlier. Apply gentle pressure to ensure a secure bond.
- Continue with the remaining planks: Repeat the adhesive application and installation process for each subsequent plank, ensuring consistent spacing between each plank.
- Check for any excess adhesive: As you install each plank, periodically check for any excess adhesive that may seep out from the edges. Immediately wipe away any excess adhesive with a damp cloth or sponge.
Allow the adhesive to dry according to the manufacturer’s instructions before proceeding to the next step. This will usually take several hours or overnight.
Now that you’ve installed the first row, it’s time to continue with the remaining rows of wood planks.
Read more: How To Join Wood Planks With Hand Tools
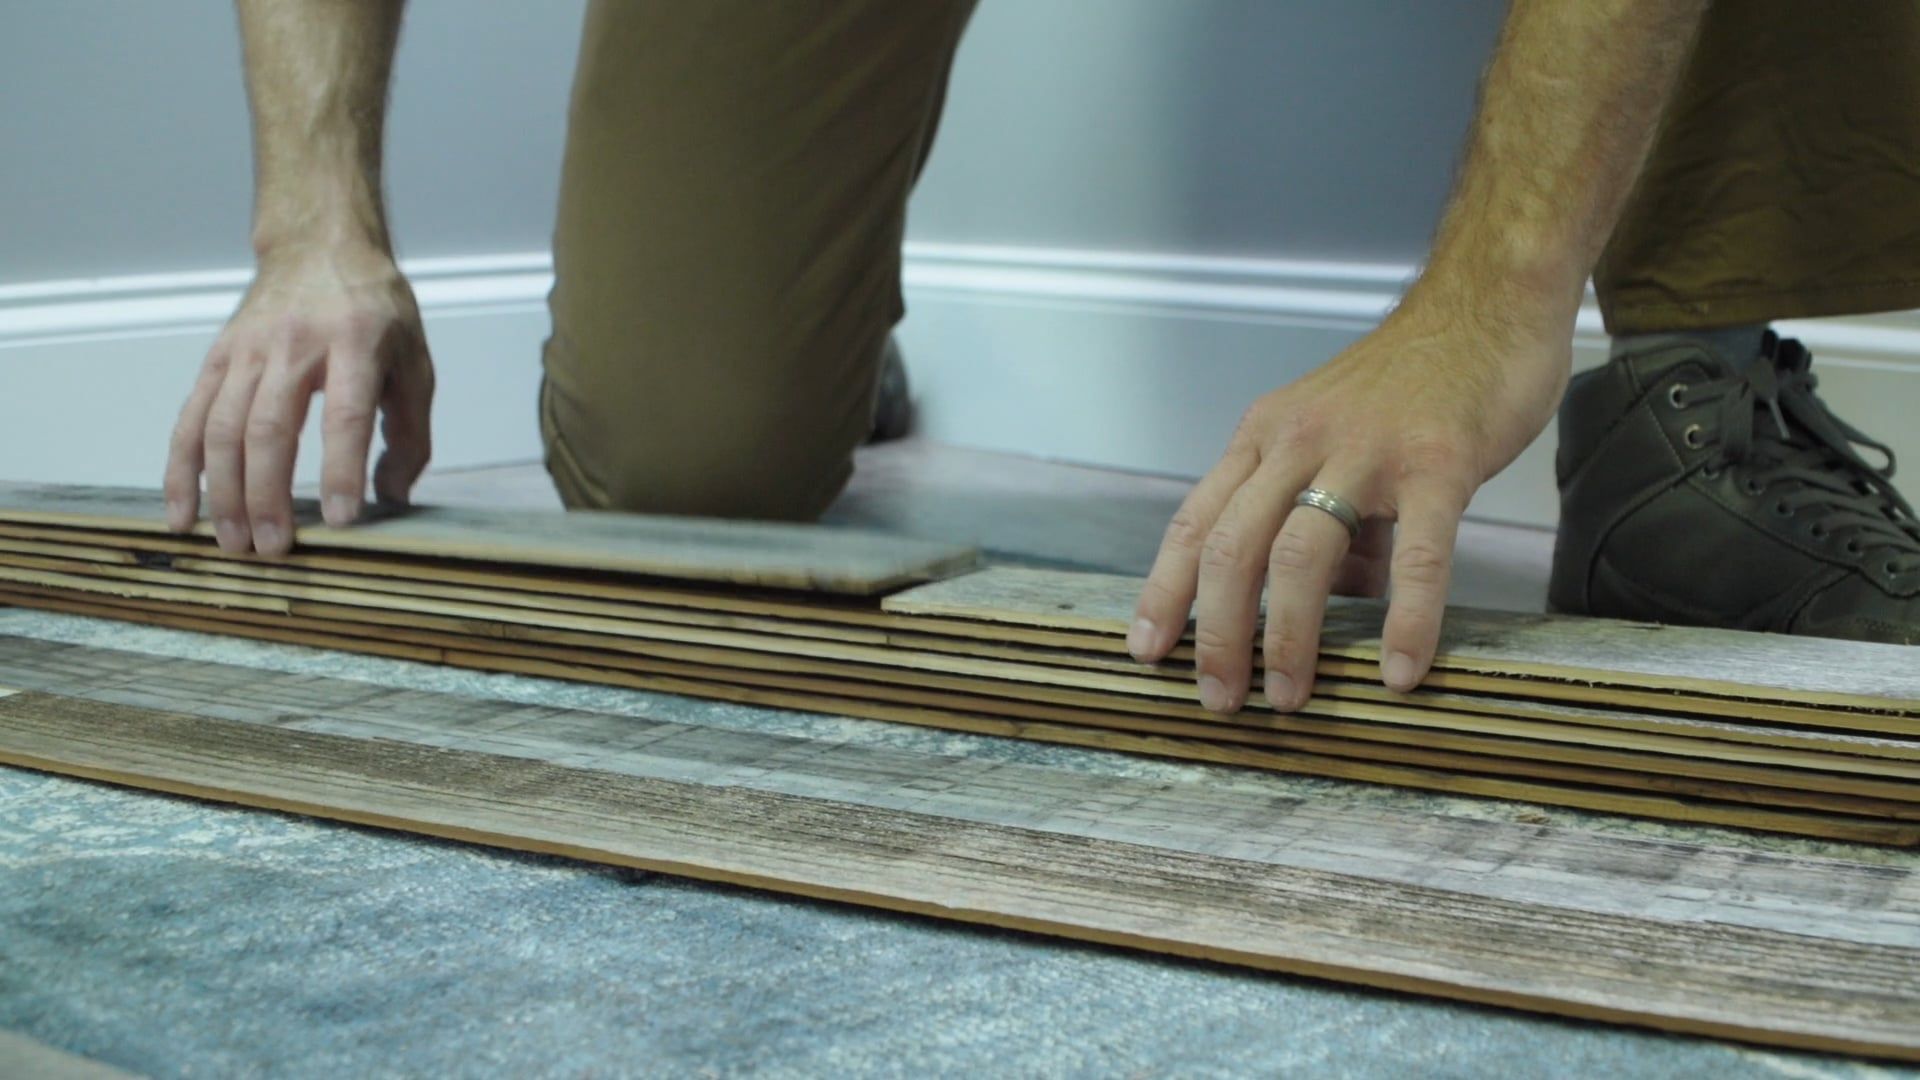
Installing the First Row
Installing the first row of wood planks is a critical step in creating a straight and level base for the rest of the installation. Follow these steps to ensure a seamless and professional result:
- Start from the bottom: Begin installing the first row of planks at the bottom of the wall. This will help provide a solid foundation for the rest of the installation.
- Ensure level installation: Use a level to ensure that the first row is installed perfectly level. Adjust as necessary by adding or removing adhesive.
- Secure the planks: Once the first plank is in position, use nails or a brad nailer to securely fasten it to the wall. Place the nails at regular intervals, ensuring they go through the plank and into the wall studs for maximum stability.
- Continue with the remaining planks: Install the adjacent planks, ensuring a tight fit and maintaining the desired spacing. Use the level to check for any inconsistencies and adjust as needed.
- Trim the last plank: Measure and cut the last plank of the first row to fit the remaining space, allowing for the desired spacing between the plank and any adjacent walls or corners.
As you install each plank, double-check for levelness and alignment with the previous plank. This will help create a seamless and visually appealing wood plank wall.
Once the first row is complete, continue with the installation of the remaining rows to cover the entire wall.
Before installing a wood plank wall, make sure to acclimate the wood to the room’s humidity for at least 48 hours. This will prevent warping and shrinking after installation.
Installing the Remaining Rows
With the first row securely installed, it’s time to continue building your wood plank wall by installing the remaining rows. Follow these steps to ensure a consistent and visually appealing installation:
- Apply adhesive to the back of each plank: Use a trowel or putty knife to apply adhesive to the backside of each plank before placing it on the wall. Make sure to spread the adhesive evenly for a secure bond.
- Align and level the planks: As you install each new row, use a level to ensure that the planks are aligned horizontally and vertically. This will help maintain a straight and even appearance for the entire wall.
- Continue with the staggered pattern: To achieve a more natural and visually appealing look, stagger the seams of the planks in each row. This will create a pleasing pattern and enhance the overall aesthetic of the wood plank wall.
- Secure the planks: Just like with the first row, use nails or a brad nailer to securely fasten each plank to the wall. Make sure to place the nails at regular intervals, ensuring they penetrate the plank and go into the wall studs for added stability.
- Trim the last plank of each row: Measure and cut the last plank of each row to fit the remaining space. Remember to leave the desired spacing between the plank and any adjacent walls or corners.
- Check for consistency: Periodically step back and assess your progress to ensure that the planks are level, aligned, and consistently spaced across the entire wall.
Take your time during the installation process to achieve a high-quality finish. A well-installed wood plank wall can instantly elevate the look and feel of your space.
Once you’ve completed installing all the rows, it’s time to trim any excess planks and fill in any nail holes.
Trimming the Planks
After completing the installation of the wood planks, it’s common to have excess length on some of the planks. Trimming them will give your wall a clean and finished look. Here’s how to trim the planks:
- Measure the excess length: Use a measuring tape to determine the necessary amount to trim from each plank. Measure from the last installed row to the edge of the wall or any obstructions, such as outlets or corners.
- Mark the cutting line: Use a pencil to mark the cutting line on each plank according to your measurements.
- Trim the planks: Carefully cut along the marked lines using a circular saw or a miter saw. Ensure that your cuts are straight and precise to achieve a neat finish.
It’s important to take safety precautions while trimming the planks. Use protective goggles and gloves, and be cautious of your fingers and body position.
Once you’ve trimmed the planks, examine the wall for any visible nail holes or imperfections.
Filling Nail Holes
As you near the completion of your wood plank wall installation, you’ll want to ensure a polished and seamless appearance by filling in the nail holes. Here’s how to fill the nail holes:
- Select a suitable filler: Choose a wood filler or putty that matches the color of your wood planks. This will help to blend the filled holes with the surrounding wood.
- Prepare the filler: Follow the manufacturer’s instructions to prepare the filler. This may involve mixing the filler or simply opening the container.
- Apply the filler: Use a putty knife or a small spatula to apply the filler into the nail holes. Fill the holes completely, ensuring that the filler is level with the surface of the wood.
- Smooth the filler: After filling the holes, use the putty knife or spatula to smooth the surface of the filler. This will help create a seamless finish.
- Remove excess filler: Wipe away any excess filler from the surrounding wood using a damp cloth. Be careful not to remove the filler from the nail holes.
- Allow the filler to dry: Give the filler sufficient time to dry according to the product’s instructions. This will typically take several hours or overnight.
- Sand the filled areas: Once the filler has dried, lightly sand the filled areas using fine-grit sandpaper. This will ensure a smooth and even surface.
By filling in the nail holes and sanding the filled areas, you’ll achieve a professional and seamless wood plank wall installation.
After sanding, it’s time to move on to the final step: sanding and finishing the wood planks.
Read more: How To Install Vinyl Plank Flooring
Sanding and Finishing
One of the last steps in the wood plank wall installation process is sanding and finishing the planks. This step will not only ensure a smooth and polished surface but also provide protection for the wood. Here’s how to sand and finish your wood plank wall:
- Sand the planks: Using a sanding block or an orbital sander, gently sand the surface of the wood planks. Start with a coarse-grit sandpaper and gradually move to finer grits to achieve a smooth finish. Sand in the direction of the wood grain to avoid any scratches or damage.
- Remove dust: After sanding, wipe away any dust or debris from the planks using a clean, damp cloth. This will prepare the surface for the finishing process.
- Choose the finish: Decide whether you want to leave the natural beauty of the wood exposed or apply a protective finish. Options include clear sealants, stains, or paint. Consider the aesthetic you want to achieve and choose a finish that complements your space.
- Apply the finish: Follow the manufacturer’s instructions to apply the chosen finish to the wood planks. Use a brush, roller, or spray application method, depending on the finish you have selected. Apply the finish in even strokes, following the direction of the wood grain.
- Allow the finish to dry: Give the finish ample time to dry according to the manufacturer’s recommendations. This will typically take a few hours or overnight.
- Inspect the finished wall: Once the finish is dry, inspect the wood plank wall for any areas that may require touch-ups or additional coats of finish. Make any necessary adjustments to ensure a consistent and desired appearance.
By sanding and finishing your wood plank wall, you’ll not only enhance its visual appeal but also protect the wood and increase its longevity.
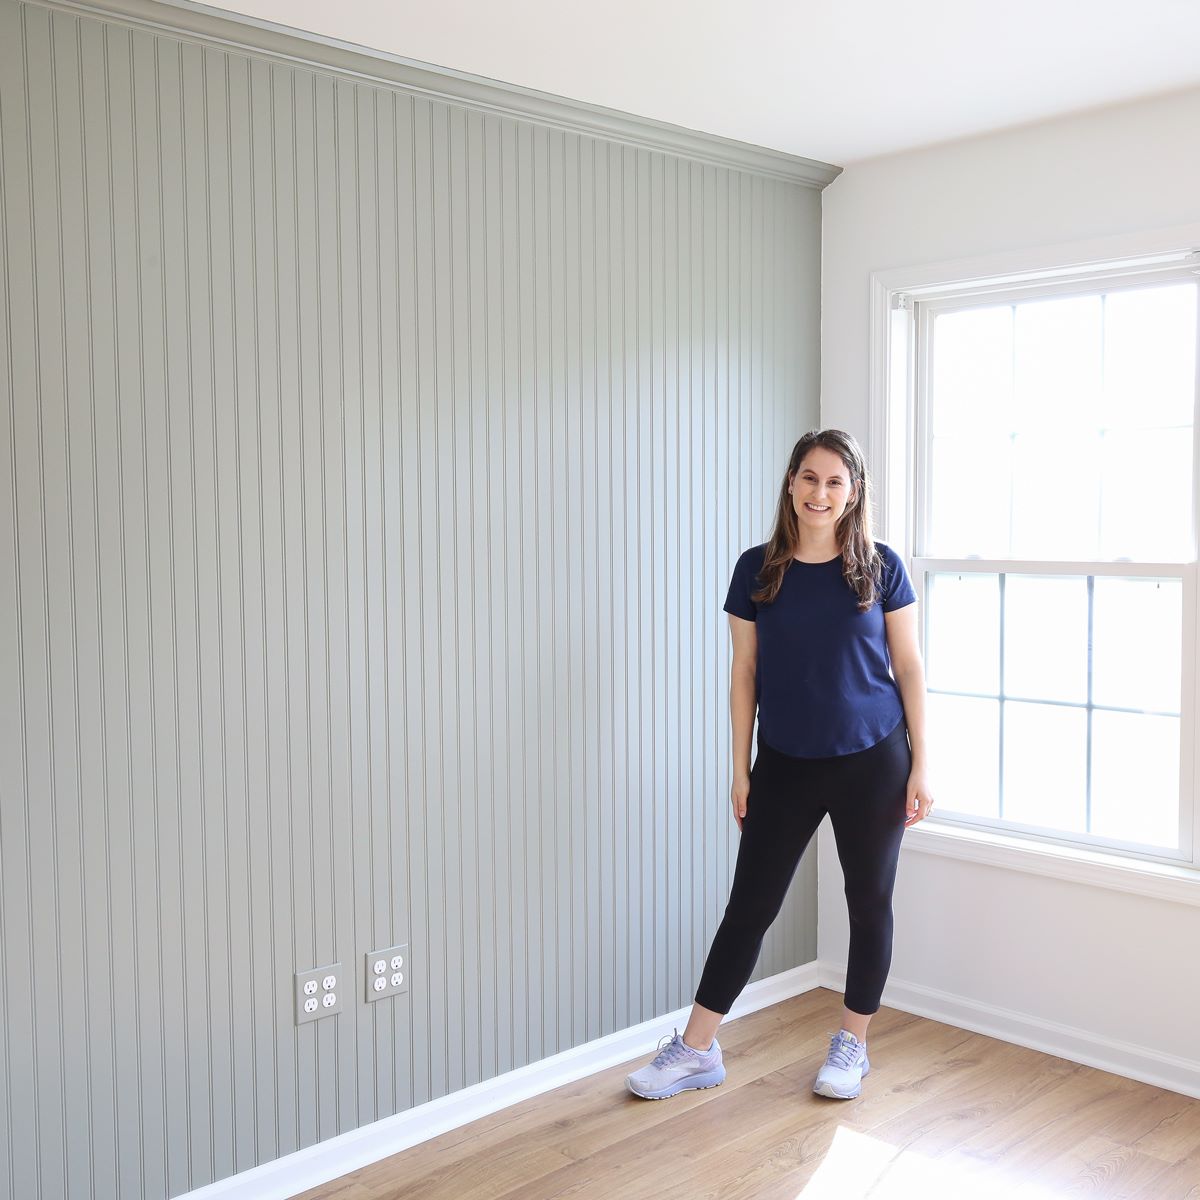
Congratulations! You have successfully completed the installation and finishing of your wood plank wall. Step back and admire the beautiful transformation of your space.
Conclusion
Installing a wood plank wall is a rewarding and creative DIY project that can instantly elevate the look and feel of any room. By following the step-by-step process and using the right materials, you can achieve a professional-looking installation that adds warmth and character to your space.
Throughout this guide, we have covered the essential steps, from preparing the wall to sanding and finishing the wood planks. By properly measuring, cutting, and installing the planks, you can create a beautiful and cohesive wood plank wall that will be the envy of your friends and family.
Remember to prioritize safety and take necessary precautions when working with tools and adhesives. Wear protective gear and double-check your measurements to ensure accurate and precise installation.
Don’t be afraid to get creative with the design of your wood plank wall. Play with different wood textures, stains, or paints to achieve the aesthetic that best suits your style and space. Whether you prefer a rustic, farmhouse-inspired look or a sleek and modern design, a wood plank wall can be customized to fit any décor scheme.
Lastly, enjoy the process and take your time to ensure a high-quality finish. By putting in the effort, you will be rewarded with a stunning feature wall that adds charm and character to your home for years to come.
So go ahead, embrace your inner DIY enthusiast, and start transforming your space with a wood plank wall installation. Get ready to create a warm and inviting atmosphere that will be the envy of all who enter.
Frequently Asked Questions about How To Install The Wood Plank Wall Of Your Dreams
Was this page helpful?
At Storables.com, we guarantee accurate and reliable information. Our content, validated by Expert Board Contributors, is crafted following stringent Editorial Policies. We're committed to providing you with well-researched, expert-backed insights for all your informational needs.


0 thoughts on “How To Install The Wood Plank Wall Of Your Dreams”