Articles
How To Install Vertical Hardie Board Siding
Modified: August 20, 2024
Learn how to install vertical Hardie board siding with our informative articles. Achieve a professional-looking exterior for your home with step-by-step instructions and expert tips.
(Many of the links in this article redirect to a specific reviewed product. Your purchase of these products through affiliate links helps to generate commission for Storables.com, at no extra cost. Learn more)
Introduction
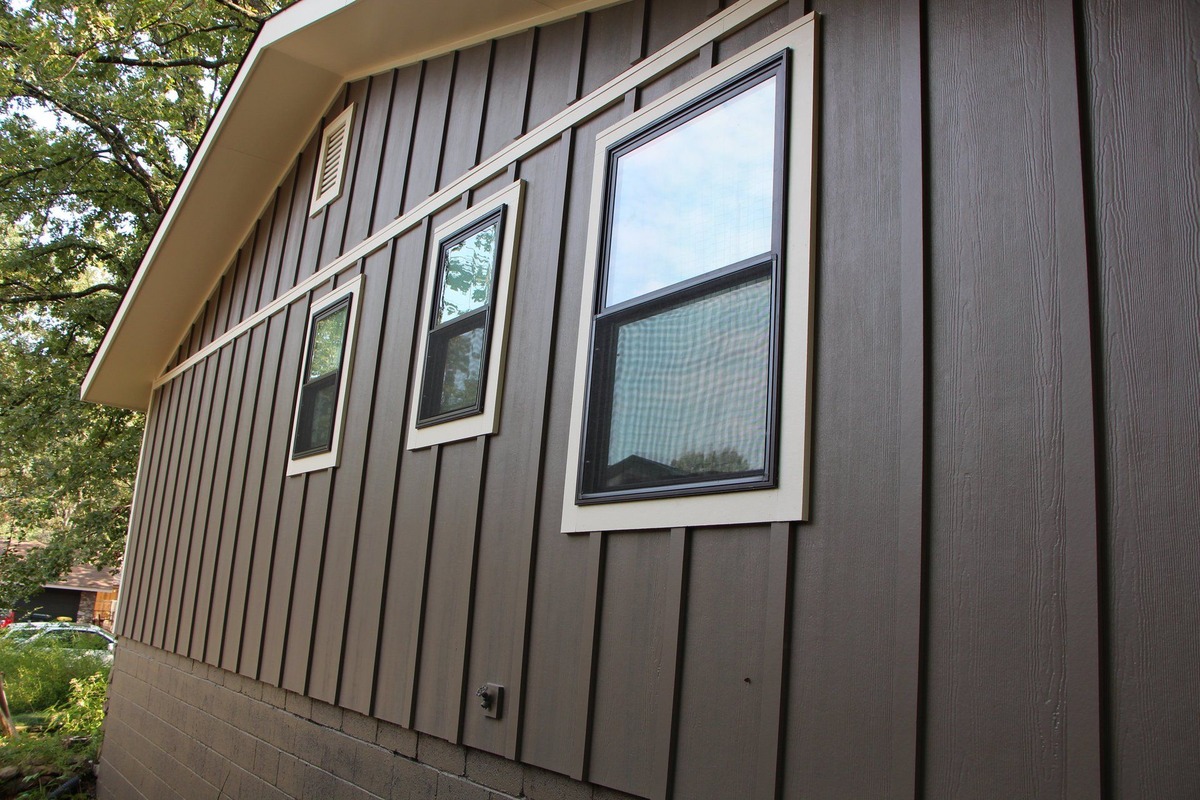
Welcome to the comprehensive guide on how to install vertical Hardie board siding. If you’re looking to add durability, beauty, and value to your home, Hardie board siding is an excellent choice. Made from cement fiber, it is resistant to rot, insects, and fire, making it a popular option for many homeowners.
Installing vertical Hardie board siding may seem like a daunting task, but with the right materials, tools, and instructions, it can be a straightforward process. In this article, we will walk you through the step-by-step process of installing vertical Hardie board siding, from preparing the wall to finishing touches.
Before we dive into the installation process, let’s take a look at some of the materials and tools you will need to complete the project:
Read more: How To Remove Hardie Board Siding
Materials Needed:
- Vertical Hardie board siding
- Siding nails
- Siding starter strips
- House wrap
- Furring strips (if needed)
- Corner posts
- Trim boards
- Caulk and sealants
- Paint or finish
Tools Needed:
- Tape measure
- Level
- Chalk line
- Circular saw or snips
- Hammer or nail gun
- Utility knife
- Drill
- Caulking gun
- Paintbrush
Now, let’s get started with preparing the wall for the installation of vertical Hardie board siding.
Key Takeaways:
- Installing vertical Hardie board siding requires careful preparation, accurate measurements, and attention to detail. Following the step-by-step process outlined in this guide will ensure a durable and visually appealing result for your home.
- Vertical Hardie board siding offers resistance to rot, insects, and fire, adding both beauty and value to your home. With low maintenance requirements and a long lifespan, it’s a worthwhile investment for homeowners seeking durability and longevity.
Materials and Tools Needed
Before you begin the installation process, it’s important to gather all the necessary materials and tools. Here is a list of what you’ll need:
Materials:
- Vertical Hardie board siding: This is the main material for your siding installation. Choose the color and style that best suits your home.
- Siding nails: These nails are specifically designed for siding installation and provide a secure hold.
- Siding starter strips: These strips are installed at the bottom of the wall and provide a level and solid base for your siding.
- House wrap: This is a protective barrier that helps to prevent moisture infiltration and provides additional insulation.
- Furring strips (if needed): These are wooden strips that are installed vertically on the wall to create a flat surface for the siding.
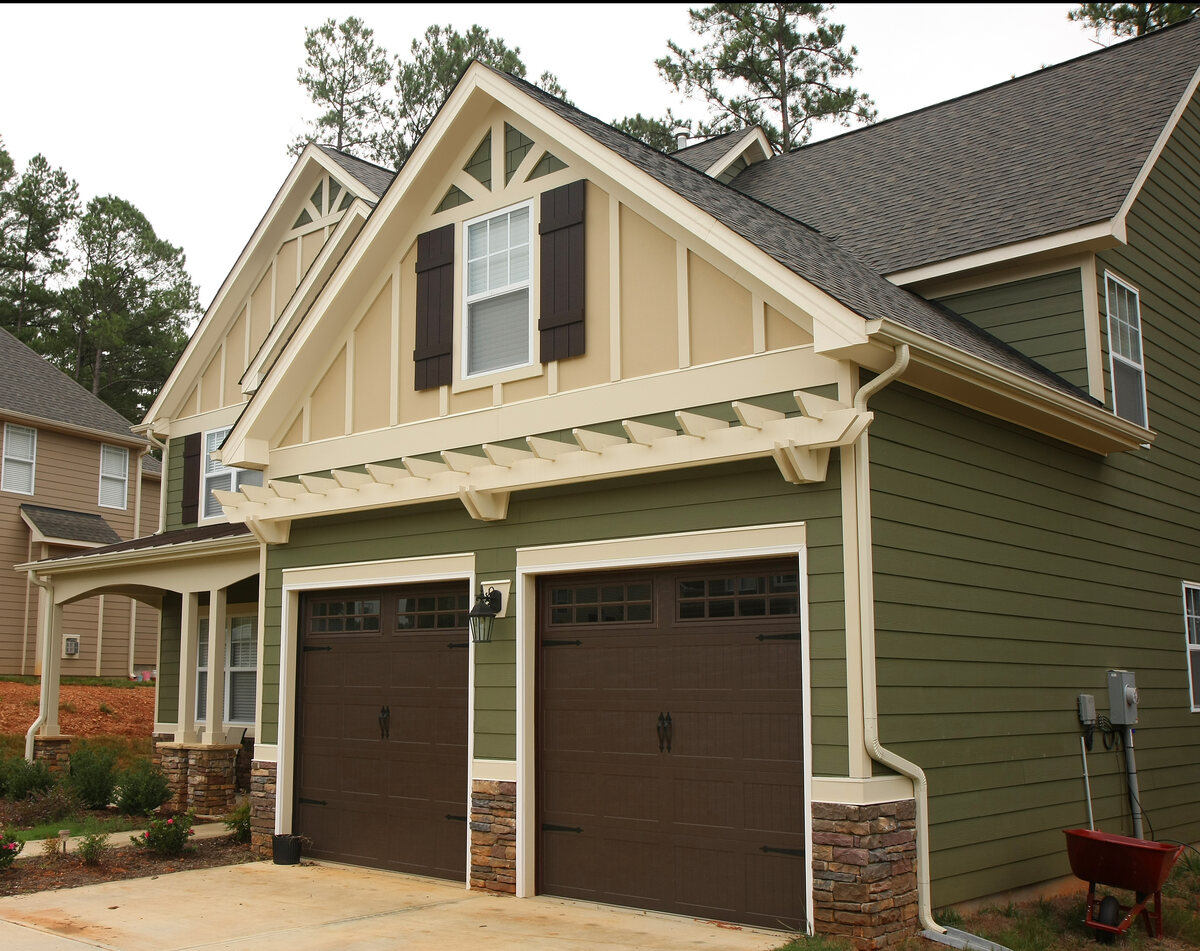
- Corner posts: These posts are used to cover the corners of your home and provide a finished look.
- Trim boards: Trim boards are used around windows, doors, and other areas to create a clean and polished appearance.
- Caulk and sealants: These are used to seal gaps and joints between the siding and other materials, providing extra protection against water intrusion.
- Paint or finish: If you choose to paint or finish your siding, make sure to have the appropriate paint or finish for Hardie board.
Read more: How To Cut Hardie Board Siding
Tools:
- Tape measure: This is essential for taking accurate measurements.
- Level: A level is necessary to ensure that your siding is installed straight and level.
- Chalk line: A chalk line is used to mark guidelines for the installation.
- Circular saw or snips: You’ll need one of these tools to cut the siding to the appropriate length.
- Hammer or nail gun: A hammer or nail gun is used to secure the siding to the wall.
- Utility knife: A utility knife is handy for trimming the siding to fit around obstacles and corners.
- Drill: A drill is needed to pre-drill nail holes and make any necessary adjustments.
- Caulking gun: This tool is used to apply caulk and sealants.
- Paintbrush: If you’re painting or finishing your siding, a paintbrush will be needed.
Having these materials and tools ready before starting the installation will make the process smoother and more efficient. Now that you’re equipped with everything you need, let’s move on to preparing the wall for your vertical Hardie board siding.
Preparing the Wall
Before you can begin installing the vertical Hardie board siding, you need to properly prepare the wall. Follow these steps to ensure a solid foundation for your siding:
1. Inspect the wall:
Start by inspecting the wall for any signs of damage, such as rot or mold. If you notice any issues, address them and make the necessary repairs before proceeding.
2. Remove existing siding:
If there is any existing siding in place, such as vinyl or wood, you’ll need to remove it. This can be done using a pry bar or siding removal tool. Take care not to damage the underlying structure of the wall.
Read more: What Is Hardie Board Siding Made Out Of
3. Install house wrap:
Next, install house wrap to provide an additional layer of protection against moisture. Start at the bottom of the wall and work your way up, overlapping the seams by at least 6 inches. Secure the house wrap using staples or nails, ensuring it is taut and wrinkle-free.
4. Install furring strips (if needed):
If your wall is uneven or not suitable for direct installation of the siding, you may need to install furring strips. These wooden strips create a flat surface for the siding and allow for better insulation. Place the furring strips vertically on the wall, spaced according to the manufacturer’s guidelines.
5. Mark reference lines:
Use a chalk line to mark reference lines on the wall. These lines will serve as a guide for the installation of the starter strips and the first course of siding. Ensure the lines are level and straight.
Once the wall is properly prepared, you’re ready to move on to the next step: installing the first board of vertical Hardie board siding. Preparing the wall is a crucial step in ensuring the success and longevity of your siding installation, so take the time to do it right. Let’s continue with the installation process and learn how to install the first board.
Installing the First Board
Now that the wall is prepared, it’s time to start installing the vertical Hardie board siding. Follow these steps to install the first board:
Read more: How Do You Clean Hardie Board Siding
1. Measure and cut the first board:
Measure the height of the wall from the bottom to the top and subtract the appropriate clearance, as specified by the manufacturer. Use a circular saw or snips to cut the first board to the desired length.
2. Install the starter strip:
Place the starter strip along the bottom of the wall, aligning it with the reference line. The starter strip provides a base for the first course of siding and helps to ensure a level installation. Secure the starter strip to the wall using nails or screws.
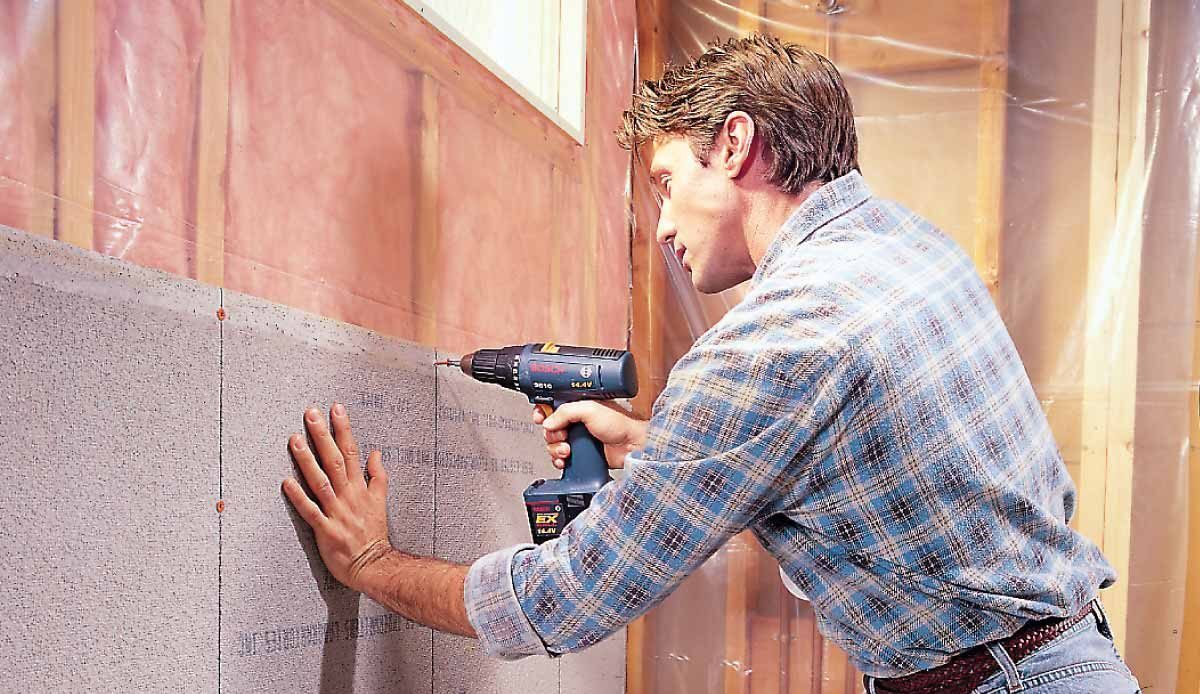
3. Attach the first board:
Place the first board vertically against the starter strip, aligning it with the reference line. Make sure the board is level using a spirit level. Start at one end and secure the board to the wall using siding nails or screws. Place the nails or screws at the top of the board, leaving room for expansion and contraction.
4. Ensure proper spacing:
Leave a small gap, typically around 1/8 inch, between the boards to allow for expansion and contraction. Use spacers or your fingers to maintain consistent spacing as you install the siding.
Read more: How To Attach Hardie Siding
5. Continue with the next boards:
Once the first board is securely in place, proceed to install the next boards in the same manner. Align each board with the reference line, ensuring it is level and properly spaced from the previous board. Secure each board with nails or screws, leaving room for expansion and contraction.
Continue installing the vertical Hardie board siding, working your way up the wall, until you reach the top. Take care to maintain straight and level lines, and double-check measurements and spacing as you go along. Now that you’ve installed the first board, it’s time to move on to attaching the remaining boards. Let’s proceed to the next step and learn how to do it.
Attaching the Remaining Boards
Once the first board of vertical Hardie board siding is installed, it’s time to attach the remaining boards. Follow these steps to ensure a proper and secure installation:
1. Align the boards:
Align each subsequent board with the previous one, ensuring they are level and properly spaced. Use a spirit level to check for any unevenness or deviations from the reference line.
2. Secure the boards:
Secure each board to the wall by driving siding nails or screws near the top, leaving enough room for expansion and contraction. Take care not to overdrive the nails or screws, as this can cause damage to the siding.
Read more: How To Paint Hardie Siding
3. Double-check spacing and alignment:
Continuously check the spacing between the boards to maintain a consistent and uniform look. Use spacers or your fingers to ensure the proper gap between each board. Additionally, regularly check the alignment of the boards with the reference line and adjust as necessary.
4. Trim and cut as needed:
As you approach obstacles such as windows, doors, or corners, you may need to trim or cut the siding to fit. Measure carefully and use a circular saw or snips to make accurate cuts. Ensure that the trimmed pieces fit properly and align with the adjacent boards.
5. Continue until reaching the top:
Continue attaching the boards one by one, working your way up the wall until you reach the top. Take your time to ensure that each board is securely fastened and properly aligned. Regularly check for levelness, spacing, and any adjustments that may be needed.
Remember to follow the manufacturer’s guidelines for installation, which may include specific instructions for nailing or screwing and spacing requirements. By carefully attaching the remaining boards, you will create a seamless and visually appealing vertical Hardie board siding for your home.
Now that you’ve successfully attached the remaining boards, let’s move on to the next step of cutting and fitting the siding to create a finished look.
Cutting and Fitting the Siding
When installing vertical Hardie board siding, you’ll often encounter areas that require cutting and fitting to create a seamless and finished look. Follow these steps to effectively cut and fit the siding:
Read more: How Thick Is Hardie Siding
1. Measure the area:
Using a tape measure, carefully measure the dimensions of the area where the siding needs to be cut and fitted. Pay attention to any obstacles such as windows, doors, or corners that may require special cuts.
2. Mark the siding:
Transfer the measurements to the siding panel, marking the area that needs to be cut. Use a pencil or marker to make clear and accurate lines. Take into account the necessary allowance for expansion and contraction.
3. Cut the siding:
Depending on the complexity of the cut, you can use either a circular saw or snips to cut the siding. Ensure that you follow proper safety precautions when using power tools and always wear protective gear. Make precise and clean cuts following the marked lines.
4. Fit the siding:
After cutting the siding, carefully fit it into the designated area. Check for proper alignment and make any necessary adjustments, ensuring that the piece fits snugly against the adjacent siding.
5. Secure the siding:
Once the siding piece is properly fitted, secure it to the wall using siding nails or screws. Take care not to overdrive the fasteners, as this can damage the siding. Ensure that the piece is adequately anchored to the wall.
6. Repeat for other areas:
Continue the process of measuring, marking, cutting, fitting, and securing the siding for any additional areas that require customization. Double-check your measurements and alignments to maintain a uniform and professional finish.
Remember, accuracy and precision are key when cutting and fitting the siding. Take your time to ensure that each piece is cut to the correct measurements and fits seamlessly into the designated space. By following these steps, you’ll achieve a polished appearance for your vertical Hardie board siding installation.
Now that you’ve successfully cut and fitted the siding, let’s move on to the next steps of installing trim and corner posts for a refined and complete look.
Installing Trim and Corner Posts
Installing trim and corner posts is an important step in completing the installation of vertical Hardie board siding. Trim and corner posts not only add aesthetic value but also provide a clean and finished look. Follow these steps to effectively install trim and corner posts:
1. Measure and cut the trim:
Using a tape measure, carefully measure the length of the area where the trim will be installed. Transfer the measurements to the trim board, marking the appropriate length. Use a saw or snips to make precise cuts according to the marked measurements.
Read more: What Is Vertical Siding
2. Attach the trim:
Hold the trim board against the area where it will be installed, ensuring it is properly aligned. Secure the trim board to the wall using nails or screws, making sure to pre-drill holes if necessary. Place the fasteners evenly along the length of the trim to ensure a secure and even attachment.
3. Repeat for other trim areas:
Repeat the measurement, cutting, and attachment process for any other areas that require trim, such as around windows, doors, or corners. Follow the same steps to ensure that the trim is properly aligned, securely attached, and creates a neat and professional appearance.
4. Install corner posts:
Corner posts are used to cover the corners of your home and provide a finished look. Measure the length of the corner post and cut it to the appropriate size using a saw or snips. Hold the corner post against the corner of the wall, ensuring it is plumb and level. Secure the corner post to the wall using nails or screws, making sure to pre-drill holes if necessary.
5. Check for alignment:
Regularly check for proper alignment as you install the trim and corner posts. Use a level to ensure that they are plumb and level. Make any necessary adjustments before fully securing them.
By installing trim and corner posts, you’ll add the finishing touches to your vertical Hardie board siding installation. These elements not only enhance the appearance of your siding but also provide protection and longevity. Take care to measure accurately, cut precisely, and attach securely for a polished final result.
With the trim and corner posts in place, the next step is to apply caulk and sealants to ensure a watertight and weather-resistant siding installation. Let’s move on to that step to complete the installation process.
Read more: What Is Hardie Plank Siding Made Of
Applying Caulk and Sealants
Applying caulk and sealants is a crucial step in the installation of vertical Hardie board siding. Caulk and sealants help to create a watertight and weather-resistant barrier, preventing water infiltration and ensuring the longevity of your siding. Follow these steps to effectively apply caulk and sealants:
1. Inspect the siding:
Before applying caulk and sealants, inspect the vertical Hardie board siding for any gaps, cracks, or joints that may need to be sealed. Pay particular attention to areas where the siding meets trim, corner posts, windows, doors, or other materials.
2. Choose the appropriate caulk:
Select a high-quality caulk that is specifically designed for exterior use and compatible with Hardie board siding. Some caulk options include silicone or acrylic-based caulks. Consider the climate and environmental conditions in your area to choose the most suitable option.
3. Prepare the caulk gun:
If using a caulk gun, insert the caulk tube into the gun and cut the tip of the nozzle at a 45-degree angle. This angled cut will allow for precise and controlled application of the caulk.
Read more: What Nails To Use For Hardie Siding
4. Apply caulk to the gaps:
Squeeze the caulk gun or apply caulk directly from the tube along the gaps, cracks, or joints that need to be sealed. Ensure a smooth and consistent bead of caulk. Use a caulk smoothing tool or your finger dipped in water to smooth and shape the caulk, ensuring it fills the gaps completely.
5. Wipe away excess caulk:
Use a damp cloth or sponge to wipe away any excess caulk on the surface of the siding. This will create a neat and clean appearance and prevent excess caulk from drying and hardening on the siding.
6. Allow caulk to dry:
Follow the manufacturer’s instructions for drying time. It is typically recommended to allow the caulk to dry for at least 24 hours before exposing it to water or other elements.
7. Consider additional sealants:
In addition to caulk, you may also want to apply sealants to further enhance the weather resistance of your siding. Sealants can be applied to the trim, corner posts, and other areas that may be prone to water penetration.
By applying caulk and sealants, you’ll create a tight seal and protect your vertical Hardie board siding from potential water damage and moisture infiltration. Take your time to ensure thorough coverage and a professional finish. With the caulk and sealants applied, the next step is to consider painting or finishing your siding. Let’s proceed to that step to complete the installation process.
Read more: How To Install HardieBacker On Floor
Painting or Finishing the Siding
Painting or finishing your vertical Hardie board siding is the final step in the installation process. This step not only enhances the visual appeal of your siding but also provides an additional layer of protection. Follow these steps to effectively paint or finish your siding:
1. Clean the siding:
Before applying paint or finish, ensure that the siding is clean and free from dust, dirt, and debris. Use a soft brush or a low-pressure washer to remove any loose particles. Allow the siding to dry completely before continuing.
2. Prepare the surface:
If the siding is newly installed, it may need to be primed before painting. Check the manufacturer’s recommendations for priming, as some Hardie board products come pre-primed. If necessary, apply a primer that is compatible with your chosen paint or finish. This will ensure better adhesion and durability.
3. Choose the paint or finish:
Select a high-quality exterior paint or finish that is specifically designed for use on cement fiber siding. Consider the color, finish (such as matte, satin, or glossy), and the level of UV protection it offers. Consult with a paint specialist if needed to choose the best option for your area and desired aesthetic.
Read more: How Much Does Hardie Siding Cost
4. Apply the paint or finish:
Follow the manufacturer’s instructions for applying the paint or finish. Use a brush, roller, or sprayer to apply an even and consistent coat. Work in small sections, starting from the top and working your way down. Apply additional coats as needed, following proper drying times between each coat. Make sure to cover all surfaces, including the trim and corner posts.
5. Allow proper drying and curing:
After you have applied the paint or finish, allow sufficient time for drying and curing as specified by the manufacturer. This will ensure that the paint or finish properly adheres to the siding and provides long-lasting protection and beauty.
6. Maintain the painted or finished siding:
Regularly inspect your painted or finished siding for any signs of peeling, cracking, or fading. Perform touch-ups or repainting as necessary to maintain the appearance and protection of your siding. Follow appropriate maintenance guidelines provided by the paint or finish manufacturer.
By painting or finishing your vertical Hardie board siding, you’ll not only enhance its visual appeal but also provide added protection against the elements. Follow these steps carefully to achieve a professional and long-lasting result. With the siding installed, trimmed, sealed, and finished, you’ve successfully completed the installation process. Congratulations on your new vertical Hardie board siding!
Conclusion
Congratulations on successfully completing the installation of vertical Hardie board siding! You’ve transformed the exterior of your home with a durable and visually appealing siding option. By following the steps outlined in this comprehensive guide, you have learned how to install the siding, prepare the wall, attach the boards, cut and fit the siding, install trim and corner posts, apply caulk and sealants, and paint or finish the siding.
Vertical Hardie board siding offers numerous benefits, including resistance to rot, insects, and fire. It adds both beauty and value to your home, making it an excellent investment. With its low maintenance requirements and long lifespan, you can enjoy the benefits of your siding for years to come. Remember to regularly inspect and maintain your siding to ensure its continued beauty and protection.
Throughout the installation process, you’ve learned the importance of proper preparation, accurate measurements, and careful attention to detail. By following these guidelines, you have created a solid foundation for your siding, achieved a level and seamless installation, and enhanced the overall appearance of your home.
We hope this guide has provided you with the necessary knowledge and confidence to install vertical Hardie board siding. Remember to follow the manufacturer’s instructions and guidelines specific to your siding product for the best results.
Thank you for taking the time to read this comprehensive article on how to install vertical Hardie board siding. We hope it has been informative and helpful in your siding installation journey. Enjoy your new siding and the numerous benefits it offers!
Now that you're well-versed in installing vertical Hardie board siding, why not delve deeper into the nitty-gritty of vertical exteriors? Our article on "What Is Vertical Siding" offers a comprehensive breakdown, perfect for anyone looking to understand the broader scope and benefits of this popular siding style. So, roll up your sleeves, grab your toolbox, and get ready to transform your home's appeal with newfound knowledge and practical tips on vertical siding!
Frequently Asked Questions about How To Install Vertical Hardie Board Siding
Was this page helpful?
At Storables.com, we guarantee accurate and reliable information. Our content, validated by Expert Board Contributors, is crafted following stringent Editorial Policies. We're committed to providing you with well-researched, expert-backed insights for all your informational needs.

0 thoughts on “How To Install Vertical Hardie Board Siding”