Home>Articles>How To Install Exterior Board And Batten Siding

Articles
How To Install Exterior Board And Batten Siding
Modified: August 27, 2024
Learn how to properly install exterior board and batten siding with our informative articles. Enhance the beauty and durability of your home's exterior.
(Many of the links in this article redirect to a specific reviewed product. Your purchase of these products through affiliate links helps to generate commission for Storables.com, at no extra cost. Learn more)
Introduction
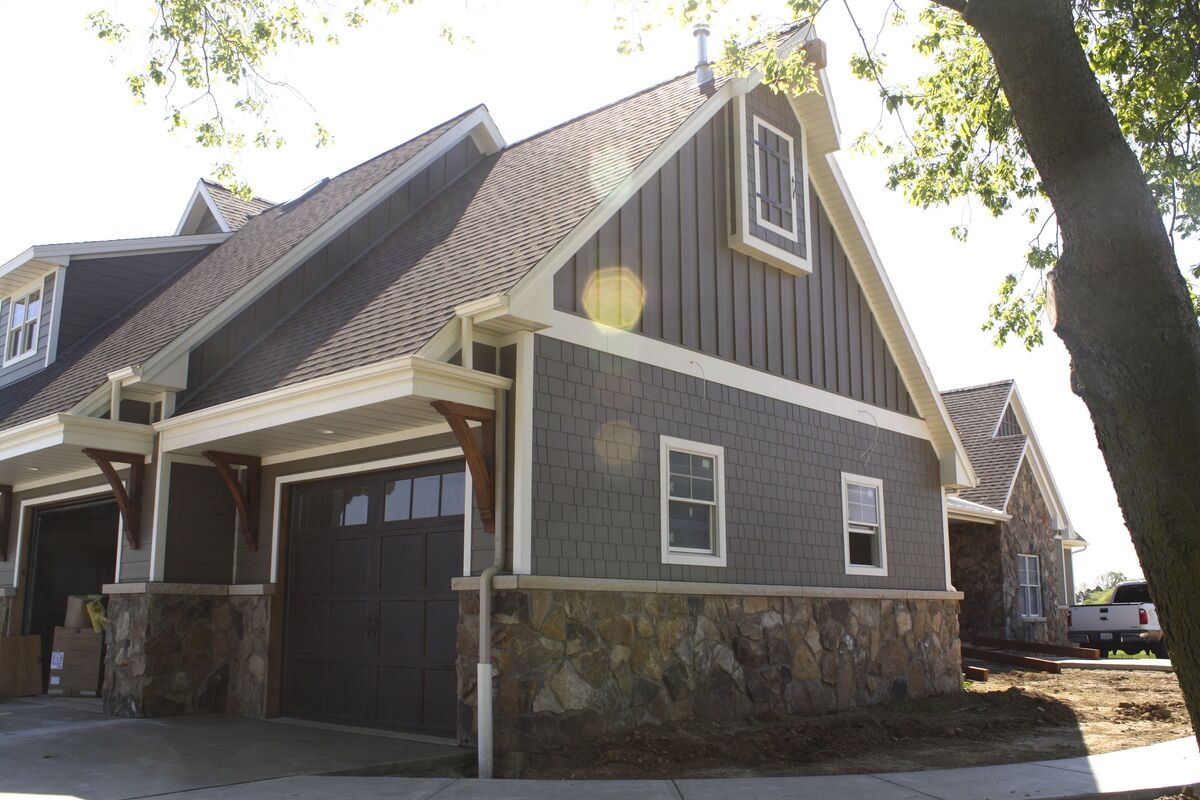
Exterior board and batten siding is a popular choice for homeowners looking to add a touch of rustic charm and character to their homes. This unique siding style, characterized by its vertical boards and contrasting battens, not only enhances the aesthetic appeal of the house but also provides added protection against the elements.
In this article, we will guide you through the process of installing exterior board and batten siding, offering step-by-step instructions and valuable tips to ensure a successful and professional-looking installation. Whether you are a seasoned DIY enthusiast or a novice homeowner looking to tackle your first siding project, this article will provide the knowledge and guidance you need to get the job done.
Before we dive into the installation process, it’s important to gather the necessary tools and materials. By having everything at your disposal, you can work efficiently and effectively, saving both time and frustration along the way.
Key Takeaways:
- Proper preparation, accurate measurements, and attention to detail are crucial for a successful exterior board and batten siding installation. Prioritize safety, plan meticulously, and enjoy the rustic charm it brings to your home.
- From layout and measurements to finishing touches, each step contributes to the durability and visual appeal of board and batten siding. Embrace the DIY spirit, follow the guide, and revel in the transformation of your home’s exterior.
Read more: What Is Batten Board Siding
Tools and Materials
Before you begin the installation of exterior board and batten siding, make sure you have the following tools and materials on hand:
Tools:
- Measuring tape
- Level
- Pencil
- Circular saw or miter saw
- Chalk line
- Hammer or nail gun
- Utility knife
- Straight edge
- Screws or nails
- Power drill
- Safety goggles
- Gloves
- Step ladder or scaffolding
Materials:
- Exterior grade plywood or solid wood boards
- Battens (typically made of PVC or wood)
- Weather-resistant paint or stain
- Primer
- Exterior caulk
- Construction adhesive
- Housewrap or moisture barrier
- Flashing tape
- Trim boards
- Screws or nails (corrosion-resistant)
- Plastic or metal spacers
- Drip edge
Having these tools and materials ready will ensure a smooth and uninterrupted installation process. Additionally, it’s important to prioritize safety by wearing protective goggles and gloves, especially when handling power tools or sharp objects.
Now that you have all the necessary tools and materials, let’s move on to the preparation stage before installing the exterior board and batten siding.
Step 1: Preparation
Proper preparation is key to a successful installation of exterior board and batten siding. Follow these steps to ensure a solid foundation for your siding:
1. Inspect and repair:
Before you begin the installation, carefully inspect the existing exterior walls for any signs of damage, rot, or moisture intrusion. Repair any issues you find to ensure a stable and secure surface for the siding installation. Replace any damaged or rotten wood and seal any gaps or cracks with exterior caulk or wood filler.
2. Remove existing siding (if necessary):
If you have existing siding that needs to be removed before installing the board and batten siding, take the necessary steps to do so. Use a pry bar or siding removal tool to gently remove the old siding without damaging the underlying structure. Be cautious of any electrical or plumbing lines that may be hidden beneath the siding and work around them carefully.
3. Install housewrap or moisture barrier:
To protect your home from moisture infiltration, it’s essential to install a housewrap or moisture barrier. This will act as a protective layer between the siding and the sheathing, preventing water from seeping into the walls. Follow the manufacturer’s instructions for installation, ensuring proper overlap and sealing of the seams.
4. Apply flashing tape:
Flashing tape should be applied around windows, doors, and any other openings to provide an additional layer of protection against water intrusion. Cut the tape to the appropriate size, remove the backing, and carefully apply it to the desired areas, making sure it is securely adhered.
Read more: How Much Does Board And Batten Siding Cost
5. Measure and mark:
Using a measuring tape, measure the width and height of each wall section where the board and batten siding will be installed. Mark these measurements with a pencil to provide a guide for the installation process. Consider factors such as windows, doors, and corners when making your measurements.
6. Plan the layout:
Before starting the installation, plan the layout of your board and batten siding. Consider factors such as the spacing between boards, the width of the battens, and the desired overall aesthetic. Use a chalk line to create reference lines for the vertical boards, ensuring they are straight and evenly spaced.
Taking the time to properly prepare your walls and plan the layout will set the stage for a smooth and successful installation of the exterior board and batten siding. Once you have completed these steps, you are ready to move on to the next phase: layout and measurements.
Step 2: Layout and Measurements
The layout and measurements process is crucial in achieving a professional and visually appealing installation of exterior board and batten siding. Follow these steps to ensure accurate measurements and a well-planned layout:
1. Establish reference lines:
Using a level and a chalk line, establish vertical and horizontal reference lines on the wall. This will serve as a guide for the placement of the siding boards and battens.
Read more: How To Install Exterior Shiplap Siding
2. Determine the width of the boards:
Decide on the width of the boards and mark the measurements accordingly. This will depend on your personal preference and the overall aesthetic you want to achieve. Common board widths range from 4 inches to 8 inches.
3. Space out the boards:
Using your desired spacing between boards, mark horizontal lines on the wall to indicate where each board will be installed. Ensure that the spacing is consistent and visually pleasing.
4. Design the batten placement:
Decide on the placement of the battens. Typically, they are placed vertically over the seams between two adjacent boards. Mark the spots where the battens will be installed to ensure they are evenly spaced and align with the reference lines.
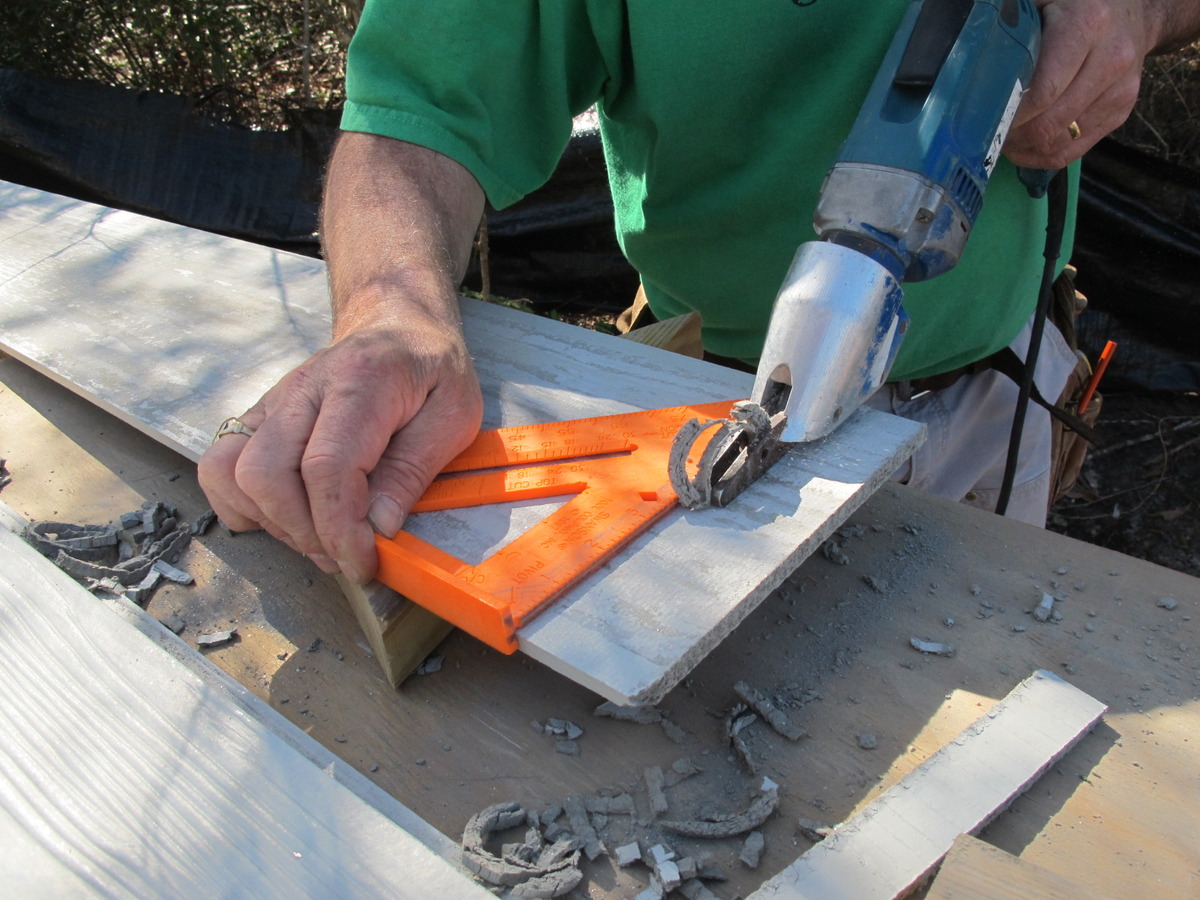
5. Measure and cut the boards:
Measure each section between the reference lines and cut the boards accordingly. Use a circular saw or miter saw to achieve clean and precise cuts. Be sure to account for any windows, doors, or corners in your measurements and make the necessary cuts to accommodate them.
Read more: How To Install Vertical Hardie Board Siding
6. Dry-fit the boards:
Before attaching the boards to the wall, dry-fit them to ensure they fit properly and align with your layout and measurements. Make any adjustments as necessary to achieve a seamless and visually balanced result.
Taking the time to carefully plan and measure your board and batten siding installation will ensure a professional and aesthetically pleasing outcome. Once you have completed these steps, you are ready to move on to the next phase: installing the vertical boards.
Step 3: Installing Vertical Boards
With the layout and measurements in place, it’s time to start installing the vertical boards for your exterior board and batten siding. Follow these steps for a smooth installation:
1. Start from the bottom:
Begin by installing the first board at the bottom of the wall. Align it with the reference lines and make sure it is level. Use a level to ensure it is straight vertically as well.
2. Secure the board:
Once the first board is properly aligned, secure it to the wall using screws or nails. Make sure to drive the fasteners into the studs or sheathing for maximum stability. Leave a small gap between the bottom of the board and the ground for adequate air circulation.
3. Continue with the rest of the boards:
Proceed to install the remaining vertical boards, working your way up the wall. Make sure each board is level, aligned with the reference lines, and properly spaced from the adjacent boards. Use a level frequently to ensure accuracy.
4. Trim the boards:
Once all the vertical boards are installed, trim them as needed. Use a circular saw or miter saw to achieve clean and precise cuts. Trim the top board to fit against the eaves or soffit.
5. Check for levelness:
After completing the installation, double-check the levelness of the vertical boards. Use a level to ensure they are straight and aligned from top to bottom.
By following these steps, you will successfully install the vertical boards for your exterior board and batten siding. It’s now time to move on to the next phase: adding the battens.
Step 4: Adding Battens
Adding battens to your exterior board and batten siding will not only enhance its visual appeal but also provide additional structural support. Follow these steps to correctly install the battens:
Read more: How To Caulk Exterior Siding
1. Determine batten placement:
Decide on the spacing and placement of the battens. Typically, they are placed vertically over the seams between two adjacent boards. Mark the spots where the battens will be installed to ensure they are evenly spaced and align with the reference lines.
2. Measure and cut the battens:
Measure the distance between the top and bottom of the board and mark it on the batten. Use a circular saw or miter saw to cut the battens to the appropriate length. Be sure to cut enough battens to cover each seam.
3. Attach the battens:
Apply a thin layer of construction adhesive to the back of the batten and press it onto the board, aligning it with the reference lines. Secure the batten in place by either nailing it or using screws, being careful not to overdrive the fasteners. Repeat this process for each batten.
4. Install corner and trim battens:
If your siding has corners or requires trim, install corner and trim battens accordingly. Measure and cut the battens to fit the corners or trim areas, and attach them using the same method as before.
Read more: How To Repair Cement Board Siding
5. Check for uniformity:
After adding the battens, step back and inspect the siding for uniformity. Ensure that all the battens are evenly spaced and aligned with the board seams. Make any necessary adjustments to achieve a visually balanced appearance.
Once you have completed these steps, you will have successfully added the battens to your exterior board and batten siding. This brings us to the final step: applying the finishing touches.
Step 5: Finishing Touches
The finishing touches of your exterior board and batten siding installation will not only enhance the overall look but also provide added protection and longevity. Follow these steps to complete the project with finesse:
1. Apply paint or stain:
Once the siding and battens are securely installed, it’s time to apply paint or stain. Choose a high-quality exterior-grade paint or stain that will withstand the elements. Follow the manufacturer’s instructions for application, ensuring an even and smooth finish. Consider using a primer before painting to enhance durability and color consistency.
2. Apply caulk and seal gaps:
Inspect the joints, corners, and seams of the siding for any gaps or cracks. Apply exterior-grade caulk to seal these areas, preventing moisture intrusion and improving the overall weather resistance of the siding. Use a caulking gun and ensure smooth and even application.
Read more: How To Remove Hardie Board Siding
3. Install trim boards:
If your project requires additional trim boards, such as window or door casings, install them now. Measure and cut the trim boards to fit around these areas, and attach them securely using screws or nails. Ensure the trim boards are aligned and leveled with the siding for a seamless appearance.
4. Install drip edge:
For added protection against water damage, install drip edge along the eaves and edges of the siding. This will help direct water away from the siding, preventing water infiltration. Use a hammer or nails to secure the drip edge in place.
5. Clean the siding:
Before completing the project, give the siding a thorough cleaning to remove any dirt or debris. Use a mild detergent mixed with water and a soft-bristle brush to scrub away any stains or grime. Rinse the siding with clean water and allow it to dry completely.
By following these steps and applying the finishing touches, your exterior board and batten siding installation project will reach its final stage. Take a moment to step back and appreciate the transformation of your home’s exterior. Congratulations on completing the installation process successfully!
Conclusion
Installing exterior board and batten siding can significantly enhance the curb appeal and overall appearance of your home. With the right tools, materials, and a step-by-step guide, you can successfully complete this project and enjoy the rustic charm and durability of this siding style.
Throughout the installation process, it is essential to prioritize safety and follow proper techniques. Ensure that you have all the necessary tools and materials, observe safety precautions, and take your time to plan and measure accurately. By doing so, you can achieve a professional-looking result that will stand the test of time.
From the preparation stage to the finishing touches, each step plays a vital role in the overall success of the project. Carefully inspecting and repairing the walls, establishing reference lines, and accurately measuring and cutting the boards and battens are all important elements of the installation process. Additionally, paying attention to details such as paint or stain application, sealing gaps, and installing trim boards and drip edge will contribute to the long-term durability and aesthetic appeal of your exterior board and batten siding.
Remember, the quality of the materials you choose and the craftsmanship put into the installation will determine the longevity and performance of your siding. Consider consulting with professionals or seeking guidance from experienced individuals if you are unsure about any aspect of the installation.
By following the steps outlined in this article and putting in the necessary time and effort, you can proudly showcase a beautiful and unique exterior board and batten siding on your home. Enjoy the transformation and the compliments that are sure to come your way!
Now you have the knowledge and guidance to embark on this rewarding DIY project. Good luck, and may your exterior board and batten siding installation be a success!
Ready to tackle more projects around your home? Our guide on DIY home projects is perfect for those eager to handle renovations personally. From simple fixes to more elaborate transformations, you'll find practical advice to make each task manageable and successful. Boost your confidence in home improvement with these tried and tested tips. Whether you're looking to update a room or overhaul your backyard, this article ensures you're well-prepared to take on any challenge.
Frequently Asked Questions about How To Install Exterior Board And Batten Siding
Was this page helpful?
At Storables.com, we guarantee accurate and reliable information. Our content, validated by Expert Board Contributors, is crafted following stringent Editorial Policies. We're committed to providing you with well-researched, expert-backed insights for all your informational needs.
0 thoughts on “How To Install Exterior Board And Batten Siding”