Articles
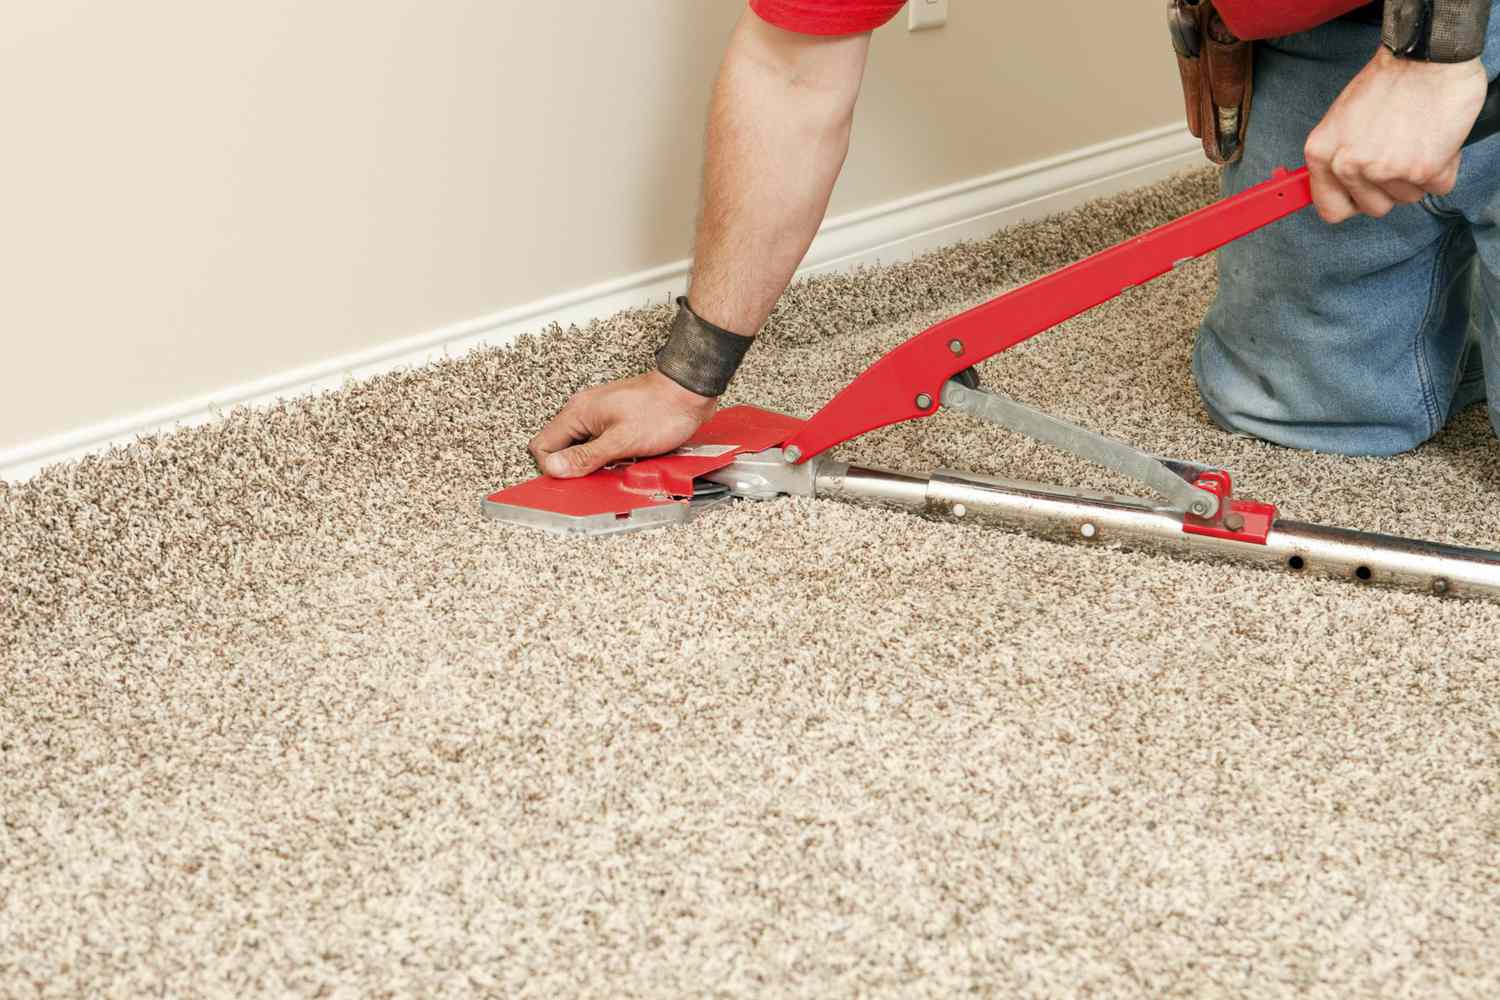
How To Lay Carpet
Modified: January 9, 2024
Learn how to lay carpet with our comprehensive articles. Get step-by-step instructions and essential tips for a professional-looking installation.
(Many of the links in this article redirect to a specific reviewed product. Your purchase of these products through affiliate links helps to generate commission for Storables.com, at no extra cost. Learn more)
Introduction
When it comes to enhancing the comfort and aesthetics of a space, few things can rival the luxurious feel and warmth that carpet provides. Whether you’re renovating your home or updating a commercial space, laying carpet can be a rewarding project that adds value and beauty to any room.
However, before diving into the installation process, proper planning and preparation are essential for achieving a smooth and professional-looking result. This article will guide you through the necessary steps, from measuring the room to selecting the right carpet and gathering the required tools and materials. Let’s get started!
Key Takeaways:
- Regular vacuuming and prompt spot cleaning are essential for maintaining a clean and fresh carpet. Deep cleaning at least once a year removes embedded dirt and allergens, prolonging the carpet’s lifespan.
- Taking preventative measures, such as using doormats and protecting the carpet from direct sunlight, can significantly enhance the longevity and appearance of your carpet. Professional deep cleaning ensures effective and safe maintenance.
Read more: How To Lay Down Carpet
Planning and Preparation
Before you begin installing carpet, taking the time to plan and prepare will ensure a successful outcome. Here are the key steps to consider in this stage:
Measuring the Room
The first step in planning is to accurately measure the dimensions of the room. Use a tape measure to determine the length and width, and don’t forget to factor in any irregularities such as closets or bay windows. It’s essential to have precise measurements to avoid running short on carpet or having excessive wastage.
Choosing the Right Carpet
Once you have the room dimensions, it’s time to choose the perfect carpet for your space. Consider factors such as durability, pile height, and color to meet your specific requirements. Additionally, keep in mind the overall style and decor of the room to ensure a cohesive and harmonious look.
Gathering the Necessary Tools and Materials
To install carpet effectively, you’ll need a few essential tools and materials. Some of the key items include a carpet knife, knee kicker, power stretcher, carpet tucker, measuring tape, carpet cushion or padding, carpet tack strips, and a staple gun. Make sure you have all the necessary supplies before starting the installation process.
Read more: How To Lay A Carpet Pad
Preparing the Subfloor
Before laying carpet, it’s important to prepare the subfloor to ensure a smooth and stable foundation. Clear the room of any furniture or debris, and inspect the subfloor for any damage or uneven areas. Fix any issues and clean the subfloor thoroughly to create a clean and level surface.
Taking the time to properly plan and prepare will set the stage for a successful carpet installation. By accurately measuring the room, selecting the right carpet, gathering the necessary tools, and preparing the subfloor, you’ll be ready to move onto the next step – installing the carpet itself.
Measuring the Room
Before you can start installing carpet, you need to measure the room to determine the amount of carpet material required. Accurate measurements are crucial to ensure that you have enough carpet and to minimize waste. Here are the steps to measure the room effectively:
1. Start by removing any existing carpet or flooring from the room, as this can interfere with accurate measurements.
2. Use a measuring tape to measure the length and width of the room. Begin at one wall and extend the tape measure to the opposite wall, ensuring that it runs parallel to the longest side of the room. Take note of the measurements in both feet and inches.
3. For rooms with irregular shapes or recesses, measure each section separately. Break down the room into smaller rectangles or squares and measure them individually. This will help you calculate the total carpet required more accurately.
4. Take note of any doorways or areas where the carpet will need to be cut to fit around obstacles. Measure the width of these areas and make sure to include them in your calculations.
5. If there are closets or alcoves within the room, measure them separately, as they often require different cutting and fitting techniques.
6. Consider adding a few inches of extra carpet length on all sides to account for any trimming or adjustments needed during the installation process.
7. If you are planning to install carpet on stairs, measure each step individually. Measure the width and depth of each step and multiply these measurements by the number of steps required to cover the entire staircase.
8. Finally, double-check your measurements to ensure accuracy. It is worth measuring the room twice to be certain that you have the correct dimensions.
By taking precise measurements of the room, you can determine the amount of carpet needed for the installation. Remember to calculate the square footage by multiplying the length and width measurements together. It’s always a good idea to add a bit of extra carpet to account for any mistakes or unforeseen requirements during installation. With accurate measurements in hand, you can confidently move on to selecting the right carpet for your space.
Choosing the Right Carpet
Selecting the right carpet is crucial for achieving the desired look and performance in your space. With so many options available in terms of texture, color, and fiber type, it’s essential to consider a few key factors before making your decision. Here are some guidelines to help you choose the perfect carpet for your needs:
1. Consider Durability: Determine the level of foot traffic in the room where you plan to install carpet. If it’s a high-traffic area, such as a hallway or living room, opt for a durable carpet with a dense pile and good stain resistance. For low-traffic areas like bedrooms, a softer and more luxurious carpet may be suitable.
2. Evaluate Pile Height: The pile height refers to the length of the carpet fibers. Consider the level of comfort and aesthetics you desire. For a plush and luxurious feel, choose a high-pile carpet. Low-pile carpets are more resilient and easier to clean, making them suitable for high-traffic areas.
3. Explore Different Fiber Types: Carpets come in various fiber types, including nylon, polyester, wool, and more. Each fiber has its own unique characteristics, so it’s essential to understand the pros and cons of each option. For example, nylon is known for its durability, while wool offers natural softness and warmth.
4. Consider Color and Pattern: The color and pattern of the carpet significantly impact the overall look and feel of the room. Consider the existing decor and color scheme when choosing a carpet. Neutral shades can create a timeless and versatile look, while bolder colors and patterns can add visual interest and make a statement.
5. Think About Maintenance: Different carpets require different levels of maintenance. Some types are more resistant to stains and easier to clean, while others may require more frequent professional cleaning. Consider your lifestyle, the presence of pets or children, and your willingness to invest time and effort into carpet maintenance.
6. Seek Professional Advice: If you’re unsure about which carpet to choose, consult a flooring specialist or carpet retailer. They can provide valuable guidance based on your specific needs and preferences. They will also be able to recommend quality brands and assist with any questions you may have.
Remember, choosing the right carpet is not just about aesthetics; it’s also about functionality and long-term satisfaction. Take the time to research and explore different options, considering factors such as durability, pile height, fiber type, color, and maintenance requirements. With the right carpet in place, you can create a comfortable and inviting atmosphere in your space.
Gathering the Necessary Tools and Materials
Before you can start installing carpet, it’s essential to gather all the necessary tools and materials. Having the right equipment on hand will ensure a smooth and efficient installation process. Here’s a list of the key tools and materials you’ll need:
1. Carpet Knife: A sharp carpet knife is essential for cutting and trimming the carpet. Look for a knife with a retractable blade and a comfortable grip for ease of use.
2. Knee Kicker: A knee kicker is a specialized tool used to stretch the carpet and secure it in place. It has a padded end that you can strike with your knee to stretch the carpet over the tack strips.
3. Power Stretcher: For larger rooms or areas with heavy furniture, a power stretcher is recommended. It provides added stretching force, ensuring that the carpet is properly taut and free from wrinkles or ripples.
4. Carpet Tucker: A carpet tucker is used to neatly tuck the edges of the carpet into the gaps between the baseboard and the floor. This tool helps create a clean and professional finish.
5. Measuring Tape: Accurate measurements are crucial during the installation process. A measuring tape will help you measure the room, cut the carpet to the right size, and ensure a proper fit.
6. Carpet Cushion or Padding: Carpet cushion or padding is placed underneath the carpet to provide extra cushioning and prolong the life of the carpet. Choose a padding thickness and density suitable for your carpet and the level of comfort you desire.
7. Carpet Tack Strips: Carpet tack strips are wooden strips with small, sharp pins that grip the carpet and hold it in place. These strips are installed around the perimeter of the room, except for doorways and transitions, to secure the carpet edges.
8. Staple Gun: A staple gun is used to attach the carpet padding to the subfloor. Make sure to use appropriate staples designed for use with carpet padding.
9. Safety Equipment: It’s important to ensure your safety during the installation process. Consider wearing knee pads to protect your knees, as well as gloves and safety glasses.
10. Other Supplies: Additional supplies you may need include a utility knife for cutting carpet padding, a hammer for securing tack strips, a chalk line for marking guidelines, and a straight edge for cutting long, straight lines.
Before starting the carpet installation, double-check that you have all the necessary tools and materials. This will allow you to work efficiently and avoid interruptions during the process. With your tools gathered, you’re ready to move on to preparing the subfloor and laying the carpet.
Read more: How To Lay Indoor/Outdoor Carpet
Preparing the Subfloor
Before you can start installing carpet, it’s important to properly prepare the subfloor to ensure a smooth and long-lasting result. Here are the key steps to follow when preparing the subfloor:
1. Clear the Room: Remove any furniture, fixtures, and debris from the room. This will provide you with a clear and uninterrupted space to work in.
2. Inspect the Subfloor: Thoroughly inspect the subfloor for any damage, such as cracks, unevenness, or moisture issues. Address any issues that could affect the installation, such as repairing cracks or leveling uneven areas.
3. Clean the Subfloor: Thoroughly clean the subfloor to remove any dirt, dust, or debris. This will help create a clean and smooth surface for the carpet to adhere to. Sweep or vacuum the floor, and use a damp cloth or mop to remove any stubborn dirt or stains.
4. Install a Moisture Barrier (if necessary): If your subfloor is concrete or prone to moisture issues, consider installing a moisture barrier. This will help prevent any moisture from seeping into the carpet and causing damage over time.
5. Allow for Proper Ventilation: Ensure that there is proper ventilation in the room, especially if you have installed a moisture barrier. Good airflow will help prevent any potential moisture buildup and maintain the integrity of the carpet.
By properly preparing the subfloor, you can create an ideal foundation for the carpet installation. Once the subfloor is clean, dry, and level, you’re ready to move on to the next stage – installing the carpet.
Installing the Carpet
With the subfloor prepared, it’s time to lay the carpet and bring your room to life. Here’s a step-by-step guide on how to install the carpet:
1. Begin by laying down the carpet tack strips around the perimeter of the room, leaving a small gap between the strips and the wall. Use a hammer to secure them in place, ensuring that the pins are facing towards the wall.
2. Next, roll out the carpet padding over the subfloor. Trim the padding to fit the room, leaving a slight overlap against the walls. Secure the padding to the subfloor with a staple gun, making sure to keep it taut and smooth.
3. With the padding in place, it’s time to cut the carpet. Roll out the carpet over the room, leaving a few inches of excess on all sides. Using a carpet knife, trim the carpet to fit the dimensions of the room. Ensure that the carpet is cut straight and fits snugly against the walls.
4. Now comes the stretching and securing process. Starting in one corner of the room, use a knee kicker to push the carpet onto the tack strips. Work your way across the room, using the knee kicker to stretch and secure the carpet along each edge.
5. Once the carpet is stretched and secured, use a carpet tucker to neatly tuck the edges of the carpet into the gap between the baseboard and the floor. This will create a clean and professional finish.
6. Finally, trim any excess carpet along the edges using a carpet knife, and make any necessary adjustments to ensure a perfect fit. Take care to remove any visible seams or folds and make sure the carpet is smooth and flat.
Congratulations! You have successfully installed the carpet in your room. The preparation and installation process may take some time and effort, but the end result will be a beautiful and comfortable carpeted space.
Clearing the Room
Before you can begin the process of installing carpet, it is essential to clear the room of any furniture, fixtures, and other items. This step allows for easy access to the entire floor and ensures a smooth installation process. Here are some important considerations when clearing the room:
1. Furniture Removal: Start by moving all the furniture out of the room. This includes chairs, tables, sofas, beds, and any other large or bulky items. If some furniture pieces are too heavy to move, place furniture sliders or cardboard underneath them to protect the floor and ease the moving process.
2. Electronics and Appliances: Disconnect and remove any electronics or appliances from the room. This includes televisions, computers, lamps, and other devices that may be present. Make sure to unplug them properly and safely store them in a different area to prevent any damage during the installation.
3. Decor and Wall Hangings: Take down wall decorations, artwork, mirrors, and any other items that are mounted on the walls. Carefully pack these items and store them in a safe place to avoid any potential damage during the carpet installation process.
4. Window Treatments: Remove curtains, blinds, or any other window treatments that may obstruct the installation process. This will make it easier to work on the floor area and prevent any damage to your window coverings.
5. Floor Coverings: If there is already existing carpet, vinyl, or laminate flooring in the room, it will need to be removed before installing the new carpet. Follow the manufacturer’s instructions or consult a professional on the proper removal process for the specific type of flooring.
6. Personal Items and Valuables: Take the time to remove any personal items, valuables, or delicate items from the room. This includes items such as jewelry, collectibles, and fragile objects. Storing these items in a safe place will give you peace of mind during the installation process.
By clearing the room before installing carpet, you create a safe and unobstructed workspace. This allows for efficient and effective installation while minimizing the risk of damage to your belongings. Once the room is cleared, you can move forward with confidence and embark on the next steps of the carpet installation process.
Applying Carpet Tack Strips
When installing carpet, one of the crucial steps is to securely fasten the carpet to the subfloor using carpet tack strips. These strips are wooden boards or strips with small, sharp pins or tacks that grip the carpet backing, keeping it in place. Here’s a step-by-step guide on how to apply carpet tack strips:
1. Gather the Necessary Tools and Materials: Before you begin, ensure that you have all the necessary tools and materials. You’ll need carpet tack strips, a hammer, a measuring tape, a pencil or marker, and a utility knife.
2. Prepare the Subfloor: Ensure that the subfloor is clean, dry, and free from any debris. Remove any existing carpet or flooring, and thoroughly clean the area. Use a vacuum cleaner to remove dirt and dust, providing a clean surface for the tack strips.
3. Measure and Cut the Tack Strips: Measure the length of each wall where you plan to install the carpet. Using a utility knife, cut the tack strips to fit the measured lengths. It’s crucial to leave a small gap, about 1/2 inch, between the wall and the strip to accommodate the carpet padding and carpet.
4. Position the Tack Strips: Place the tack strips around the perimeter of the room, ensuring that a small gap is present between the strip and the wall. The tack strips should be positioned with the pins facing the wall. Use a hammer to nail the strips into place, ensuring that they are securely attached to the subfloor.
5. Install Transition Strips: If you have doorways or areas where the carpet meets a different type of flooring (such as hardwood or tile), install transition strips. These strips will provide a smooth, finished look and help prevent the carpet from fraying or coming loose.
6. Check for Stability: Once all the tack strips are secured, walk around the room and press down on the tack strips with your hand or foot. Ensure that they are firmly in place and don’t wobble or move. If any strips feel loose, use additional nails to secure them more effectively.
7. Double-Check the Placement: Before proceeding with the carpet installation, double-check the placement of the tack strips. Ensure that they are positioned at the correct distance from the wall, allowing for the carpet padding and carpet to fit snugly.
By applying carpet tack strips correctly, you create a solid foundation for your carpet installation. These strips will securely hold the carpet in place and contribute to its longevity. Take care to measure accurately, position the tack strips correctly, and ensure their stability before moving on to the next steps of the carpet installation process.
Read more: How To Lay Indoor Outdoor Carpet
Laying the Carpet Padding
Laying carpet padding is a crucial step in the carpet installation process, as it provides cushioning, insulation, and helps prolong the life of the carpet. Here’s a step-by-step guide on how to lay the carpet padding:
1. Gather the Necessary Tools and Materials: Before you begin, gather all the tools and materials you’ll need. These include the carpet padding, utility knife, measuring tape, duct tape or carpet adhesive, and a staple gun.
2. Prepare the Subfloor: Ensure that the subfloor is clean, dry, and free from any debris. Remove any existing carpet or flooring and vacuum or sweep the area to create a clean surface for the padding.
3. Measure and Cut the Padding: Roll out the carpet padding across the room, starting from one wall and extending it to the other side. Use the measuring tape to measure the length and width of the area where the padding will be laid. Add a few inches to each measurement to ensure full coverage and a snug fit.
4. Cut the padding using a utility knife, following the measured dimensions. Take care to make clean, straight cuts, and avoid cutting the padding too short or oversized.
5. Position the Padding: Once cut to size, position the padding over the subfloor, ensuring that the entire floor area is covered. Adjust the padding as needed to align it with the walls and ensure a snug fit.
6. Secure the Padding: To keep the padding in place, you can use duct tape or carpet adhesive. If using duct tape, attach short strips along the edges of the padding, overlapping them slightly to create a secure bond. Alternatively, you can use carpet adhesive by applying it directly to the subfloor and pressing the padding firmly onto it.
7. Staple the Padding (Optional): For added stability and to prevent any shifting of the padding, you can staple it to the subfloor using a staple gun. Place staples along the edges of the padding, spaced evenly apart. Make sure the staples are secure but not too close to the edge to avoid damaging the carpet.
8. Trim Excess Padding: Once the padding is securely in place, trim any excess padding using a utility knife. Carefully cut along the edges, ensuring that the padding is flush with the walls.
By correctly laying the carpet padding, you create a comfortable and supportive base for your carpet. The padding helps to absorb impact, reduce noise, and provide insulation. Take care to measure accurately, position the padding correctly, and secure it in place to ensure a smooth and successful carpet installation.
Cutting and Fitting the Carpet
Cutting and fitting the carpet is a crucial step in the carpet installation process to ensure a precise and professional-looking finish. Here’s a step-by-step guide on how to cut and fit the carpet:
1. Gather the Necessary Tools and Materials: Before you begin, gather all the tools and materials you’ll need. These include a carpet knife, measuring tape, chalk or marker, a straight edge or stair tool, and knee pads for comfort.
2. Roll Out the Carpet: Start by unrolling the carpet in the room, making sure to position it in the right direction and aligning the seams if there are multiple rolls. Allow the carpet to relax for a while to remove any wrinkles or creases.
3. Measure and Mark: Measure the length and width of the room, and mark these measurements on the backside of the carpet using a chalk or marker. Be precise and double-check your measurements before cutting.
4. Cut the Carpet: Use a straight edge or stair tool as a guide to cut along the marked lines. Hold the tool firmly and run the carpet knife along the edge, applying even pressure to ensure clean and straight cuts. Take extra care when cutting around objects like doorways and irregular shapes.
5. Fit the Carpet: Position the cut piece of carpet into the room, making sure it fits snugly against the walls. Adjust and align the seams if necessary. If the carpet is slightly oversized, trim the excess carefully using the carpet knife.
6. Match the Pattern: If your carpet has a pattern, ensure that the pattern matches up correctly at the seams and throughout the room. Align the pattern of each piece as closely as possible to create a seamless and uniform look.
7. Seam the Carpet (if applicable): If you have multiple pieces of carpet, you’ll need to seam them together. Use a carpet seaming tape and adhesive according to the manufacturer’s instructions to create a strong and invisible seam.
8. Secure the Carpet: Once the carpet is in the desired position, use a knee kicker tool and/or power stretcher to stretch the carpet and secure it over the tack strips along the walls. Make sure the carpet is pulled tightly and there are no wrinkles or uneven areas.
9. Trim Excess Carpet: Trim any excess carpet along the edges using a carpet knife, following the contour of the walls. Take care not to cut into the baseboards or expose any tack strips.
10. Finish and Smooth: Use a carpet tucker or stair tool to tuck the edges of the carpet neatly into the space between the baseboard and the floor. Smooth out any wrinkles or folds in the carpet to create a clean and professional finish.
By carefully cutting and fitting the carpet, you achieve a seamless and tailored look for your flooring. Take your time, measure accurately, and work diligently to ensure a precise fit that showcases the beauty of your new carpet.
Stretching and Securing the Carpet
Stretching and securing the carpet is a critical step in the carpet installation process. Properly stretched carpet ensures a smooth, wrinkle-free surface that will last for years to come. Here’s a step-by-step guide on how to stretch and secure the carpet:
1. Clear the Room: Before you begin, ensure the room is clear of any furniture or obstacles that may hinder the stretching process. This will allow for unobstructed access to the carpet.
2. Starting Point: Begin stretching the carpet in a corner of the room, opposite the exit point. This will ensure that you’re working your way toward the exit, making it easier to complete the process.
3. Knee Kicker: Position a knee kicker against the carpet about 6 inches from the wall. Apply firm pressure with your knee to push the carpet onto the carpet tack strip, using small, quick kicks to stretch the carpet towards the wall.
4. Power Stretcher (If Required): For larger areas or rooms with heavy furniture, you may need to use a power stretcher. Place the head of the power stretcher against the wall opposite from where you want to stretch the carpet. Extend the lever arm and attach it to the carpet, then push down on the lever to stretch the carpet.
5. Stretching Direction: Always stretch the carpet in the direction where there are no doorways or openings. This minimizes the risk of the carpet pulling away from the tack strips or creating uneven tension.
6. Repeat the Process: Move along the wall, repeating the process of using the knee kicker or power stretcher to stretch the carpet onto the tack strip. Make sure to maintain consistent pressure and tension for an even and smooth installation.
7. Trim Excess Carpet: Once the carpet is properly stretched, use a carpet knife to trim any excess along the edges. Be careful not to cut too close to the wall or the tack strips, leaving a small border of carpet for tucking.
Finishing Touches
With the carpet properly stretched and secured, it’s time to focus on the finishing touches to achieve a professional and polished look. Here are some important steps to follow:
1. Trim Excess Carpet: Trim any excess carpet along the edges using a carpet knife. Take care to follow the contour of the walls and leave a small border for tucking.
2. Tucking the Edges: Use a carpet tucker or a putty knife to neatly tuck the edges of the carpet into the gap between the baseboard and the floor. Work your way around the entire perimeter of the room, ensuring all edges are securely tucked.
3. Attaching Transition Strips: If your carpet meets a different type of flooring, such as hardwood or tile, install transition strips to create a seamless and safe transition between the surfaces. Follow the manufacturer’s instructions to attach the transition strips securely.
4. Inspect and Adjust: Take a moment to inspect the entire carpeted area. Look for any visible seams, wrinkles, or uneven areas. Smooth out any imperfections, making necessary adjustments to ensure the carpet is even and free from any tripping hazards.
5. Walk Over the Carpet: Finally, walk over the installed carpet to check for any squeaking or loose areas. Apply pressure in various spots to ensure the carpet is firmly secured and doesn’t move or shift underfoot.
By stretching and securing the carpet properly and completing the finishing touches, you’ll achieve a flawless and professional-looking carpet installation. Take your time during this stage to ensure excellent results that will enhance the comfort and beauty of your space for years to come.
When laying carpet, be sure to properly prepare the subfloor by removing any debris and ensuring it is smooth and level. This will help the carpet to lay flat and prevent premature wear and tear.
Read more: How To Get A Rug To Lay Flat On Carpet
Trimming Excess Carpet
Trimming excess carpet is an essential step in the carpet installation process, as it gives the flooring a neat and finished appearance. Here’s a step-by-step guide on how to trim excess carpet:
1. Gather the Necessary Tools: Before you begin trimming the carpet, gather the tools you’ll need. These include a carpet knife or utility knife, a straight edge or ruler, and a marker or chalk.
2. Ensure the Carpet is Fully Installed: Make sure that the carpet is fully stretched, secured, and tucked in along the edges before proceeding with trimming. This will ensure that the carpet is in its final position and any adjustments have been made.
3. Mark the Cutting Line: Determine the desired length of the carpet by measuring the distance between the wall and the edge of the carpet. Using the straight edge or ruler, draw a straight line along the excess carpet, marking where you will make the cut.
4. Double-Check the Cutting Line: Before making any cuts, double-check the marked line to ensure its accuracy. Take measurements and compare them to ensure the line is straight and aligned with the wall.
5. Cut the Excess Carpet: With the cutting line in place, use a carpet knife or utility knife to carefully cut along the marked line. Apply gentle, even pressure, and make multiple passes if needed to achieve a clean cut.
6. Dispose of the Excess Carpet: Once the excess carpet has been trimmed, roll it up and dispose of it properly. It’s important to properly dispose of the waste to maintain a clean and safe work area.
7. Inspect the Trimmed Area: After trimming the excess carpet, take a moment to inspect the trimmed area. Ensure that the cut is clean and straight, and check for any loose or frayed carpet fibers. Trim any unruly or loose fibers if necessary.
8. Tuck the Trimmed Edge: If the trimmed edge is exposed, use a carpet tucker or putty knife to neatly tuck the trimmed carpet edge into the gap between the baseboard and the floor. This will give the carpet a finished and polished appearance.
9. Check Overall Appearance: Walk around the room and visually inspect the entire carpeted area. Look for any uneven edges or visible seams. Smooth out any imperfections or adjustments to achieve an even and uniform appearance.
Trimming excess carpet is an important step to achieve a clean and professional-looking carpet installation. Take your time, use the proper tools, and double-check your measurements and cutting line to ensure precision and accuracy. With the excess carpet trimmed and the edges neatly tucked, your carpeted floors will have a polished and finished look.
Tucking the Edges
Tucking the edges of the carpet is an essential step in the carpet installation process to create a clean, finished look. Tucking involves neatly securing the carpet along the perimeter of the room, between the baseboard or molding and the floor. Here’s a step-by-step guide on how to tuck the edges of the carpet:
1. Gather the Necessary Tools: Before you begin, gather the tools you’ll need. These include a carpet tucker, a putty knife, or a similar tool that has a flat, thin edge.
2. Ensure the Carpet is Fully Installed: Before tucking the edges, confirm that the carpet is properly stretched, secured, and trimmed to size. This will ensure that the carpet is in its final position and ready for tucking.
3. Start at a Corner: Begin at a corner of the room and locate the edge of the carpet that needs to be tucked. Using your fingers or the flat edge of a putty knife, gently lift the carpet edge and fold it back slightly.
4. Insert the Tool: Insert the carpet tucker or putty knife into the gap between the baseboard or molding and the floor. Position it at a slight angle, allowing it to slide underneath the edge of the carpet.
5. Push the Carpet into the Gap: Apply steady pressure against the edge of the carpet, using the carpet tucker or putty knife to push and tuck the carpet into the gap. You may need to use a bit of force to ensure a secure fit.
6. Smooth Out the Carpet: Run your hand or the flat side of the putty knife along the edge of the carpet to smooth out any wrinkles or folds. Make sure the carpet is evenly distributed and securely tucked along the entire perimeter of the room.
7. Repeat the Process: Work your way around the entire room, repeating the tucking process at each corner and along each wall. Take care to ensure that the carpet is smooth and aligned as you go.
8. Trim Any Excess Carpet: If there is excess carpet that prevents a clean tuck, use a carpet knife or utility knife to carefully trim away the excess, allowing for a better fit.
9. Double-Check the Tucking: Take a moment to walk around the room and visually inspect the edges of the carpet. Ensure that it is securely tucked and that there are no visible gaps or loose areas.
By successfully tucking the edges of the carpet, you achieve a polished and seamless look. The tucking process ensures that the carpet remains firmly in place, preventing tripping hazards and maintaining a neat appearance. Take your time and use the appropriate tools to achieve clean and professional tucks along the edges of the carpeted area.
Attaching Transition Strips
Attaching transition strips is an important step in the carpet installation process, especially when the carpet meets a different type of flooring, such as hardwood, tile, or vinyl. Transition strips provide a seamless and safe transition between the different surfaces. Here’s a step-by-step guide on how to attach transition strips:
1. Gather the Necessary Tools: Before you begin, gather the tools and materials you’ll need. These may include transition strips, a measuring tape, a saw or utility knife for cutting the strips to size, and screws, nails, or adhesive to secure them in place.
2. Determine the Type of Transition Strip: There are various types of transition strips available, including T-shaped, reducer, threshold, or multi-purpose strips. Choose the appropriate type of strip that matches your specific flooring types and requirements.
3. Measure and Cut the Strip: Measure the distance between the edges of the two floorings where the transition strip will be installed. Mark this measurement on the transition strip and use a saw or utility knife to trim it to the correct size. Ensure a clean and precise cut.
4. Dry Fit the Strip: Place the cut transition strip in its intended position to check the fit and alignment. Make any necessary adjustments to ensure a snug fit between the two floor surfaces.
5. Prepare the Strip for Installation: If your transition strip requires screws or nails, drill pilot holes at even intervals along the strip. This will prevent the strip from splitting when you secure it. Alternatively, if adhesive is needed, apply it according to the manufacturer’s instructions.
6. Install the Transition Strip: Position the strip in place, ensuring that it aligns properly between the two floor surfaces. If using screws or nails, drive them through the pilot holes and into the subfloor or floor joists. If using adhesive, press the strip firmly onto the floor, following the adhesive manufacturer’s guidelines.
7. Secure and Finishing Touches: Make sure the strip is securely attached and flush with the floor. If necessary, use a hammer and a protective block to gently tap the strip into place. Check the strip for any protruding screws, nails, or adhesive and ensure they are flush with the surface.
8. Test and Adjust: Walk over the transition strip to ensure that it is sturdy and secure. Check for any gaps or unevenness and make any necessary adjustments to ensure a smooth and seamless transition.
Transition strips not only enhance the visual appeal of the carpet installation but also provide a functional and safe transition between different flooring surfaces. By following these steps, you can successfully attach transition strips to create a polished and cohesive transition between your carpet and other types of flooring.
Maintenance and Care
Proper maintenance and care is crucial to ensure the longevity and lasting beauty of your carpet. Here are some essential tips for maintaining and caring for your carpet:
1. Regular Vacuuming: Vacuum your carpet at least once a week, or more frequently in high-traffic areas, to remove dirt, dust, and debris. Use a vacuum cleaner with a rotating brush or beater bar for the best results.
2. Spot Cleaning: Attend to spills and stains promptly to prevent them from setting into the carpet fibers. Blot the spill with a clean cloth or paper towel, and gently clean the affected area using a carpet stain remover or a mixture of mild detergent and water. Avoid scrubbing, as this can damage the carpet fibers.
3. Deep Cleaning the Carpet: Schedule regular deep cleaning for your carpet to remove embedded dirt and allergens. This can be done using professional cleaning services or renting a carpet cleaner to do it yourself. Follow the manufacturer’s instructions for the best practices in deep cleaning your specific type of carpet.
4. Protect from Sunlight: Direct and prolonged exposure to sunlight can cause fading and damage to your carpet. Limit the amount of sunlight coming into the room by using curtains, blinds, or window films. Consider rotating furniture or using area rugs to minimize the effects of sun exposure.
5. Preventative Measures: Use doormats at entryways to help prevent dirt and debris from being tracked onto the carpet. Establish a “no shoes” policy or provide shoe covers for guests to minimize the amount of dirt and contaminants brought into the space.
6. Address Furniture Indentations: If furniture leaves indentations on the carpet, take steps to fluff up the affected area. Gently brush the carpet fibers with your fingers or use a spoon to lift them up. You can also place ice cubes on the indentations, and once melted, use a clean cloth to brush the fibers in an upward motion.
7. Professional Maintenance: Consider scheduling professional carpet cleaning at least once a year to remove deep-seated dirt and allergens. Professional cleaning can also help revive the carpet’s appearance and prolong its life.
By following these maintenance and care tips, you can keep your carpet looking clean, fresh, and vibrant for years to come. Regular cleaning and preventative measures will help maintain its beauty and extend its lifespan, ensuring that you enjoy your carpeted space to the fullest.
Read more: How To Lay Brick
Regular Vacuuming
Regular vacuuming is one of the most important tasks in maintaining the cleanliness and longevity of your carpet. Vacuuming helps remove dirt, dust, pet dander, allergens, and debris that can accumulate on the surface and within the carpet fibers. Here are some essential tips for effective and regular vacuuming:
1. Use the Right Vacuum Cleaner: Choosing the right vacuum cleaner is crucial for optimal cleaning. Consider factors such as the type of carpet, the level of foot traffic, and any specific cleaning needs. Look for a vacuum cleaner that has strong suction power, adjustable height settings, and additional attachments for versatility.
2. Adjust the Height Setting: Set the vacuum cleaner’s height according to the carpet pile height. If the vacuum is too low, it may damage the carpet fibers, while a too high setting won’t effectively pick up debris. Refer to your carpet manufacturer’s guidelines or test different height settings to find the most suitable one for your carpet.
3. Clear the Area: Remove any small objects or obstacles from the carpeted area before you start vacuuming. Coins, paper clips, or small toys can get stuck in the vacuum cleaner’s brush roll or clog the hose.
4. Pre-Vacuum Preparation: Before you start vacuuming, consider giving the carpet a quick pre-vacuum preparation. This may include using a carpet rake or a broom with soft bristles to loosen any embedded dirt or debris, making it easier for the vacuum cleaner to pick them up.
5. Vacuum in Multiple Directions: To ensure effective cleaning, vacuum the carpet in multiple directions. Both forward and backward motions, as well as diagonal passes, help loosen and remove dirt from different angles. Focus on high-traffic areas and areas where dirt tends to accumulate, such as entryways and hallways.
6. Pay Attention to Edges and Corners: Take extra care to vacuum the edges and corners of the carpet, where dirt and dust can accumulate. Use the vacuum cleaner’s attachments or a crevice tool to reach these areas, ensuring a thorough clean.
7. Slow and Steady: Vacuum slowly and steadily to allow the vacuum cleaner enough time to extract dirt and debris effectively. Rapid vacuuming may not have the desired cleaning results, as the vacuum may not have enough time to pick up all the dirt particles.
8. Empty or Replace the Bag/Canister: If your vacuum cleaner has a bag or a canister, ensure that it is not full before you start vacuuming. A full bag or canister can reduce the vacuum’s suction power and performance. Empty or replace it as needed to maintain optimal cleaning efficiency.
9. Clean or Replace Filters: Check your vacuum cleaner’s filters regularly and clean or replace them according to the manufacturer’s instructions. Clogged or dirty filters can significantly impact the vacuum’s performance and airflow, reducing its effectiveness.
10. Vacuuming Frequency: The frequency of vacuuming depends on the level of foot traffic, the presence of pets, and individual needs. In most cases, vacuuming once or twice a week is recommended for maintaining a clean and healthy carpet. However, high-traffic areas may require more frequent vacuuming to prevent a buildup of dirt and debris.
By regularly vacuuming your carpet, you can effectively remove dirt, allergens, and debris, improving indoor air quality and prolonging the life of your carpet. Develop a vacuuming routine and follow these tips to ensure your carpet looks clean, fresh, and well-maintained for years to come.
Spot Cleaning
Spot cleaning is a crucial part of carpet maintenance and can help prevent stains from setting into the carpet fibers. It’s important to address spills and stains promptly to minimize any lasting damage. Here are some essential tips for effective spot cleaning:
1. Act Quickly: As soon as a spill occurs, act quickly to prevent the stain from setting into the carpet. The longer a stain sits, the more challenging it may be to remove.
2. Blot, Don’t Rub: When dealing with a spill or stain, always blot the affected area instead of rubbing or scrubbing. Use a clean cloth, sponge, or paper towel to gently blot the stain. Rubbing can push the stain deeper into the carpet fibers and cause it to spread.
3. Work from the Outside In: Start blotting the stain from the outer edges toward the center. This helps prevent the stain from spreading to a larger area.
4. Use a Cleaning Solution: For most spills, mild detergent mixed with water can be effective in removing stains. Alternatively, you can use a carpet stain remover that is safe for your type of carpet. Follow the product instructions and test it on a small, inconspicuous area of the carpet before applying it to the stain.
5. Blot with the Cleaning Solution: Apply a small amount of the cleaning solution directly onto the stain, and then blot with a clean cloth or sponge. Avoid saturating the carpet with excessive moisture, as this can lead to carpet damage and the growth of mold or mildew.
6. Blot with Water: After treating the stain with the cleaning solution, rinse the area by blotting with clean water. This helps remove any residue from the cleaning solution. Blot with a dry cloth or paper towel to absorb the moisture.
7. Never Scrub or Brush: Avoid using vigorous scrubbing or brushing motions on the carpet, as this can damage the fibers and potentially spread the stain. Stick to the blotting technique to remove the stain effectively.
8. Patience is Key: Removing certain stains can take time and multiple rounds of blotting. Be patient and continue to blot gently until the stain is lifted. It may require repeating the process several times to achieve the desired results.
9. Dry the Area: After spot cleaning, allow the area to air dry completely. Avoid stepping on the damp carpet until it is fully dry to prevent any additional staining or damage.
10. For Persistent Stains: If a stain persists despite spot cleaning efforts, it’s best to consult a professional carpet cleaner. They have specialized equipment and knowledge to tackle tough stains effectively.
Remember, different spills and stains may require different cleaning methods. Always refer to the manufacturer’s guidelines for your specific type of carpet and consult professional cleaners if needed. By addressing spills and stains promptly with proper spot cleaning techniques, you can maintain the beauty and cleanliness of your carpet for years to come.
Deep Cleaning the Carpet
Deep cleaning your carpet is an essential part of regular maintenance to keep it looking fresh, vibrant, and free from deep-seated dirt and allergens. While regular vacuuming and spot cleaning are crucial, deep cleaning should be performed at least once a year to ensure a thorough and effective clean. Here are some steps to follow for deep cleaning your carpet:
1. Vacuum Thoroughly: Before deep cleaning, vacuum the carpet thoroughly to remove loose dirt and debris. This helps prevent the dirt from becoming trapped in the carpet during the deep cleaning process.
2. Choose the Right Method: There are several methods for deep cleaning carpets, including steam cleaning, shampooing, and dry cleaning. Consider factors such as the type of carpet, its condition, and your preference when selecting the appropriate method.
3. Rent or Hire Professional Equipment: Depending on the method chosen, you may need to rent a carpet cleaner or hire professional carpet cleaning services. Follow the manufacturer’s instructions or seek professional guidance to ensure the proper use of the equipment.
4. Prepare the Area: Clear the room of furniture and any obstructions before starting the deep cleaning process. This allows for easy access to the entire carpeted area and ensures a thorough clean.
5. Follow Instructions and Mix Cleaning Solution: If using a carpet cleaner, ensure you use the appropriate cleaning solution recommended for your carpet type. Follow the instructions provided to mix the solution properly.
6. Test in an Inconspicuous Area: Before applying the cleaning solution to the entire carpet, test it in a small, inconspicuous area to ensure compatibility and to evaluate any potential color fading or damage.
7. Work in Sections: Divide the carpeted area into sections and clean one section at a time. This allows for more thorough cleaning and ensures that each area is cleaned evenly.
8. Use Proper Technique: When using the carpet cleaner, follow the recommended technique, whether it’s a back-and-forth motion or overlapping strokes. Ensure consistent and even coverage to achieve the best results.
9. Extract and Rinse: After cleaning each section, extract as much moisture as possible by going over the area with the carpet cleaner in the extraction mode. Follow up with a separate rinse cycle to remove any residue from the cleaning solution.
10. Allow for Drying Time: Ensure proper ventilation in the room to help speed up the drying process. Avoid walking on the carpet until it is completely dry to prevent dirt and debris from being tracked onto the damp carpet.
Deep cleaning your carpet on a regular basis helps restore its freshness and prolong its lifespan. It removes dirt, allergens, and deep-seated stains, resulting in a healthier indoor environment. By following the appropriate deep cleaning method and seeking professional help if needed, you can enjoy a clean and beautiful carpet for years to come.
Conclusion
Maintaining and caring for your carpet is essential to keep it looking its best and to prolong its lifespan. By following proper maintenance techniques such as regular vacuuming, spot cleaning, deep cleaning, and taking preventative measures, you can ensure that your carpet remains clean, fresh, and inviting.
Regular vacuuming helps remove dirt, dust, and allergens from the surface and within the carpet fibers. Spot cleaning allows you to promptly address spills and stains, preventing them from becoming permanent. Deep cleaning, performed at least once a year, provides a thorough and deep-seated clean to remove embedded dirt, allergens, and tough stains.
Taking preventative measures, such as using doormats, removing shoes, and protecting the carpet from direct sunlight, can significantly enhance the longevity and appearance of your carpet. Additionally, seeking professional help for deep cleaning or challenging stains can ensure effective and safe cleaning methods.
By implementing these maintenance and care practices, you’ll create a clean and comfortable environment while preserving the beauty and durability of your carpet. So, keep your carpet well-maintained and enjoy the warmth, comfort, and style it brings to your living space for years to come.
Frequently Asked Questions about How To Lay Carpet
Was this page helpful?
At Storables.com, we guarantee accurate and reliable information. Our content, validated by Expert Board Contributors, is crafted following stringent Editorial Policies. We're committed to providing you with well-researched, expert-backed insights for all your informational needs.


0 thoughts on “How To Lay Carpet”