Articles
How To Level A Bathroom Vanity
Modified: October 31, 2024
Discover helpful articles on how to level a bathroom vanity. Find step-by-step instructions and expert tips to ensure a smooth and sturdy installation.
(Many of the links in this article redirect to a specific reviewed product. Your purchase of these products through affiliate links helps to generate commission for Storables.com, at no extra cost. Learn more)
Introduction
When it comes to installing or remodeling a bathroom, one crucial aspect is ensuring that your bathroom vanity is level. A level vanity not only looks aesthetically pleasing but also ensures the proper functioning of the sink and countertops. If your vanity is not level, it can lead to issues such as water pooling, improper drainage, and difficulty in opening or closing drawers and doors.
Leveling a bathroom vanity may sound like a daunting task, but with the right tools and steps, it can be easily accomplished. By following this guide, you can level your bathroom vanity and create a stable and functional space.
To level a bathroom vanity, you will need a few tools and materials:
Key Takeaways:
- Ensure proper water drainage, prevent water pooling, and allow for smooth operation of drawers and doors by leveling your bathroom vanity using shims and a spirit level.
- Create a stable and visually appealing bathroom space by securely attaching the vanity to the wall and reinstalling the vanity top after leveling the bathroom vanity.
Read more: How To Organize A Vanity
Tools and Materials Needed
- Spirit level
- Shims
- Screwdriver
- Power drill
- Screws
- Tape measure
- Pencil
Now that you have gathered the necessary tools, let’s take a closer look at the steps to level your bathroom vanity.
Key Takeaways:
- Ensure proper water drainage, prevent water pooling, and allow for smooth operation of drawers and doors by leveling your bathroom vanity using shims and a spirit level.
- Create a stable and visually appealing bathroom space by securely attaching the vanity to the wall and reinstalling the vanity top after leveling the bathroom vanity.
Read more: How To Organize A Vanity
Tools and Materials Needed
Before you begin leveling your bathroom vanity, gather the following tools and materials:
- Spirit level: A spirit level is essential for determining the levelness of the vanity. It consists of a long, rectangular tube filled with liquid and an air bubble. The bubble should be centered between the indicator lines for a level surface.
- Shims: Shims are thin, tapered pieces typically made of wood or plastic. They are used to fill gaps and level uneven surfaces. Shims are crucial for adjusting the height of the vanity and ensuring it sits evenly on the floor.
- Screwdriver: A screwdriver is necessary for removing any screws or clips holding the vanity top in place and securing the vanity to the wall.
- Power drill: A power drill is useful for creating pilot holes in the wall for securing the vanity with screws.
- Screws: Screws are needed for attaching the vanity to the wall. Make sure to choose the appropriate length and type of screws depending on the material of your vanity and the wall.
- Tape measure: A tape measure allows you to accurately measure the height, width, and depth of the vanity. This helps in determining the positions for screws and shims.
- Pencil: Use a pencil to mark the locations for screw holes and indicate areas that require shimming.
Having these tools and materials ready will ensure that you can efficiently and effectively level your bathroom vanity.
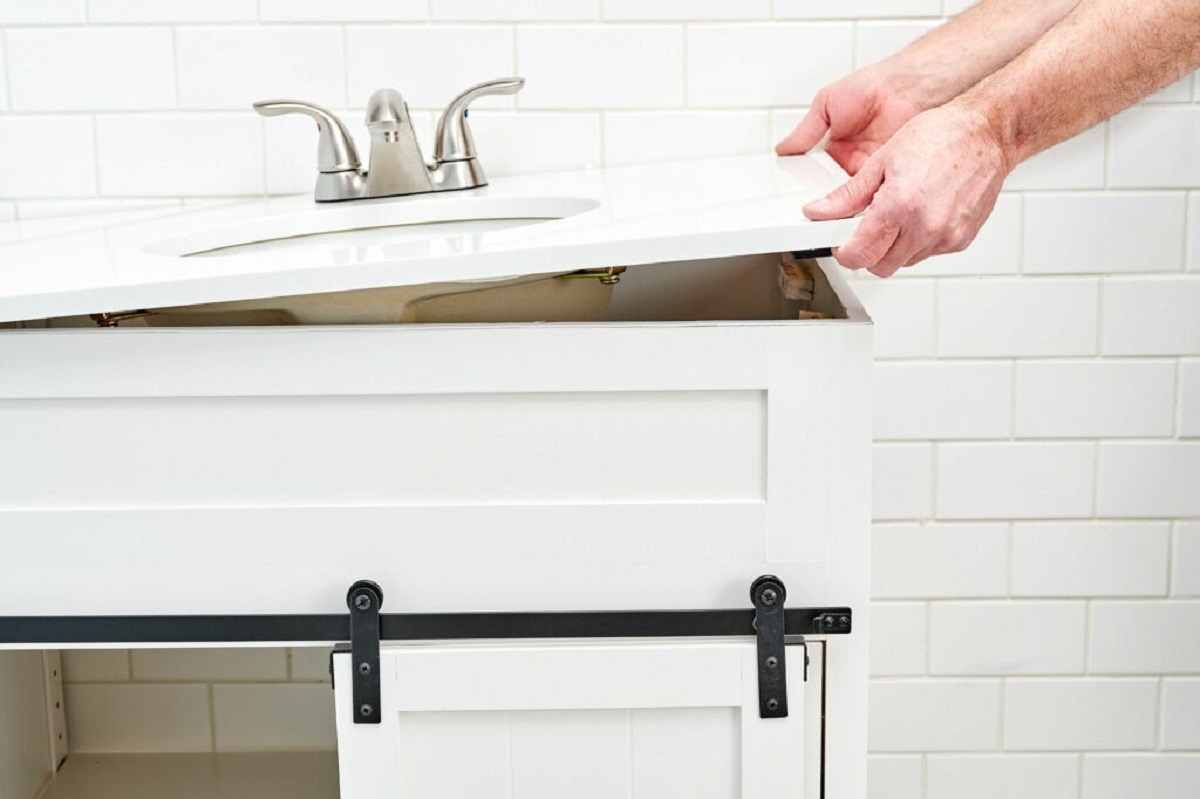
Step 1: Remove the Vanity Top
The first step in leveling a bathroom vanity is to remove the vanity top. This will provide you with easier access to the vanity base and make it simpler to level the unit. Follow these steps to remove the vanity top:
- Unscrew any screws or clips securing the vanity top: Carefully examine the vanity top for any screws or clips that may be holding it in place. Use a screwdriver to remove these screws or clips. Keep the screws or clips aside as you will need them later to reattach the vanity top.
- Carefully lift and remove the vanity top: Once the screws or clips are removed, gently lift the vanity top from the vanity base. It may take some effort, so be cautious while removing it to avoid any damage. Set the vanity top aside in a safe place where it won’t get scratched or cracked.
Removing the vanity top will make it easier to access the vanity base and ensure a smooth leveling process.
Step 2: Check the Level
Now that the vanity top has been removed, it’s time to check the levelness of the vanity base. To do this, follow these steps:
- Place the spirit level on top of the vanity base: Take your spirit level and position it on top of the vanity base. Make sure the level is long enough to cover the entire width of the vanity. Rest it on the surface and ensure it is stable.
- Check if the vanity is level from side to side and front to back: Look at the bubble inside the spirit level. The bubble should be between the indicator lines, indicating that the vanity is level. Check both the side-to-side and front-to-back position of the vanity. If the bubble is off-center in either direction, it means the vanity is not level and needs adjustment.
This step is crucial as it helps you identify any unevenness in the vanity base. By checking the level from side to side and front to back, you can determine which areas need to be addressed during the leveling process.
When leveling a bathroom vanity, use a carpenter’s level to ensure it is straight and even. Adjust the legs or shims as needed to achieve a level surface.
Read more: What Is A Vanity?
Step 3: Shim the Vanity
After checking the levelness of the vanity and identifying any low spots or areas that need adjustment, it’s time to shim the vanity. Shimming involves using thin, tapered wedges called shims to even out the height of the vanity and make it level. Follow these steps to shim the vanity:
- Identify the low spots or areas where the vanity is not level: Carefully observe the vanity base and determine the areas that need to be leveled. These are the spots where the spirit level showed the bubble off-center or indicated unevenness. Pay close attention to both the side-to-side and front-to-back directions.
- Insert shims at these points to even out the height: Take your shims and gently insert them underneath the low spots or areas of the vanity. Push them in until they fill the gaps and provide support. Use additional shims if necessary to achieve a level surface.
Shimming helps to stabilize the vanity by compensating for any unevenness in the flooring or walls. It ensures that the vanity sits securely and provides a level base for the sink and countertops.
Step 4: Recheck the Level
Once you have shimmed the vanity to even out the height, it’s important to recheck the levelness to ensure that the adjustments have been successful. Follow these steps to recheck the level of the vanity:
- Place the spirit level back on top of the vanity: Take your spirit level and position it once again on top of the vanity base. Make sure it covers the entire width of the vanity and rests securely on the surface.
- Ensure the vanity is now level in all directions: Check the bubble inside the spirit level to see if the vanity is now level from side to side and front to back. The bubble should be centered between the indicator lines, indicating a level surface. Verify the levelness from different angles to confirm that the adjustments have been successful.
Rechecking the level is crucial to ensure that the shimming process has effectively leveled the vanity. By confirming the levelness from all directions, you can be confident in the stability and functionality of your bathroom vanity.
Step 5: Secure the Vanity
Once you have confirmed that the vanity is level, it’s time to secure it in place. Follow these steps to securely attach the vanity to the wall:
- Mark the locations for screw holes on the wall: Take a pencil and mark the positions on the wall where the screws will go. These locations should align with the mounting points on the vanity base. Ensure that the marks are level based on the levelness of the vanity.
- Use a power drill to create pilot holes for the screws: Using a power drill and the appropriate drill bit, create pilot holes at the marked positions on the wall. The pilot holes will make it easier to insert the screws and reduce the risk of damaging the wall. Choose a drill bit that is slightly smaller than the diameter of the screws.
- Securely attach the vanity to the wall using screws: With the pilot holes created, lift the vanity base and position it against the wall, aligning the mounting points with the pilot holes. Insert the screws through the mounting points and into the pilot holes. Use a screwdriver or power drill to tighten the screws, ensuring that the vanity is securely attached to the wall.
Securing the vanity to the wall is essential for stability and durability. By securely attaching the vanity, you will prevent it from shifting or moving over time.
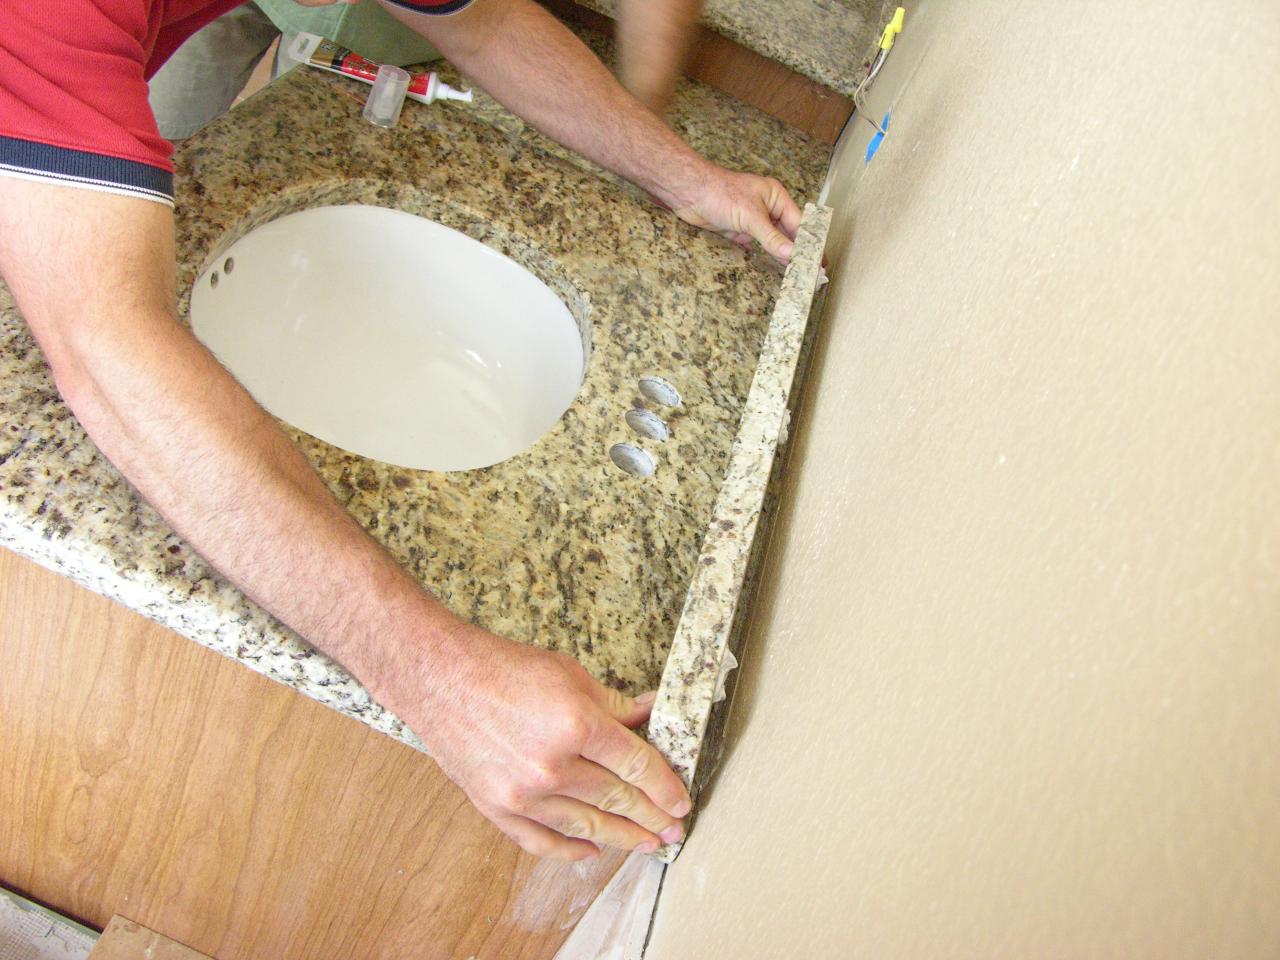
Step 6: Reinstall the Vanity Top
With the vanity base securely attached to the wall, it’s time to reinstall the vanity top. Follow these steps to properly reinstall the vanity top:
- Carefully place the vanity top back onto the vanity base: Lift the vanity top and align it with the edges of the vanity base. Take extra care to position it correctly to ensure a proper fit. Avoid any sudden movements that may cause damage to the vanity top or base.
- Align and secure it using screws or clips: Once the vanity top is in place, check its alignment with the vanity base. Make sure the edges are flush and there are no gaps between the top and base. If your vanity top has pre-drilled holes, use screws to secure it to the base. Alternatively, if your vanity top uses clips, follow the manufacturer’s instructions to securely attach the top using the provided clips.
Reinstalling the vanity top not only completes the aesthetic look of the vanity but also ensures the stability and functionality of the entire unit. A properly secured vanity top will withstand daily use and maintain its levelness.
Read more: How To Paint A Vanity
Conclusion
Leveling a bathroom vanity is a crucial step in creating a functional and visually appealing bathroom space. A level vanity ensures proper water drainage, prevents water pooling, and allows for smooth operation of drawers and doors. By following the steps outlined in this guide, you can successfully level your bathroom vanity.
Start by gathering the necessary tools and materials, including a spirit level, shims, screwdriver, power drill, screws, tape measure, and pencil. Remove the vanity top to access the vanity base, and then use a spirit level to check for levelness. If any low spots or uneven areas are found, insert shims to even out the height. Recheck the level to ensure the adjustments have been successful.
Next, secure the vanity to the wall by marking the screw hole locations, creating pilot holes, and attaching the vanity base with screws. Finally, reinstall the vanity top by carefully aligning it with the base and securing it with screws or clips.
Remember to take your time during the process, paying attention to details and double-checking the levelness at each step. A properly leveled vanity will not only enhance the functionality of your bathroom but also contribute to its overall aesthetic appeal.
By following these steps, you can confidently level your bathroom vanity and enjoy a well-balanced and stylish bathroom for years to come.
Frequently Asked Questions about How To Level A Bathroom Vanity
Was this page helpful?
At Storables.com, we guarantee accurate and reliable information. Our content, validated by Expert Board Contributors, is crafted following stringent Editorial Policies. We're committed to providing you with well-researched, expert-backed insights for all your informational needs.


0 thoughts on “How To Level A Bathroom Vanity”