Articles
How To Loosen Pvc Pipe Under Sink
Modified: May 6, 2024
Learn how to loosen a PVC pipe under your sink with these informative articles. Discover step-by-step guides and expert tips to tackle this common plumbing issue.
(Many of the links in this article redirect to a specific reviewed product. Your purchase of these products through affiliate links helps to generate commission for Storables.com, at no extra cost. Learn more)
Introduction
When dealing with plumbing issues, one common problem that many homeowners encounter is a PVC pipe that is difficult to loosen under the sink. This can be a frustrating situation, especially when you need to make repairs or replace a component. However, with the right tools and techniques, you can successfully loosen the PVC pipe and resolve the issue.
In this article, we will provide a step-by-step guide on how to loosen a PVC pipe under the sink. Whether you are a DIY enthusiast or a homeowner in need of quick fixes, this article will equip you with the knowledge and skills to tackle this common plumbing problem.
Key Takeaways:
- Loosening a PVC pipe under the sink requires gathering the right tools, turning off the water supply, identifying the problem area, applying heat, and using a pipe wrench or pliers to effectively address plumbing issues.
- After loosening the PVC pipe, it’s crucial to inspect for damage or leaks, and if necessary, replace or repair the pipe. Turning the water supply back on and checking for leaks ensures a functional and leak-free plumbing system.
Read more: How To Replace Pipe Under Kitchen Sink
Tools and Materials Needed
Before you begin the process of loosening a PVC pipe under the sink, it is essential to gather the necessary tools and materials. Having these items on hand will make the task much easier and ensure a smooth process. Here are the tools and materials you will need:
- Pipe wrench or pliers
- Heat gun or hairdryer
- Rag or towel
- Pipe lubricant or WD-40
- Bucket or container to catch water
- Safety gloves and goggles
- Replacement PVC pipes and fittings (if needed)
The pipe wrench or pliers will be used to grip and loosen the PVC pipe, while the heat gun or hairdryer will help soften the pipe and make it more pliable. The rag or towel will come in handy for wiping away any excess moisture or debris. Pipe lubricant or WD-40 can be applied to stubborn joints to ease the loosening process. Having a bucket or container nearby will allow you to catch any water that may leak during the process. Lastly, don’t forget to protect your hands and eyes with safety gloves and goggles.
Once you have gathered all the necessary tools and materials, you are ready to proceed to the step-by-step process of loosening the PVC pipe under the sink. Remember to always exercise caution and follow safety guidelines when working with plumbing systems.
Step 1: Gather the necessary tools and materials
The first step in loosening a PVC pipe under the sink is to gather all the required tools and materials. By having everything on hand, you’ll be prepared and save time during the process.
Here is a checklist of the tools and materials you’ll need:
- Pipe wrench or pliers: These tools will help you grip and loosen the PVC pipe securely.
- Heat gun or hairdryer: You’ll use this to apply heat to the pipe and make it more pliable.
- Rag or towel: This will be useful for wiping off any excess moisture or debris.
- Pipe lubricant or WD-40: Applying lubricant to stubborn joints can make the loosening process easier.
- Bucket or container: You’ll need something to catch any water that may leak during the process.
- Safety gloves and goggles: Protecting your hands and eyes is crucial while working on plumbing systems.
- Replacement PVC pipes and fittings (if needed): If you’re planning to replace any damaged components, make sure you have the right replacements available.
Once you have gathered all the necessary tools and materials, ensure they are readily accessible near your work area. This way, you won’t have to pause mid-process to find a missing tool or scramble for a replacement part.
Remember, it’s crucial to exercise caution and wear safety gear when working on plumbing systems. Plumbing tasks may involve sharp edges, hot surfaces, and potential water leakage, so keep your gloves and goggles on at all times to protect yourself.
With all the tools and materials in place, you’re now ready to proceed to the next step and begin loosening the PVC pipe under the sink.
Step 2: Turn off the water supply
Before you start loosening the PVC pipe under the sink, it is essential to turn off the water supply to avoid any leaks or water damage. This step will help ensure your safety and prevent any unnecessary mess.
Here’s a step-by-step guide on how to turn off the water supply:
- Locate the shut-off valve: The shut-off valve is usually located near the sink or in the basement. It is a valve that controls the flow of water to the specific area.
- Turn the valve clockwise: To close the valve, rotate it in a clockwise direction until it is fully closed. This will stop the water flow to the sink.
- Check for water flow: After closing the valve, turn on the faucet to see if the water supply has been successfully shut off. If no water comes out, then the water supply has been properly turned off.
It is important to note that in some cases, the shut-off valve may not completely stop the water flow. In such instances, it is advisable to turn off the main water supply to your house to ensure no water enters the plumbing system.
By turning off the water supply, you minimize the risk of water leakage and enable a safe and controlled environment for loosening the PVC pipe. Proceeding with the next steps while the water supply is turned off will prevent any unwanted water damage and allow for a smoother process.
Once you have turned off the water supply, you are ready to move on to the next step: identifying the problem area.
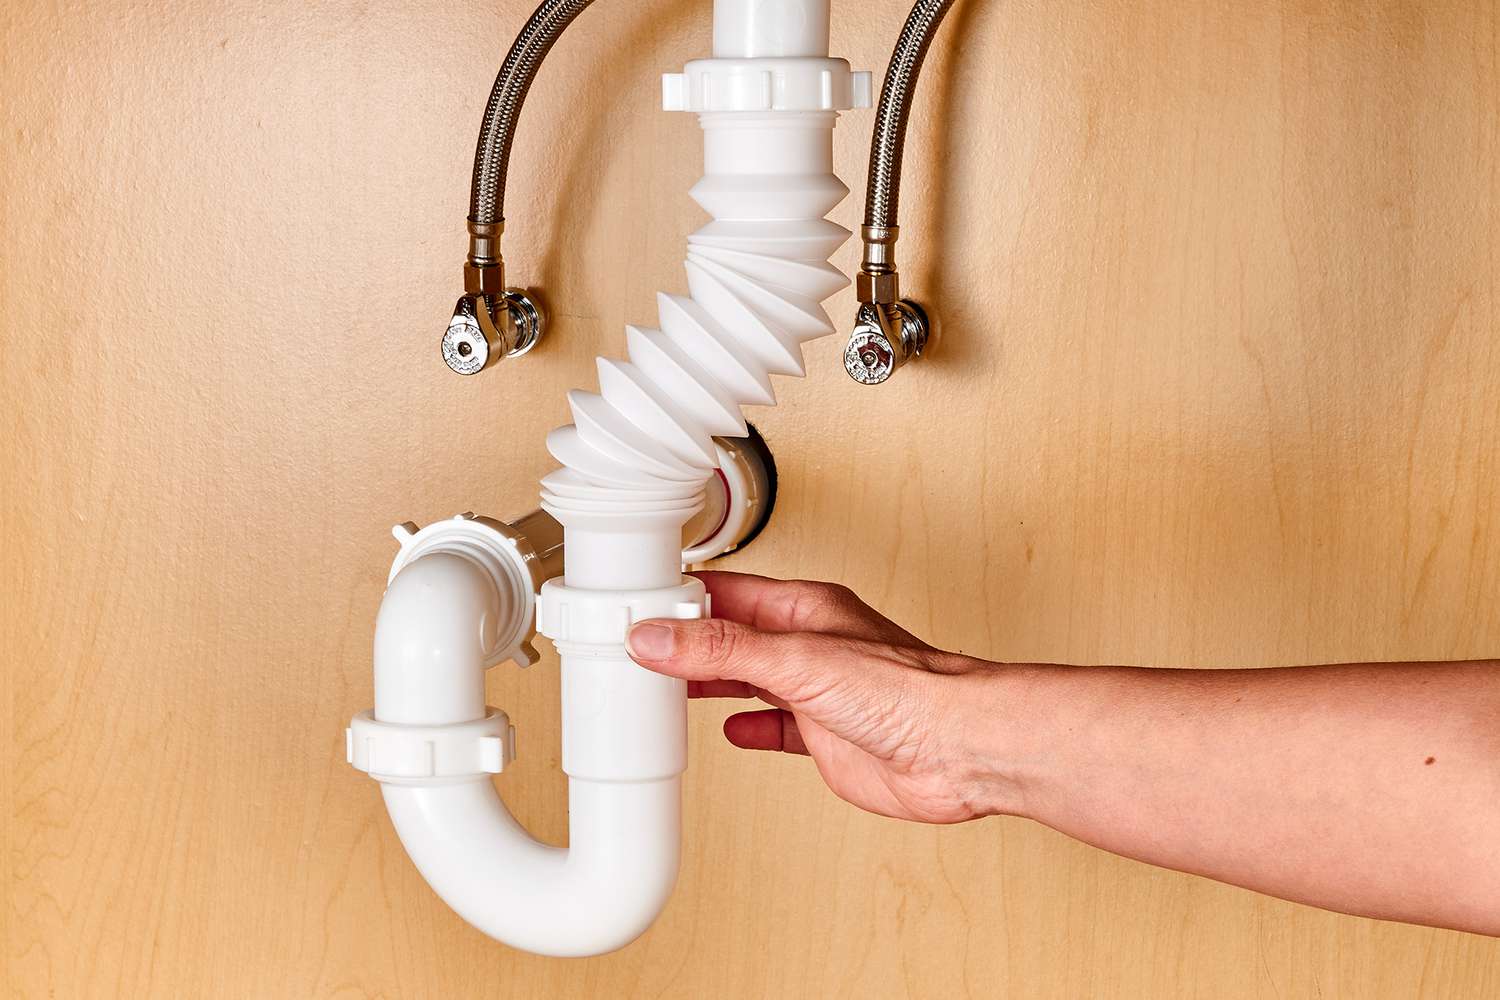
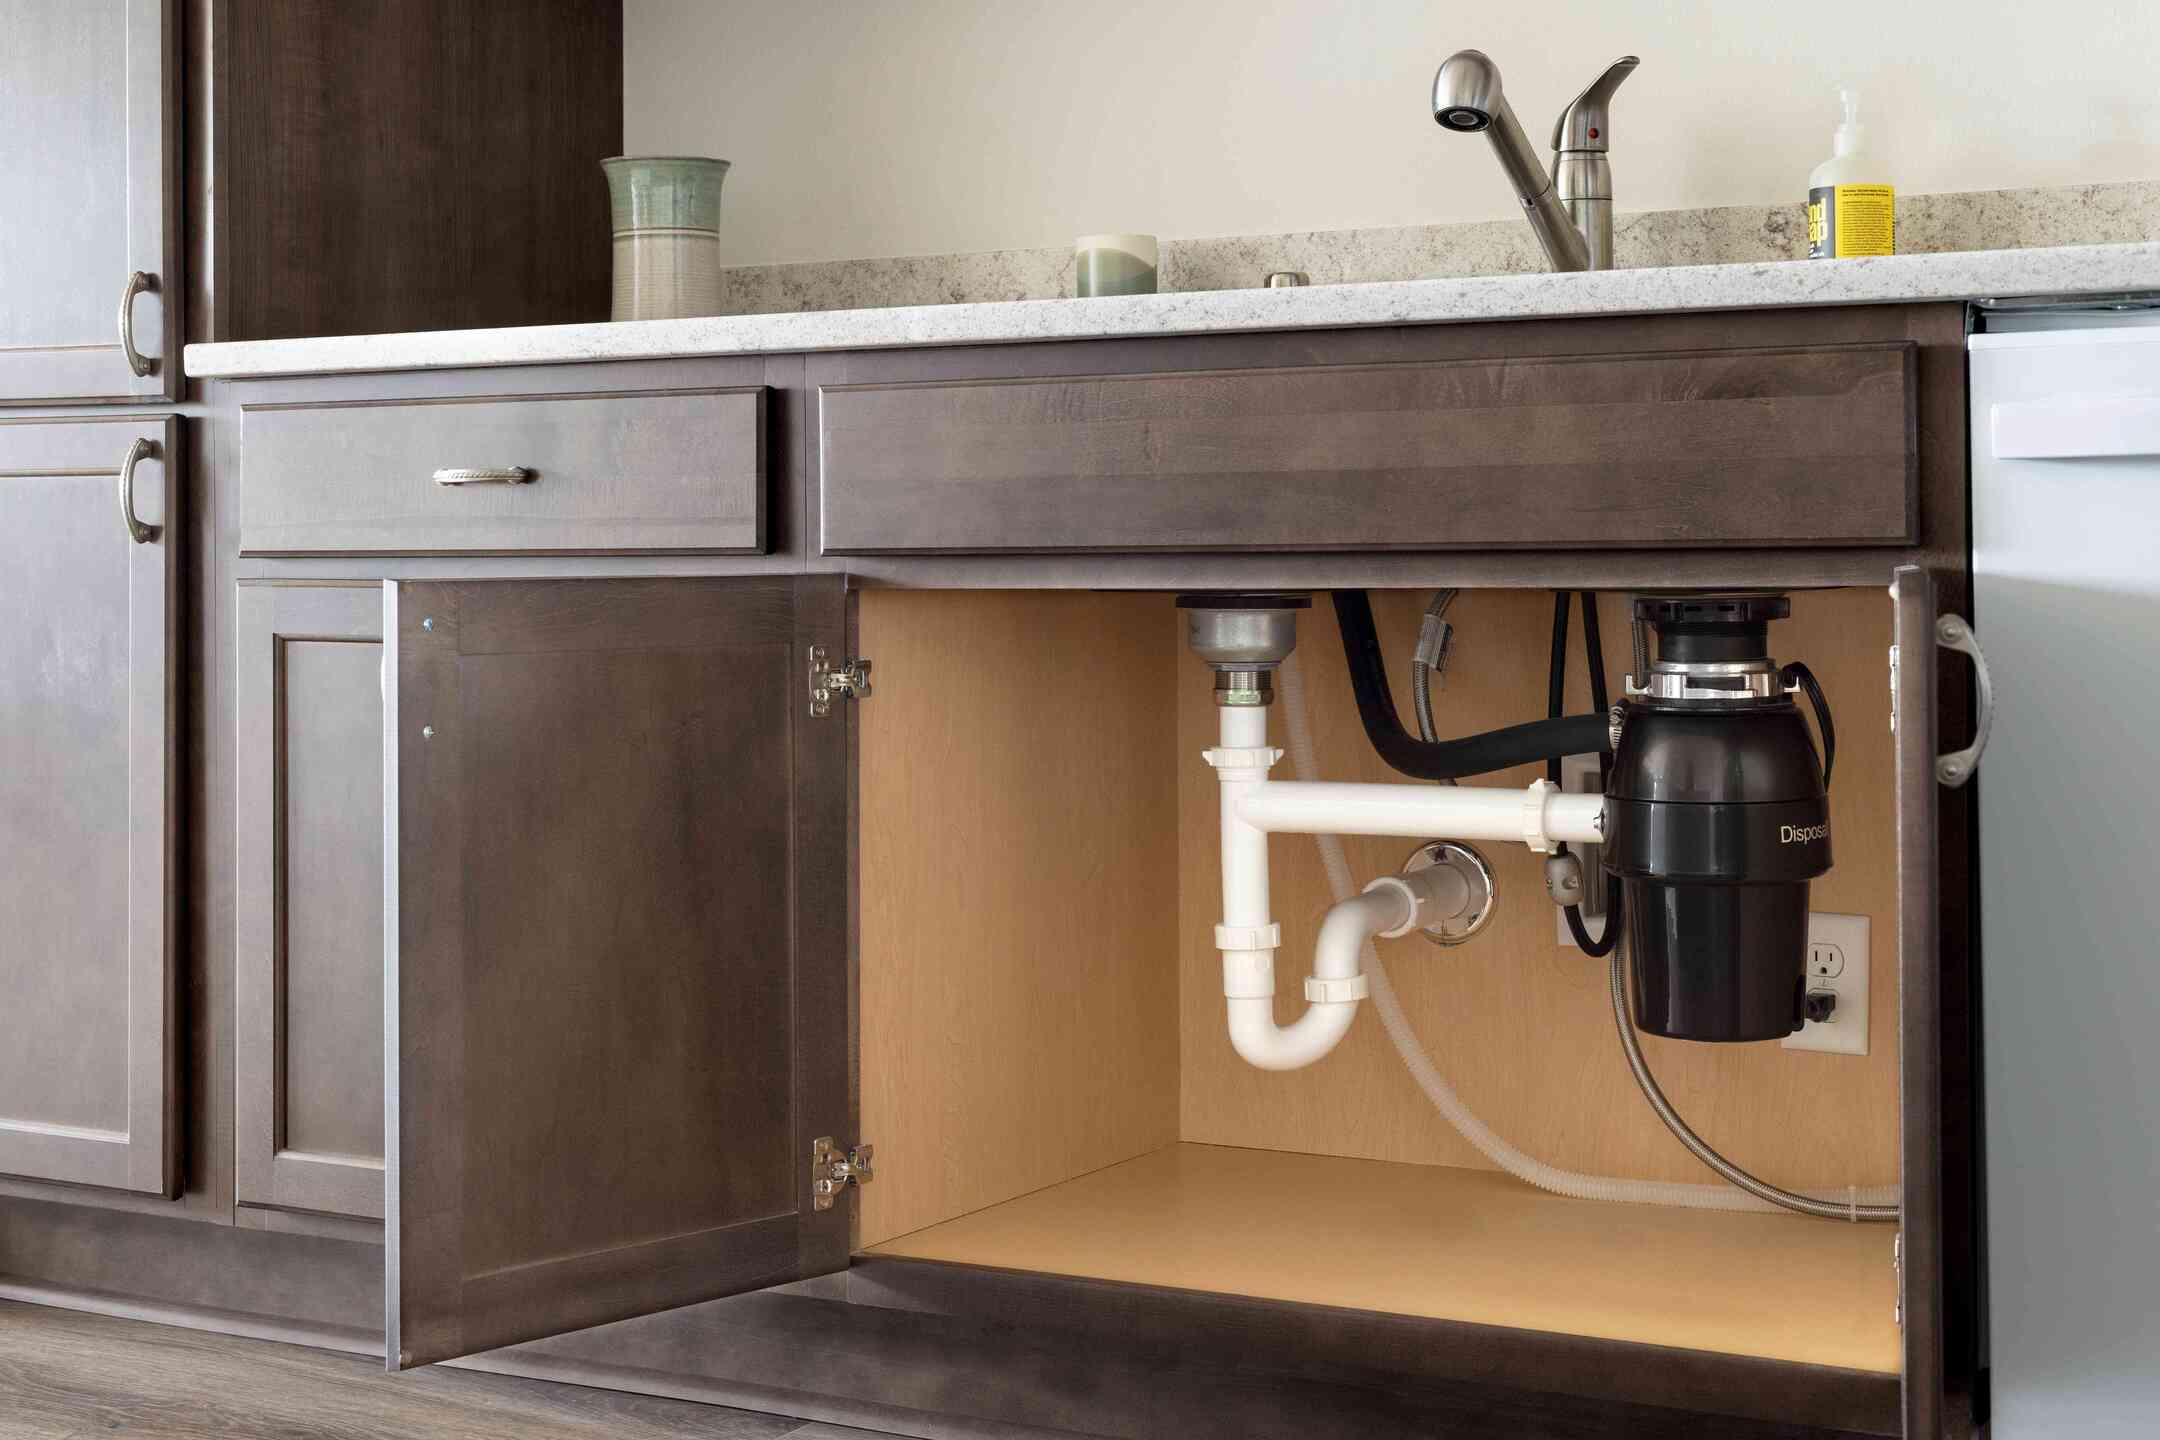
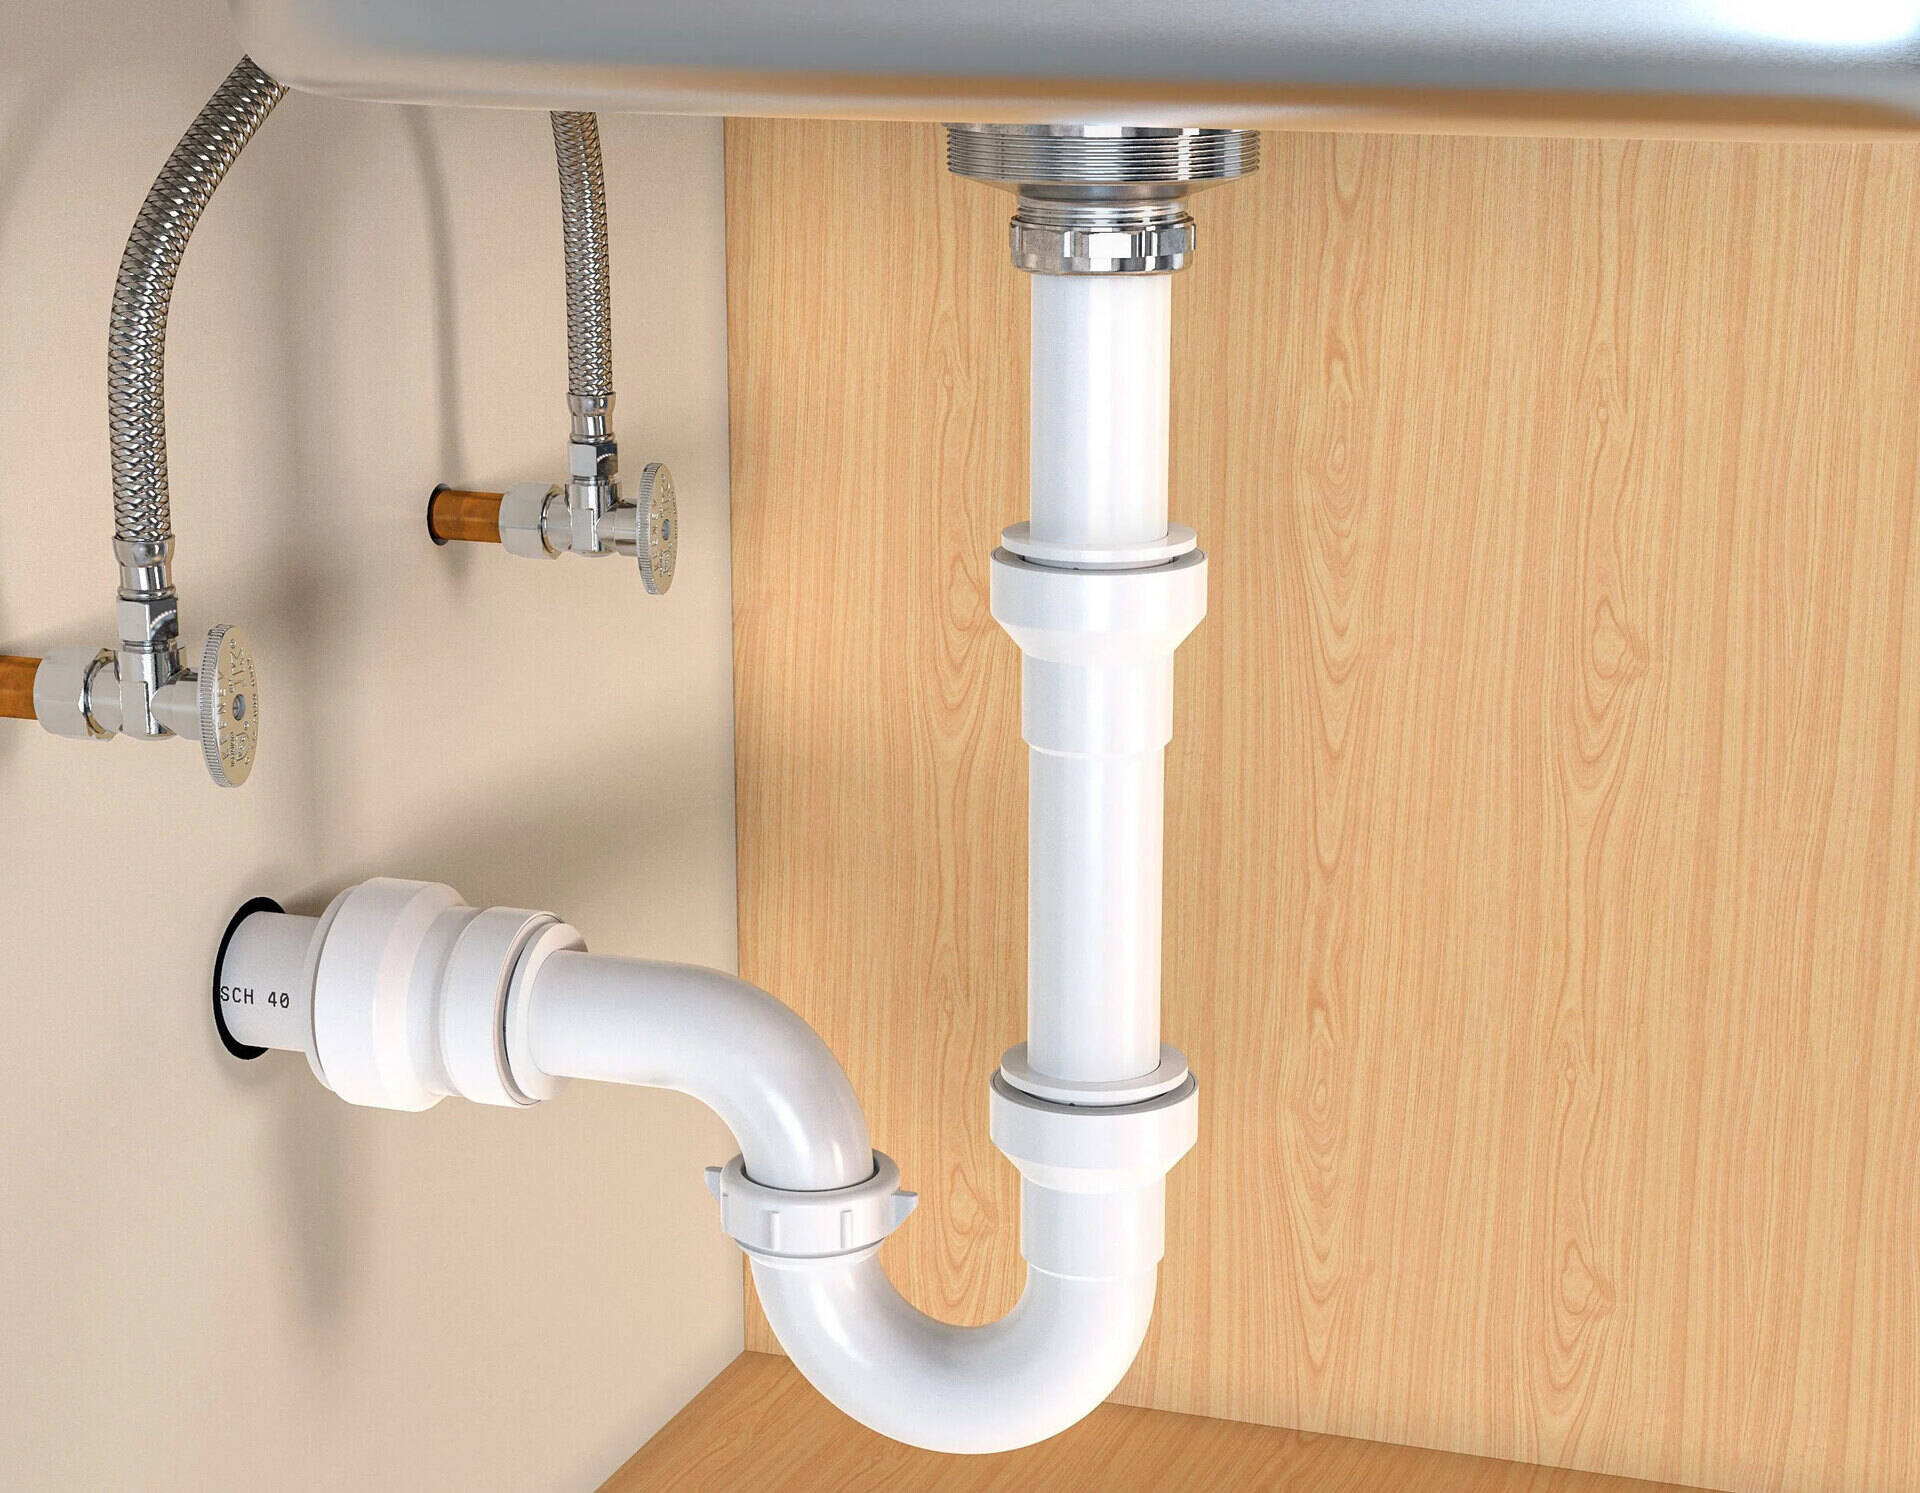
Step 3: Identify the problem area
Before you can effectively loosen the PVC pipe under the sink, it is crucial to identify the specific problem area. By understanding the location and extent of the issue, you can determine the best approach for loosening the pipe.
Here are a few common problem areas to look out for:
- Leaking joints: Check for any visible signs of water leakage around the joints of the PVC pipe. Look for water droplets, wet spots, or water stains.
- Cracked or damaged pipes: Inspect the PVC pipes under the sink for any visible cracks, breaks, or damage. These can often be the source of leaks or blockages.
- Tight or stubborn connections: Some PVC pipes may have tight or stuck connections due to aging or improper installation. These can make it difficult to remove or loosen the pipe.
To identify the problem area, you should visually inspect the plumbing beneath the sink. Shine a flashlight to get a clear view of the pipes and connections. Look for any signs of moisture, corrosion, or obvious damage.
If you are unsure about the problem area or need a more accurate assessment, you may consider consulting a professional plumber. They can provide expert advice and help you pinpoint the exact issue.
Once you have identified the problem area, you can proceed to the next step, which involves applying heat to the PVC pipe.
Read more: How To Fix Leaking Pipe Under Sink
Step 4: Apply heat to the PVC pipe
Applying heat to the PVC pipe is an effective method for softening it and making it more pliable, which will significantly ease the process of loosening the pipe.
Here’s how to apply heat to the PVC pipe:
- Ensure proper ventilation: Before using any heat sources, make sure the area is well-ventilated to prevent the buildup of fumes.
- Use a heat gun or hairdryer: Point a heat gun or hairdryer towards the PVC pipe, focusing on the sections that need to be loosened. Keep the heat source at a safe distance to avoid damaging the pipe.
- Move the heat source back and forth: Gradually move the heat source back and forth along the pipe, applying heat evenly to the problem area. This will soften the pipe and make it more flexible.
- Continue heating until the pipe becomes pliable: Monitor the pipe as you apply heat. Once it becomes pliable and slightly softened, you can proceed to the next step.
It is important to note that excessive heat can cause the PVC pipe to melt or deform, so be cautious and avoid overheating it. Take breaks as needed to allow the pipe to cool down before continuing with the process.
By applying heat, you make the PVC pipe more responsive to manipulation, making it easier to loosen and remove. This method is particularly useful for loosening stuck or tight connections and can save you time and effort during the repair or replacement process.
Once the PVC pipe has been adequately heated, you’re ready to move on to the next step: using a pipe wrench or pliers to loosen the pipe.
To loosen a PVC pipe under the sink, use a pipe wrench to grip the pipe and turn it counterclockwise. If it’s still stuck, apply penetrating oil and let it sit for a few minutes before trying again.
Step 5: Use a pipe wrench or pliers to loosen the pipe
Now that the PVC pipe has been heated and softened, you can proceed to use a pipe wrench or pliers to loosen it further. These tools will provide the necessary grip and leverage to loosen the pipe connections.
Follow these steps to use a pipe wrench or pliers effectively:
- Choose the appropriate tool: Select a pipe wrench or pliers that best suits the size and type of the PVC pipe you are working on. Make sure the tool provides a secure grip without causing damage to the pipe.
- Position the tool: Position the pipe wrench or pliers around the pipe or the fitting you wish to loosen. Ensure a firm and secure grip to avoid slipping or causing damage to the pipe.
- Apply force in the appropriate direction: For most PVC pipe connections, turning counterclockwise (lefty-loosey) will help to loosen the joint. Apply steady pressure while turning to gradually loosen the connection.
- Use lubricant if needed: If the joints are stubborn or difficult to loosen, you can apply a small amount of pipe lubricant or WD-40 to help ease the process. Allow the lubricant to penetrate the joint before attempting to loosen it again.
- Repeat the process for other connections: If there are multiple connections on the PVC pipe that need to be loosened, repeat the same steps for each one.
It’s important to remember that PVC pipes can be fragile, so avoid using excessive force or twisting the pipe too forcefully. Apply gentle pressure and use gradual movements to avoid damaging the pipe or causing it to break.
If you encounter any resistance or the pipe is still difficult to loosen, you may need to reapply heat or use additional tools such as a pipe cutter to remove the pipe completely.
Once you have successfully loosened the PVC pipe, it’s time to move on to the next step: removing the loosened pipe.
Step 6: Remove the loosened PVC pipe
After successfully loosening the PVC pipe using a pipe wrench or pliers, the next step is to remove the loosened pipe from its connection. This step will allow you to further inspect the pipe and address any necessary repairs or replacements.
Follow these steps to remove the loosened PVC pipe:
- Continue turning counterclockwise: If you haven’t already, continue turning the pipe wrench or pliers counterclockwise to fully loosen the pipe from its connection. Apply steady and controlled force, ensuring not to twist or bend the pipe excessively.
- Carefully pull the pipe away: Once the pipe is sufficiently loosened, carefully pull it away from the connection. Be cautious of any remaining water or debris that may spill out during this process.
- Use a rotational motion: If the pipe seems stuck or difficult to remove, gently rotate it back and forth while pulling it away. This rotational motion can help dislodge any remaining grip or resistance.
- Inspect the pipe and fittings: With the pipe removed, take a moment to inspect it for any signs of cracks, damage, or deterioration. Similarly, inspect the fittings and joints for any issues. This examination will help determine if any repairs or replacements are necessary.
- Set aside the removed pipe: Once you have inspected the pipe and fittings, set aside the removed pipe in a safe location. Depending on your specific situation, you may either reuse the pipe or replace it with a new one.
It is important to handle the removed PVC pipe with care to minimize the risk of injury and prevent any further damage. If the pipe is cracked, broken, or shows signs of significant wear, it is advisable to replace it rather than reusing it.
By removing the loosened PVC pipe, you have successfully completed this step of the process. Now, you can move on to the next step: inspecting for any damage or leaks.
Step 7: Inspect for damage or leaks
After removing the loosened PVC pipe, it is crucial to thoroughly inspect the pipe and the surrounding area for any signs of damage, cracks, or leaks. This step will help you identify any issues that need to be addressed before proceeding with repairs or replacements.
Here’s how to effectively inspect for damage or leaks:
- Examine the removed pipe: Carefully examine the removed PVC pipe for any visible cracks, breaks, or signs of wear and tear. Pay close attention to the joints and fittings, as these are common areas for leaks to occur.
- Inspect the surrounding area: Look around the area where the pipe was connected to check for any signs of water damage, dampness, or moisture. These can be indications of a leak or faulty plumbing.
- Wipe down the pipes and fittings: Use a clean cloth or towel to wipe down the pipes and fittings, checking for any signs of moisture or residue. This will help ensure a clear view of any potential leaks or damage.
- Perform a leakage test: To check for leaks, you can reattach the water supply temporarily and observe whether any water escapes from the joints or fittings. Alternatively, you can use a handheld spray bottle to lightly spray water on the connections and observe if there are any leaks.
If you notice any damage or leaks during the inspection, it is important to address them before moving forward. Depending on the severity of the issue, this may involve repairing the pipe, replacing damaged fittings, or seeking professional assistance.
Remember that even minor leaks can lead to more significant problems over time, such as water damage or mold growth. It’s best to address any issues promptly and ensure the plumbing system is functioning properly.
With the inspection complete, you can now determine the necessary actions, whether it is repairing the pipe, replacing fittings, or moving on to the next step: replacing or repairing the PVC pipe if needed.
Step 8: Replace or repair the PVC pipe if necessary
After inspecting the PVC pipe and identifying any damage or leaks, it’s time to determine whether the pipe needs to be replaced or repaired. Depending on the severity of the issue, you may need to take different approaches to restore the plumbing system under the sink.
Here are the steps to replace or repair the PVC pipe:
- Assess the damage: Evaluate the extent of the damage to the PVC pipe. If there are minor cracks or leaks, you may be able to repair them using PVC pipe repair tape, epoxy, or sealant. However, if the damage is severe, such as a significant break or extensive deterioration, it is advisable to replace the entire pipe.
- Measure and cut replacement pipe: If you decide to replace the PVC pipe, measure the length needed and ensure you have a replacement pipe of the correct size and type. Use a pipe cutter or saw to cut the replacement pipe to the appropriate length.
- Prepare the pipe and fittings: Prior to installation, clean and prepare the ends of the replacement pipe and the existing fittings where they will be connected. Use a PVC primer and solvent cement to provide a strong and secure bond.
- Attach the replacement pipe: Apply solvent cement to the end of the replacement pipe and the inside of the fitting where it will be connected. Insert the pipe into the fitting, ensuring it is fully seated and secure. Hold the pipe in place for a few seconds to allow the cement to set.
- Follow the same process for other connections: If there are multiple connections to be made, repeat the steps above for each joint, ensuring a proper and tight fit between the pipe and the fittings.
- Allow the cement to cure: Give the solvent cement sufficient time to cure as per the manufacturer’s instructions. This will ensure a strong and leak-free connection.
It’s important to follow the proper techniques and safety guidelines when replacing or repairing PVC pipes. If you are unfamiliar with plumbing tasks or if the damage is extensive, it is advisable to seek the assistance of a professional plumber to ensure the job is done correctly.
By replacing or repairing the PVC pipe as needed, you can restore the functionality and integrity of the plumbing system under the sink. This step will bring you closer to completing the process of loosening the PVC pipe.
Step 9: Turn the water supply back on
After completing the necessary repairs or replacements, it’s time to turn the water supply back on to restore the flow of water to the sink. This step will allow you to test the repairs, ensure proper functionality, and confirm that there are no leaks or issues.
Follow these steps to turn the water supply back on:
- Locate the shut-off valve: Identify the shut-off valve that you turned off in Step 2 to stop the water supply.
- Turn the valve counterclockwise: To open the valve and restore the water flow, turn it in a counterclockwise direction (righty-tighty). Gradually open the valve to allow water to flow back into the plumbing system.
- Check for any leaks: Once the water supply is turned back on, closely inspect the connections and joints that you repaired or replaced. Look for any signs of leaks, such as dripping water or moist spots. If you notice any leaks, tighten the connections or seek professional assistance as needed.
- Test the functionality: Turn on the faucet connected to the previously loosened pipe and let the water run for a few moments. Check for proper water flow, temperature control, and any signs of leakage or irregularities. Ensure that everything is functioning as expected.
It’s essential to be cautious during this step and verify that all repairs and replacements have been successful. Take your time to thoroughly inspect the connections and test the water flow to ensure a properly functioning plumbing system.
If you detect any issues or experience persistent leaks despite your attempts to repair or replace the PVC pipe, it may be necessary to contact a professional plumber for further assessment and assistance.
Congratulations! By turning the water supply back on, you have completed the final step of the process. You can now enjoy a functional and leak-free plumbing system under the sink.
Conclusion
Loosening a PVC pipe under the sink can be a challenging task, but with the right tools, techniques, and information, it is a manageable DIY project. By following the step-by-step guide outlined in this article, you can successfully loosen the PVC pipe and address any plumbing issues you may be facing.
Remember to take the time to gather the necessary tools and materials before starting the process. Turning off the water supply is crucial to ensure your safety and prevent any water damage. Identifying the problem area will help you focus your efforts and apply the appropriate solutions. Applying heat to the PVC pipe helps make it more pliable and easier to loosen.
Using a pipe wrench or pliers, you can effectively loosen the pipe and remove it from its connections. Through careful inspection, you can identify any damage or leaks that need to be addressed. If necessary, you can replace or repair the PVC pipe to restore the plumbing system’s functionality.
Finally, don’t forget to turn the water supply back on and check for any leaks or irregularities. Take your time during each step and ensure that everything is securely connected and functioning as expected. If you encounter any difficulties or if the problem persists, it is always wise to seek the assistance of a professional plumber.
By following this guide, resolving issues with a PVC pipe under the sink becomes more manageable, allowing you to maintain the integrity of your plumbing system and ensure a smooth flow of water in your home.
Remember, when working with plumbing systems, it is crucial to prioritize safety and exercise caution. With the right tools, knowledge, and care, you can successfully loosen a PVC pipe under the sink and tackle common plumbing challenges with confidence.
Now that you've mastered loosening PVC pipes under sinks, why not broaden your DIY skills with our guide on home repairs? Delving into various tasks, this comprehensive resource provides insights into fixing common household issues, ensuring your home stays in tip-top shape. So, grab your tools and let's get fixing!
Frequently Asked Questions about How To Loosen Pvc Pipe Under Sink
Was this page helpful?
At Storables.com, we guarantee accurate and reliable information. Our content, validated by Expert Board Contributors, is crafted following stringent Editorial Policies. We're committed to providing you with well-researched, expert-backed insights for all your informational needs.


0 thoughts on “How To Loosen Pvc Pipe Under Sink”