
Articles
How To Make A Landscape Quilt
Modified: August 22, 2024
Discover the art of creating breathtaking landscape quilts with our comprehensive collection of articles. Learn step-by-step techniques and tips to craft your own masterpiece.
(Many of the links in this article redirect to a specific reviewed product. Your purchase of these products through affiliate links helps to generate commission for Storables.com, at no extra cost. Learn more)
Introduction
Welcome to the world of landscape quilting! Creating a landscape quilt is a wonderful way to combine your love for quilting with your appreciation for nature and scenery. Whether you’re a seasoned quilter or just starting out, this article will guide you through the process of making your very own landscape quilt.
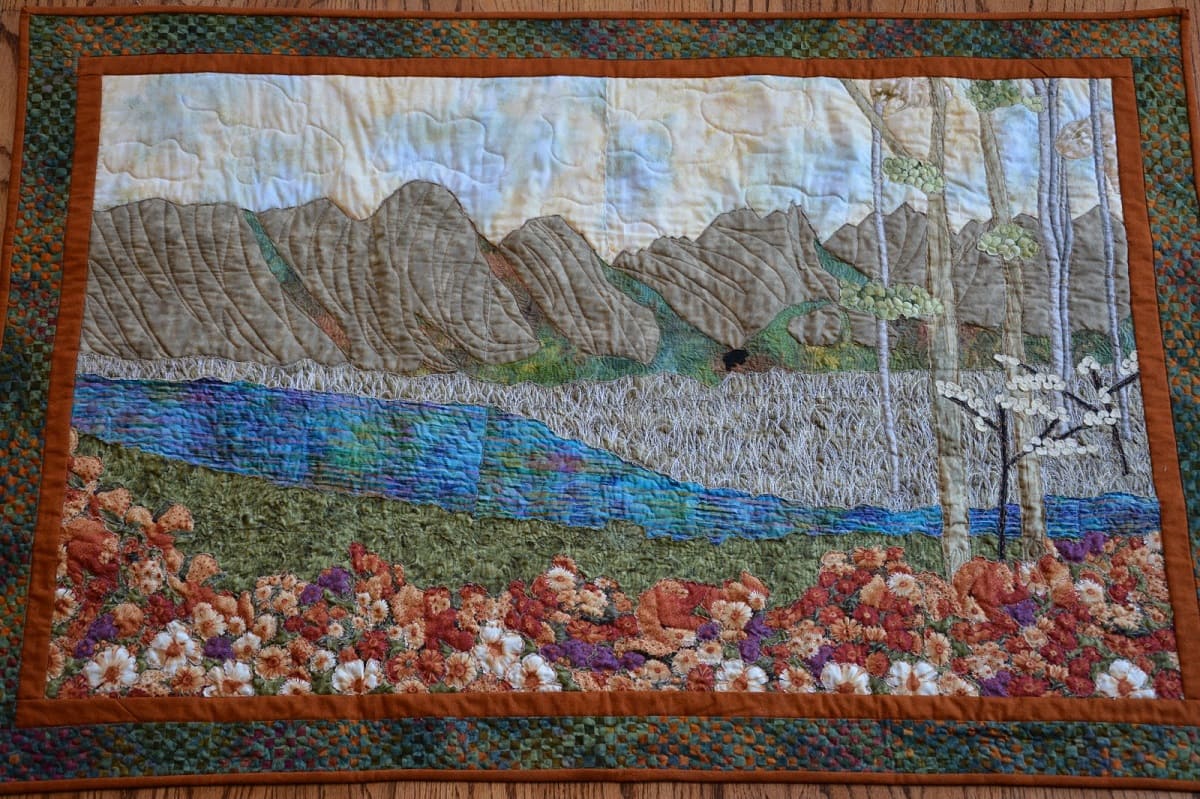
Landscape quilting is a unique form of quilting that allows you to create stunning scenes and capture the beauty of nature in fabric. From serene mountains and peaceful meadows to vibrant sunsets and bustling cityscapes, the possibilities are endless when it comes to designing a landscape quilt.
Not only is landscape quilting a creative and artistic endeavor, but it also allows you to experiment with various quilting techniques, fabric choices, and embellishments. The end result is a one-of-a-kind quilt that reflects your personal style and vision.
Before you dive into your landscape quilt project, it’s important to familiarize yourself with the necessary tools and techniques. In the following sections, we will walk you through the process step-by-step, from choosing a design to adding the finishing touches.
So, grab your quilting supplies and get ready to embark on a journey of creativity and imagination as we delve into the world of landscape quilting!
Key Takeaways:
- Landscape quilting is a creative and artistic endeavor that allows you to capture the beauty of nature in fabric. From choosing a design to adding the finishing touches, it’s a journey of imagination and skill.
- By carefully selecting materials, adding intricate details through appliqué, and quilting the layers together, you can create a stunning landscape quilt that reflects your passion for quilting and love for nature.
Read more: How To Make A Quilt
Getting Started
Before you begin your landscape quilting project, it’s important to gather all the necessary tools and materials. Here’s a list of the basics you’ll need:
- Fabric: Choose a variety of fabrics in different colors and textures to create your landscape. Consider using cotton or linen for the background and a mix of cotton and specialty fabrics for the details.
- Quilting Tools: You’ll need a rotary cutter, cutting mat, quilting ruler, and sharp scissors.
- Sewing Machine: A sewing machine will make the piecing and quilting process faster and more efficient. Ensure that it’s in good working condition and that you have the necessary thread and needles.
- Thread: Choose high-quality thread in colors that complement your fabric choices.
- Batting: Batting is the layer of material that adds warmth and structure to your quilt. Select a type that suits your desired level of insulation and loft.
- Backing Fabric: This is the fabric that will be on the back of your quilt. Make sure it’s wide enough to accommodate your design.
- Pins and Needles: Gather an assortment of pins and hand-sewing needles for secure fabric placement and finishing touches.
- Optional Embellishments: Consider adding embellishments like beads, embroidery floss, or fabric paints to give your landscape quilt extra texture and dimension.
Once you have all your materials, it’s time to choose a design for your landscape quilt.
Next, you’ll need to select a suitable design for your landscape quilt. You can find inspiration from photographs, paintings, or even your own imagination. Take some time to sketch out your ideas on paper and plan the layout of your quilt.
Consider the composition of your design, incorporating elements such as the horizon line, focal points, and foreground and background details. Think about the mood and atmosphere you want to convey, whether it’s a serene and peaceful setting or a vibrant and energetic scene.
With your design in mind, you’re ready to move on to the next step: gathering your fabric and preparing it for construction.
Choosing the Design
Choosing the right design for your landscape quilt is a crucial step that sets the foundation for your project. Here are some tips to help you select the perfect design:
- Consider Your Skill Level: If you’re new to landscape quilting, it’s best to start with a simpler design that has fewer details and elements. As you gain more experience and confidence, you can gradually move on to more complex designs.
- Draw Inspiration from Nature: Look to the world around you for inspiration. Take a walk in a park, visit the beach, or explore the countryside. Observe the colors, textures, and shapes in the environment, and capture them in your design.
- Use Reference Images: Collect reference images of landscapes that inspire you. These can be photographs, postcards, paintings, or even magazine clippings. Study these images to understand the placement of trees, rocks, water, and other elements.
- Create a Story: Consider telling a story through your landscape quilt. Choose a theme or a specific moment in time and incorporate elements that help convey that story. For example, a quilt depicting a beach scene could include seashells, footprints in the sand, and a colorful sunset.
- Experiment with Colors and Fabrics: Play with different color schemes and fabric combinations to bring your design to life. Consider the mood you want to evoke and choose fabrics that reflect that atmosphere. For example, cool blues and greens can create a calming and peaceful vibe, while bright and bold colors can add vibrancy and energy.
- Think About Scale and Perspective: Consider the scale of your design and how different elements interact with each other. Incorporate perspective by making objects in the foreground larger and those in the background smaller. This gives your quilt a sense of depth and distance.
Remember, there is no right or wrong design for a landscape quilt. The most important thing is to choose a design that you love and that speaks to you personally. Let your creativity flow and trust your instincts as you embark on this artistic journey.
Once you’ve chosen your design, it’s time to gather the materials needed to bring it to life.
Gathering Materials
Now that you have chosen your design for your landscape quilt, it’s time to gather all the materials you will need to bring your vision to life. Here’s a list of essential materials to ensure you’re well-prepared:
- Fabric: Select a variety of fabrics in different colors, textures, and prints. Consider the elements in your design and choose fabrics that closely represent them. For example, if your design includes a blue sky, choose a fabric with a sky-blue color.
- Background Fabric: Choose a fabric that will serve as the backdrop for your entire quilt. This fabric should complement the overall color scheme of your design.
- Fabric Marking Tools: These tools will be used to trace and mark your design onto the fabric. You can use fabric pens, chalk, or water-soluble markers.
- Thread: Select high-quality thread that matches the colors of your fabrics. It’s important to choose thread that will blend seamlessly into your quilt.
- Quilting Batting: Choose a batting that suits the desired loft and warmth of your quilt. There are various options available, such as cotton, polyester, or wool batting.
- Backing Fabric: This fabric will be used for the back of your quilt. Choose a fabric that complements the overall design and color scheme.
- Quilting Notions: Gather all necessary quilting notions, such as a rotary cutter, cutting mat, quilting ruler, scissors, pins, and hand-sewing needles.
- Optional Embellishments: If you want to add extra texture and dimension to your quilt, consider embellishments such as beads, embroidery floss, or fabric paint.
It’s important to quality-check all your materials before starting your project. Make sure your fabrics are free from defects or flaws, and that your thread and batting are in good condition. Pre-washing your fabrics can also help prevent shrinkage or color bleeding.
Once you have gathered all the necessary materials, you’re ready to move on to the next step: preparing the fabric for construction. This involves washing, ironing, and cutting the fabric according to your design specifications. Following these steps will ensure that your fabric is clean, wrinkle-free, and ready to be transformed into a beautiful landscape quilt.
Preparing the Fabric
Before you begin piecing your landscape quilt, it’s important to properly prepare the fabric. Taking the time to wash, iron, and cut the fabric will ensure that your quilt turns out clean, crisp, and free from any unwanted surprises. Here are the steps to follow:
Step 1: Pre-Wash the Fabric
It’s highly recommended to pre-wash your fabric before starting your quilt. This helps to remove any chemicals, excess dye, or shrinkage that might occur when the finished quilt is washed later on. Follow the care instructions on the fabric and wash it in the same manner as you plan to wash your finished quilt.
Step 2: Iron the Fabric
Once your fabric is clean and dry, iron it to remove any wrinkles or creases. Press gently on the fabric with an iron set to the appropriate temperature for the fabric type. Make sure to iron on the wrong side of the fabric to avoid damaging any prints or designs.
Step 3: Cut the Fabric
Now it’s time to cut the fabric according to your design. Use a rotary cutter, cutting mat, and quilting ruler to ensure precise and straight cuts. Measure and mark the fabric based on the dimensions and shapes required by your design. Take your time and double-check your measurements before cutting to avoid any mistakes.
Step 4: Organize and Label the Pieces
As you cut the fabric, it’s helpful to organize and label the pieces. Keep them in separate piles or use plastic bags to keep everything organized. Label each piece with a fabric marker or small sticky note indicating its purpose in the design. This will make it easier to assemble the quilt later on.
Step 5: Store the Fabric
Once everything is cut and labeled, store the fabric in a clean and organized manner. You can use plastic containers, ziplock bags, or fabric storage bins to keep everything neatly arranged. Make sure to protect your fabric from dust and moisture to preserve its quality.
By following these steps, you will ensure that your fabric is clean, wrinkle-free, and ready to be transformed into a beautiful landscape quilt. Taking the time to prepare your fabric sets the stage for a smooth and enjoyable quilting process.
Now that your fabric is ready, it’s time to start creating the background of your landscape quilt.
Read more: How To Make A Quilt Larger
Creating the Background
The background of your landscape quilt sets the stage for the entire design. It forms the base upon which you will build the rest of your quilt. Here are the steps to create a beautiful and cohesive background for your landscape quilt:
Step 1: Select the Background Fabric
Choose a fabric that will serve as the backdrop for your landscape. Consider the overall mood and atmosphere you want to evoke. For example, a light blue fabric can create a peaceful sky, while a combination of greens and browns can represent a lush meadow or forest.
Step 2: Cut the Background Fabric
Measure and cut the background fabric to the desired size for your quilt. Take into account any seam allowances and extra fabric you may need for quilting. Use a rotary cutter, cutting mat, and quilting ruler to ensure precise cuts.
Step 3: Piece Together the Background
If your quilt requires multiple pieces of background fabric to create the desired size, neatly piece them together. Ensure that the seams are straight and secure by using a ¼-inch seam allowance. Press the seams open or to one side, as per your preference.
Step 4: Add Texture and Detail
To add visual interest and texture to the background of your landscape quilt, consider incorporating different techniques. You can create a textured look by quilt-as-you-go or by adding quilted lines or swirls. Alternatively, you can add fabric strips or patches to represent fields, water, or other elements in your design.
Step 5: Secure the Background Fabric
Once you are satisfied with the layout and texture of the background fabric, thoroughly press it to ensure it is flat and smooth. Take care to avoid stretching or distorting the fabric. Secure it in place by basting or pinning, making sure there are no wrinkles or folds before moving on to the next step.
Step 6: Consider Special Effects
If you want to add special effects to the background, you can experiment with techniques such as fabric painting, stenciling, or appliqué. These techniques can help create a more realistic or artistic look, adding depth and dimension to your landscape quilt.
Creating a beautiful and well-executed background is essential for a successful landscape quilt. It provides the foundation upon which you will build the rest of your design. By carefully selecting the fabric, piecing it together, adding texture, and securing it in place, you will create a stunning backdrop that brings your landscape to life.
Now that you have the background set, it’s time to move on to the next step: adding the details to your landscape quilt.
When creating a landscape quilt, start by choosing a focal point and building the scene around it. Use a variety of fabrics and textures to add depth and dimension to your design.
Appliqué Techniques
Appliqué is a popular technique used in landscape quilting to add intricate details and embellishments to your design. It involves attaching fabric pieces onto the background fabric to create the desired shapes and elements. There are several appliqué techniques you can use to bring your landscape quilt to life. Here are some common techniques:
Hand Appliqué
In hand appliqué, fabric pieces are sewn onto the background fabric by hand using a needle and thread. This technique gives you more control and precision over the placement and stitching of the appliqué pieces. It can be time-consuming but allows for more intricate and detailed designs. To achieve a smooth and seamless look, use small and even stitches to secure the appliqué pieces in place.
Machine Appliqué
Machine appliqué involves using a sewing machine to attach the fabric pieces onto the background fabric. This technique is faster and more suitable for larger and less intricate designs. You can use a straight stitch, zigzag stitch, or decorative stitches to secure the appliqué pieces. Experiment with different stitch lengths and widths to achieve the desired effect.
Raw-Edge Appliqué
Raw-edge appliqué is a technique where the edges of the fabric pieces are left unfinished and exposed. This creates a textured and slightly frayed look, adding visual interest to your landscape quilt. Use fusible web or a fabric glue stick to adhere the fabric pieces to the background fabric, and then secure them with decorative stitching or free-motion quilting.
Reverse Appliqué
In reverse appliqué, the fabric pieces are layered underneath the background fabric. A shape or design is cut out from the top layer of fabric, revealing the fabric underneath. This technique adds depth and dimension to your design. Secure the layers together with pins or basting, and then stitch around the shape or design to secure them in place.
Appliqué with Fusible Web
Fusible web is a thin adhesive sheet that allows you to easily attach fabric pieces onto the background fabric. Trace your design onto the fusible web, iron it onto the wrong side of the fabric, and then cut out the shape. Peel off the backing paper, position the fabric piece onto the background fabric, and press with an iron to fuse them together. Secure the edges in place with stitching.
These are just a few of the many appliqué techniques you can explore in landscape quilting. Each technique offers a unique look and allows for endless creative possibilities. Experiment with different methods to find the one that suits your desired style and level of intricacy.
Now that you have added the details to your landscape quilt through appliqué, it’s time to focus on refining the design and adding any additional elements.
Adding Details
Adding details to your landscape quilt is where you can truly bring your design to life. These small elements and embellishments help to enhance the overall visual appeal and create a sense of depth and realism. Here are some key steps to consider when adding details to your landscape quilt:
1. Layering and Depth
Consider the different layers of your landscape and how you can create depth through your design. For example, if you have trees in the foreground, cut out smaller fabric pieces to represent the leaves and branches. Attach them using appliqué techniques to create a sense of depth and dimension.
2. Texture and Embellishments
Add texture to your landscape quilt by incorporating different fabrics or embellishments. Consider using textured fabrics for elements such as grass, water, or foliage to add visual interest. Incorporate beads, sequins, or embroidery stitches to create texture and sparkle in your design.
3. Small Details and Accents
Pay attention to the small details that can make your landscape quilt more realistic and engaging. Add small embroidered flowers, tiny buttons for windows on buildings, or fabric scraps to represent rocks or pebbles. These small accents can make a big difference in the overall impact of your quilt.
4. Balancing Colors and Contrast
Consider the color scheme of your landscape quilt and ensure that there is a good balance of colors and contrast. Use lighter colors for distant objects to create the illusion of depth, and darker colors for objects in the foreground to make them stand out. Pay attention to the color harmony of your design, keeping in mind the mood and atmosphere you want to convey.
5. Highlighting Focal Points
Identify the focal points of your landscape quilt and emphasize them through your design. These focal points could be a mountain range, a picturesque tree, or a flowing river. Use appliqué, embroidery, or quilting techniques to highlight these areas and draw the viewer’s attention to them.
6. Balance and Composition
Consider the overall balance and composition of your landscape quilt. Ensure that the elements are distributed evenly and that the design feels harmonious. Step back from your quilt periodically to assess the composition and make any necessary adjustments to achieve a visually pleasing result.
These steps will help you add those final touches to your landscape quilt, bringing out the beauty and intricacy of your design. Remember, the details will make your quilt unique and personal, so let your creativity shine through as you work on this stage.
Once you are satisfied with the details and overall composition of your landscape quilt, it’s time to move on to the next step: quilting the layers together.
Quilting the Layers
Quilting the layers is the process of stitching the top, batting, and backing fabric together to create a cohesive and durable quilt. This step not only secures the layers but also adds an extra layer of texture and design to your landscape quilt. Here are the key steps to quilting the layers:
1. Prepare the Quilt Sandwich
Start by laying out your backing fabric with the right side down. Smooth out any wrinkles and secure it to a flat surface. Next, place the batting on top of the backing fabric, ensuring that it is centered and smooth. Finally, position the quilt top on top of the batting, right side up. Pin or baste the layers together, keeping them flat and secure.
2. Choose the Quilting Technique
Decide on the quilting technique you want to use for your landscape quilt. There are various options to consider, such as straight-line quilting, free-motion stitching, or using a quilting pattern or stencil. Each technique offers a different effect, so choose the one that best complements your design.
3. Quilt the Layers
Using a sewing machine or quilting by hand, stitch through all layers of the quilt following your chosen quilting technique. Take your time and work methodically, ensuring that you maintain an even stitch length and tension. Quilt along the lines or patterns you have planned, or let your creativity guide you with free-motion quilting.
4. Secure Loose Threads
After quilting, trim any loose threads carefully and knot or secure them to prevent unraveling. This will give your landscape quilt a clean and polished finish.
5. Consider Additional Quilting
If desired, you can add additional quilting to enhance specific areas of your landscape quilt. This can include outlining appliqué shapes, adding texture to certain elements, or quilting patterns that enhance the overall design. Use different thread colors or decorative stitches to highlight and accentuate different areas of your quilt.
6. Binding the Quilt
Once you have finished quilting the layers, it’s time to bind the edges of your landscape quilt. Choose a fabric that complements your design and cut it into strips. Fold the strips in half lengthwise and attach them to the raw edges of the quilt, sewing them in place. Fold the binding over to the back of the quilt and hand-stitch it in place for a neat and professional finish.
Quilting the layers is a labor-intensive process that requires patience and attention to detail. Take your time and enjoy the process, as this is where your landscape quilt truly comes together. Once the layers are securely stitched, it’s time to add the final finishing touches.
Read more: How Much Is It To Make A Quilt
Finishing Touches
The finishing touches of your landscape quilt are the final details that make it truly special and complete. These final steps ensure that your quilt is well-prepared, polished, and ready to be admired and cherished. Here are some important finishing touches to consider:
1. Trim and Square
Trim the excess batting and backing fabric from the edges of your quilt, ensuring that all sides are straight and even. Use a quilting ruler and rotary cutter for precise cuts. This step helps to give your quilt a clean and professional appearance.
2. Create a Label
Adding a label to your landscape quilt not only adds a personal touch but also serves as a way to identify the quilt’s maker and record important details. Create a fabric or embroidered label with your name, date, and any other information you wish to include. Attach it securely to the back of your quilt.
3. Finishing Stitches
Inspect your quilt for any loose threads or areas that need reinforcement. Carefully hand-stitch any loose threads or small sections that require additional stitching. This ensures that your quilt remains durable and intact over time.
4. Block and Press
Block and press your quilt to give it a smooth and professional finish. Lay your quilt flat on a clean surface and use a gentle misting of water to dampen the fabric. Smooth out any wrinkles or folds and use quilt clips or pins to hold it in place. Allow it to dry completely, and then press it with a warm iron. This step helps to set the stitches and improve the overall appearance of your quilt.
5. Display or Gift Wrap
Once your landscape quilt is finished, decide how you want to present it. If you plan to display it in your home, choose a prominent location that showcases its beauty. Consider using a quilt hanger or a quilt rack for easy hanging. If you’re gifting the quilt, carefully wrap it in tissue paper or fabric and place it in a special presentation box or gift bag.
6. Celebrate and Enjoy
Take a moment to celebrate your hard work and creativity. Admire the beauty of your finished landscape quilt and share it with others. Take pride in knowing that you’ve created a one-of-a-kind piece of art that reflects your passion for quilting and love for nature.
By focusing on these finishing touches, you can ensure that your landscape quilt not only looks stunning but also stands the test of time. Take care of your quilt by periodically washing and storing it properly, so that it remains a cherished piece for years to come.
With the finishing touches complete, it’s time to step back and admire your masterpiece. Your landscape quilt represents your vision, creativity, and dedication. Congratulations on a job well done!
Conclusion
Congratulations on completing your landscape quilt! Through careful selection of materials, meticulous design choices, and skillful execution of techniques, you have created a beautiful piece of art that captures the essence of nature and showcases your quilting talents.
Throughout this journey, you have learned the importance of choosing a design that speaks to you personally and reflects your vision of the natural world. You have explored various techniques, such as appliqué, to add intricate details and depth to your quilt. The process of gathering materials, preparing the fabric, and creating the background has laid the foundation for your masterpiece.
As you added details and quilting stitches, your landscape quilt came to life, with each element contributing to the overall harmony and visual appeal. The finishing touches, such as trimming, labeling, and pressing, have given your quilt a polished and professional finish.
Remember to take the time to appreciate and showcase your landscape quilt. Whether displayed in your home or gifted to a loved one, let it serve as a reminder of your creativity, passion, and dedication to the art of quilting.
As your skills grow, consider exploring new designs, experimenting with different techniques, and pushing the boundaries of your creativity. Landscape quilting is a constantly evolving art form, offering endless possibilities for expression and inspiration.
Thank you for joining us on this journey into the world of landscape quilting. We hope this article has provided you with valuable insights and guidance to create your very own captivating landscape quilt. Remember to have fun, embrace your creativity, and enjoy the process. Happy quilting!
Frequently Asked Questions about How To Make A Landscape Quilt
Was this page helpful?
At Storables.com, we guarantee accurate and reliable information. Our content, validated by Expert Board Contributors, is crafted following stringent Editorial Policies. We're committed to providing you with well-researched, expert-backed insights for all your informational needs.



0 thoughts on “How To Make A Landscape Quilt”