Articles
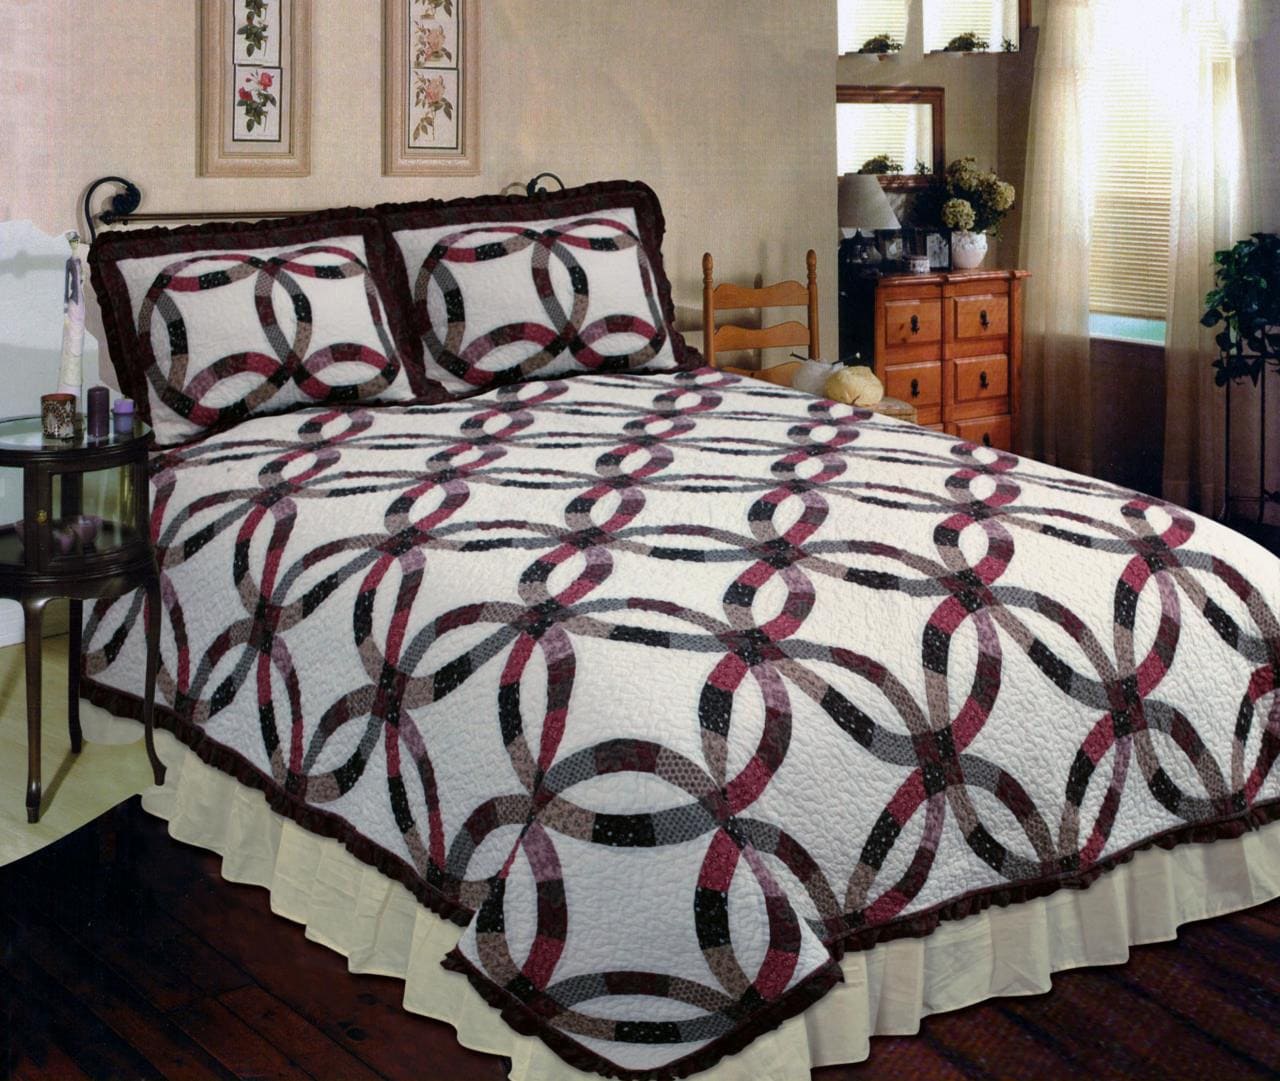
How To Make A Wedding Ring Quilt
Modified: August 22, 2024
Discover the step-by-step process of creating a stunning wedding ring quilt with our informative articles. Learn the essential techniques and tips to make your own beautiful masterpiece.
(Many of the links in this article redirect to a specific reviewed product. Your purchase of these products through affiliate links helps to generate commission for Storables.com, at no extra cost. Learn more)
Introduction
When it comes to quilting, there are countless patterns and designs to choose from. One of the most beloved and timeless patterns is the Wedding Ring quilt. With its interlocking circles of fabric, the Wedding Ring quilt symbolizes love, unity, and commitment, making it a perfect choice for a special occasion like a wedding.
In this article, we will guide you through the process of making a Wedding Ring quilt, step by step. Whether you are an experienced quilter or a beginner, this project can be a rewarding and enjoyable endeavor. By following these instructions and using your creativity, you can create a beautiful and meaningful quilt that will be cherished for years to come.
Before we dive into the details of creating a Wedding Ring quilt, let’s take a look at the materials and tools you will need for this project.
Key Takeaways:
- Crafting a Wedding Ring quilt is a labor of love, combining creativity, skill, and attention to detail. The process involves careful fabric selection, precise cutting, meticulous piecing, thoughtful quilting, and adding the finishing touches, resulting in a stunning and meaningful quilt.
- The completed Wedding Ring quilt is not just a functional item; it is a cherished work of art that tells a story and carries sentimental value. Whether kept as a family heirloom or given as a special gift, the quilt symbolizes unity, celebration, and the artistry of quilting.
Read more: How To Bind A Wedding Ring Quilt
Materials and Tools Needed
To make a Wedding Ring quilt, you will need the following materials and tools:
- Fabric: Choose a variety of fabrics in different colors and patterns for your quilt. Consider using fabrics in shades of white, ivory, and pastel colors to create a romantic and elegant look.
- Quilting Batting: This is the layer of material that goes between the quilt top and the backing. Look for a batting that is compatible with the size and weight of your quilt.
- Backing Fabric: Select a fabric for the backing of your quilt. It should complement the colors and design of your quilt top.
- Ruler and Rotary Cutter: These tools will help you accurately measure and cut your fabric squares.
- Quilting Pins: These pins will be used to hold your fabric squares in place while sewing.
- Sewing Machine: A sewing machine will make the assembly process much quicker and more efficient.
- Thread: Choose a high-quality thread that matches or complements the colors of your fabrics.
- Quilting Needles: These needles are specifically designed for quilting and will make the quilting process easier.
- Quilting Hoop or Frame: A hoop or frame will hold your quilt layers together while you quilt them.
- Iron and Ironing Board: These tools are essential for pressing your fabric and achieving crisp seams.
- Scissors: A good pair of fabric scissors will come in handy for cutting threads and trimming excess fabric.
- Quilting Templates or Stencils: These tools can be used to create the circular shape of the Wedding Ring pattern.
- Bias Tape or Binding: Bias tape or binding will be used to finish the edges of your quilt.
Make sure to gather all the necessary materials and tools before starting your project. Having everything on hand will help streamline the process and ensure a smooth quilting experience.
Step 1: Choose Your Fabric
The first step in creating a Wedding Ring quilt is selecting the fabric. The choice of fabric will greatly influence the overall look and feel of your quilt, so take your time and consider the following factors:
- Color Palette: Decide on a color palette that corresponds to your personal style and the theme of the quilt. Traditional Wedding Ring quilts often feature soft and romantic colors such as pastels, whites, and creams. However, you can also opt for bold and vibrant colors for a more modern twist.
- Prints and Patterns: Consider using a mix of prints and patterns to add visual interest to your quilt. You can choose fabrics with floral motifs, geometric designs, or even solid colors that will complement each other.
- Contrast: To create a stunning visual impact, choose fabrics that have a good contrast with each other. This will highlight the circular shapes of the Wedding Ring pattern and make it stand out.
- Quality: Select high-quality fabrics that are durable and easy to work with. This will ensure that your quilt will withstand the test of time and look beautiful for years to come.
Once you have decided on the color palette and patterns, it’s time to purchase your fabrics. Visit your local fabric store or browse online for a wide range of options. If possible, feel the fabrics in person to assess their quality and texture.
Consider buying a bit more fabric than what is required for your quilt to account for any mistakes or miscalculations during the cutting and sewing process. Having extra fabric will also give you the flexibility to make changes to your design if needed.
Remember, the fabric you choose is the foundation of your Wedding Ring quilt, so take your time and enjoy the process of selecting fabrics that will bring your vision to life.
Step 2: Cut the Fabric Squares
Now that you have chosen your fabric, it’s time to start cutting the fabric squares for your Wedding Ring quilt. Follow the steps below:
1. Measure and Determine Size: Determine the desired size of your fabric squares based on the overall size of your quilt. Common sizes for quilt squares range from 4 inches to 8 inches. Consider the scale of your pattern and how many squares you will need to create the Wedding Ring design.
2. Prepare the Fabric: Pre-wash and press your fabric to remove any wrinkles or shrinkage. This will ensure that your fabric squares are cut accurately and will prevent any unwanted distortion during the quilting process.
3. Use a Ruler and Rotary Cutter: Place your fabric on a cutting mat and use a ruler and rotary cutter to cut the fabric into the desired square sizes. Make sure to cut with clean, straight lines to ensure the squares are uniform.
4. Cut the Desired Number of Squares: Determine how many fabric squares you will need for your Wedding Ring quilt. This will depend on the size of your quilt and the desired pattern. Remember to account for any extra squares needed for borders or sashing.
5. Double Check Measurements: After cutting your fabric squares, double-check their measurements to ensure they are accurate and consistent. This will help make the piecing process go smoothly and result in a well-constructed quilt top.
By cutting fabric squares with precision, you will have the foundation needed to create the intricate Wedding Ring pattern in your quilt. Take your time and pay attention to detail for best results.
Step 3: Arrange and Pin the Squares
With your fabric squares cut and ready, it’s time to start arranging and pinning them to create the Wedding Ring pattern. Follow these steps:
1. Clear Workspace: Clear a large, flat workspace where you can lay out your fabric squares. This will give you a better visual of how the pattern will come together.
2. Create the Pattern: Start by arranging the fabric squares in the shape of a circle. The Wedding Ring pattern typically consists of interlocking circles, so you may need to experiment with different arrangements until you achieve the desired look.
3. Consider Color Placement: Pay attention to the placement of colors and patterns in your pattern. You can create a more cohesive look by distributing the colors evenly or strategically placing them in certain areas.
4. Pin the Squares: Once you are satisfied with the arrangement, use quilting pins to temporarily secure the fabric squares together. Pinning the squares will prevent them from shifting and help you maintain the desired pattern when sewing.
5. Step Back and Assess: Take a step back and look at your fabric squares arrangement from a distance. This will give you a better perspective on the overall design and allow you to make any necessary adjustments before moving on to the next step.
Arranging and pinning the fabric squares is a crucial step in creating the Wedding Ring pattern. Take your time to play with different arrangements and make sure you are happy with the overall design before proceeding to the next step.
Read more: What To Write On A Wedding Quilt Square?
Step 4: Sew the Squares Together
Now that you have arranged and pinned the fabric squares, it’s time to sew them together to create the Wedding Ring quilt top. Follow these steps:
1. Set Up Your Sewing Machine: Make sure your sewing machine is set up and in good working condition. Thread the machine with a coordinating thread color and insert a fresh needle suitable for quilting.
2. Start Sewing the Squares: Take the first two fabric squares that are adjacent to each other and place them right sides together. Align the edges and pin them together to secure the pieces in place.
3. Sew a Seam: Using a ¼-inch seam allowance, start sewing the squares together, starting from one edge and sewing to the opposite edge. Backstitch at the beginning and end of the seam to secure it.
4. Repeat for All Squares: Continue sewing the adjacent fabric squares together in the same manner, one pair at a time, until all the squares in the circular pattern are connected.
5. Press the Seams: After sewing each seam, press it with an iron to set the stitches and create crisp, flat seams. Press the seams in one direction for a neater appearance.
6. Join the Last Square to the First: Once you have sewn together all the pairs of squares, it’s time to join the last square to the first square in the pattern. Align the edges, pin, and sew them together to complete the circular shape of the Wedding Ring pattern.
By sewing the fabric squares together in a careful and precise manner, you will create a cohesive and visually stunning Wedding Ring quilt top.
When making a wedding ring quilt, be sure to use precise measurements and accurate cutting to ensure that the curved pieces fit together seamlessly. Take your time and be patient with the process to achieve a beautiful finished quilt.
Step 5: Create the Wedding Ring Pattern
Now that the fabric squares are sewn together, it’s time to create the iconic Wedding Ring pattern. This step involves adding the curved pieces to complete the circular design. Follow these steps:
1. Cut the Curved Pieces: Using a quilting template or stencil, trace and cut the curved pieces from your chosen fabric. These pieces will create the illusion of interlocking rings in the Wedding Ring pattern.
2. Pin and Sew the Curved Pieces: Take one curved piece and place it on top of one of the fabric squares, matching up the edges. Pin the curved piece in place, making sure it is positioned correctly to create the desired ring shape. Sew the curved piece to the fabric square with a ¼-inch seam allowance.
3. Repeat for the Remaining Curved Pieces: Continue pinning and sewing the curved pieces to the remaining fabric squares until the entire Wedding Ring pattern is formed. Make sure to align the curved pieces accurately to maintain the circular shape of the rings.
4. Press the Seams: After sewing each curved piece, press the seams with an iron to set the stitches and create a smooth appearance. Be careful when ironing over the curved pieces to avoid distorting their shape.
5. Double Check the Pattern: Once all the curved pieces are sewn on, step back and double check the Wedding Ring pattern for any adjustments or corrections. Make sure the rings are visually balanced and the pattern is well-defined.
Creating the Wedding Ring pattern requires attention to detail and precision. Take your time and ensure that the curved pieces are sewn on accurately to achieve the desired effect.
Step 6: Quilt the Layers Together
Now that you have created the Wedding Ring pattern, it’s time to quilt the layers together. Quilting adds dimension, stability, and texture to your quilt. Follow these steps to quilt your Wedding Ring quilt:
1. Prepare the Layers: Lay your quilt backing fabric flat on your work surface, right side down. Smooth out any wrinkles or creases. On top of the backing fabric, place the quilting batting. Make sure it is centered and extends beyond the edges of your quilt top. Finally, place your quilt top right side up on top of the batting.
2. Baste the Layers: To hold the layers together while quilting, you can use one of the following methods: thread basting, pin basting, or spray basting. Choose the method that works best for you and secure the layers, ensuring that they lay flat and are free from wrinkles or tucks.
3. Select Quilting Designs: Decide on the quilting designs you want to incorporate into your Wedding Ring quilt. This could be simple straight lines, free-motion quilting, or even custom designs that complement the circular shapes of the Wedding Ring pattern.
4. Quilt the Layers: Using your preferred quilting method, start quilting the layers together. Follow the chosen designs, moving smoothly and steadily across the quilt. Take your time, and if needed, practice on scrap fabric to get comfortable with the chosen quilting technique.
5. Secure Loose Threads: As you quilt, periodically check for any loose threads and secure them with a few backstitches. This will prevent the threads from unraveling and marring the appearance of your quilt.
6. Quilt the Entire Quilt: Continue quilting until you have covered the entire surface of your Wedding Ring quilt. Take breaks as needed to rest your hands and maintain your focus. Remember that quilting is a time-consuming process, but it is also an opportunity to add your personal touch and creativity to the quilt.
Quilting the layers together not only adds structural integrity to your Wedding Ring quilt, but it also contributes to the overall visual impact. By quilting with care and attention to detail, you will enhance the beauty and longevity of your quilt.
Step 7: Add Binding to the Quilt
After quilting the layers together, it’s time to add the binding to your Wedding Ring quilt. The binding not only finishes the edges of the quilt but also adds a decorative element. Follow these steps to add binding:
1. Prepare the Binding Strips: Cut fabric strips for binding, typically 2.5 inches wide, from your chosen binding fabric. Join the strips together, end to end, at a 45-degree angle, creating a continuous binding strip. Press open the seams.
2. Prepare the Quilt: Trim the excess batting and backing fabric, ensuring that the edges of the quilt are even. Press the quilt top, backing, and batting away from the edges to create a flatter surface for attaching the binding.
3. Attach the Binding: Starting on one side of the quilt, align the raw edges of the binding strip with the raw edges of the quilt. Leave a 6-8 inch tail of binding and start sewing with a ¼-inch seam allowance. Sew along the edge, mitering the corners as you reach them, until you are approximately 8-10 inches away from your starting point.
4. Join the Binding Ends: To join the binding ends, overlap them by the width of the binding and mark the overlap point. Trim the excess binding, fold over the top layer, and press. Then, fold over the bottom layer to create a neat join. Sew across the overlap to secure the binding.
5. Finish Sewing the Binding: Complete sewing the binding to the quilt, backstitching at the beginning and end. Ensure the binding is evenly attached and smooth along the edges of the quilt.
6. Fold and Hand Stitch the Binding: Fold the binding over to the back of the quilt, covering the raw edges of the binding and the quilt. Secure the binding to the back of the quilt using a hand sewing needle and thread, using a blind stitch or ladder stitch. Take care to make neat and even stitches to create an invisible finish on the front of the quilt.
7. Final Pressing: Once the binding is completely sewn and attached, give the quilt a final press with an iron, being careful not to flatten or distort the quilting stitches.
Adding the binding not only gives your Wedding Ring quilt a polished look but also protects the raw edges and adds durability. Take your time with this step to ensure a professional and beautiful finish.
Read more: How To Make Flower Centerpieces For Weddings
Step 8: Finishing Touches
Now that the binding is in place, it’s time to add the finishing touches to your Wedding Ring quilt. Follow these final steps to complete your quilt:
1. Trim Excess Threads: Take a moment to carefully inspect your quilt for any loose threads. Use scissors or a thread cutter to trim any stray threads, ensuring that your quilt looks clean and polished.
2. Label Your Quilt: Personalize your Wedding Ring quilt by adding a label. Include your name, the date, and any other special details you want to remember. You can embroider a label or use a fabric marker to write directly on the quilt back.
3. Give it a Final Press: Before displaying or gifting your quilt, give it a final press. Use an iron set to the appropriate heat setting for the fabric to smooth out any wrinkles and make the quilt look its best.
4. Display or Gift Your Quilt: Your Wedding Ring quilt is now complete and ready to be displayed or given as a cherished gift. Place it on a bed, drape it over a couch, or proudly showcase it on a wall as a stunning piece of handmade art.
5. Care Instructions: Provide care instructions for the recipient of your quilt. Include recommendations for washing, drying, and storing the quilt to ensure its longevity and preserve its beauty for years to come.
Congratulations! You have successfully completed your Wedding Ring quilt. This project has allowed you to express your creativity and create a beautiful symbol of love and unity. Whether kept as a family heirloom or given as a special gift, your Wedding Ring quilt is sure to be cherished for generations.
Conclusion
Crafting a Wedding Ring quilt is an immensely rewarding project that combines creativity, skill, and love. Through careful fabric selection, precise cutting, meticulous piecing, and thoughtful quilting, you have created a stunning quilt that symbolizes unity and celebration.
Throughout the journey of making your Wedding Ring quilt, you have embraced the artistry of quilting while adding your personal touch to each step. From choosing the fabrics to arranging the squares, sewing the pieces together, quilting the layers, adding binding, and applying the finishing touches, every stage has allowed your creativity to shine through.
As you reflect on the time and effort invested in this project, you can take pride in the creation of a unique and meaningful quilt. Your Wedding Ring quilt is not just a functional item; it is a cherished work of art that tells a story and carries sentimental value.
Whether you keep the quilt for yourself and enjoy its warmth and beauty or gift it to someone special, your Wedding Ring quilt is sure to bring comfort, joy, and admiration. It will be appreciated as a testament to your dedication, patience, and craftsmanship.
Now, as you gaze upon your completed Wedding Ring quilt, take a moment to admire the intricate pattern, the carefully chosen fabrics, and the exquisite quilting stitches. Recall the joy you experienced throughout the process and the love that was poured into every stitch.
Quilting is not only a form of expression but also a way to connect with the rich tradition of creating art from fabric. Your Wedding Ring quilt joins the legacy of quilting, capturing the essence of handmade craftsmanship and the beauty of a timeless pattern.
Congratulations on completing your Wedding Ring quilt. May it bring you a lifetime of warmth, beauty, and cherished memories.
Frequently Asked Questions about How To Make A Wedding Ring Quilt
Was this page helpful?
At Storables.com, we guarantee accurate and reliable information. Our content, validated by Expert Board Contributors, is crafted following stringent Editorial Policies. We're committed to providing you with well-researched, expert-backed insights for all your informational needs.


0 thoughts on “How To Make A Wedding Ring Quilt”