Articles
How To Make An Electric Motor Science Project
Modified: August 27, 2024
Learn how to create an impressive electric motor science project with this step-by-step guide. Find articles, tips, and inspiration to make your project a success.
(Many of the links in this article redirect to a specific reviewed product. Your purchase of these products through affiliate links helps to generate commission for Storables.com, at no extra cost. Learn more)
Introduction
Welcome to the exciting world of science projects! If you’re looking for a hands-on activity that combines fun and learning, then making an electric motor is the perfect project for you. In this article, we will guide you through the step-by-step process of creating your very own electric motor.
Building an electric motor is not only a great way to understand the principles of electromagnetism, but it also provides valuable insights into how various components work together to generate motion. This project is suitable for both kids and adults who are curious about science and engineering.
Throughout the project, you will get the chance to explore concepts such as magnetic fields, electric currents, and the interaction between electricity and magnetism. By the end of this project, you will have a functioning electric motor that you can proudly showcase to your friends and family.
So, let’s get started on this electrifying journey and create your very own electric motor science project!
Key Takeaways:
- Building an electric motor science project is an electrifying journey that combines fun and learning. It provides valuable insights into electromagnetism and the interaction between electricity and magnetism, making it a rewarding and educational experience for both kids and adults.
- Constructing an electric motor allows for hands-on exploration of scientific concepts such as magnetic fields, electric currents, and motion generation. It fosters problem-solving skills, creativity, and a deeper understanding of the fascinating world of electricity and magnetism.
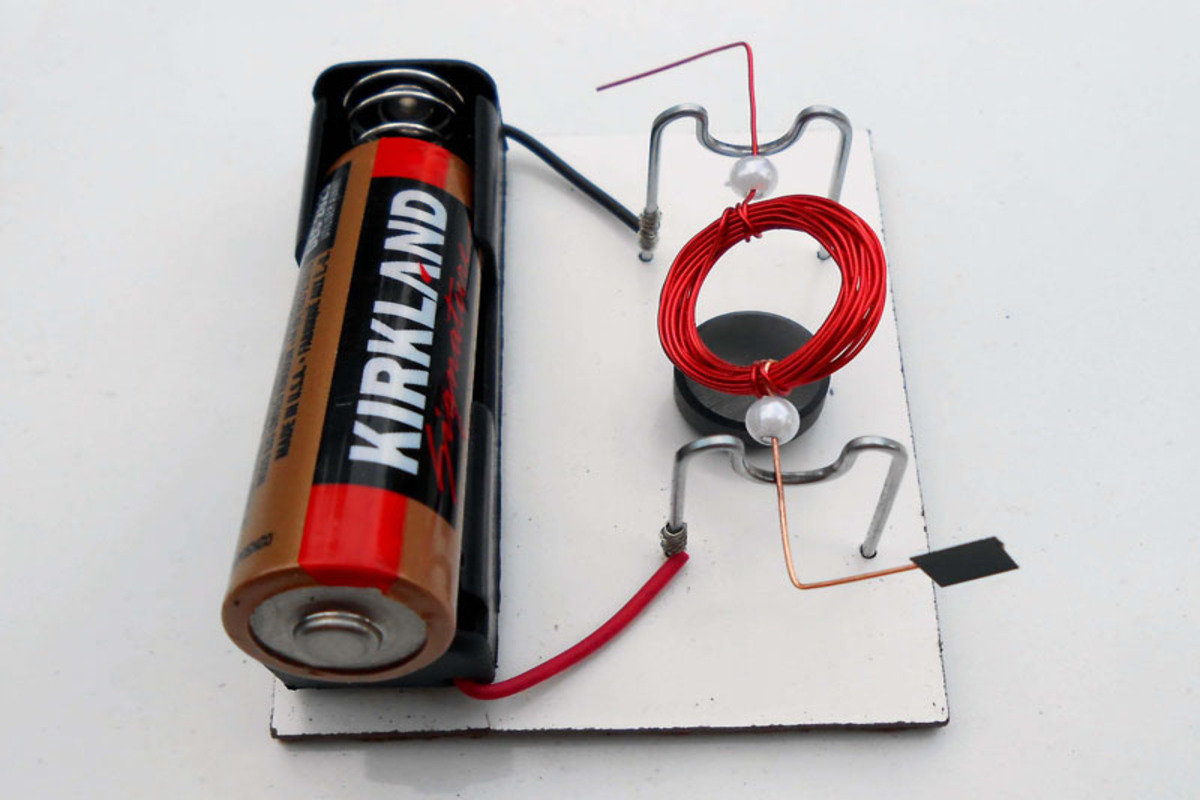
Materials Needed
Before we dive into the construction process, let’s gather all the materials necessary for making our electric motor. Here’s a list of items you will need:
- 1 D-size battery
- 1 neodymium magnet
- 22-gauge insulated copper wire
- 1 small block of wood
- 1 nail
- Electrical tape
- Scissors
- Sandpaper
- Wire stripper or cutter
- Small screwdriver
Make sure you have all these materials readily available before starting the project. It’s essential to use proper safety precautions when handling sharp objects and electrical components. If you’re a younger scientist, be sure to seek adult supervision throughout the project.
Once you have gathered all the materials, we can move on to the next step of building the base for our electric motor.
Step 1: Gather Supplies
Before we begin constructing our electric motor, it’s important to gather all the necessary supplies for this project. By ensuring that you have all the materials ready, you’ll be able to work smoothly and efficiently through the remaining steps. Here’s a breakdown of the supplies you’ll need:
1. D-size battery: This will serve as the power source for the electric motor. It provides the necessary electrical current for the motor to function.
2. Neodymium magnet: This powerful magnet will be used to create a magnetic field, which is essential for the motor’s operation. The stronger the magnet, the better the motor’s performance.
3. 22-gauge insulated copper wire: The wire will be used to create the coil in the motor. Make sure to use a sufficient length of wire to allow for multiple windings around the nail.
4. Small block of wood: This serves as the base or platform for your motor. It provides stability and support for the various components.
5. Nail: The nail acts as the shaft of the motor, allowing the coil to rotate. It should be long enough to span the width of the wooden base.
6. Electrical tape: This will be used to secure the wires and keep them in place during assembly. It also helps to insulate any exposed wires and minimize the risk of short circuits.
7. Scissors: You’ll need a pair of scissors to cut the wire to the desired length and trim any excess later on.
8. Sandpaper: This is used to clean the ends of the wire and the nail, ensuring good electrical conductivity and a strong connection.
9. Wire stripper or cutter: This tool is handy for removing the insulation from the end of the wire, allowing for easy attachment to the battery and coil.
10. Small screwdriver: You’ll need a screwdriver to loosen or tighten screws, particularly when attaching the magnet and securing the wire to the wooden base.
With all these supplies at your disposal, you’re now ready to move on to the construction phase of the electric motor. Remember to follow the steps carefully and have fun throughout the process!
Step 2: Building the Base
Now that we have all the necessary supplies, it’s time to start constructing the base for our electric motor. The base will provide stability and support for the motor’s components. Follow the steps below to build the base:
- Take the small block of wood and ensure it’s clean and free from any debris or rough surfaces.
- Using sandpaper, gently sand down any rough edges or surfaces of the wood to create a smooth base.
- Decide where you want to position the nail as the shaft of the motor on the wooden base. Mark this spot with a pencil.
- Using a small screwdriver, make a small pilot hole on the marked spot. This will help to guide the nail into the wood later on.
- Take the nail and insert it into the pilot hole, pushing it firmly into the wood to secure it as the motor shaft.
- Ensure that the nail is centered and perpendicular to the wooden base, allowing for smooth rotation of the coil.
- Once the nail is securely in place, double-check the alignment and make any necessary adjustments.
Congratulations! You have successfully built the base for your electric motor. With the nail securely fastened in the wooden base, we can now move on to the next step of attaching the magnet.
Remember to exercise caution while handling the nail and screwdriver. If you’re younger, make sure to have adult supervision during this step.
Step 3: Attaching the Magnet
Now that we have our base ready, it’s time to attach the magnet. The magnet will be responsible for creating a magnetic field that interacts with the coil to produce motion. Follow these steps to attach the magnet:
- Take the neodymium magnet and place it at the end of the nail, opposite the base.
- Ensure that the magnet is aligned parallel to the nail shaft.
- Use small strips of electrical tape to secure the magnet in place. Wrap the tape tightly around the magnet and nail, ensuring a secure connection.
- Double-check that the magnet is firmly attached to the nail and doesn’t wobble or move around.
- Inspect the magnet to ensure there are no loose or exposed parts that could pose a safety risk.
By attaching the magnet to the nail, we have created the magnetic component of our electric motor. The magnet’s magnetic field will interact with the electric current flowing through the coil, resulting in a rotational motion when the motor is activated.
Remember to handle the magnet with care, as it can be very strong and can attract nearby metal objects. Ensure that there are no metal objects in close proximity to the magnet during assembly.
With the magnet securely attached to the nail, we’re now ready to move on to the next step of creating the coil.
When building an electric motor science project, make sure to use a strong magnet and a coil of wire to create the electromagnetic force needed for the motor to function. Also, ensure that the wire is insulated to prevent short circuits.
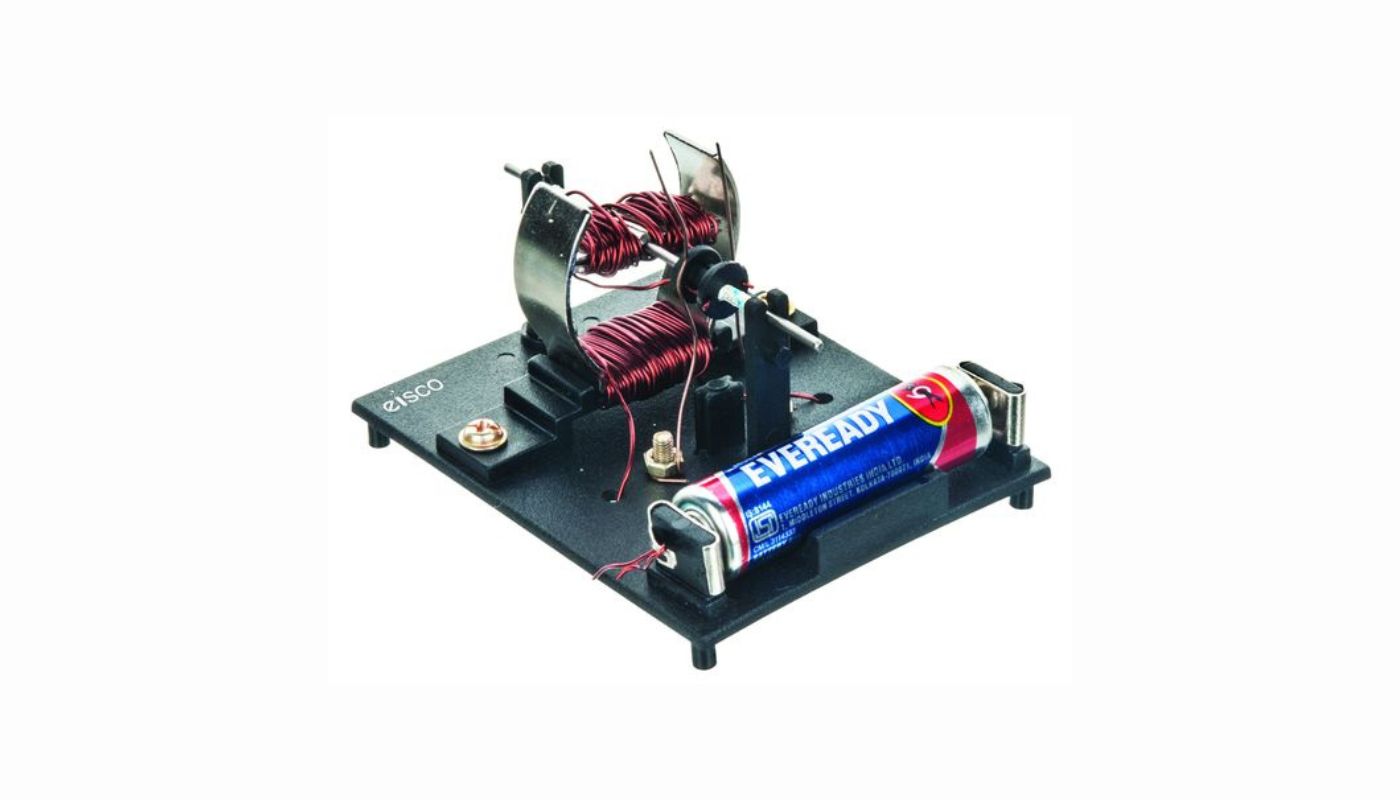
Step 4: Creating the Coil
Now it’s time to create the coil, which is the heart of our electric motor. The coil interacts with the magnetic field created by the magnet to generate motion. Follow these steps to create the coil:
- Take the 22-gauge insulated copper wire and cut a length of approximately 2 to 3 feet.
- Using sandpaper, gently scrape off the insulation from the ends of the wire to expose the bare copper.
- Hold one end of the wire against the nail near the base, ensuring that it has good contact with the metal surface.
- Start winding the wire tightly around the nail, moving towards the magnet end.
- Continue winding the wire until you reach the other end of the nail, making sure to keep the turns close and evenly spaced.
- Once you have reached the end of the nail, secure the wire by wrapping it around the nail a few times.
- Trim any excess wire, leaving a small tail to create a secure connection.
- Ensure that the turns of the coil are tightly wound and neatly stacked, with no loose or overlapping wires.
Creating a tight and well-formed coil is crucial for the efficient operation of the electric motor. The more turns in the coil, the stronger the magnetic field it will produce. Remember to keep the turns close together to maximize the interaction with the magnet.
With the coil successfully created and securely attached to the nail, we can now move on to the next step of connecting the wires.
Exercise caution when handling the wire, as it may have sharp ends when stripped. If you’re younger, seek adult supervision during this step for safety.
Step 5: Connecting the Wires
Now that we have our coil in place, it’s time to connect the wires to complete the circuit for our electric motor. Follow these steps to connect the wires:
- Take one end of the wire that is connected to the base of the coil. Strip off about half an inch of insulation from the end.
- Attach the stripped end of the wire to the positive terminal of the D-size battery. You can do this by wrapping the wire around the terminal or using an alligator clip if available.
- Ensure that the connection between the wire and the battery terminal is secure and that there is good contact.
- Take the other end of the wire, which is connected to the top of the coil, and strip off the insulation in the same manner as before.
- Attach the stripped end of the wire to the negative terminal of the D-size battery. Again, make sure the connection is secure.
By connecting the wires to the battery terminals, we have completed the circuit for our electric motor. When the battery is connected, an electric current will flow through the wire, creating a magnetic field in the coil. This magnetic field interacts with the magnet, causing the coil to rotate and create motion.
It’s important to ensure that the connections between the wires and the battery terminals are secure and free from loose connections. If needed, use electrical tape or alligator clips to reinforce the connections and prevent any accidental disconnections.
Now that we have successfully connected the wires, we’re almost ready to see our electric motor in action. But first, let’s move on to the final step of testing the motor!
Step 6: Testing the Motor
Now that we have completed the construction of our electric motor, it’s time to put it to the test! Follow these steps to test the motor:
- Ensure that all the connections between the wires and the battery terminals are secure.
- Place the motor on a flat, stable surface.
- Hold the battery firmly and touch the exposed wire ends to the appropriate terminals on the battery.
- Observe the motor closely and look for any signs of movement or rotation.
- If the motor does not start rotating, check the connections, ensuring they are secure and that the coil is properly aligned with the magnet.
- If necessary, adjust the coil or the position of the magnet to achieve better alignment.
- Once the motor starts rotating, observe its speed and direction of rotation.
Congratulations! If your motor starts rotating, you have successfully created and tested your electric motor science project. It’s truly an achievement to see the principles of electromagnetism in action.
Feel free to experiment with different aspects of the motor to see if you can improve its performance. You can try using different magnets or varying the number of turns in the coil to observe the effects on the motor’s speed or torque.
Remember, when the motor is running, it consumes energy from the battery. Disconnect the wires from the battery when you’re done testing to conserve battery power.
Enjoy the satisfaction of creating your very own electric motor and share your exciting project with friends and family!
Conclusion
Congratulations on completing your electric motor science project! By building your own motor, you have gained a deeper understanding of the principles of electromagnetism and how electric currents interact with magnetic fields to generate motion.
Throughout this project, you have learned how to gather the necessary materials, construct the base, attach the magnet, create the coil, connect the wires, and test the motor. Each step has allowed you to explore different concepts and apply your knowledge of science and engineering.
Constructing an electric motor is not only a rewarding experience but also a great way to develop your problem-solving skills and creativity. As you test and experiment with your motor, you may discover new ways to improve its performance or even come up with innovative designs.
Remember, this science project is just the beginning of your exploration into the fascinating world of electricity and magnetism. You can further expand your knowledge by delving into more advanced topics such as electromagnetic induction or exploring other types of motors.
Hopefully, this project has sparked your interest in science and inspired you to pursue further experimentation and learning. Keep exploring, asking questions, and engaging in hands-on activities to fuel your curiosity and passion for science.
So, celebrate your achievement, showcase your electric motor to friends and family, and keep nurturing your scientific spirit. Who knows, your next project might just be the stepping stone to an amazing scientific breakthrough!
Frequently Asked Questions about How To Make An Electric Motor Science Project
Was this page helpful?
At Storables.com, we guarantee accurate and reliable information. Our content, validated by Expert Board Contributors, is crafted following stringent Editorial Policies. We're committed to providing you with well-researched, expert-backed insights for all your informational needs.
0 thoughts on “How To Make An Electric Motor Science Project”