Articles
How To Rewind Electric Motor
Modified: October 31, 2024
Discover helpful articles on how to rewind an electric motor, providing step-by-step instructions and expert tips to successfully complete the task.
(Many of the links in this article redirect to a specific reviewed product. Your purchase of these products through affiliate links helps to generate commission for Storables.com, at no extra cost. Learn more)
Introduction
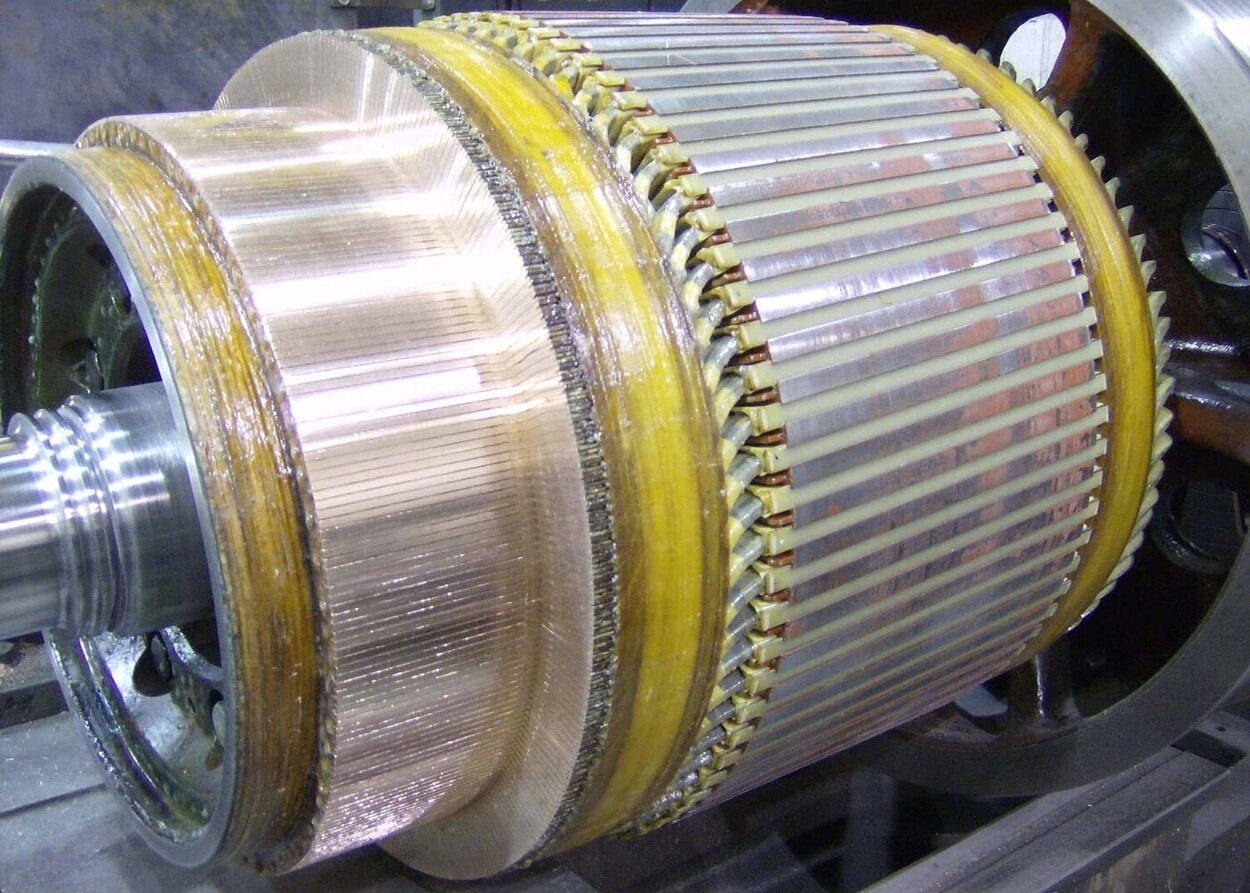
Electric motors play a crucial role in various industries, powering everything from household appliances to heavy machinery. Over time, these motors may experience wear and tear, resulting in decreased efficiency or even failure. One solution to this problem is rewinding the motor, a process that involves replacing the worn-out copper windings.
Rewinding an electric motor can be a cost-effective way to prolong its lifespan and restore its performance. While it may seem like a daunting task, with the right tools, materials, and knowledge, you can successfully rewind an electric motor. In this article, we will guide you through the step-by-step process of rewinding an electric motor, ensuring that you approach the task with confidence and achieve the desired results.
Before we dive into the details, it is important to note that rewinding an electric motor requires both technical expertise and attention to safety. If you are not familiar with electrical systems or lack experience in motor repair, it is highly recommended to seek the assistance of a professional. Safety should always be the top priority when working with electricity and mechanical components.
Now that we have addressed the precautions, let’s explore the tools and materials you will need for the motor rewinding process.
Key Takeaways:
- Safety First
When rewinding an electric motor, prioritize safety by disconnecting the power, wearing protective gear, and working in a well-ventilated area. Following safety precautions is crucial to prevent accidents and ensure a safe working environment. - Precision and Testing
Precision is key when rewinding a motor, from identifying wiring connections to rewinding with new copper wire. Thoroughly testing the rewound motor ensures optimal functionality and reliability, minimizing the risk of future issues.
Read more: How To Build A Electric Motor
Safety Precautions
Before beginning any work on an electric motor, it is crucial to prioritize safety to prevent accidents and injuries. Here are some essential safety precautions to follow when rewinding an electric motor:
- Disconnect the Power: Before starting the rewinding process, always disconnect the power supply to the motor. This can be done by shutting off the circuit breaker or unplugging the motor from the power source. Never work on a motor that is still connected to electricity to avoid electrical shock.
- Wear Protective Gear: To protect yourself from potential hazards, wear appropriate protective gear such as safety goggles, gloves, and a dust mask. This will shield your eyes, hands, and respiratory system from debris, solvents, and fumes.
- Work in a Well-Ventilated Area: Ensure that you are working in a well-ventilated space to minimize the inhalation of any fumes emitted by solvents or cleaning agents. Open windows or use fans to improve air circulation.
- Use Insulated Tools: When handling electrical components, use insulated tools to reduce the risk of electrical shock. Insulated tools have handles made from non-conductive materials, providing an extra layer of protection.
- Beware of Sharp Edges: Throughout the rewinding process, be cautious of any sharp edges or protruding components that could cause injury. Use caution when removing the motor housing or working with any metal parts.
- Keep the Work Area Clean: Maintain a tidy workspace by removing any unnecessary objects or debris. This will minimize the risk of tripping or falling and ensure that you have ample space to work safely.
- Work with a Partner: If possible, it is advisable to have someone else present while rewinding the motor. They can assist you when needed and provide an extra set of eyes for safety checks.
- Follow Manufacturer Guidelines: Refer to the manufacturer’s guidelines and instructions for your specific motor model. Each motor may have unique specifications and precautions that need to be followed.
- Seek Professional Help: If you are unsure about any step of the rewinding process or lack experience in motor repair, it is always best to consult a professional. They have the expertise and knowledge to handle the task safely and effectively.
By adhering to these safety precautions, you can minimize the risk of accidents and ensure a safe working environment while rewinding an electric motor. Remember, safety should always be a top priority throughout the entire process.
Tools and Materials Needed
Before you begin rewinding an electric motor, it is essential to gather the necessary tools and materials. Having everything prepared in advance will streamline the process and ensure that you have everything you need. Here is a list of the tools and materials you will need for the motor rewinding process:
Tools:
- Screwdrivers: A set of screwdrivers with different sizes and types, including flathead and Phillips screwdrivers, for removing screws and accessing the motor components.
- Pliers: Both regular and needle-nose pliers will come in handy for gripping and manipulating small parts during the rewinding process.
- Wire Strippers: To remove the insulation from the existing windings, you will need a wire stripper tool designed to cut and strip wires.
- Multimeter: A multimeter is important for measuring voltages, resistances, and continuity. It will help you diagnose any issues with the motor windings.
- Insulation Tape: Insulation tape is used to securely wrap and insulate the rewound windings, preventing any short circuits or electrical malfunctions.
- Measuring Tape or Calipers: Accurate measurements are crucial when rewinding a motor. A measuring tape or calipers will allow you to determine the correct length and diameter of wire needed for the new windings.
- Brushes: Small brushes, such as toothbrushes or paintbrushes, are useful for cleaning the motor components and removing dust or debris.
- Soldering Iron: A soldering iron and solder wire are necessary for soldering connections between wires and terminals.
- Heat Gun or Hair Dryer: A heat gun or hair dryer can be used to soften the insulation on the existing windings, making them easier to remove.
Materials:
- Copper Wire: You will need copper wire of the appropriate gauge and length to create the new windings. Ensure that you select wire suitable for motor rewinding.
- Electrical Insulation Varnish: Insulation varnish is used to coat the rewound windings, providing an extra layer of protection against moisture and electrical shorts.
- Insulation Sleeving: Insulation sleeving is used to insulate individual wires and prevent them from touching each other. This helps maintain the integrity of the windings and prevents electrical shorts.
- Cleaning Solvent: A cleaning solvent, such as isopropyl alcohol, can be used to clean the motor components and remove any dirt or grime.
- Replacement Bearings: If the motor bearings are worn out or damaged, you may need to replace them during the rewinding process. Make sure to have the appropriate replacement bearings on hand.
- Replacement Motor Capacitor: In some cases, the motor capacitor may also need to be replaced. Consult the manufacturer’s specifications to determine the correct replacement capacitor.
Having these tools and materials ready before you begin rewinding the electric motor will ensure a smooth and efficient process. It is important to gather everything you need in advance to avoid delays or interruptions during the rewinding process.
Read more: How To Cool An Electric Motor
Step 1: Disconnect the Power
The first step before undertaking any work on an electric motor is to ensure that the power supply is completely disconnected. This is crucial for your safety and to prevent any electrical accidents or damage to the motor.
To disconnect the power, follow these steps:
- Locate the power source: Identify the power source that supplies electricity to the motor. This could be a circuit breaker, a switch, or an outlet.
- Turn off the power supply: Once you have located the power source, switch it off or shut off the circuit breaker that supplies power to the motor. This will ensure that no electricity is flowing to the motor during the rewinding process.
- Double-check for power: To be absolutely certain that the power is disconnected, use a voltage tester or a multimeter to verify that there is no voltage or current present at the motor’s terminals.
- Lockout and tagout: To further ensure your safety and prevent accidental power restoration, use a lockout/tagout device to lock the switch or circuit breaker in the off position. This will prevent anyone from inadvertently turning the power back on while you are working on the motor.
By following these steps to disconnect the power, you can be confident that the motor is completely de-energized and safe to work on. Remember, working on an electric motor that is still connected to power can be extremely dangerous and may result in severe electrical shock or damage to the motor.
Once you have confirmed that the power is disconnected, you can proceed to the next step of the motor rewinding process with peace of mind.
Step 2: Remove the Motor Housing
Once you have ensured that the power supply is disconnected, you can proceed to remove the motor housing. Removing the motor housing will provide access to the internal components of the motor, including the windings.
Follow these steps to remove the motor housing:
- Inspect the motor housing: Before removing the housing, visually inspect it for any signs of damage or loose screws. If you notice any issues, take note of them for later inspection or repair.
- Locate and remove the screws: Most motor housings are held together with screws. Use a suitable screwdriver to remove the screws and set them aside in a safe place. Take note of the position and order of the screws, as they may be different lengths or have different threading.
- Gently pry open the housing: Once the screws are removed, gently pry open the motor housing using a flathead screwdriver or a plastic pry tool. Take care not to use excessive force to prevent damaging the housing or internal components.
- Inspect the housing interior: With the motor housing open, visually inspect the internal components, including the windings, bearings, and other mechanical parts. Look for any signs of damage, wear, or loose connections.
- Secure the removed screws: As you remove the motor housing screws, it is a good practice to secure them in a tray or container. This will prevent them from being misplaced and ensure they are readily available when you need to reassemble the motor later.
Removing the motor housing allows you to have a clear view of the motor’s internal components. This step also facilitates the inspection and assessment of any potential issues that may require further attention during the rewinding process.
Remember to handle the motor housing with care to avoid causing damage to the housing or other sensitive parts of the motor. With the housing removed, you are now ready to move on to the next step in rewinding the electric motor.
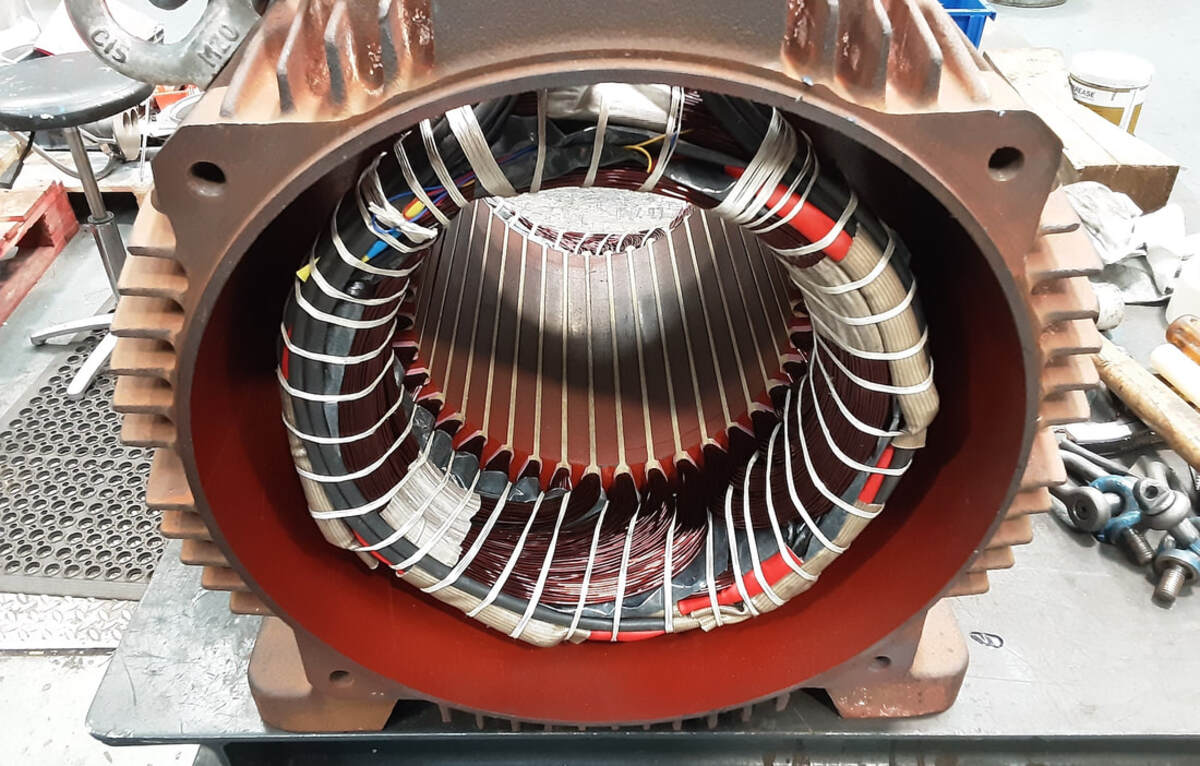
Step 3: Accessing the Windings
Once you have removed the motor housing, it’s time to access the windings of the electric motor. The windings are the coiled wires responsible for generating the magnetic field that drives the motor’s rotation. To access them, follow these steps:
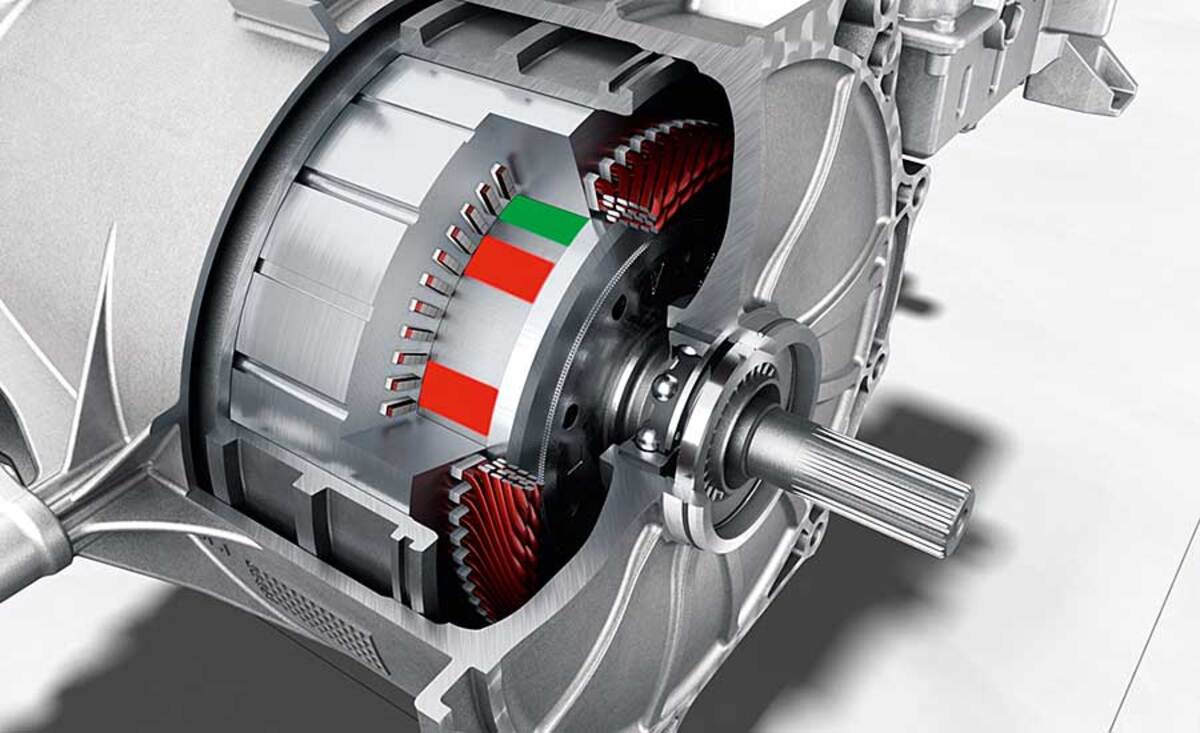
- Identify the windings: Take a close look at the interior of the motor, paying attention to the wire bundles that form the windings. The windings are typically located near the stator or armature of the motor.
- Remove any retaining clips or brackets: Some motors may have retaining clips or brackets that secure the windings in place. If present, carefully remove these clips or brackets using pliers or a screwdriver. Take note of their positions for reassembly later.
- Detach any terminal connectors: The windings are usually connected to terminal connectors that provide electrical connections. Use pliers or a screwdriver (depending on the type of connectors) to disconnect the wires from the terminals. Alternatively, take a photo or make a diagram to document the connections for reference.
- Inspect the windings: Once the windings are accessible, inspect them for any signs of damage or wear. Look for broken or frayed wires, burnt insulation, or any other visible issues. If you notice any problems, take note of them for repair or replacement.
- Label the windings: To ensure that you can reassemble the motor correctly, it’s helpful to label each set of windings. Use labels or markers to indicate the start and end of each winding, as well as any specific details or special considerations.
Accessing the windings is a crucial step in the rewinding process as it allows for visual inspection and identification of any issues. Remember to exercise caution when handling the windings to avoid damaging them or causing further harm to the motor.
With the windings now accessible, you’re ready to move on to the next step: identifying and documenting the wiring connections.
Step 4: Identify and Document Wiring Connections
After accessing the windings of the electric motor, the next step in the rewinding process is to identify and document the wiring connections. This will ensure that you can reassemble the motor correctly and maintain the proper electrical connections. Follow these steps to accurately identify and document the wiring connections:
- Inspect the wiring connections: Take a close look at how the wires are connected to the terminals or connectors. Observe the color-coded wires and their positions in relation to the terminals.
- Make a diagram or take photos: To document the wiring connections, create a diagram or take clear photos of the existing connections. Label the terminals and corresponding wires for easy reference during reassembly.
- Note any special configurations: Some motors may have unique wiring configurations, such as multiple speed settings or specific winding arrangements. Make sure to note any special configurations or details that are relevant to your motor.
- Disconnect the wires: Once you have documented the wiring connections, carefully disconnect the wires from the terminals or connectors. Take note of any specific instructions or precautions required for each wire.
- Organize and label the wires: To avoid confusion, organize the disconnected wires and label them according to your documentation. This will help you identify which wires correspond to specific terminals or connectors later on.
Properly identifying and documenting the wiring connections is crucial for a successful motor rewinding process. It ensures that you can reassemble the motor accurately and maintain the electrical integrity of the windings. Take your time during this step to ensure accuracy and clarity in your documentation.
With the wiring connections identified and documented, you are now ready to proceed to the next step: removing the windings from the motor.
Read more: How Efficient Is An Electric Motor
Step 5: Remove the Windings
With the wiring connections identified and documented, it’s time to remove the old windings from the electric motor. Removing the windings allows you to make way for new, properly rewound windings. Follow these steps to remove the windings:
- Inspect the windings: Before removing them, carefully inspect the windings for any signs of damage or wear. Look for broken wires, damaged insulation, or any other issues that may require repair or replacement.
- Loosen the windings: Depending on the motor design, you may need to loosen the windings by gently prying them loose with a screwdriver or using specialized winding removal tools.
- Remove the windings: Once the windings are loosened, carefully pull them out from the motor core. Take care not to damage any other components, and pay attention to the order in which the windings are removed. Keep them organized to maintain clarity during reassembly.
- Clean the motor core: After removing the old windings, take the opportunity to clean the motor core. Use a soft-bristle brush or a cloth to remove any debris, dust, or old insulation residue. A cleaning solvent may be used, but make sure it is appropriate for electrical components and has completely dried before proceeding.
- Inspect other components: While the windings are removed, inspect other components such as the rotor, stator, and bearings for any signs of damage, wear, or malfunction. Replace or repair any necessary parts.
Removing the windings can be a delicate process, so take your time and handle the windings with care. Keep track of the order and arrangement of the windings to ensure proper reinstallation.
With the windings successfully removed, you are ready to move on to the next step: inspecting and cleaning the windings before rewinding the motor.
When rewinding an electric motor, be sure to carefully document the original winding configuration and take precise measurements to ensure the new winding matches. Use the appropriate gauge of wire and insulation to maintain the motor’s efficiency and performance.
Step 6: Inspect and Clean the Windings
After removing the old windings from the electric motor, it’s essential to inspect and clean them before proceeding with the rewinding process. This step ensures that the new windings will be installed on a clean and well-prepared surface. Follow these steps to inspect and clean the windings:
- Inspect the windings: Carefully examine the removed windings for any signs of damage, such as broken wires, burnt or frayed insulation, or loose connections. Make note of any areas that require repair or replacement.
- Clean the windings: Use a soft brush or compressed air to remove dust, dirt, and other debris from the windings. Be gentle to avoid causing further damage. If there are stubborn stains or residue, you can use a cleaning solvent suitable for electrical components. Ensure that the windings are completely dry before continuing.
- Check for continuity: Using a multimeter set to the continuity mode, test the continuity of each winding. If there are any breaks or interruptions in the flow of electrical current, you may need to repair or replace the affected section of the winding.
- Repair or replace damaged windings: If you encounter any damaged windings during inspection, take the necessary steps to repair or replace them. Repair options may include soldering broken wires, reapplying insulation, or splicing new wire sections. If significant damage is present, it may be more practical to replace the entire winding.
By inspecting and cleaning the windings, you ensure that the rewound motor will operate optimally and avoid any potential issues caused by damaged or dirty components. Additionally, evaluating the windings during this phase allows you to address any necessary repairs or replacements before proceeding.
With the windings inspected, cleaned, and, if needed, repaired or replaced, you can now proceed to the next step: rewinding the motor with new copper wire.
Step 7: Rewind the Motor
Now that the windings have been inspected, cleaned, and prepared, it’s time to begin the rewinding process. Rewinding the motor involves replacing the old windings with new copper wire to restore its electrical functionality. Follow these steps to rewind the motor:
- Select the appropriate copper wire: Choose a copper wire with the correct gauge and length for the motor’s specifications. Refer to the manufacturer’s guidelines or consult an electric motor specialist for the appropriate wire size.
- Secure the wire end: Start by securing one end of the copper wire to the designated starting point of the motor core. This point is usually marked or indicated in the motor’s documentation or schematic.
- Begin winding the wire: Carefully wind the copper wire around the motor core, following the original winding pattern as closely as possible. Use gentle and even tension to ensure proper alignment and spacing between the wire turns.
- Maintain insulation separation: As you wind the copper wire, make sure to maintain insulation separation between adjacent wires. This can be achieved by using insulation tape or insulating sleeves on individual wires to prevent contact and potential short circuits.
- Continue winding until completed: Repeat the winding process until you have completely covered the motor core and all the designated winding areas. Take care to maintain consistent and even winding throughout the process.
- Secure the wire end: Once you have finished winding the copper wire, secure the other end to the motor core, ensuring it is tightly held in place. Use appropriate insulating materials, such as insulation tape or insulation varnish, to secure and protect the wire connections.
Precision, attention to detail, and patience are crucial during the rewinding process to ensure the new windings are properly installed. Take your time and refer to any diagrams or documentation you have created during the earlier steps to ensure accurate placement and alignment of the copper wire.
With the motor successfully rewound, you are ready to move on to the next step: reinstalling the windings into the motor.
Step 8: Reinstall the Windings
With the motor successfully rewound, it’s time to reinstall the newly wound windings back into the motor. This step involves carefully placing the windings in their proper positions and reconnecting them to the motor terminals. Follow these steps to reinstall the windings:
- Refer to your documentation: Review the diagrams or photos you created earlier to ensure the correct placement of the windings. Pay attention to any specific instructions or notes you made during the removal process.
- Position the windings: Carefully position the rewound windings back into their original locations within the motor. Ensure that each winding is aligned properly, with the correct orientation and spacing.
- Reconnect the wiring: Using your documentation as a guide, reconnect the wires of the windings to their respective terminals or connectors. Double-check that each wire is properly secured and tightened.
- Secure the windings: Once the wiring connections are made, fix the windings in place using any retaining clips or brackets that were previously removed. Ensure that the windings are secure and properly aligned.
Throughout the reinstallation process, it is essential to be attentive to detail and ensure that the windings are reinstated exactly as they were before. Referencing your documentation and taking your time will help ensure the proper alignment and connection of the windings.
With the windings successfully reinstalled, you are now ready to proceed to the next step: reassembling the motor housing.
Read more: How To Clean An Electric Motor
Step 9: Reassemble the Motor Housing
After the windings have been reinstalled and secured, it’s time to reassemble the motor housing. This step involves putting the motor housing back together to protect the internal components and provide stability to the rewound motor. Follow these steps to reassemble the motor housing:
- Retrieve the motor housing components: Gather all the components of the motor housing, including any screws, clips, or brackets that were removed during the disassembly process.
- Align the motor housing: Carefully position the motor housing to align it with the motor core. Ensure that any openings or slots in the housing match up with the corresponding features on the core.
- Secure the motor housing: Begin securing the motor housing by inserting and tightening the screws in their designated positions. Use the appropriate screwdriver to tighten the screws firmly but avoid over-tightening, as it may damage the housing or internal components.
- Attach any retaining clips or brackets: If there were any retaining clips or brackets, reattach them securely to hold the motor housing in place. Refer to your documentation or notes from the disassembly process to ensure proper placement.
During the reassembly of the motor housing, it’s important to be mindful of the alignment and proper tightening of screws or clips. Take care not to damage any components or misalign any parts of the motor during this step.
With the motor housing successfully reassembled, you are now ready to proceed to the final step: testing the rewound motor to ensure its functionality.
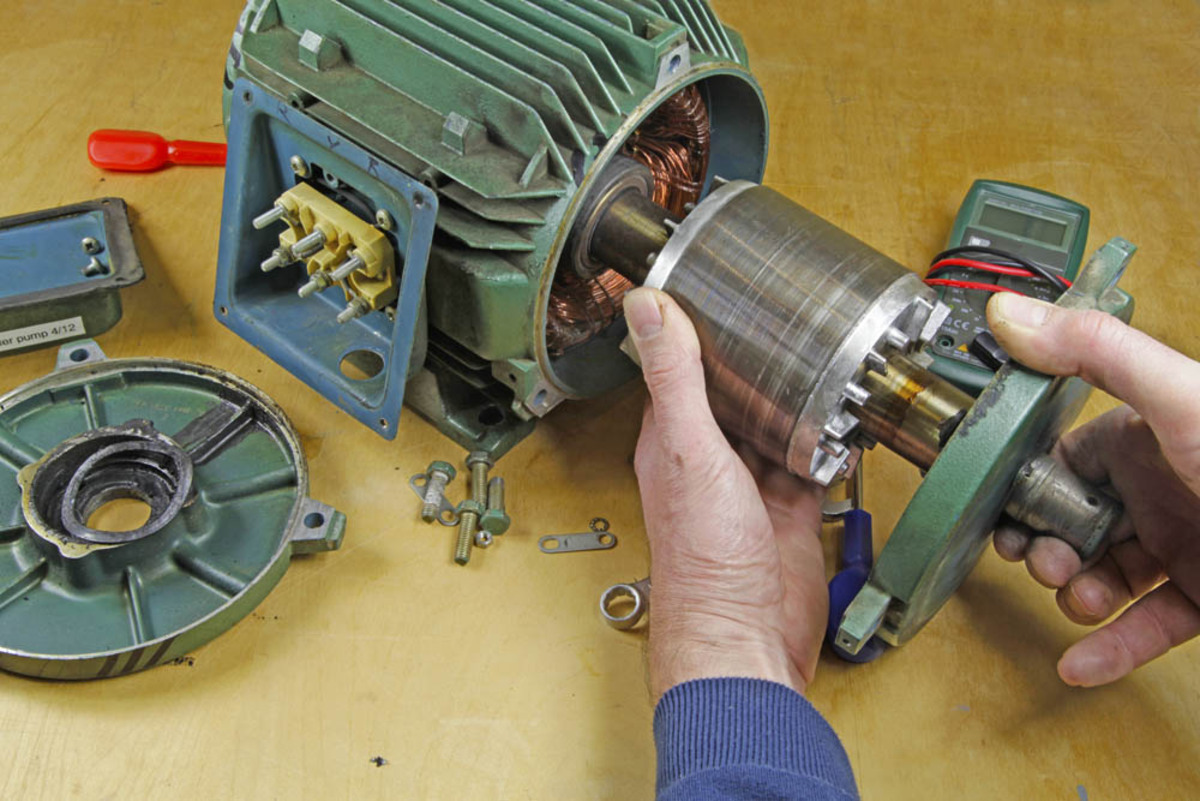
Step 10: Testing the Rewound Motor
After completing the rewinding and reassembly process, it’s crucial to test the rewound motor to ensure that it functions properly. Testing the motor will help you determine if the rewinding process was successful and if any further adjustments or repairs are needed. Follow these steps to test the rewound motor:
- Connect the power: Ensure that the motor is properly connected to a power source. Double-check that the power supply is switched off before connecting the motor.
- Inspect the terminal connections: Verify that all the wiring connections from the windings to the motor terminals are secure and tightened. If any connections seem loose or improper, correct them before proceeding.
- Turn on the power: Switch on the power supply and observe the motor’s initial response. Listen for any unusual sounds, vibrations, or signs of overheating, which may indicate a problem with the rewinding process or other motor components.
- Check motor functionality: Test the motor’s functionality by running it at different speeds and loads, if applicable. Pay attention to any irregularities, such as reduced power, overheating, or inefficient operation. If any issues arise, investigate further to identify the cause and make any necessary adjustments or repairs.
- Measure voltage and current: Using a multimeter or appropriate measuring device, measure the voltage and current of the motor while it is running. Compare the readings to the motor’s specifications to ensure that it is operating within the desired range.
- Perform a load test: If applicable, subject the motor to a load test to assess its performance under normal operating conditions. Monitor the motor’s behavior and measure any changes in voltage, current, or temperature during the test.
- Monitor for an extended period: Keep an eye on the motor’s performance over an extended period to ensure its stability and reliability. Look out for any recurring issues or signs of deterioration.
By thoroughly testing the rewound motor, you can identify any potential problems, validate the effectiveness of the rewinding process, and make any necessary adjustments or repairs. This step ensures that the motor is ready for regular use and minimizes the risk of failure or inefficiency.
If you notice any issues or abnormalities during the testing process, it is advisable to consult a professional for further assessment and assistance.
With the rewound motor successfully tested and functioning properly, you have completed the entire process of rewinding an electric motor. Congratulations on a job well done!
Remember to exercise proper maintenance and care for the motor to prolong its lifespan and optimize its performance in the long run.
Conclusion
Rewinding an electric motor can be a complex but rewarding process. By following the step-by-step guide outlined in this article, you can successfully rewind an electric motor and restore its functionality and performance.
Throughout the rewinding process, it is crucial to prioritize safety and follow the necessary precautions. Always disconnect the power supply and wear appropriate protective gear to prevent accidents and injuries. If you lack experience or confidence in motor repair, it is advisable to seek the assistance of a professional.
Gathering the necessary tools and materials, such as screwdrivers, pliers, wire strippers, and copper wire of the appropriate gauge, is essential for a smooth and efficient rewinding process.
The step-by-step process includes disconnecting the power, removing the motor housing, accessing the windings, identifying and documenting the wiring connections, removing the windings, inspecting and cleaning the windings, rewinding the motor with new copper wire, reinstalling the windings, reassembling the motor housing, and finally, testing the rewound motor to ensure its functionality.
Thoroughly inspecting and cleaning the windings, along with accurately identifying the wiring connections, is crucial for a successful rewinding process. Take your time and document the process to ensure accurate reassembly later on.
Once the rewinding process is complete, test the motor’s functionality, measuring voltage and current, and subjecting it to load tests to ensure optimal performance. Monitor the motor’s behavior over time to identify and address any recurring issues.
Remember, if you encounter any difficulties or feel uncertain at any point during the rewinding process, it is always recommended to consult a professional who specializes in electric motor repair.
By successfully rewinding an electric motor, you can extend its lifespan, restore its performance, and save on the cost of replacement. Embrace the challenge and satisfaction that comes with mastering this valuable skill.
With proper care and maintenance, your rewound electric motor will continue to power various applications and contribute to the smooth functioning of machinery and appliances for years to come.
Frequently Asked Questions about How To Rewind Electric Motor
Was this page helpful?
At Storables.com, we guarantee accurate and reliable information. Our content, validated by Expert Board Contributors, is crafted following stringent Editorial Policies. We're committed to providing you with well-researched, expert-backed insights for all your informational needs.
0 thoughts on “How To Rewind Electric Motor”