Articles
How To Make Car Curtains
Modified: December 7, 2023
Learn how to make car curtains with these informative articles. Find step-by-step guides and expert tips to create stylish and functional curtains for your vehicle.
(Many of the links in this article redirect to a specific reviewed product. Your purchase of these products through affiliate links helps to generate commission for Storables.com, at no extra cost. Learn more)
Introduction
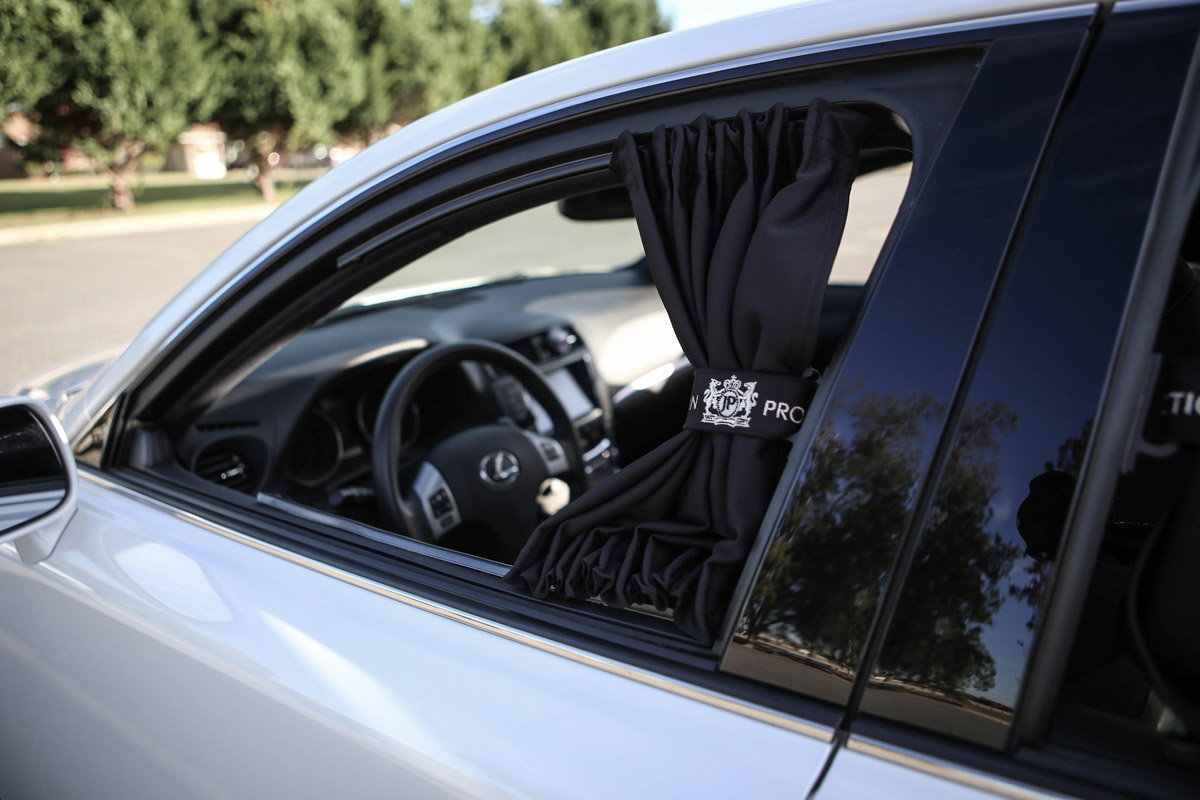
Welcome to our guide on how to make car curtains! If you love going on road trips or spending long hours in your car, adding curtains to your windows can provide privacy, shade, and an aesthetically pleasing touch to your vehicle. Whether you want to block out the sun’s glare or create a cozy sleeping space for overnight adventures, car curtains are a practical and stylish solution.
In this article, we will walk you through the step-by-step process of making your own car curtains. Don’t worry if you are a beginner, as this DIY project is straightforward and doesn’t require advanced sewing skills. With just a few materials and some basic tools, you’ll be able to create custom curtains for your car that suit your personal style.
Before we dive into the details, let’s quickly go over the materials you’ll need for this project:
Key Takeaways:
- Create custom car curtains to add privacy, style, and comfort to your vehicle. With basic materials and simple steps, you can personalize your car interior for a more enjoyable driving experience.
- By following this guide, you can make and install car curtains that reflect your personal style and meet your specific needs. Enjoy the benefits of privacy, shade, and a customized car interior on your journeys.
Read more: How To Make A Shower Curtain
Materials Needed
- Fabric of your choice
- Curtain hooks or rings
- Curtain rod or tension rod
- Measuring tape
- Fabric scissors
- Sewing machine or needle and thread
- Pins
- Iron
Once you have gathered these materials, you’re ready to get started on creating your car curtains. Let’s move on to the first step!
Key Takeaways:
- Create custom car curtains to add privacy, style, and comfort to your vehicle. With basic materials and simple steps, you can personalize your car interior for a more enjoyable driving experience.
- By following this guide, you can make and install car curtains that reflect your personal style and meet your specific needs. Enjoy the benefits of privacy, shade, and a customized car interior on your journeys.
Read more: How To Make A Shower Curtain
Materials Needed
Before you embark on making your car curtains, let’s ensure you have all the necessary materials. Here’s a list of what you’ll need:
- Fabric of your choice: Select a fabric that suits your style and preferences. Consider factors such as durability, opacity, and design. Heavyweight fabrics like blackout or thermal curtains can help block out light and provide insulation, while lightweight fabrics like sheer or cotton can let in some natural light.
- Curtain hooks or rings: These will be used to attach the curtains to the curtain rod. Choose hooks or rings that are suitable for your chosen fabric and curtain rod.
- Curtain rod or tension rod: The curtain rod will serve as the support for your curtains. Measure the width of your car windows to determine the appropriate length of the rod, and choose a rod that fits securely in your car.
- Measuring tape: Accurate measurements are key to ensuring your curtains fit perfectly. A measuring tape will help you measure the dimensions of your car windows and fabric panels.
- Fabric scissors: Sharp fabric scissors are essential for cutting the fabric cleanly and accurately. Make sure the blades are sharp for smooth cutting.
- Sewing machine or needle and thread: You will need a sewing machine or a needle and thread to hem the edges of the fabric panels. If you’re using a sewing machine, make sure it’s in good working condition and thread it with a suitable thread color. If you prefer to hand sew, choose a strong thread that matches your fabric.
- Pins: Sewing pins will help keep the fabric in place while cutting and sewing. They should be long enough to securely hold the layers of fabric together.
- Iron: An iron is essential for pressing and ironing the fabric, ensuring smooth seams and a polished finished look. Make sure your iron is clean and set to the appropriate fabric setting.
Once you have gathered all these materials, you’re ready to move on to the next steps of making your car curtains. It’s time to measure your car windows and select your fabric!
Step 1: Measure the Car Windows
Before you start making your car curtains, it’s important to accurately measure the dimensions of your car windows. This will ensure that your curtains fit properly and provide optimal coverage. Follow these steps to measure your car windows:
- Begin by rolling down the car window completely. This will give you a clear view of the entire window area that needs to be covered by the curtains.
- Take your measuring tape and measure the width of the window from one end to the other. Make sure to measure from inside the window frame, from one inner edge to the other. Note down this measurement.
- Next, measure the height of the window from the top to the bottom. Again, measure from inside the window frame for accuracy. Note down this measurement as well.
- If your car has multiple windows that you want to cover with curtains, repeat the measurement process for each window.
Once you have all the necessary measurements, you’ll have a clear idea of the size of fabric panels needed for your curtains. These measurements will serve as a guide when cutting the fabric in the next steps.
It’s important to note that when measuring, it’s always better to err on the side of caution and add a few extra inches to the width and height measurements. This will give you some leeway when it comes to attaching the curtains and ensures that they adequately cover the windows.
With your car window measurements in hand, let’s move on to the next step: selecting the fabric and gathering the necessary supplies!
Step 2: Select Fabric and Gather Supplies
Now that you have measured your car windows, it’s time to select the fabric for your car curtains. The fabric you choose should not only match your personal style but also be functional and durable. Here’s how to select the right fabric and gather the necessary supplies:
- Determine the purpose: Consider the main purpose of your car curtains. Do you want them primarily for privacy, light control, or both? This will help you decide on the opacity and thickness of the fabric. For maximum privacy and light blocking, opt for heavyweight fabrics like blackout or thermal curtains. If you want some privacy while still allowing natural light to filter through, go for lighter fabrics like sheer or cotton.
- Choose a suitable fabric: Look for fabrics that are durable and easy to clean, as they will be subjected to various environmental conditions. Avoid delicate fabrics that can easily get damaged or stained. Consider factors such as color, pattern, and texture to match the interior of your car.
- Estimate the fabric quantity: Based on the measurements you took in Step 1, calculate the amount of fabric needed for your curtains. Take into account any additional fabric you want for fullness or decorative purposes. Add a few inches to the width and height measurements for seam allowances and hemming.
- Gather the necessary supplies: In addition to the fabric, make sure you have all the other supplies mentioned earlier, such as curtain hooks or rings, a curtain rod or tension rod, measuring tape, fabric scissors, sewing machine or needle and thread, pins, and an iron. Double-check that you have everything on hand before proceeding.
By selecting the right fabric and gathering all the necessary supplies, you’re one step closer to creating your own car curtains. In the next step, we will guide you through cutting the fabric panels to size. So let’s get ready to bring your car curtain vision to life!
Read more: How To Make Soundproofing Curtains
Step 3: Cutting the Fabric Panels
Now that you have selected the fabric and gathered all the necessary supplies, it’s time to cut the fabric panels for your car curtains. Follow these steps to ensure your fabric is cut to the correct size:
- Start by preparing your fabric. Lay it flat on a clean, spacious surface, such as a table or the floor.
- Refer to the measurements you took in Step 1 to determine the width and height of each fabric panel. Use a measuring tape, ruler, or straight edge to mark these measurements directly onto the fabric.
- Once the measurements are marked, use fabric scissors to carefully cut along the marked lines. Take your time to ensure clean and precise cuts. Remember to cut two fabric panels for each window if you plan to have curtains on both sides.
- If you’re using a patterned fabric, make sure to align the pattern properly when cutting the fabric panels. This will ensure a cohesive and uniform look when the curtains are installed.
- After cutting all the fabric panels, double-check their sizes to ensure they match the measurements of your car windows. Make any adjustments if needed.
It’s important to take your time and be precise when cutting the fabric panels. Accurate measurements and clean cuts will result in well-fitting curtains that enhance the overall appearance of your car interior. Once you have successfully cut the fabric panels, you’re ready to move on to the next step: hemming the edges.
When making car curtains, be sure to measure your windows accurately to ensure a proper fit. Use durable and easy-to-clean fabric for longevity. Consider using magnetic or suction cup attachments for easy installation and removal.
Step 4: Hemming the Edges
After cutting the fabric panels for your car curtains, the next step is to hem the edges. Hemming the edges will give your curtains a polished and finished look while preventing fraying. Follow these steps to hem the edges of your fabric panels:
- Prepare your fabric panels by ironing them to remove any wrinkles or creases. This will make hemming easier and result in neater seams.
- Begin with one side of a fabric panel. Fold the raw edge of the fabric to the wrong side by about half an inch (or as desired for a wider hem). Use pins to hold the folded edge in place.
- Repeat the folding process for the opposite side of the fabric panel, ensuring that the edge is parallel to the first folded edge.
- Once the sides are folded and pinned, iron the folds to create crisp creases. This will help keep the fabric in place during the sewing process.
- Using a sewing machine or needle and thread, sew along the folded edges to secure the hems. Opt for a straight stitch or a zigzag stitch to prevent fraying. Remove the pins as you sew.
- Continue this process of folding, pinning, and sewing for all remaining sides of the fabric panels.
- After hemming all the edges, give the fabric panels a final press with an iron to ensure smooth and even hems.
Hemming the edges of your fabric panels adds a professional touch to your car curtains. The finished hems will prevent fraying and add durability to the curtains. With the edges neatly hemmed, you’re now ready to move on to the next step: attaching curtain hooks.
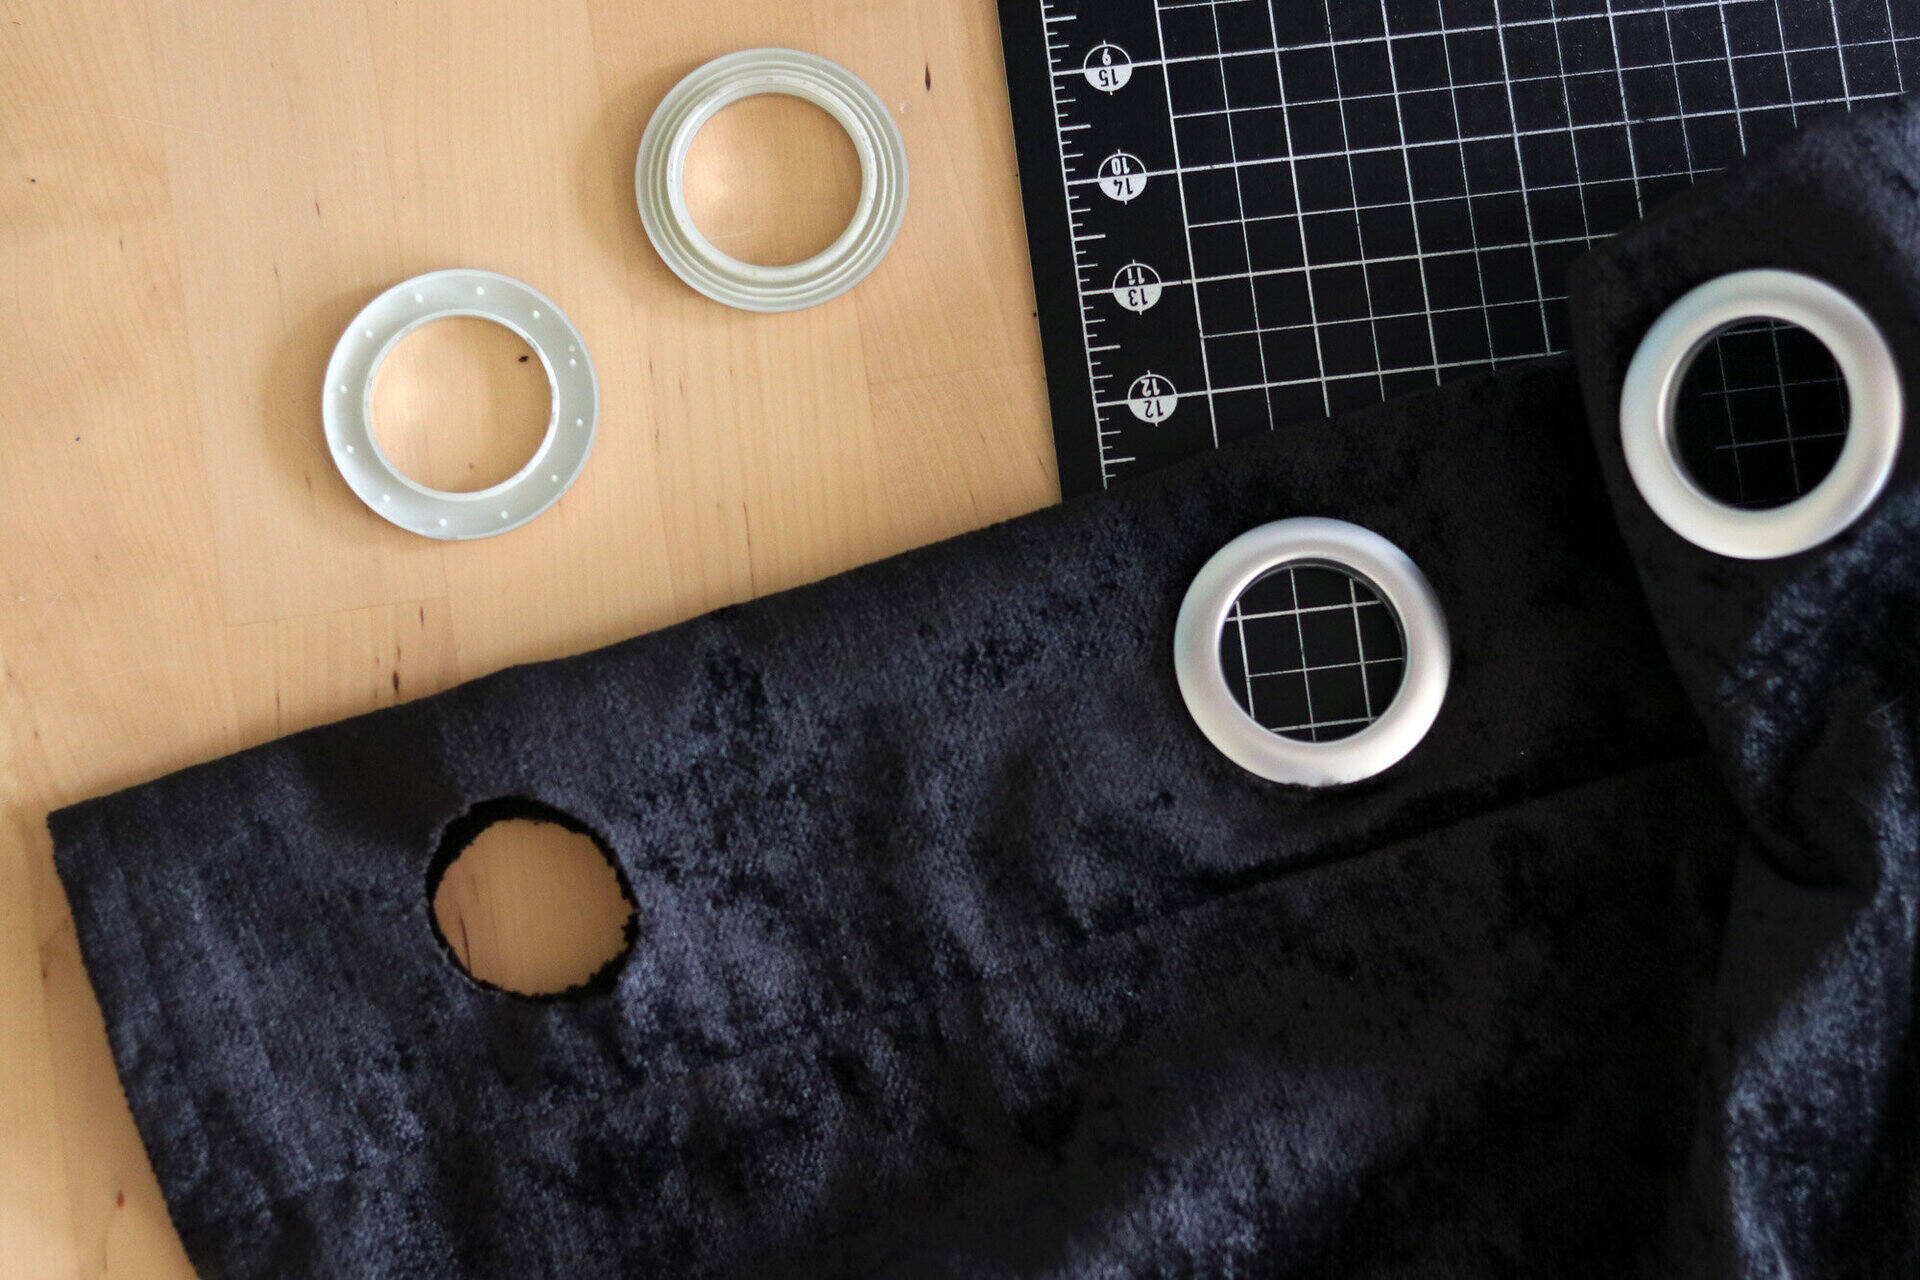
Step 5: Attaching Curtain Hooks
With the fabric panels cut and the edges hemmed, it’s time to move on to attaching the curtain hooks. Curtain hooks are essential for hanging the curtains securely and ensuring they stay in place while driving. Follow these steps to attach the curtain hooks:
- Start with one fabric panel. Locate the top edge of the panel that will be attached to the curtain rod.
- Measure equal distances along the top edge of the fabric panel and mark these points with a fabric pen or chalk. The number of marks will depend on the width of your fabric panel and the number of curtain hooks or rings you want to use.
- Take the curtain hooks and insert them through the fabric at each marked point. Make sure the hooks go through both layers of the fabric for a secure attachment.
- Once all the hooks are inserted, close them securely to ensure they won’t come loose when the curtains are hung.
- Repeat this process for attaching curtain hooks to all fabric panels.
Attaching curtain hooks to the fabric panels is a crucial step in properly hanging your car curtains. Make sure the hooks are evenly spaced and securely attached. The number of hooks you use will depend on the width of your fabric panel and the desired fullness of the curtains.
With the curtain hooks in place, you’re now ready to move on to the next step: installing the curtain rods in your car. Let’s make sure those curtains stay firmly in place as you hit the road!
Step 6: Installing the Curtain Rods
Installing the curtain rods is an important step in ensuring your car curtains are properly supported and functional. Follow these steps to install the curtain rods:
- Decide on the position of the curtain rods in your car. You may want to install one rod at the top of each window or a single rod to span multiple windows.
- Measure the width of the area where you plan to install the curtain rods, making sure to leave a small gap on each side for easy installation.
- Choose a suitable curtain rod that fits the measurements of your car windows. Look for rods that are adjustable or tension rods that can be easily fitted into place without the need for drilling.
- Hold the curtain rod against the chosen position and extend or adjust it to fit the width of the window area.
- Once you have positioned the rod, secure it in place. If you are using a tension rod, adjust the rod by twisting it until it is tightly held between the surfaces of the window frame.
- If you are using a curtain rod that requires installation, follow the instructions provided with the rod to attach it securely. This may involve drilling holes and using brackets or mounts for support.
- Double-check that the curtain rod is securely installed and can hold the weight of the fabric panels.
Installing the curtain rods properly is essential for the stability and functionality of your car curtains. Ensure that the rods are securely positioned and can withstand the movement of the car without slipping or falling. Once the rods are successfully installed, it’s time for the final step: hanging the curtains!
Read more: How To Make Cafe Curtains
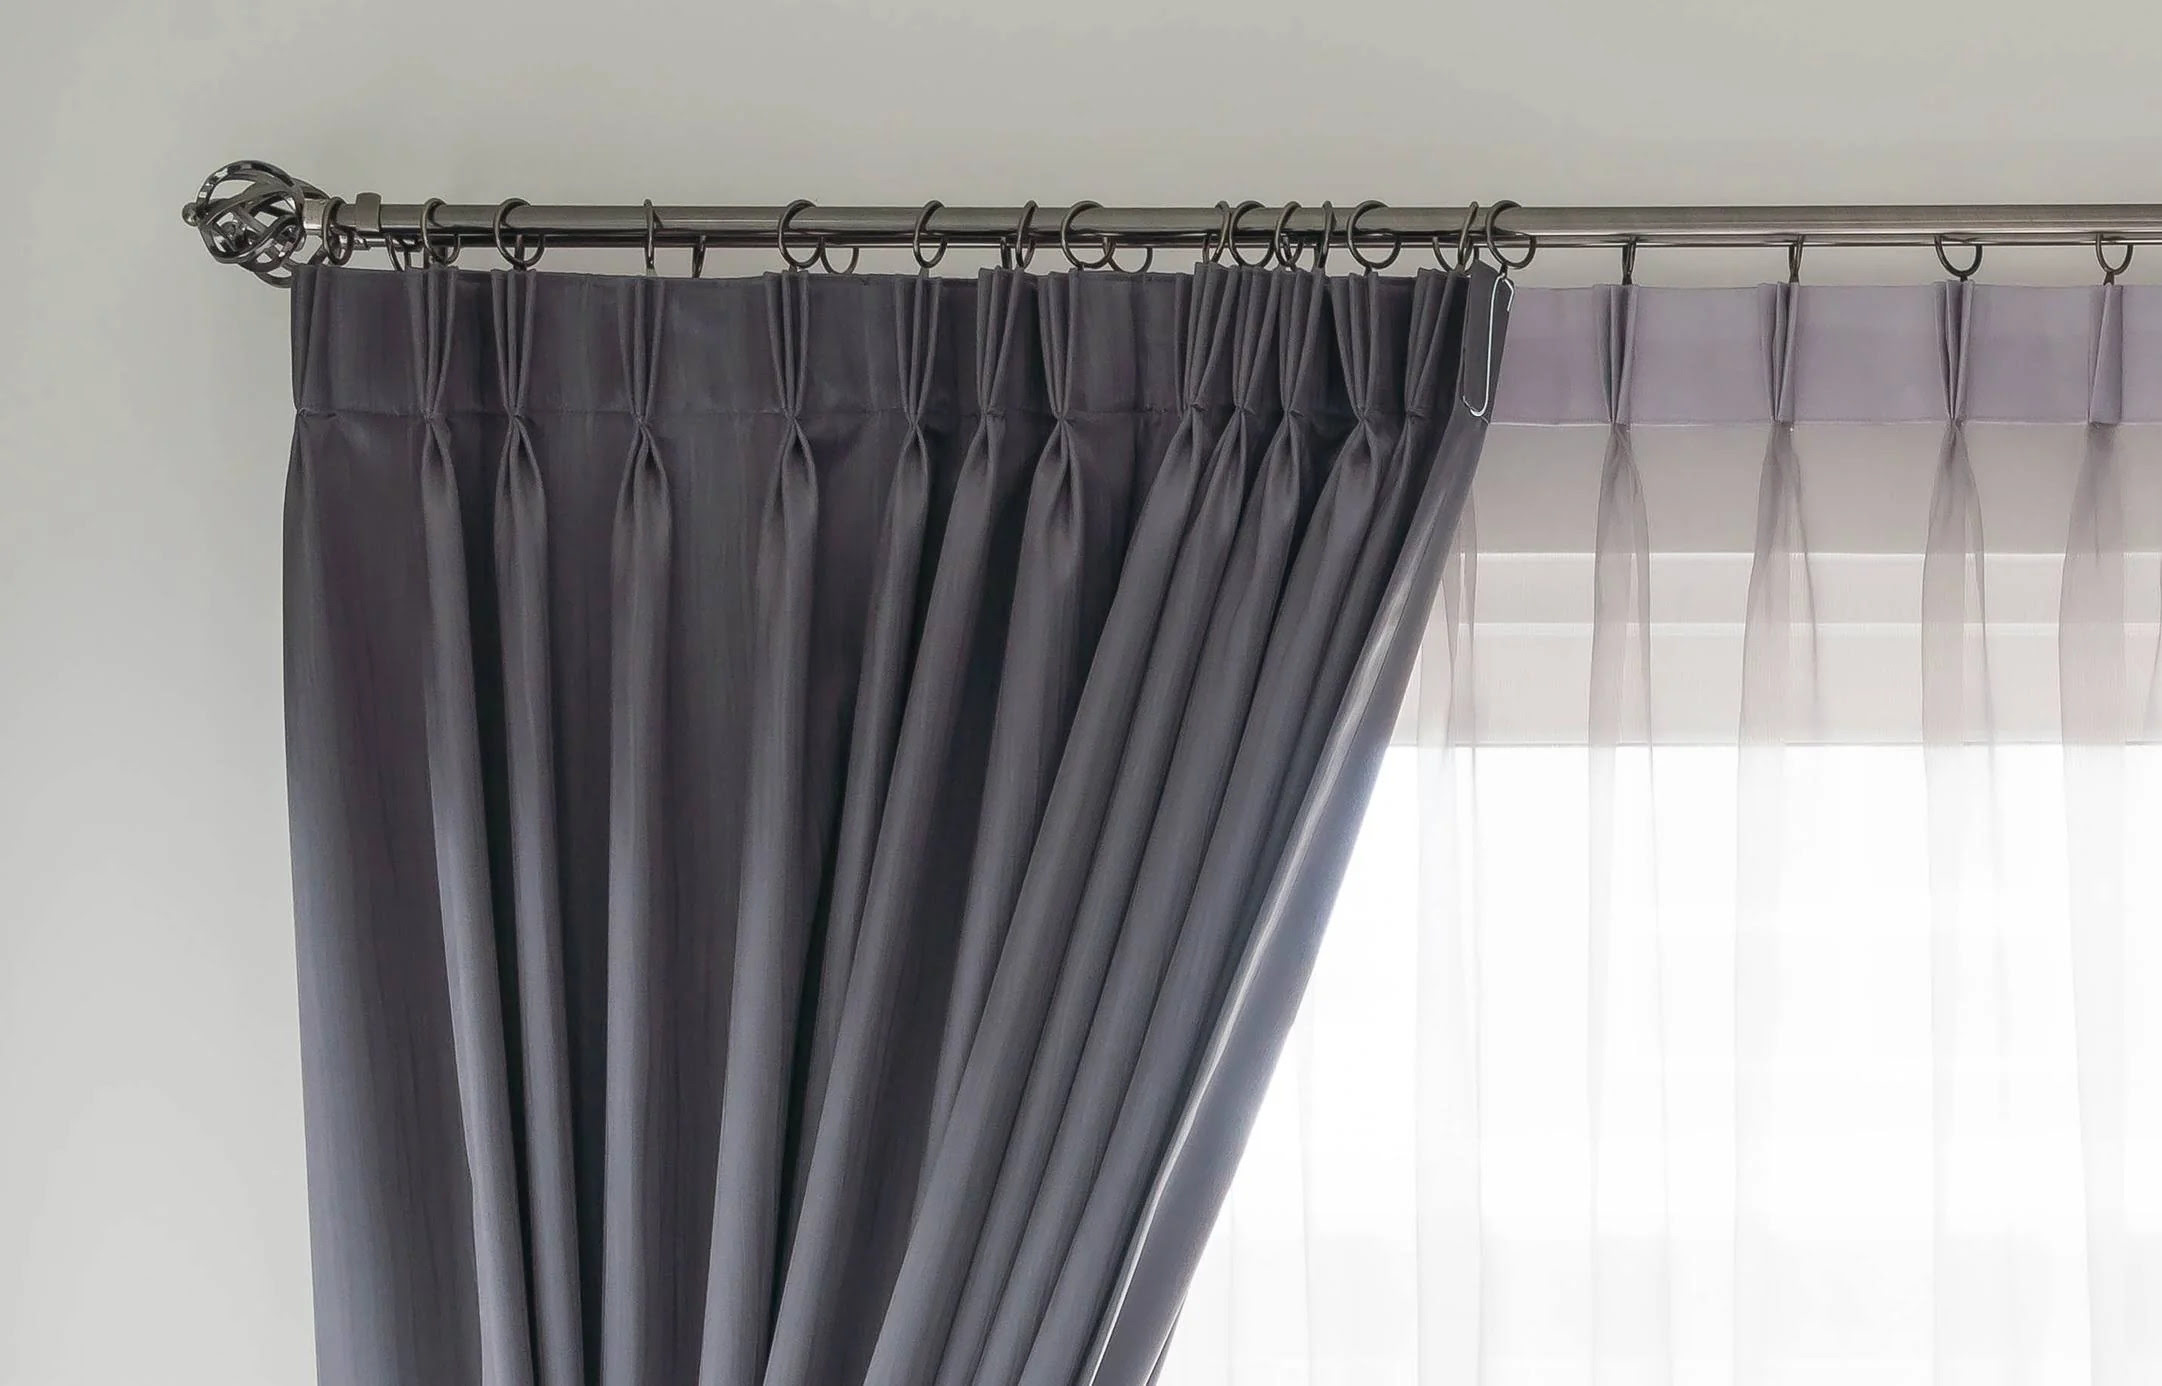
Step 7: Hanging the Curtains
After you have installed the curtain rods, it’s time to hang your car curtains and put the finishing touch on your project. Follow these steps to hang the curtains:
- Take one fabric panel and place it on the curtain rod, aligning the top edge with the hooks or rings.
- Starting from one end, slide each curtain hook or ring onto the curtain rod, ensuring that they are evenly spaced and secured.
- Repeat this process for all the fabric panels, making sure to maintain the desired fullness and appearance.
- Once all the fabric panels are attached to the curtain rod, adjust their position and spread them out evenly.
- Test the curtains by opening and closing the car windows to ensure that they move freely and do not get caught or tangled.
- Make any adjustments necessary to ensure that the curtains hang straight and provide the desired coverage and privacy.
Congratulations! You have successfully hung your car curtains. Take a step back and admire your handiwork. Not only do the curtains add a touch of style to your car interior, but they also offer practical benefits such as privacy and protection from sunlight.
Remember, you can always adjust the curtains or change the fabric panels if you want to switch up the look or functionality. Experiment with different fabrics and colors to create the perfect ambiance for your car.
And there you have it – a comprehensive guide on how to make and hang car curtains. Enjoy your customized curtains and the enhanced comfort they bring to your car journeys.
Safe travels!
Conclusion
Creating and installing car curtains is a rewarding and practical DIY project that allows you to customize the interior of your vehicle. Not only do car curtains provide privacy and shade, but they also add a stylish and personalized touch to your car’s interior design.
In this guide, we have walked you through the step-by-step process of making car curtains. From measuring the car windows and selecting the fabric to cutting the fabric panels, hemming the edges, attaching curtain hooks, installing the curtain rods, and finally, hanging the curtains, we have covered every aspect of this project.
Sewing your own car curtains gives you the freedom to choose fabrics that reflect your personal style and meet your specific needs. Whether you prefer lightweight and sheer fabrics for a soft and airy look or heavyweight and blackout fabrics for maximum privacy and light control, the choice is yours.
By following our guide and paying attention to detail, you can create high-quality car curtains that fit your car’s windows perfectly and enhance your overall driving experience. Plus, this project allows for endless customization options, enabling you to switch up the curtains whenever you feel like refreshing your car’s interior.
Now that your car curtains are hanging gracefully, you can enjoy the benefits they offer. Whether you’re embarking on a long road trip, finding a cozy nook to rest during a camping adventure, or simply enjoying the comfort and privacy of your vehicle, the addition of car curtains will make each journey more enjoyable.
We hope this guide has inspired and empowered you to embark on this DIY project. Have fun creating your car curtains and enjoy the enhanced comfort and style they bring to your driving experience.
Safe travels!
Frequently Asked Questions about How To Make Car Curtains
Was this page helpful?
At Storables.com, we guarantee accurate and reliable information. Our content, validated by Expert Board Contributors, is crafted following stringent Editorial Policies. We're committed to providing you with well-researched, expert-backed insights for all your informational needs.


0 thoughts on “How To Make Car Curtains”