Articles
How To Make Quilt Frame Leaders
Modified: January 5, 2024
Learn how to make quilt frame leaders with these helpful articles. Start your quilting journey with ease and precision.
(Many of the links in this article redirect to a specific reviewed product. Your purchase of these products through affiliate links helps to generate commission for Storables.com, at no extra cost. Learn more)
Introduction
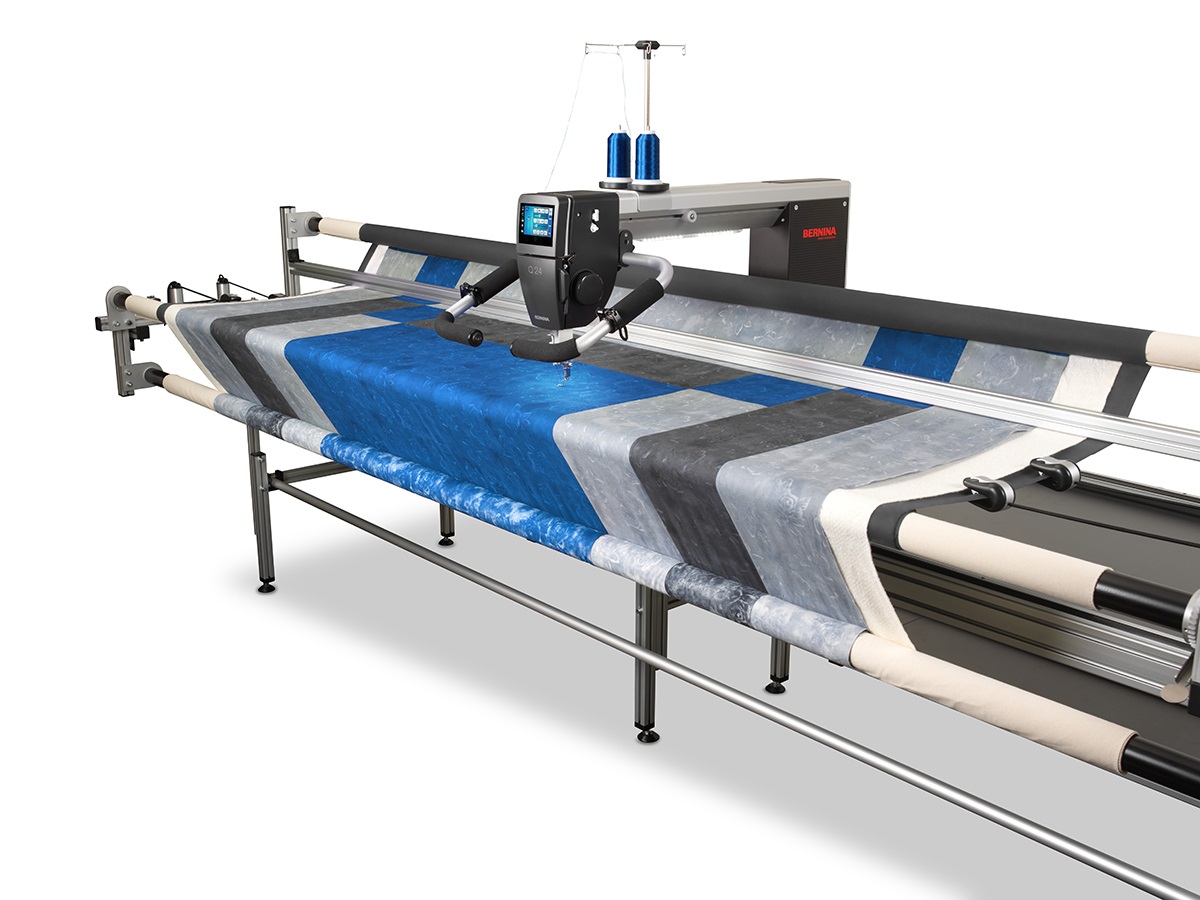
Are you a quilting enthusiast looking to improve your quilting process? Well, one essential tool that can greatly enhance your quilting experience is a quilt frame leader. Quilt frame leaders are fabric strips that are attached to the quilt frame and provide a stable and secure surface to hold your quilt while you work on it.
In this article, we will guide you through the process of making quilt frame leaders from scratch. By following the steps outlined below, you will be able to create your very own quilt frame leaders and start enjoying the benefits they bring to your quilting projects.
But first, let’s gather the materials you will need for this project.
Key Takeaways:
- Create stable and secure quilt frame leaders using sturdy fabric, sewing machine, and pins. Adjust and align leaders for a smooth quilting experience, showcasing your creativity with ease and precision.
- Elevate your quilting experience by making custom quilt frame leaders. Enjoy the benefits of taut fabric, easy maneuverability, and wrinkle-free quilting, showcasing your skills with stability and convenience.
Read more: How To Make A Quilt Frame
Materials Needed
Before you start making your quilt frame leaders, make sure you have the following materials on hand:
- Fabric – Choose a sturdy fabric that can withstand the tension of the quilt frame. Cotton or muslin fabric works well for this purpose.
- Measuring tape or ruler – To accurately measure the length and width of the fabric strips.
- Scissors – To cut the fabric strips to the desired length.
- Sewing machine – For sewing the fabric strips together.
- Thread – Choose a thread color that complements your fabric and blends in nicely.
- Pins – To hold the fabric strips in place while sewing.
- Iron – For pressing the fabric and creating neat, crisp seams.
- Quilt frame – This can be a traditional wooden frame or a modern quilting hoop.
Once you have all the necessary materials, you can proceed to the next step – cutting the fabric strips.
Step 1: Cutting the Fabric Strips
The first step in making quilt frame leaders is cutting the fabric strips. Start by measuring the length of your quilt frame. You will need two fabric strips that are slightly longer than the length of your frame.
Using a measuring tape or ruler, carefully measure and mark the fabric according to the desired width of your quilt frame leaders. Typically, a width of 4 to 6 inches is sufficient. Make sure to account for seam allowances when measuring and cutting the fabric.
Once you have marked the measurements, use a pair of sharp scissors to cut along the marked lines. Take your time to ensure that the cuts are straight and even.
Repeat the process for the second fabric strip, making sure it matches the length and width of the first strip.
With both fabric strips cut, you are now ready to move on to the next step – sewing the fabric strips together.
Step 2: Sewing the Fabric Strips
Now that you have your fabric strips cut, it’s time to sew them together. This step will join the two fabric strips into one long strip that will serve as your quilt frame leader.
First, place the two fabric strips right sides together, aligning the edges. It is important to ensure that the edges are perfectly aligned to create a seamless connection.
Using a sewing machine, set it to a straight stitch and adjust the stitch length to a standard setting. Start sewing along one of the long edges, backstitching at the beginning and end to secure the stitches.
While sewing, make sure to maintain a consistent seam allowance, typically ¼ inch or as desired. This will ensure that the fabric strips are securely joined together.
Once you reach the end of the first long edge, continue sewing along the opposite long edge, creating a continuous seam along the entire length of the fabric strips.
After sewing, trim any excess fabric and threads. Then, open up the fabric strip and press the seam open with an iron. This will create a neat and flat finish.
Now that your fabric strips are sewn together, it’s time to move on to the next step – attaching the fabric strips to the quilt frame.
When making quilt frame leaders, use sturdy fabric like canvas or duck cloth to ensure durability and stability for attaching your quilt to the frame.
Step 3: Attaching the Fabric Strips to the Quilt Frame
With your fabric strip ready, it’s time to attach it to the quilt frame. This step will ensure that your quilt is securely held in place while you work on it.
Start by positioning the quilt frame so that it is easily accessible and stable. Lay the fabric strip along one side of the quilt frame, with the sewn seam facing towards you.
Using pins, carefully secure the fabric strip to the quilt frame, making sure it is taut and evenly positioned. Start at one end and work your way along the entire length of the frame, placing pins every few inches to keep the fabric strip in place.
Once the first side is attached, repeat the process for the opposite side of the quilt frame, using another fabric strip.
After both fabric strips are secured to the quilt frame, take a moment to adjust and straighten them. Ensure that there are no wrinkles or folds in the fabric and that it is evenly tensioned across the frame.
If necessary, make small adjustments by repositioning the fabric strip or tightening the pins. It is important to ensure that the fabric strips are straight and in the correct position before moving on to the next step.
Now that the fabric strips are properly attached, let’s proceed to the next step – adjusting the leaders.
Read more: How To Hand Quilt Without A Frame
Step 4: Adjusting the Leaders
After attaching the fabric strips to the quilt frame, it’s time to adjust the leaders to ensure they are properly aligned and tensioned. This step is crucial for achieving a smooth and wrinkle-free quilting experience.
Start by standing in front of the quilt frame and inspecting the fabric strips. Look for any areas where the fabric may be sagging or unevenly tensioned.
To make adjustments, gently pull on the fabric strip in the desired direction. Use your hands to redistribute the tension and ensure that the fabric is taut and evenly stretched across the frame.
Pay attention to the corners and edges of the quilt frame, as these areas tend to require extra adjustment. Make sure the leaders are securely attached and properly aligned to avoid any sagging or distortion.
Take your time with this process, making small adjustments as needed. It’s important to achieve an even and consistent tension across the entire quilt frame.
Once you are satisfied with the adjustments, step back and look at the quilt frame from a distance. Check for any visible wrinkles or areas that may need further tweaking.
If necessary, make additional adjustments until you achieve a smooth and even surface. This will provide the ideal working space for quilting.
Now that the leaders are properly adjusted, we can move on to the final step – adding some finishing touches.
Step 5: Finishing Touches
Now that your quilt frame leaders are in place and adjusted, it’s time to add some finishing touches to ensure a seamless quilting experience.
First, double-check that all the pins securing the fabric strips to the quilt frame are firmly in place. This will prevent any accidental slippage or shifting of the fabric while you work on your quilt.
Next, take a moment to smooth out the fabric strips and remove any remaining wrinkles or folds. Gently tug on the fabric to ensure it is taut and smooth across the entire quilt frame.
Once the fabric is properly smoothed out, you can prepare your quilt top for attachment. Carefully align the edges of your quilt top with the fabric strips and secure it in place using pins or clips.
Make sure that the quilt top is evenly distributed and centered on the fabric strips. This will help maintain the overall balance and symmetry of your quilting design.
With the quilt top securely positioned, you are now ready to proceed with your quilting process. Whether you choose to hand quilt or use a quilting machine, the quilt frame leaders will provide a stable and secure base for your work.
Remember to regularly check the tension of the fabric strips and make any necessary adjustments as you quilt. This will ensure that your quilt remains taut and wrinkle-free throughout the process.
Once you have completed your quilting project, carefully remove the quilt from the frame by releasing the pins or clips. You can then detach the fabric strips from the quilt frame leaders, allowing you to showcase your beautiful finished quilt.
That’s it! By following these steps, you have successfully created and utilized quilt frame leaders to enhance your quilting process. Enjoy the benefits of a stable and secure quilting surface as you create your next masterpiece.
Happy quilting!
Conclusion
Quilt frame leaders play a vital role in ensuring a smooth and enjoyable quilting experience. By creating your own leaders, you have the opportunity to customize them to fit your specific quilt frame and preferences. With the simple steps outlined in this article, you can easily make quilt frame leaders from scratch.
From cutting the fabric strips to sewing them together, attaching them to the quilt frame, adjusting the tension, and adding those final finishing touches, each step contributes to creating a stable and secure surface for your quilting projects.
Having quilt frame leaders provides numerous benefits. They keep your quilt fabric taut and prevent any unwanted sagging or wrinkling. They also facilitate easy maneuverability of your quilt, allowing you to concentrate on the fine details of your quilting design.
Through regular adjustments and proper tensioning, you can ensure that your quilt remains securely in place, providing you with a smooth and wrinkle-free canvas to showcase your quilting skills.
So, why wait? Take the time to create your own quilt frame leaders and elevate your quilting experience. Enjoy the stability and convenience they bring to your quilting projects, and let your creativity flow seamlessly.
Now armed with the knowledge and skills to make quilt frame leaders, you’re ready to embark on your next quilting adventure. Get ready to create beautiful quilts with ease and precision, thanks to your customized quilt frame leaders.
Happy quilting!
Frequently Asked Questions about How To Make Quilt Frame Leaders
Was this page helpful?
At Storables.com, we guarantee accurate and reliable information. Our content, validated by Expert Board Contributors, is crafted following stringent Editorial Policies. We're committed to providing you with well-researched, expert-backed insights for all your informational needs.


0 thoughts on “How To Make Quilt Frame Leaders”