Articles
How To Move Electrical Box
Modified: September 1, 2024
Learn how to safely and efficiently move an electrical box with our helpful articles and tutorials. Master the process step by step and ensure a successful relocation.
(Many of the links in this article redirect to a specific reviewed product. Your purchase of these products through affiliate links helps to generate commission for Storables.com, at no extra cost. Learn more)
Introduction
When it comes to home remodeling or renovation projects, you may encounter situations where you need to move an electrical box. Whether you’re repositioning a light switch, adding an outlet, or rearranging the layout of a room, knowing how to move an electrical box is essential for a successful project. While it may seem daunting at first, with the right tools, materials, and a careful approach, you can safely relocate an electrical box without any issues.
Before diving into the process, it’s important to understand that electrical work can be hazardous if not performed correctly. If you’re not confident in your abilities, it’s always best to hire a licensed electrician to do the job. However, if you have some experience working with electrical wiring and feel comfortable taking on the task, this guide will provide you with detailed steps on how to move an electrical box safely and efficiently.
Key Takeaways:
- Prioritize safety by turning off the power, wearing protective gear, and using insulated tools when moving an electrical box to prevent accidents and ensure a successful relocation.
- Ensure a smooth and efficient process by following detailed steps to disconnect and reconnect wires, install the new electrical box, and test the connection, or seek professional assistance if unsure.
Read more: How To Store Moving Boxes
Safety Precautions
Before you begin moving an electrical box, it’s crucial to prioritize safety. Mishandling electrical components can result in severe injuries or even cause fires. To ensure a safe working environment, follow these essential safety precautions:
- Turn off the power: Locate the circuit breaker panel and turn off the power to the area where you’ll be working. Use a circuit tester to double-check that the power is indeed off before proceeding.
- Wear protective gear: Always wear safety goggles, gloves, and long sleeves to protect yourself from potential electrical shocks and injuries.
- Work in a well-lit area: Proper lighting will help you see clearly and avoid accidental contact with live wires.
- Use insulated tools: Insulated screwdrivers and pliers should be used to minimize the risk of electrical shock.
- Avoid water: Keep the work area dry and avoid working on electrical systems in wet or damp conditions to prevent short circuits.
- Label and organize wires: Before disconnecting any wires, label them to ensure proper reconnection later. Taking photos or drawing diagrams can also be helpful.
- Dispose of old electrical components properly: When removing the old electrical box, ensure that all wires and connections are safely disconnected. Dispose of the old box following local regulations or consult with your municipality for guidance.
Following these safety precautions will greatly reduce the risk of accidents while working on electrical systems. Remember, your safety should always be the top priority when handling any electrical work.
Tools and Materials Required
To successfully move an electrical box, you’ll need a few essential tools and materials. Gathering these items before you start will help ensure a smooth and efficient process. Here’s a list of what you’ll need:
Tools:
- Screwdriver set
- Pliers
- Wire stripper
- Voltage tester
- Drywall saw or reciprocating saw
- Utility knife
- Electrical tape
- Measuring tape
- Pencil or marker
- Wire connectors
Materials:
- New electrical box
- Mounting bracket
- Sheetrock screws
- Cable clamps
- Electrical wire
- Cover plate
- Wall patch or joint compound
- Sandpaper
- Paint
Having these tools and materials on hand will save you time and prevent any delays during the process. It’s always a good idea to check your inventory and ensure that everything is in proper working condition before starting the project. If any items are missing or damaged, be sure to obtain replacements before proceeding.
Step 1: Turn off the Power
The first and most crucial step when moving an electrical box is to turn off the power to the circuit you’ll be working on. This ensures your safety and prevents any potential electrical hazards. Follow these steps to turn off the power:
- Locate the circuit breaker panel in your home. It is usually found in the basement, utility room, or garage.
- Identify the breaker that controls the circuit where the electrical box is located. It may be labeled accordingly or require some trial and error by turning off individual breakers and checking which areas lose power.
- Once you’ve located the correct breaker, flip it to the “off” position.
- Test the circuit to make sure the power is off using a voltage tester. Touch the tester to the wires or outlets to ensure there is no electrical current flowing. This step is crucial for your safety.
- If the tester indicates that there is still voltage present, double-check that you’ve turned off the correct breaker. If you’re certain it’s off and there’s still power, consult a licensed electrician for further assistance.
Remember, it’s always better to be safe than sorry when working with electricity. Take the time to turn off the power and verify that it is off before proceeding to the next steps. This precaution will prevent accidental shocks or electrical damage during the relocation process.
Step 2: Remove the Cover Plate
Now that the power is safely turned off, the next step is to remove the cover plate of the electrical box. The cover plate is the visible part of the electrical box that conceals the wiring and provides access to the switches or outlets. Follow these steps to remove the cover plate:
- Using a screwdriver, carefully unscrew the screws holding the cover plate in place. Place the screws in a safe location for later use.
- Gently pull the cover plate away from the wall, exposing the inner components of the electrical box.
- Inspect the wiring within the box to ensure everything is securely connected. If you notice any loose or damaged wires, consider consulting a professional electrician for assistance.
Removing the cover plate allows you to easily access the electrical box and work on the wiring. Take your time and be gentle to avoid damaging the cover plate or the surrounding wall. Once the cover plate is removed, you can proceed to the next step of disconnecting the wires from the old electrical box.
Read more: How To Move A Litter Box
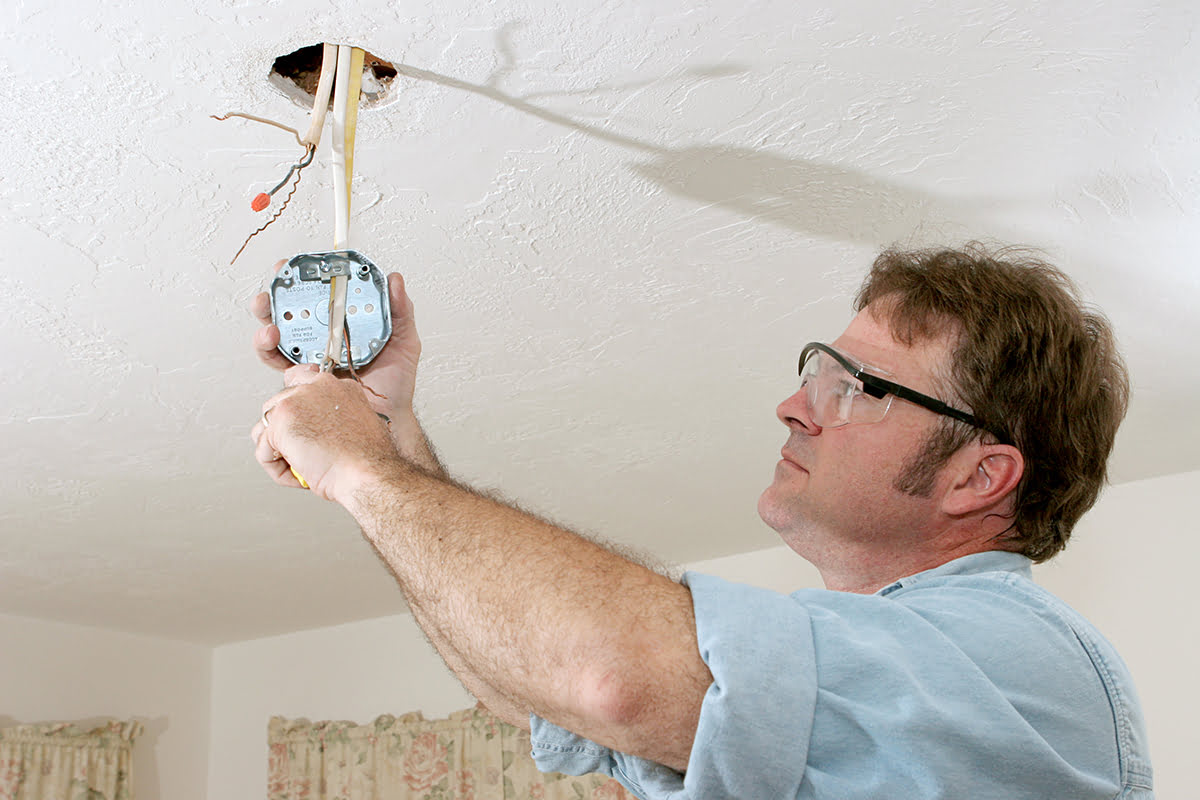
Step 3: Disconnect the Wires
With the cover plate removed, it’s time to disconnect the wires from the old electrical box. This step requires caution and precision to ensure the safe removal of the wiring. Follow these steps to disconnect the wires:
- Using a voltage tester, double-check that there is no power running through the wires. Touch the tester to each wire to ensure it does not detect any electrical current.
- Once you’ve verified that the wires are not live, use a screwdriver to loosen the terminal screws holding the wires in place. Turn the screws counterclockwise to loosen them, allowing the wires to be released.
- Gently pull the wires out of the old electrical box, taking care not to damage or strain them. Depending on the type of connection, you may need to use pliers to help disconnect the wires.
- After disconnecting the wires, use electrical tape to cover the ends and prevent any accidental contact with other wires or conductive surfaces.
It’s crucial to ensure that the wires are completely disconnected and isolated before proceeding to remove the old electrical box. Double-check that all wires are free and clear of any connections within the box. Taking the necessary precautions during this step will minimize the risk of electrical shocks and accidents.
When moving an electrical box, always turn off the power at the circuit breaker before starting. Use a voltage tester to ensure the power is off before touching any wires. Always follow local building codes and regulations.
Step 4: Remove the Old Electrical Box
Now that the wires are safely disconnected, you can proceed to remove the old electrical box from the wall. Removing the old box will create space for the installation of the new electrical box in the desired location. Follow these steps to remove the old electrical box:
- Use a screwdriver to unscrew the screws or nails that secure the old electrical box to the wall. These screws or nails are typically located on the sides or at the top and bottom of the box.
- Gently pull the old electrical box away from the wall, exposing the wiring behind it. Be careful not to damage or strain the wires during this process.
- If the old electrical box is embedded in the wall, you may need to use a drywall saw or reciprocating saw to carefully cut around the box. Make sure to cut along the marked lines to avoid damaging the surrounding drywall.
- Once the old electrical box is free from the wall, remove any remaining screws or nails and set the box aside for disposal.
- Inspect the wall opening and ensure that it is clean and free from any debris or loose materials. If necessary, use a utility knife to smooth any rough edges or remove excess drywall.
Removing the old electrical box creates a clean and empty space for the installation of the new box. Ensure that the wall opening is in good condition and ready for the next step. Take the necessary precautions to avoid damaging the wires or the surrounding wall during the removal process.
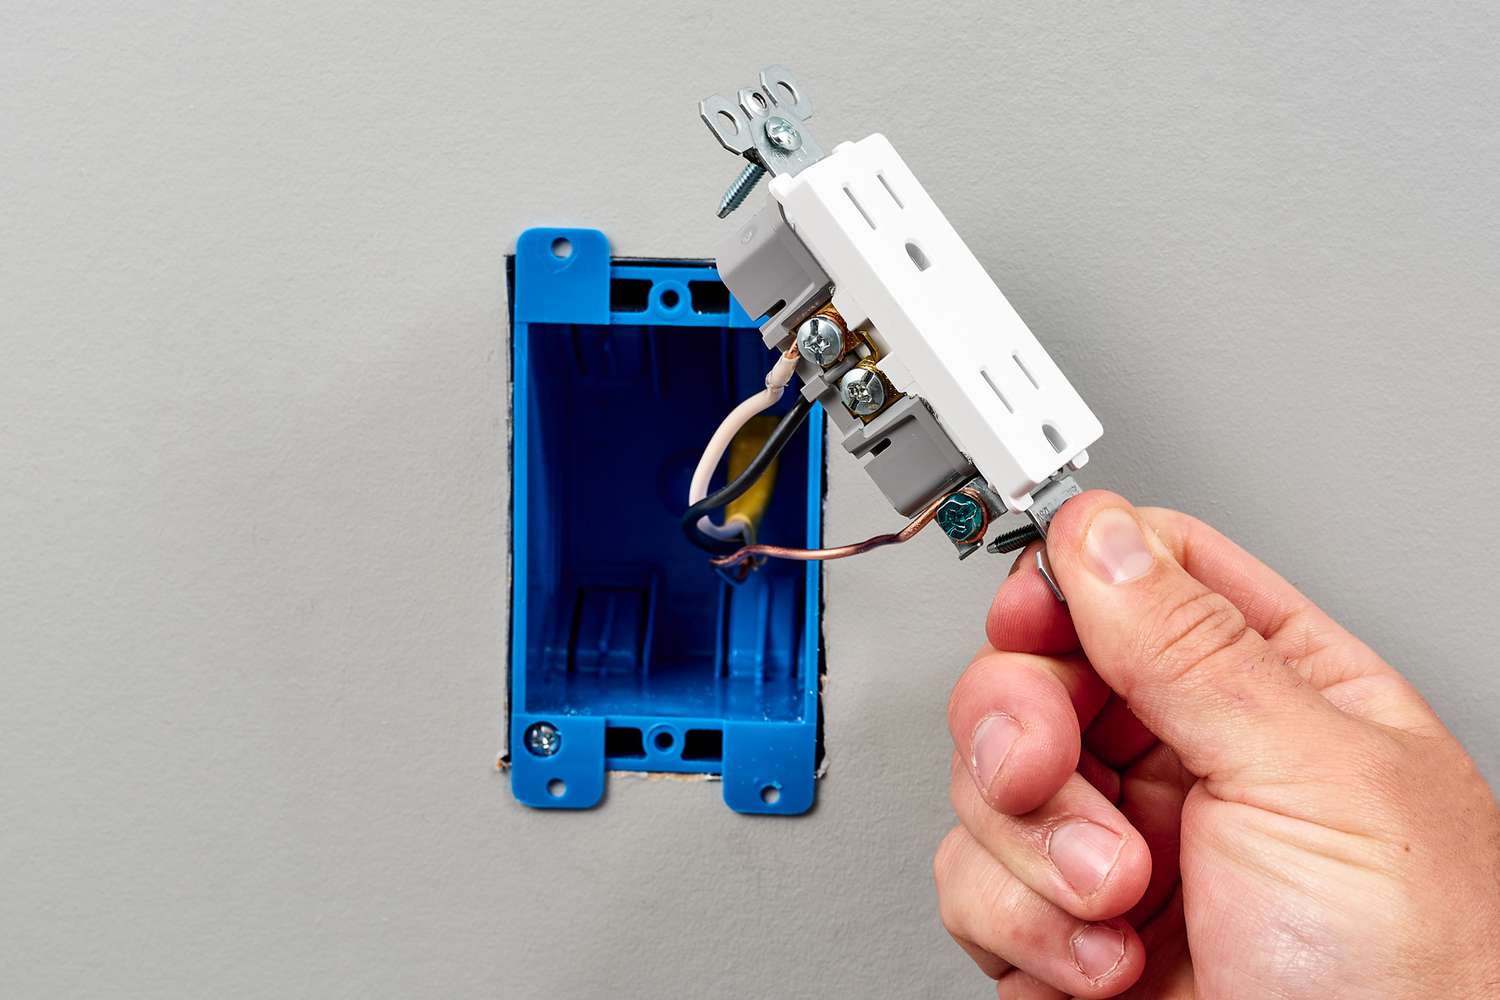
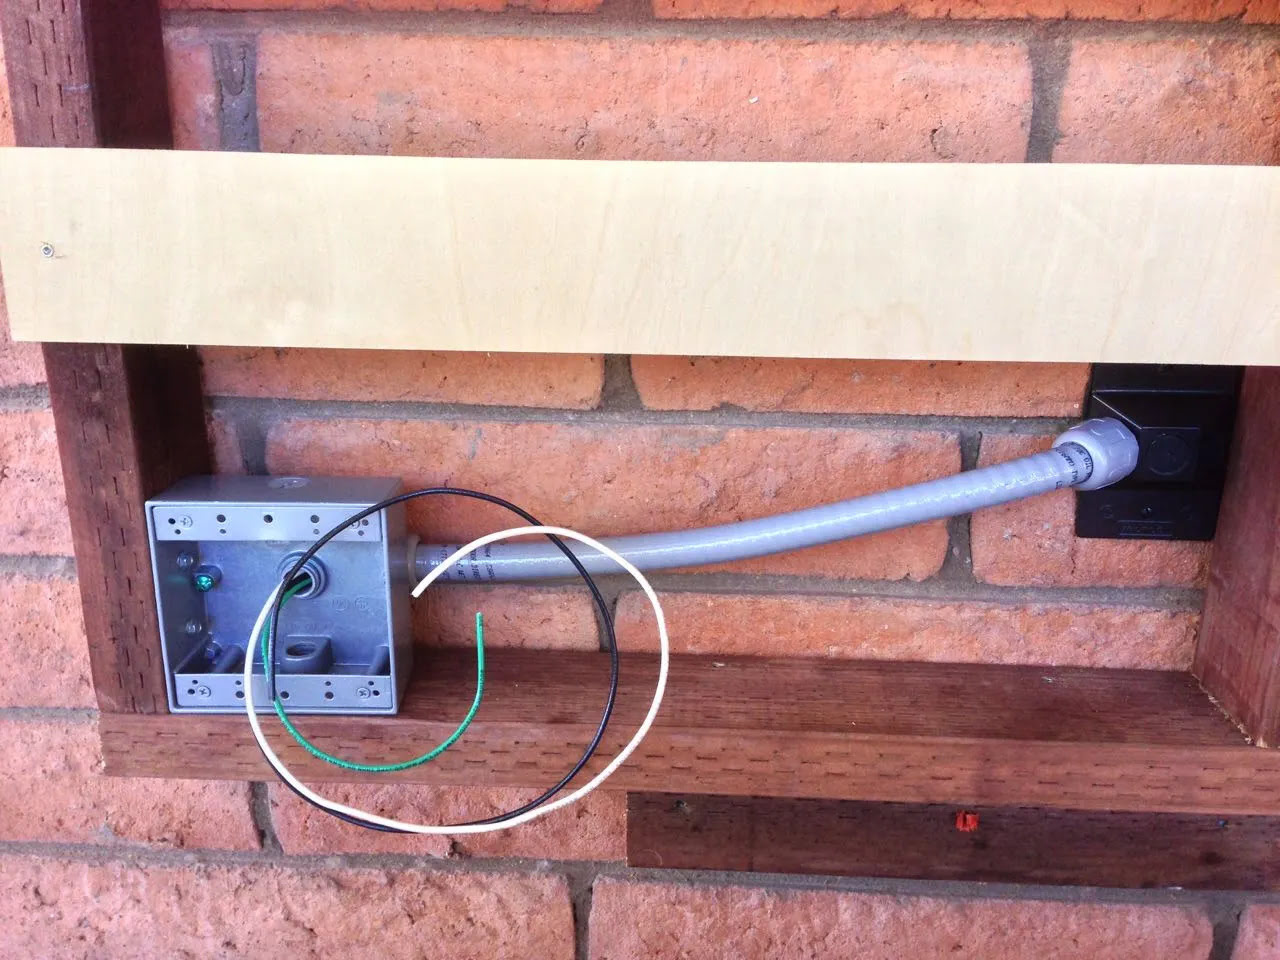
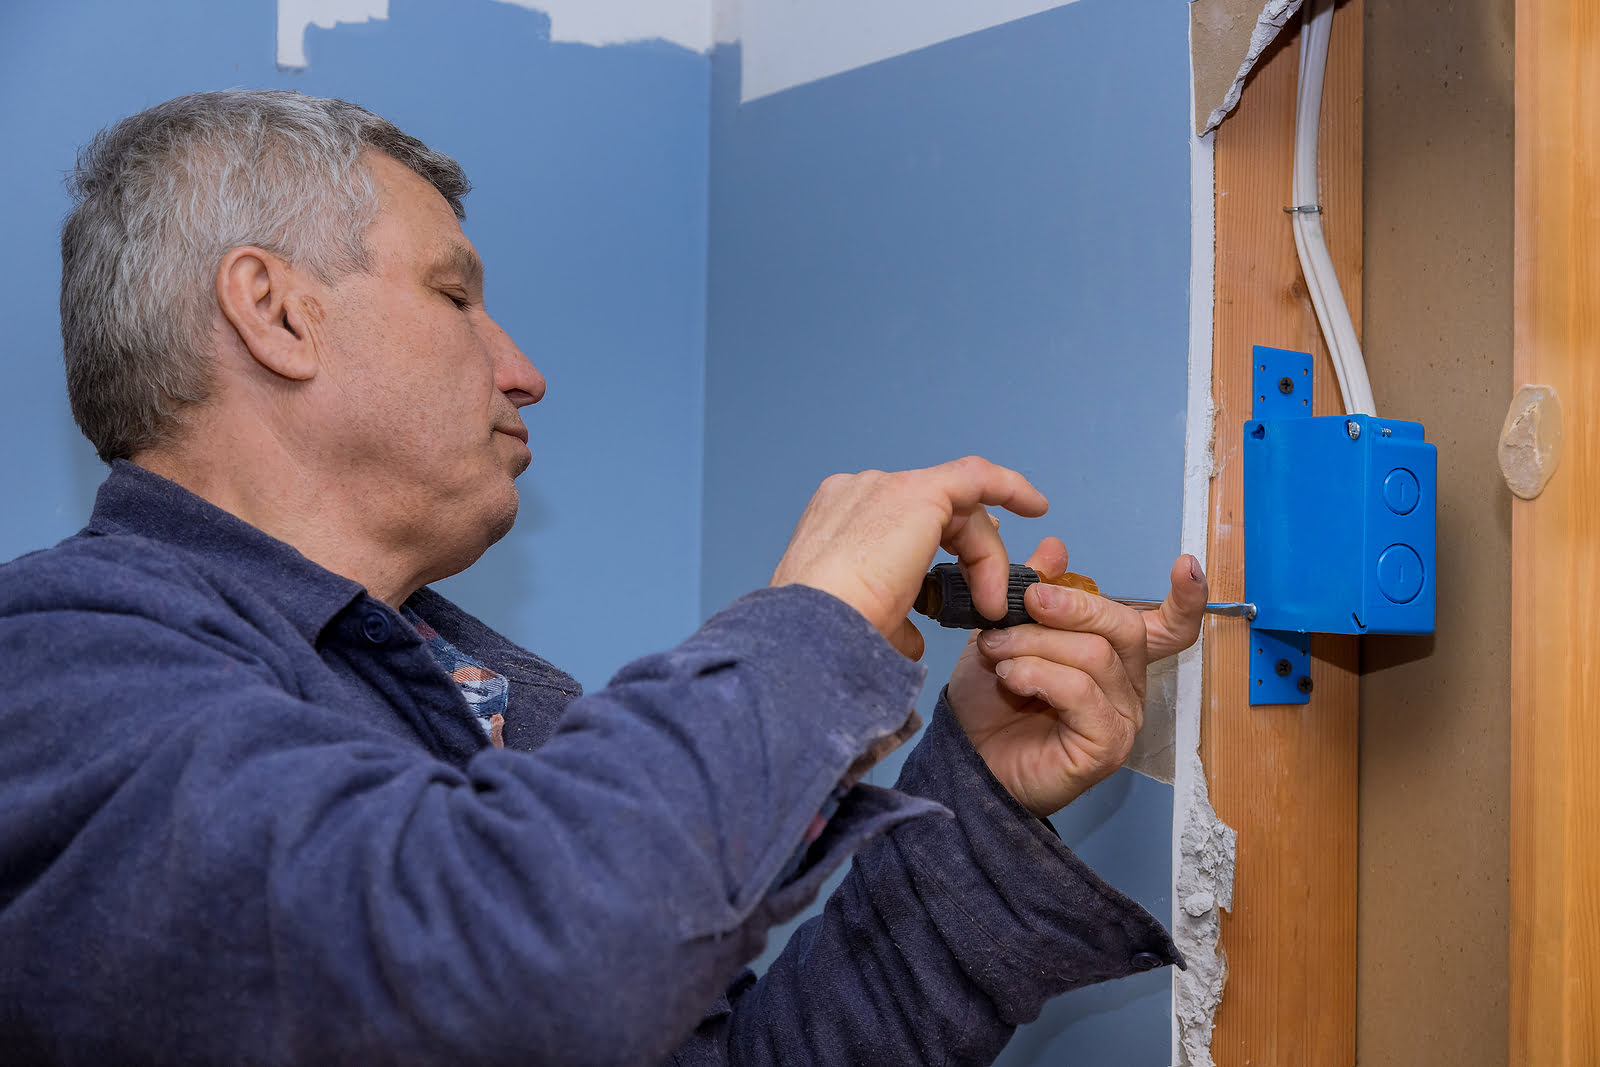
Step 5: Install the New Electrical Box
With the old electrical box removed, it’s time to install the new electrical box in the desired location. The new box will provide a secure housing for the wiring and serve as the foundation for switches, outlets, or other electrical components. Follow these steps to install the new electrical box:
- Measure the dimensions of the new electrical box and mark the outline on the wall. Use a pencil or marker to make accurate markings.
- Using a drywall saw or reciprocating saw, carefully cut along the marked lines to create a hole for the new electrical box. Take caution to avoid cutting into any existing wiring or damaging the surrounding wall.
- Insert the new electrical box into the wall opening and ensure that it fits snugly. If necessary, use mounting brackets or adjustable brackets to secure the box in place.
- Secure the new electrical box to the wall by driving screws through the screw holes located on the sides or at the top and bottom of the box. Make sure the box is securely fastened to the wall.
- If the new box has knockouts, use a screwdriver or pliers to remove the desired knockout openings for the cables entering the box.
- Install cable clamps inside the box to secure the incoming wires. These clamps will prevent the wires from being pulled out or damaged.
Proper installation of the new electrical box is essential for the safety and functionality of the electrical system. Ensure that the box is securely fastened to the wall and that the knockout openings and cable clamps are properly installed. Take your time to ensure an accurate and secure installation before proceeding to the next step.
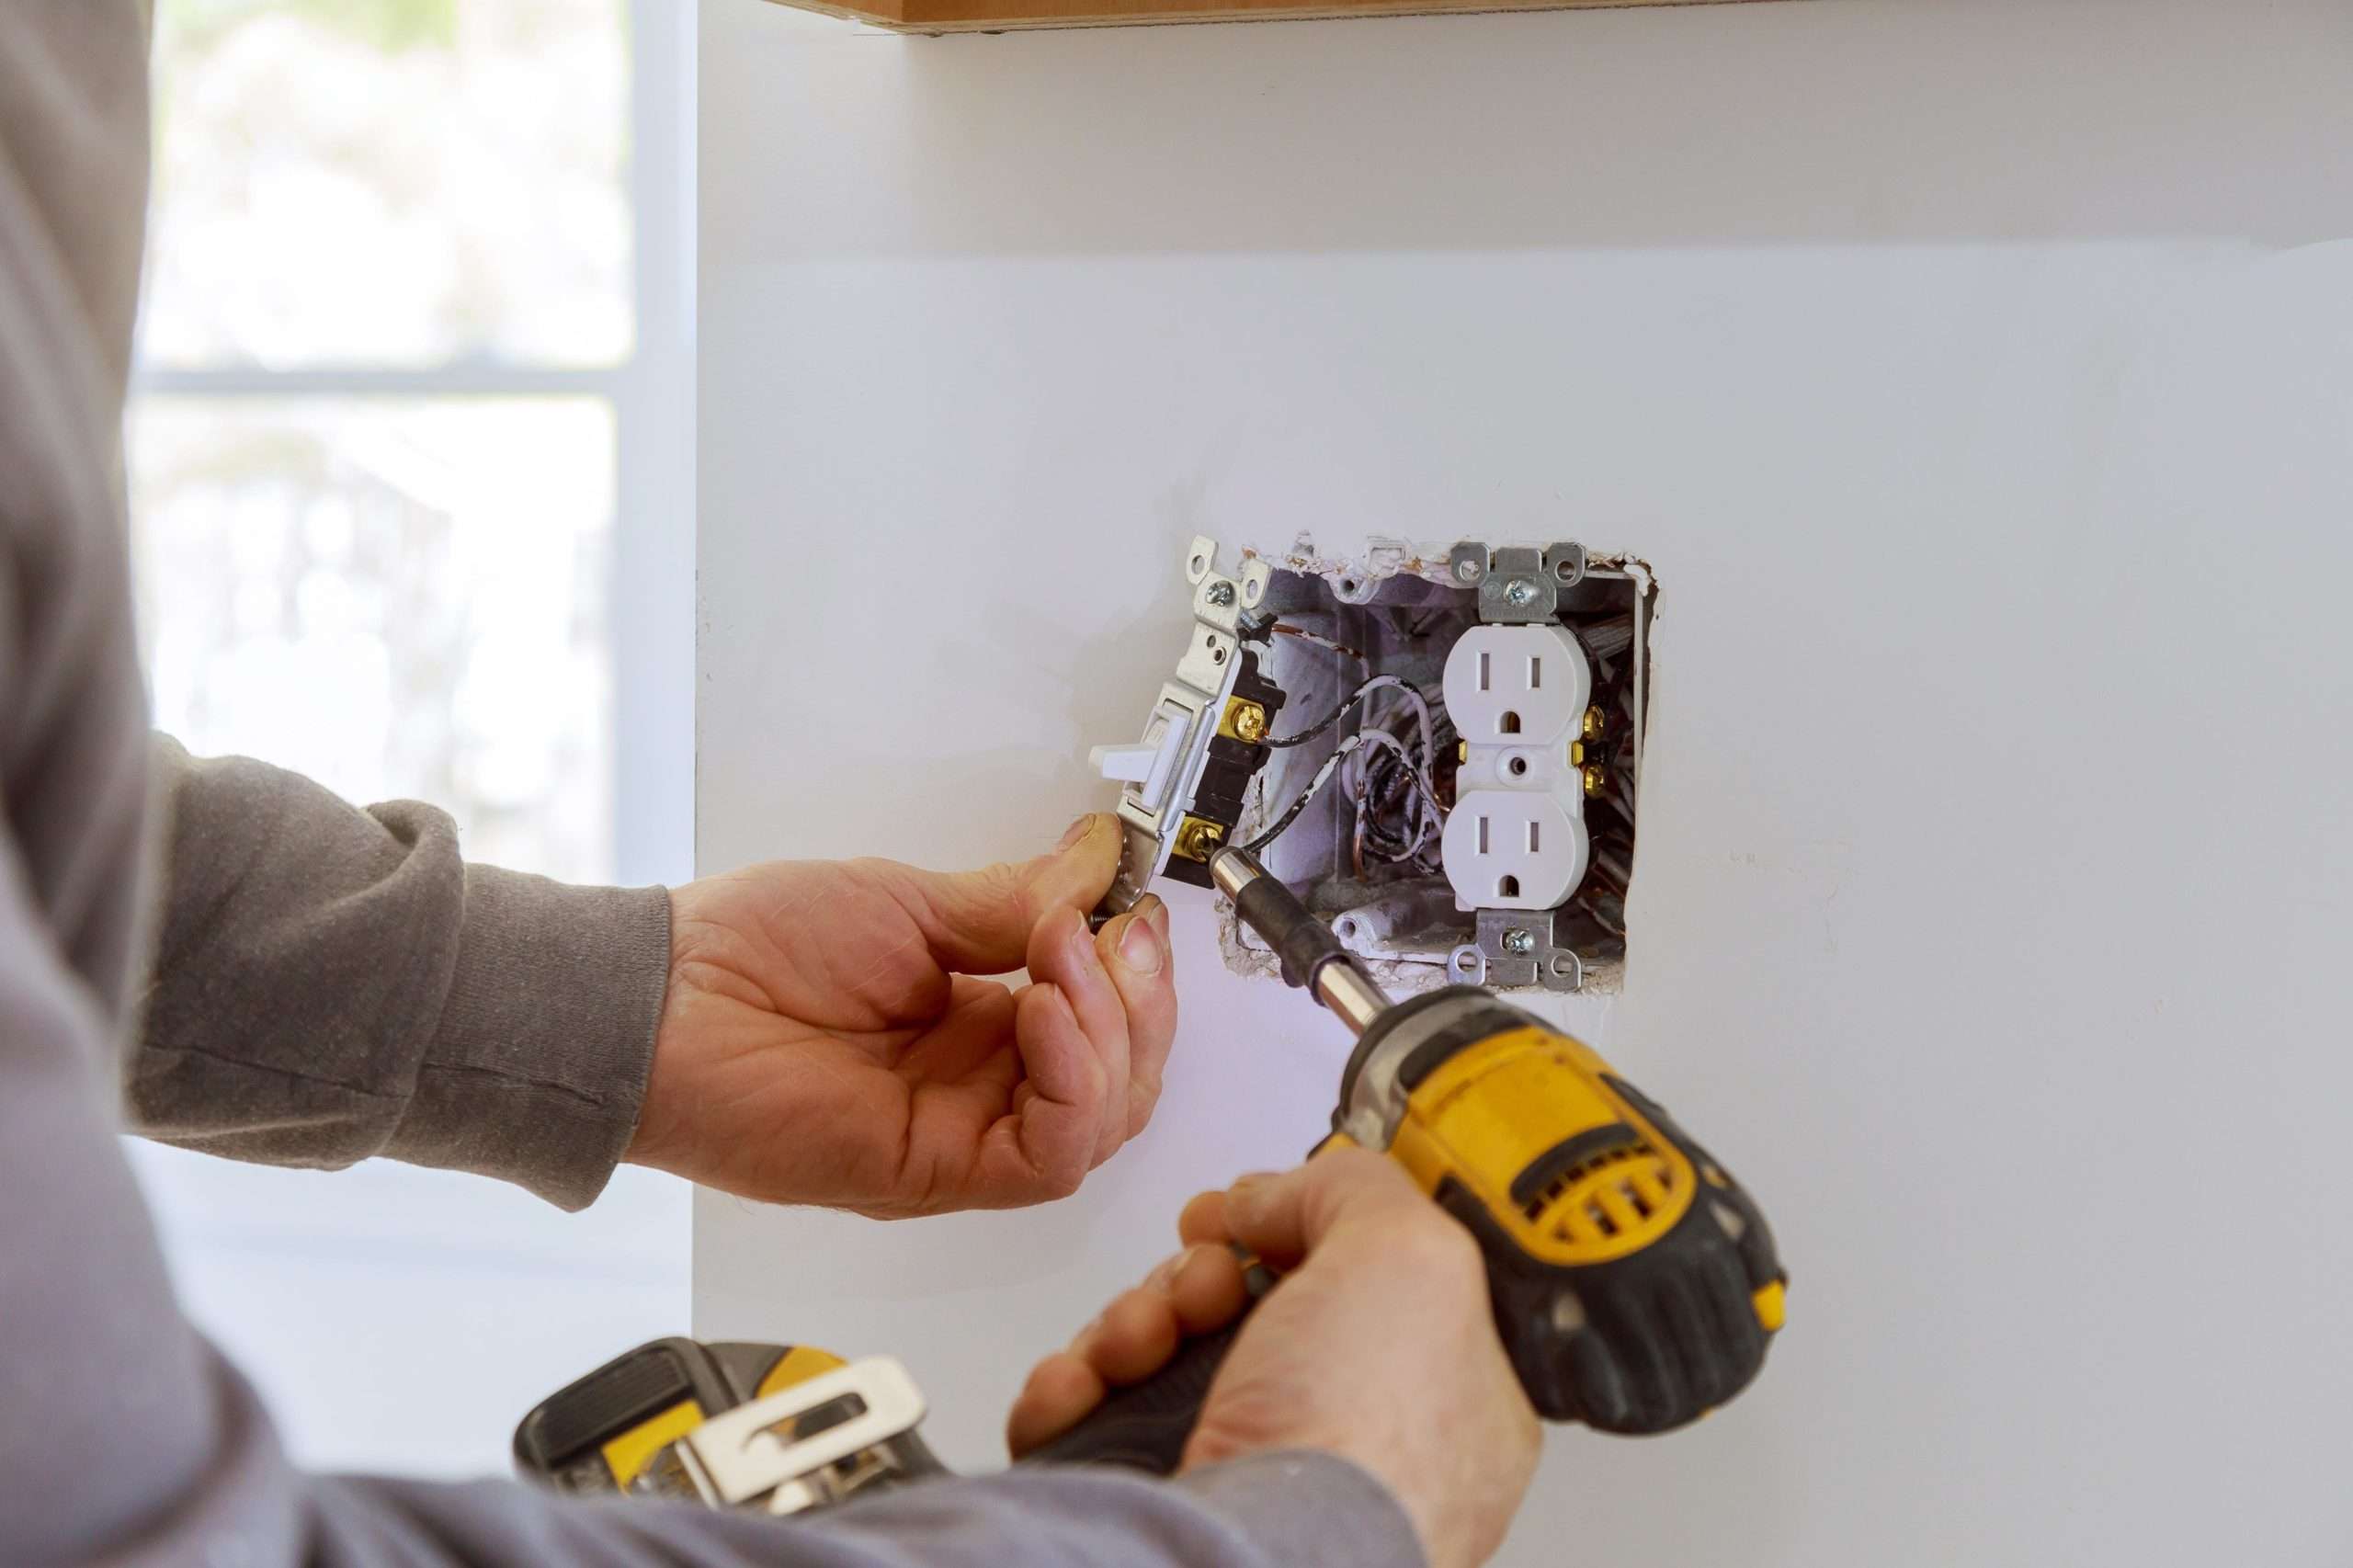
Step 6: Reconnect the Wires
With the new electrical box installed, it’s time to reconnect the wires that you previously disconnected. Reconnecting the wires properly ensures that the electrical connections are secure and safe. Follow these steps to reconnect the wires:
- Take each wire that you previously disconnected and strip about half an inch of insulation from the ends using a wire stripper. This will expose the bare copper wire.
- Match each wire to its corresponding color or connection point in the new electrical box. Typically, black wires (hot) connect to brass screws, white wires (neutral) connect to silver screws, and bare copper or green wires (ground) connect to green screws or grounding points.
- Using a screwdriver, tighten the terminal screws on the new electrical box, securing the wires in place. Make sure each connection is tight and secure, with no loose wires.
- For a safer and neater installation, use wire connectors to join any exposed twisted wires. This will protect the connections and ensure they do not come apart over time.
- Once all the wires are securely connected, carefully tuck them into the new electrical box, ensuring they are not pinched or strained by the cover plate or other components.
Reconnecting the wires properly is crucial for the proper functioning and safety of the electrical system. Taking the time to ensure secure connections will minimize the risk of electrical hazards and ensure the longevity of your electrical installation.
Read more: Where To Get Cheap Boxes For Moving
Step 7: Replace the Cover Plate
With the wires securely connected, it’s time to replace the cover plate on the new electrical box. The cover plate provides a finished and aesthetic look to the electrical installation while also protecting the internal components. Follow these steps to replace the cover plate:
- Align the cover plate with the screw holes on the new electrical box.
- Insert the screws through the cover plate and into the screw holes of the electrical box.
- Using a screwdriver, tighten the screws until the cover plate is securely fastened to the box. Be careful not to overtighten the screws, as this could damage the cover plate or the electrical box.
Ensure that the cover plate sits flush against the wall and no gaps or misalignment are present. The cover plate should be securely attached and provide a clean, seamless look to the electrical installation.
Note: If you are installing a new switch or outlet in the electrical box, follow the specific instructions provided by the manufacturer for attaching the cover plate as it may differ based on the type of device.
Step 8: Test the Connection
After completing the installation of the new electrical box and replacing the cover plate, it’s crucial to test the connection to ensure that everything is functioning correctly. Testing the connection will help identify any potential issues or wiring mistakes before restoring power to the circuit. Follow these steps to test the connection:
- Double-check that all the wires are securely connected and none are loose or exposed.
- Turn on the power to the circuit at the breaker panel.
- Test the switches, outlets, or other electrical components connected to the new electrical box to ensure they are functioning properly.
- If any switches or outlets do not work or show signs of malfunction, turn off the power at the breaker panel and inspect the connections inside the electrical box. Verify that the wiring is correctly connected and troubleshoot any issues accordingly.
Testing the connection is essential to verify the integrity of the electrical installation and ensure that all devices are properly powered. If any issues arise during the testing process, it’s important to address them promptly to avoid any safety hazards or electrical malfunctions.
Remember, if you’re unsure about any aspect of the electrical work or encounter any problems during the process, it’s always best to consult a licensed electrician for professional assistance.
Conclusion
Moving an electrical box may seem like a daunting task, but with the right knowledge and precautions, it can be done safely and efficiently. By following the steps outlined in this guide, you can successfully relocate an electrical box to accommodate your home renovation or remodeling project.
Throughout the process, it’s crucial to prioritize safety. Always remember to turn off the power, wear protective gear, and use insulated tools. Taking the time to properly disconnect and reconnect the wires, install the new electrical box, and test the connection will ensure that your electrical system functions properly and meets the necessary safety standards.
If you feel uncomfortable or unsure about any part of the process, it’s always recommended to seek the help of a licensed electrician. They have the expertise and experience to handle complex electrical tasks and ensure your project is completed safely and up to code.
By understanding and following these guidelines, you can confidently move an electrical box and make the necessary adjustments to your electrical system. Remember, electrical work can be hazardous, so never hesitate to seek professional assistance when needed. With proper care and attention to detail, your electrical system will be in excellent shape, ready to support your home’s electrical needs for years to come.
Frequently Asked Questions about How To Move Electrical Box
Was this page helpful?
At Storables.com, we guarantee accurate and reliable information. Our content, validated by Expert Board Contributors, is crafted following stringent Editorial Policies. We're committed to providing you with well-researched, expert-backed insights for all your informational needs.


0 thoughts on “How To Move Electrical Box”