Home>Interior Design>How To Plaster A Ceiling: An Expert Guide
Interior Design
How To Plaster A Ceiling: An Expert Guide
Modified: November 1, 2024
Learn how to plaster a ceiling with our expert guide. Achieve a flawless finish and transform your interior design.
(Many of the links in this article redirect to a specific reviewed product. Your purchase of these products through affiliate links helps to generate commission for Storables.com, at no extra cost. Learn more)
Introduction
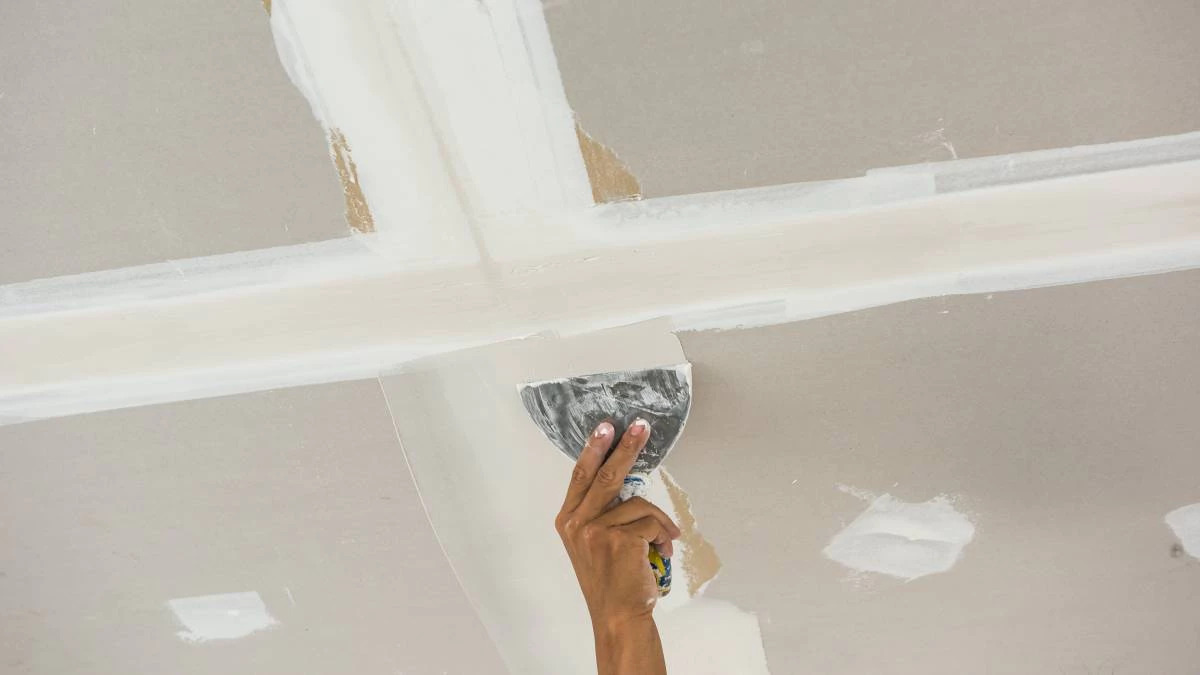
Welcome to our comprehensive guide on how to plaster a ceiling! Plastering a ceiling can completely transform the look and feel of a room, giving it a smooth and polished finish. Whether you are renovating your home or tackling a DIY project, knowing how to properly plaster a ceiling is an essential skill for any homeowner or interior design enthusiast.
Plastering a ceiling involves applying layers of plaster to create a smooth and even surface. It requires careful preparation, the right materials, and a systematic approach to ensure a flawless result. In this guide, we will take you through each step of the process and provide expert tips to help you achieve professional-quality results.
Before we dive into the nitty-gritty details, it’s important to note that plastering a ceiling can be a physically demanding task. It requires attention to detail, patience, and some basic knowledge of interior design. If you feel unsure or uncomfortable with any aspect of the process, it’s always best to consult a professional. That being said, with the right guidance and a can-do attitude, you can successfully plaster your ceiling and enjoy the satisfaction of a job well done.
Throughout this guide, we will walk you through each step, from assessing the condition of your ceiling to applying the final coat. We will also provide tips and tricks along the way to ensure a smooth and flawless finish. So, grab your tools, roll up your sleeves, and let’s get started on transforming your ceiling!
Key Takeaways:
- Transform your space with a smooth and polished ceiling by following expert tips on plastering. Master the art of plastering and achieve professional-quality results for a stunning interior design upgrade.
- From assessing the condition to sanding and priming, this comprehensive guide equips you with the knowledge and skills to successfully plaster your ceiling. Enjoy the satisfaction of a job well done and elevate your interior design game!
Read more: How To Repair A Plaster Ceiling
Step 1: Assessing the Ceiling Condition
Before you begin plastering your ceiling, it’s important to assess its condition to determine if any repairs or preparations are needed. Here are some key factors to consider during the assessment:
- Cracks and Damage: Inspect the ceiling for any cracks, holes, or water damage. This may require patching and repairing before applying the plaster. Use a scraper or putty knife to remove any loose or damaged material.
- Smoothness: Check the surface of the ceiling for any bumps or unevenness. If the ceiling has a textured finish, you might need to remove it or skim coat it to create a smooth surface for the plaster.
- Stability: Ensure that the ceiling is structurally sound and does not have any underlying issues. Any structural problems should be addressed before proceeding with plastering.
- Cleanliness: Make sure the ceiling is clean and free of dust, grease, or any other contaminants. Use a broom or vacuum cleaner to remove loose debris.
Once you have thoroughly assessed the condition of your ceiling, you can determine the necessary repairs and preparations needed before applying the plaster. If there are significant cracks or damage, it is advisable to consult a professional to ensure proper repairs are made.
Remember, a well-prepared ceiling will result in a better plastering outcome, so take the time to address any issues before moving forward with the project. By assessing and preparing the ceiling properly, you set yourself up for success and ensure a smooth and professional finish.
Step 2: Preparing the Workspace and Materials
Once you have assessed the condition of your ceiling, it’s time to prepare your workspace and gather all the necessary materials. This step is crucial to ensure a smooth and efficient plastering process. Here are some key tasks to complete during this preparation stage:
- Clear the Area: Remove any furniture, fixtures, or decorations from the room to create a clear and open space. Cover the floor and any remaining items with drop cloths or plastic sheets to protect them from plaster splatters.
- Prepare the Walls: Use painter’s tape or masking tape to cover any adjacent walls or trim to protect them from accidental plaster application.
- Gather the Materials: Get all the necessary tools and materials ready. This may include plaster mix, buckets, a trowel, a hawk, sandpaper, a sponge, a ladder, and protective gear such as goggles and gloves. Ensure that you have enough plaster mix to cover the entire ceiling area.
- Prepare the Plaster: Follow the manufacturer’s instructions to mix the plaster. Use clean water and gradually add the plaster mix while stirring continuously. Aim for a smooth and creamy consistency that is easy to spread but not too runny.
- Organize your Workspace: Set up your work area by placing the bucket of plaster mix, the hawk, and the trowel within easy reach. This will streamline the plastering process and make it easier to access the materials as needed.
By taking the time to effectively prepare your workspace and gather all the necessary materials, you minimize the chances of interruptions and ensure a more efficient plastering process. This step is vital for a successful outcome, so pay attention to detail and make sure you have everything in order before proceeding.
Step 3: Applying the Plaster Basecoat
With your workspace prepared and materials at hand, it’s time to start applying the plaster basecoat to your ceiling. This initial layer creates a solid foundation for the subsequent layers of plaster. Here’s how you can proceed:
- Moisten the Ceiling: Before applying the plaster, lightly dampen the surface of the ceiling with clean water. This helps the plaster adhere better and prevents it from drying too quickly.
- Load the Hawk: Scoop a small amount of plaster onto the hawk, holding it at an angle. Use the trowel to transfer the plaster from the hawk to the ceiling surface.
- Spread the Plaster: Using the trowel, spread the plaster onto the ceiling in smooth, even strokes. Start from one corner of the ceiling and work your way across, applying a thin layer of plaster at a time. Aim for an even thickness of approximately 6-8mm.
- Work in Sections: It’s best to work in small sections, completing one area at a time. This allows you to maintain control and ensures that the plaster doesn’t dry out before you have a chance to smooth it.
- Create a Scratch Coat: Once the basecoat is applied, use the trowel to create a series of shallow scratches on the surface. This helps the subsequent layers adhere and prevents cracking.
- Smooth the Surface: After scratching the basecoat, use the trowel to smooth the surface as best as you can. Make sure to remove any excess plaster or lumps for a more even finish.
It’s important to work efficiently but also with precision during this step. Take your time and pay attention to the thickness and evenness of the plaster as you apply the basecoat. This will help create a strong and stable foundation for the next layers of plaster.
Once you have completed the basecoat application, allow it to fully dry before moving on to the next step of the plastering process. The drying time can vary depending on the plaster mix and environmental conditions, so be patient and ensure that the basecoat is completely dry and hardened before proceeding.
Step 4: Skimming the Surface with a Finishing Coat
After the plaster basecoat has dried completely, it’s time to move on to the next step: skimming the surface with a finishing coat. This layer of plaster will provide a smooth and flawless finish to your ceiling. Here’s how you can achieve it:
- Prepare the Plaster: Mix a fresh batch of plaster, following the manufacturer’s instructions. Aim for a slightly thinner consistency compared to the basecoat to ensure easier application.
- Moisten the Ceiling: Lightly dampen the surface of the dried basecoat with water before applying the finishing coat. This helps the plaster adhere better and prevents it from drying too quickly.
- Load the Hawk and Trowel: Scoop a small amount of plaster onto the hawk, holding it at an angle. Use the trowel to transfer the plaster from the hawk to the ceiling surface.
- Apply the Finishing Coat: Using the trowel, spread the plaster onto the ceiling in smooth, even strokes. Apply a thin layer of plaster at a time, working in sections. Aim for an even thickness of approximately 2-3mm.
- Smooth and Level the Surface: After applying the plaster, use the trowel to smooth and level the surface. Glide the trowel over the fresh plaster in long, sweeping motions, removing any excess plaster and creating a uniform finish.
- Work in Small Sections: Similar to the basecoat application, it’s best to work in small sections and complete one area at a time. This ensures that the plaster remains workable and allows for better control over the smoothing process.
During this step, pay close attention to achieving a smooth and even finish. Take your time and use the trowel to carefully level the plaster as you go. Any imperfections or uneven areas can be sanded and smoothed out in the next step, so focus on creating a consistent surface for now.
Once you have skimmed the entire ceiling with the finishing coat, allow it to dry completely before moving on to the next step. The drying time can vary depending on factors such as humidity and temperature, so be patient and ensure that the plaster has hardened before proceeding.
When plastering a ceiling, make sure to apply a mist coat of diluted emulsion paint before plastering to help the plaster adhere better and prevent it from drying out too quickly.
Read more: How To Repair Plaster Ceiling Cracks
Step 5: Sanding and Smoothing the Plaster
Once the finishing coat of plaster has fully dried, it’s time to sand and smooth the surface to achieve a flawless finish for your ceiling. Sanding helps to remove any rough patches, imperfections, or high spots in the plaster. Follow these steps to effectively sand and smooth the plaster:
- Gather the Materials: Prepare the necessary materials for sanding, such as sandpaper (preferably of medium grit) and a sanding block or sanding pole.
- Prepare the Work Area: Cover the floor and any remaining furniture or items with drop cloths or plastic sheets to protect them from dust and debris generated during the sanding process.
- Sand in Circular Motions: Start sanding the plaster using circular motions with the sanding block or sanding pole. Apply even pressure and work methodically across the entire ceiling surface.
- Check for Smoothness: Periodically stop and run your hand over the sanded surface to check for smoothness. Pay special attention to any areas that may require additional sanding, such as uneven patches or high spots.
- Clean Up: Once you have achieved a smooth and even texture, carefully remove all the dust and debris created during the sanding process. Use a soft brush or vacuum cleaner to thoroughly clean the area.
- Inspect the Surface: After cleaning, inspect the sanded surface for any remaining imperfections or rough areas. Touch up these spots with additional plaster if necessary and sand again for a seamless finish.
Sanding the plaster helps to create a polished and professional look. It smooths out any unevenness and prepares the surface for further finishing touches, such as painting or wallpapering. Take your time during this step, ensuring that you achieve a smooth and uniform finish across the entire ceiling.
Remember, the dust generated during the sanding process can be harmful to your health. Make sure to wear a dust mask or respirator and work in a well-ventilated area to minimize the risk of inhaling dust particles.
Once you have finished sanding and smoothing the plaster, your ceiling is now ready for the next step in the plastering process.
Step 6: Applying a Final Coat (Optional)
After sanding and smoothing the plaster, you may choose to apply a final coat to further enhance the appearance and durability of your ceiling. This step is optional but can provide an extra layer of protection and a refined finish. Here’s how you can proceed with applying a final coat:
- Prepare the Plaster: Mix another batch of plaster, following the manufacturer’s instructions. Ensure that the consistency is similar to the previous coats for a seamless blend.
- Moisten the Surface: Lightly dampen the sanded and cleaned surface of the plaster with water before applying the final coat. This helps with better adhesion and prevents the plaster from drying too quickly.
- Load the Hawk and Trowel: Scoop a small amount of plaster onto the hawk, holding it at an angle. Use the trowel to transfer the plaster from the hawk to the ceiling surface.
- Apply the Final Coat: Using the trowel, spread a thin and even layer of plaster over the entire ceiling surface, working in small sections. Ensure that the thickness of the final coat is consistent with the previous coats.
- Smooth and Level the Surface: After applying the final coat, use the trowel to smooth and level the surface, removing any excess plaster and achieving a uniform finish.
- Allow to Dry: Allow the final coat to dry completely. The drying time may vary depending on factors such as humidity and temperature.
Applying a final coat can help refine the appearance of the plastered ceiling, providing a seamless and polished finish. It can also add an extra layer of protection against wear and tear, making the ceiling more durable over time.
Keep in mind that applying a final coat is an optional step. If you’re satisfied with the results after sanding and smoothing the plaster, you can skip this step and proceed to the next phase of the plastering process.
Once the final coat is completely dry, you are ready to move on to the next steps of sanding, priming, and finishing your newly plastered ceiling.
Step 7: Sanding and Priming the Ceiling
After applying the final coat (if you chose to do so) and allowing it to dry completely, it’s time to sand and prime the ceiling. Sanding provides a smooth and even surface, while priming prepares the plastered area for painting or other finishing touches. Here’s how you can tackle this important step:
- Gather the Materials: Collect sandpaper (medium to fine grit), a sanding block or sanding pole, and a primer suitable for plastered surfaces.
- Sand the Ceiling: Use the sandpaper and sanding block or pole to sand the entire plastered surface in gentle, circular motions. Sanding removes any remaining imperfections, smoothens the surface, and prepares it for priming.
- Clean the Ceiling: After sanding, thoroughly clean the ceiling to remove any dust or debris. Use a soft brush or vacuum to ensure a clean surface for priming.
- Apply Primer: Apply a coat of primer to the entire ceiling using a paint roller or brush. Priming helps enhance the adhesion of paint, seals the surface, and ensures a more even and professional paint finish.
- Allow the Primer to Dry: Follow the manufacturer’s instructions for drying time. Ensure the primer is fully dry before proceeding with any further decorative or finishing applications.
Sanding and priming are crucial steps to achieve a flawless and long-lasting result. Sanding smoothens the surface, making it ready for primer and paint application. The primer provides better adhesion and durability for your paint, enhancing the overall appearance of the ceiling.
Remember to protect yourself during the sanding and painting process by wearing goggles, a dust mask, and gloves. Adequate ventilation is also important to minimize exposure to dust and fumes.
Once the primer is completely dry, you are ready to move on to the final step, which involves painting or adding your preferred decorative finishes to the plastered ceiling.
Conclusion
Congratulations! You have successfully followed our expert guide on how to plaster a ceiling. By assessing the condition of your ceiling, preparing the workspace and materials, applying the plaster basecoat, skimming the surface with a finishing coat, sanding and smoothing the plaster, and finally, sanding and priming the ceiling, you have transformed your ceiling into a smooth and polished masterpiece.
Plastering a ceiling can be a challenging task, but with the right knowledge, tools, and patience, you can achieve professional-quality results. Remember to pay attention to detail, take your time, and follow the steps carefully to ensure the best outcome.
Now that your plastered ceiling is prepared, sanded, and primed, you have the option to paint it, add decorative finishes, or leave it as is, showcasing the beautiful texture of the plaster. The choice is yours, and it depends on your personal style and the overall design aesthetic of the room.
A well-plastered ceiling can greatly enhance the overall look and feel of a space. It provides a clean and visually appealing surface that adds elegance and character to any room. Whether you are renovating your home or working on a DIY project, mastering the art of plastering is a valuable skill that can bring your design vision to life.
As you continue your interior design journey, remember to maintain your new plastered ceiling by regularly cleaning and inspecting it for any signs of damage or wear. This will help preserve its beauty and longevity for years to come.
We hope this guide has been helpful in guiding you through the process of plastering a ceiling. Enjoy the satisfaction of your newly plastered ceiling and take pride in your accomplishment. Happy decorating!
Frequently Asked Questions about How To Plaster A Ceiling: An Expert Guide
Was this page helpful?
At Storables.com, we guarantee accurate and reliable information. Our content, validated by Expert Board Contributors, is crafted following stringent Editorial Policies. We're committed to providing you with well-researched, expert-backed insights for all your informational needs.


0 thoughts on “How To Plaster A Ceiling: An Expert Guide”