Articles
How To Make Plaster Wall Art
Modified: December 7, 2023
Learn how to create stunning plaster wall art with our helpful articles. Explore various techniques and get inspired to transform your space.
(Many of the links in this article redirect to a specific reviewed product. Your purchase of these products through affiliate links helps to generate commission for Storables.com, at no extra cost. Learn more)
Introduction
Plaster wall art is a fantastic way to add a touch of elegance and creativity to any space. Whether you’re looking to spruce up your living room, bedroom, or even your office, plaster wall art can transform a plain wall into a stunning focal point. Plus, creating your own plaster wall art allows you to showcase your personal style and artistic flair.
In this comprehensive guide, we will walk you through the step-by-step process of creating your own plaster wall art. From preparing the workspace to hanging and displaying your masterpiece, we will cover everything you need to know to make your project a success.
Before we dive into the exciting world of plaster wall art, let’s go over the materials you’ll need to get started.
Key Takeaways:
- Unleash your creativity and transform any space with personalized plaster wall art. Follow the step-by-step guide to create stunning, one-of-a-kind pieces that reflect your unique style and artistic vision.
- From preparing the workspace to hanging and displaying your masterpiece, this comprehensive guide equips you with the skills and knowledge to embark on a fulfilling plaster wall art journey. Enjoy the process and take pride in your handmade creations!
Read more: How To Make Metal Wall Art
Materials Needed
Before you begin your plaster wall art project, it’s important to gather all the necessary materials. Here’s a list of what you’ll need:
- Plaster of Paris: This is the main ingredient and will be used to create the base of your artwork. Make sure to choose a high-quality plaster of Paris for best results.
- Water: You’ll need water to mix with the plaster of Paris, so have a sufficient amount on hand.
- Mixing Container: Use a large mixing container or bucket to combine the plaster of Paris and water. Make sure it’s clean and free of any debris.
- Measuring Tools: Have measuring cups or a scale available to accurately measure the plaster of Paris and water ratios.
- Mold: Select a mold that suits your desired design. It can be a pre-made mold or something you create yourself. Consider using silicone molds, as they are flexible and easy to work with.
- Caulk: This will be used to seal any gaps or imperfections in your mold to ensure a smooth finish on your plaster wall art.
- Spatula or Trowel: These tools will be used to spread and texture the plaster on your mold.
- Plastic Wrap: Cover your workspace with plastic wrap to protect it from any plaster spills or mess.
- Paint and Brushes: Once your plaster wall art is dry, you’ll need paint and brushes to add color and detail to your masterpiece.
- Hanging Hardware: Depending on the size and weight of your plaster wall art, you’ll need appropriate hanging hardware such as hooks or picture wire.
Make sure to gather all these materials before you get started to ensure a smooth and uninterrupted workflow. Once you have everything ready, you’re all set to embark on your plaster wall art journey!
Step 1: Prepare the Workspace
Before you dive into creating your plaster wall art, it’s important to set up a clean and well-organized workspace. Here’s how you can do it:
- Clear the area: Start by clearing the area where you’ll be working. Remove any furniture, decorations, or items that could get in the way of your project.
- Protect the surfaces: Cover the floor and any nearby surfaces with plastic wrap or drop cloths to prevent any plaster spills or stains. This will make cleanup much easier.
- Gather your tools: Make sure you have all the required materials and tools nearby for easy access during the process. This includes the plaster of Paris, mixing container, measuring tools, mold, spatula or trowel, caulk, plastic wrap, paint, brushes, and hanging hardware.
- Set up a mixing station: Find a sturdy table or surface where you can set up your mixing station. Place the mixing container on top and ensure it’s stable and secure.
- Have a water source nearby: It’s essential to have a water source nearby to mix the plaster of Paris. This can be a sink or a bucket of water.
- Wear protective gear: Plaster can be messy, so it’s important to protect yourself. Wear old clothes, an apron, and gloves to avoid any potential mess or skin irritation.
By preparing your workspace properly, you’ll create a conducive environment for your plaster wall art project. This will help you stay organized, focused, and minimize any potential mishaps during the process.
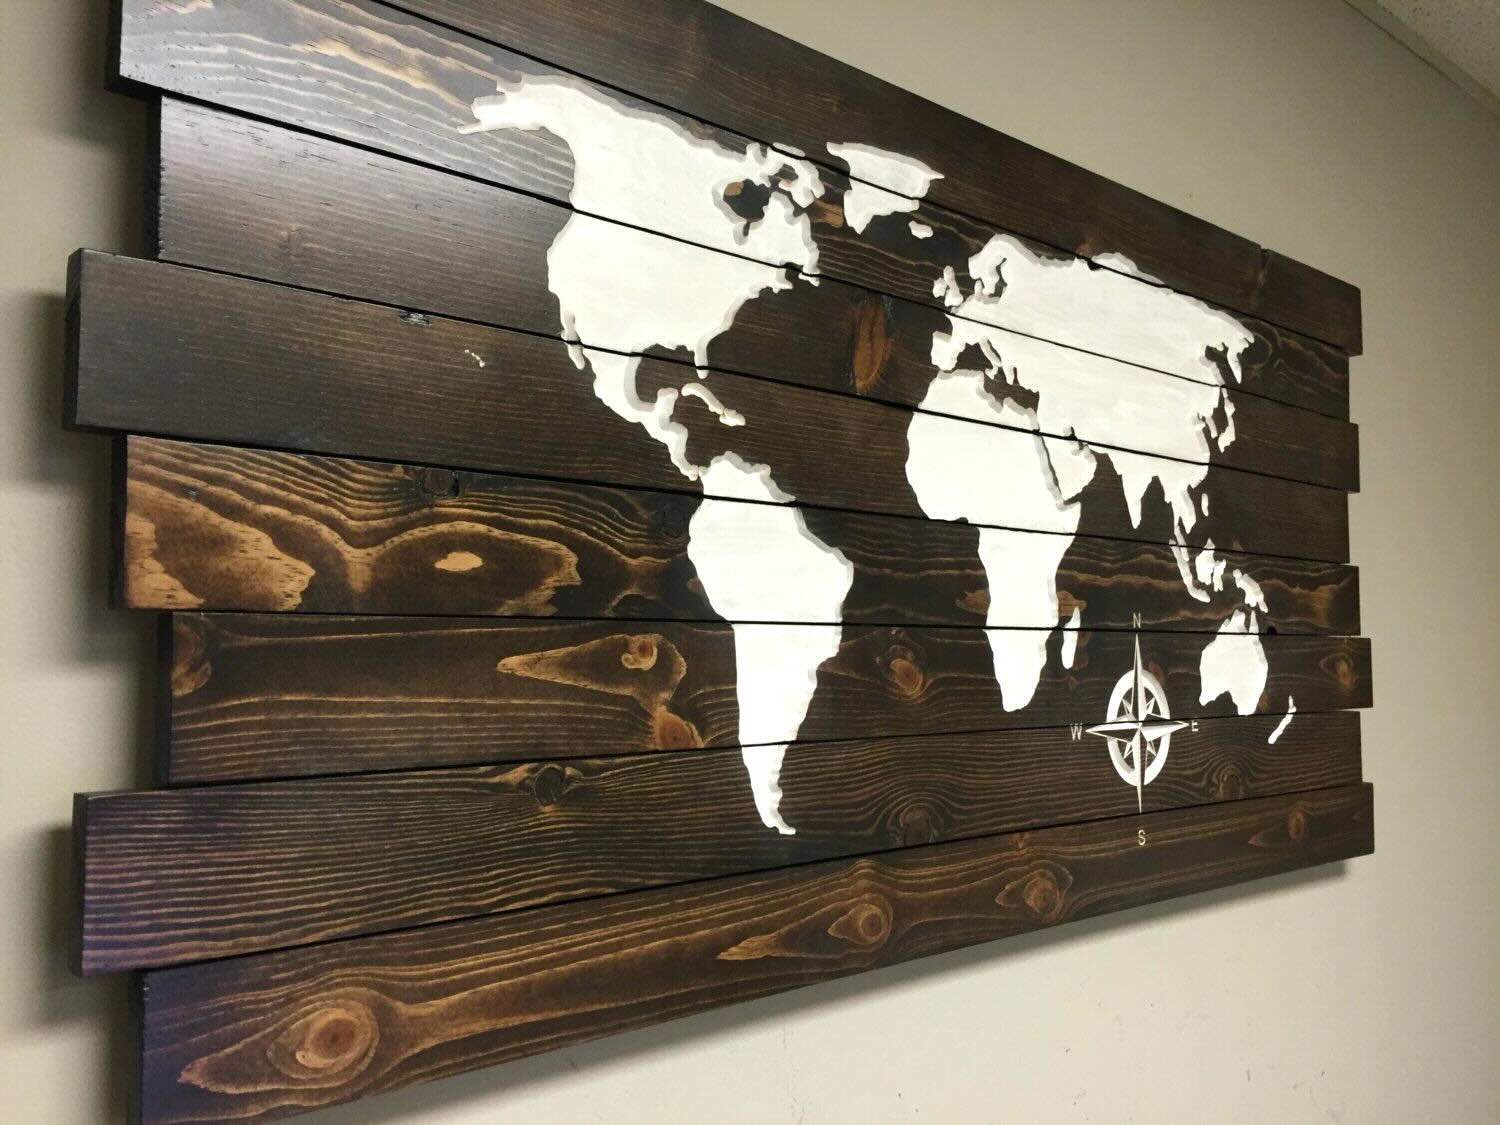
Step 2: Choose a Design
Now that your workspace is ready, it’s time to choose a design for your plaster wall art. This step allows you to unleash your creativity and showcase your personal style. Here are a few tips to help you in the design selection process:
- Consider your space: Take into account the room or area where you’ll be displaying the plaster wall art. Consider the color scheme, theme, and overall ambiance of the space. You want your wall art to complement the existing decor and create a cohesive look.
- Research and gather inspiration: Look for inspiration online, in magazines, or even nature for ideas. Browse through different styles, patterns, and shapes to spark your creativity and find a design that resonates with you.
- Sketch it out: Once you have a design in mind, sketch it out on a piece of paper. This will help you visualize how it will look on the wall and make any necessary adjustments before moving forward.
- Consider the complexity: Keep in mind your skill level and the time you’re willing to dedicate to the project. Opt for a design that suits your abilities and fits within your timeframe.
- Make it unique: Put your own twist on the design to make it unique and reflective of your artistic vision. Consider adding personal touches or custom elements to make it truly one-of-a-kind.
Choosing the right design is crucial as it sets the tone for your plaster wall art. Take your time in this step and allow yourself to be inspired. Remember, this is your chance to create something beautiful and meaningful, so let your imagination run wild!
Step 3: Create the Base
With your design chosen, it’s time to create the base for your plaster wall art. The base serves as the foundation for your artwork and provides the shape and structure. Follow these steps to create the base:
- Prepare the mold: Ensure that your mold is clean and free of any debris. If using a pre-made mold, skip to the next step. If creating your own mold, use materials like clay, silicone, or cardboard to shape it according to your design.
- Seal any gaps: Inspect the mold for any gaps or imperfections that could result in an uneven surface on your plaster wall art. Use caulk to seal these gaps and create a smooth finish.
- Mix the plaster of Paris: Refer to the instructions on the plaster of Paris packaging for the correct mixing ratio. Typically, it’s a 2:1 ratio of plaster to water. In your mixing container, gradually add the plaster of Paris to the water while stirring continuously. Mix until you achieve a smooth, lump-free consistency.
- Pour the plaster into the mold: Carefully pour the mixed plaster of Paris into the prepared mold. Be sure to fill it completely, ensuring all the intricate details of your design are covered.
- Remove air bubbles: Tap the mold gently on a hard surface to help release any trapped air bubbles. This will prevent air pockets in the plaster and ensure a smooth finish.
- Let it set: Allow the plaster to set and cure according to the instructions provided on the packaging. This typically takes a few hours, but it may vary depending on the brand and thickness of the plaster.
Creating a solid base is essential for a sturdy and well-formed plaster wall art piece. Take your time in this step to ensure that the plaster sets properly before moving on to the next phase.
Read more: How To Make Textured Wall Art
Step 4: Prepare the Plaster
With the base of your plaster wall art complete, it’s time to prepare the plaster mixture that will be applied to create texture and details. Follow these steps to prepare the plaster:
- Measure the plaster of Paris: Using your measuring tools, measure the desired amount of plaster of Paris needed for the project. Make sure to follow the instructions on the packaging for the correct mixing ratio.
- Fill the mixing container with water: Add water to the mixing container, ensuring you use the appropriate amount specified in the instructions. As a general rule, it’s better to add a little less water initially and gradually add more if needed.
- Add the plaster of Paris: Slowly pour the measured plaster of Paris into the water while stirring continuously. The mixture should have a consistency similar to pancake batter. Continue stirring until all the plaster is fully incorporated and the mixture is smooth.
- Allow the mixture to rest: Let the plaster mixture rest for a few minutes. This allows the plaster particles to hydrate properly and results in a smoother texture.
- Stir again: Give the plaster mixture a final stir before applying it to your plaster wall art. This ensures that the texture is consistent and any lumps are eliminated.
Properly preparing the plaster mixture is crucial for achieving the desired texture and finish on your plaster wall art. Be mindful of the mixing ratios and take your time to ensure a smooth and workable consistency.
When making plaster wall art, be sure to mix the plaster with water slowly to avoid lumps. Work quickly once mixed, as plaster sets fast. Smooth the surface with a wet sponge for a professional finish.
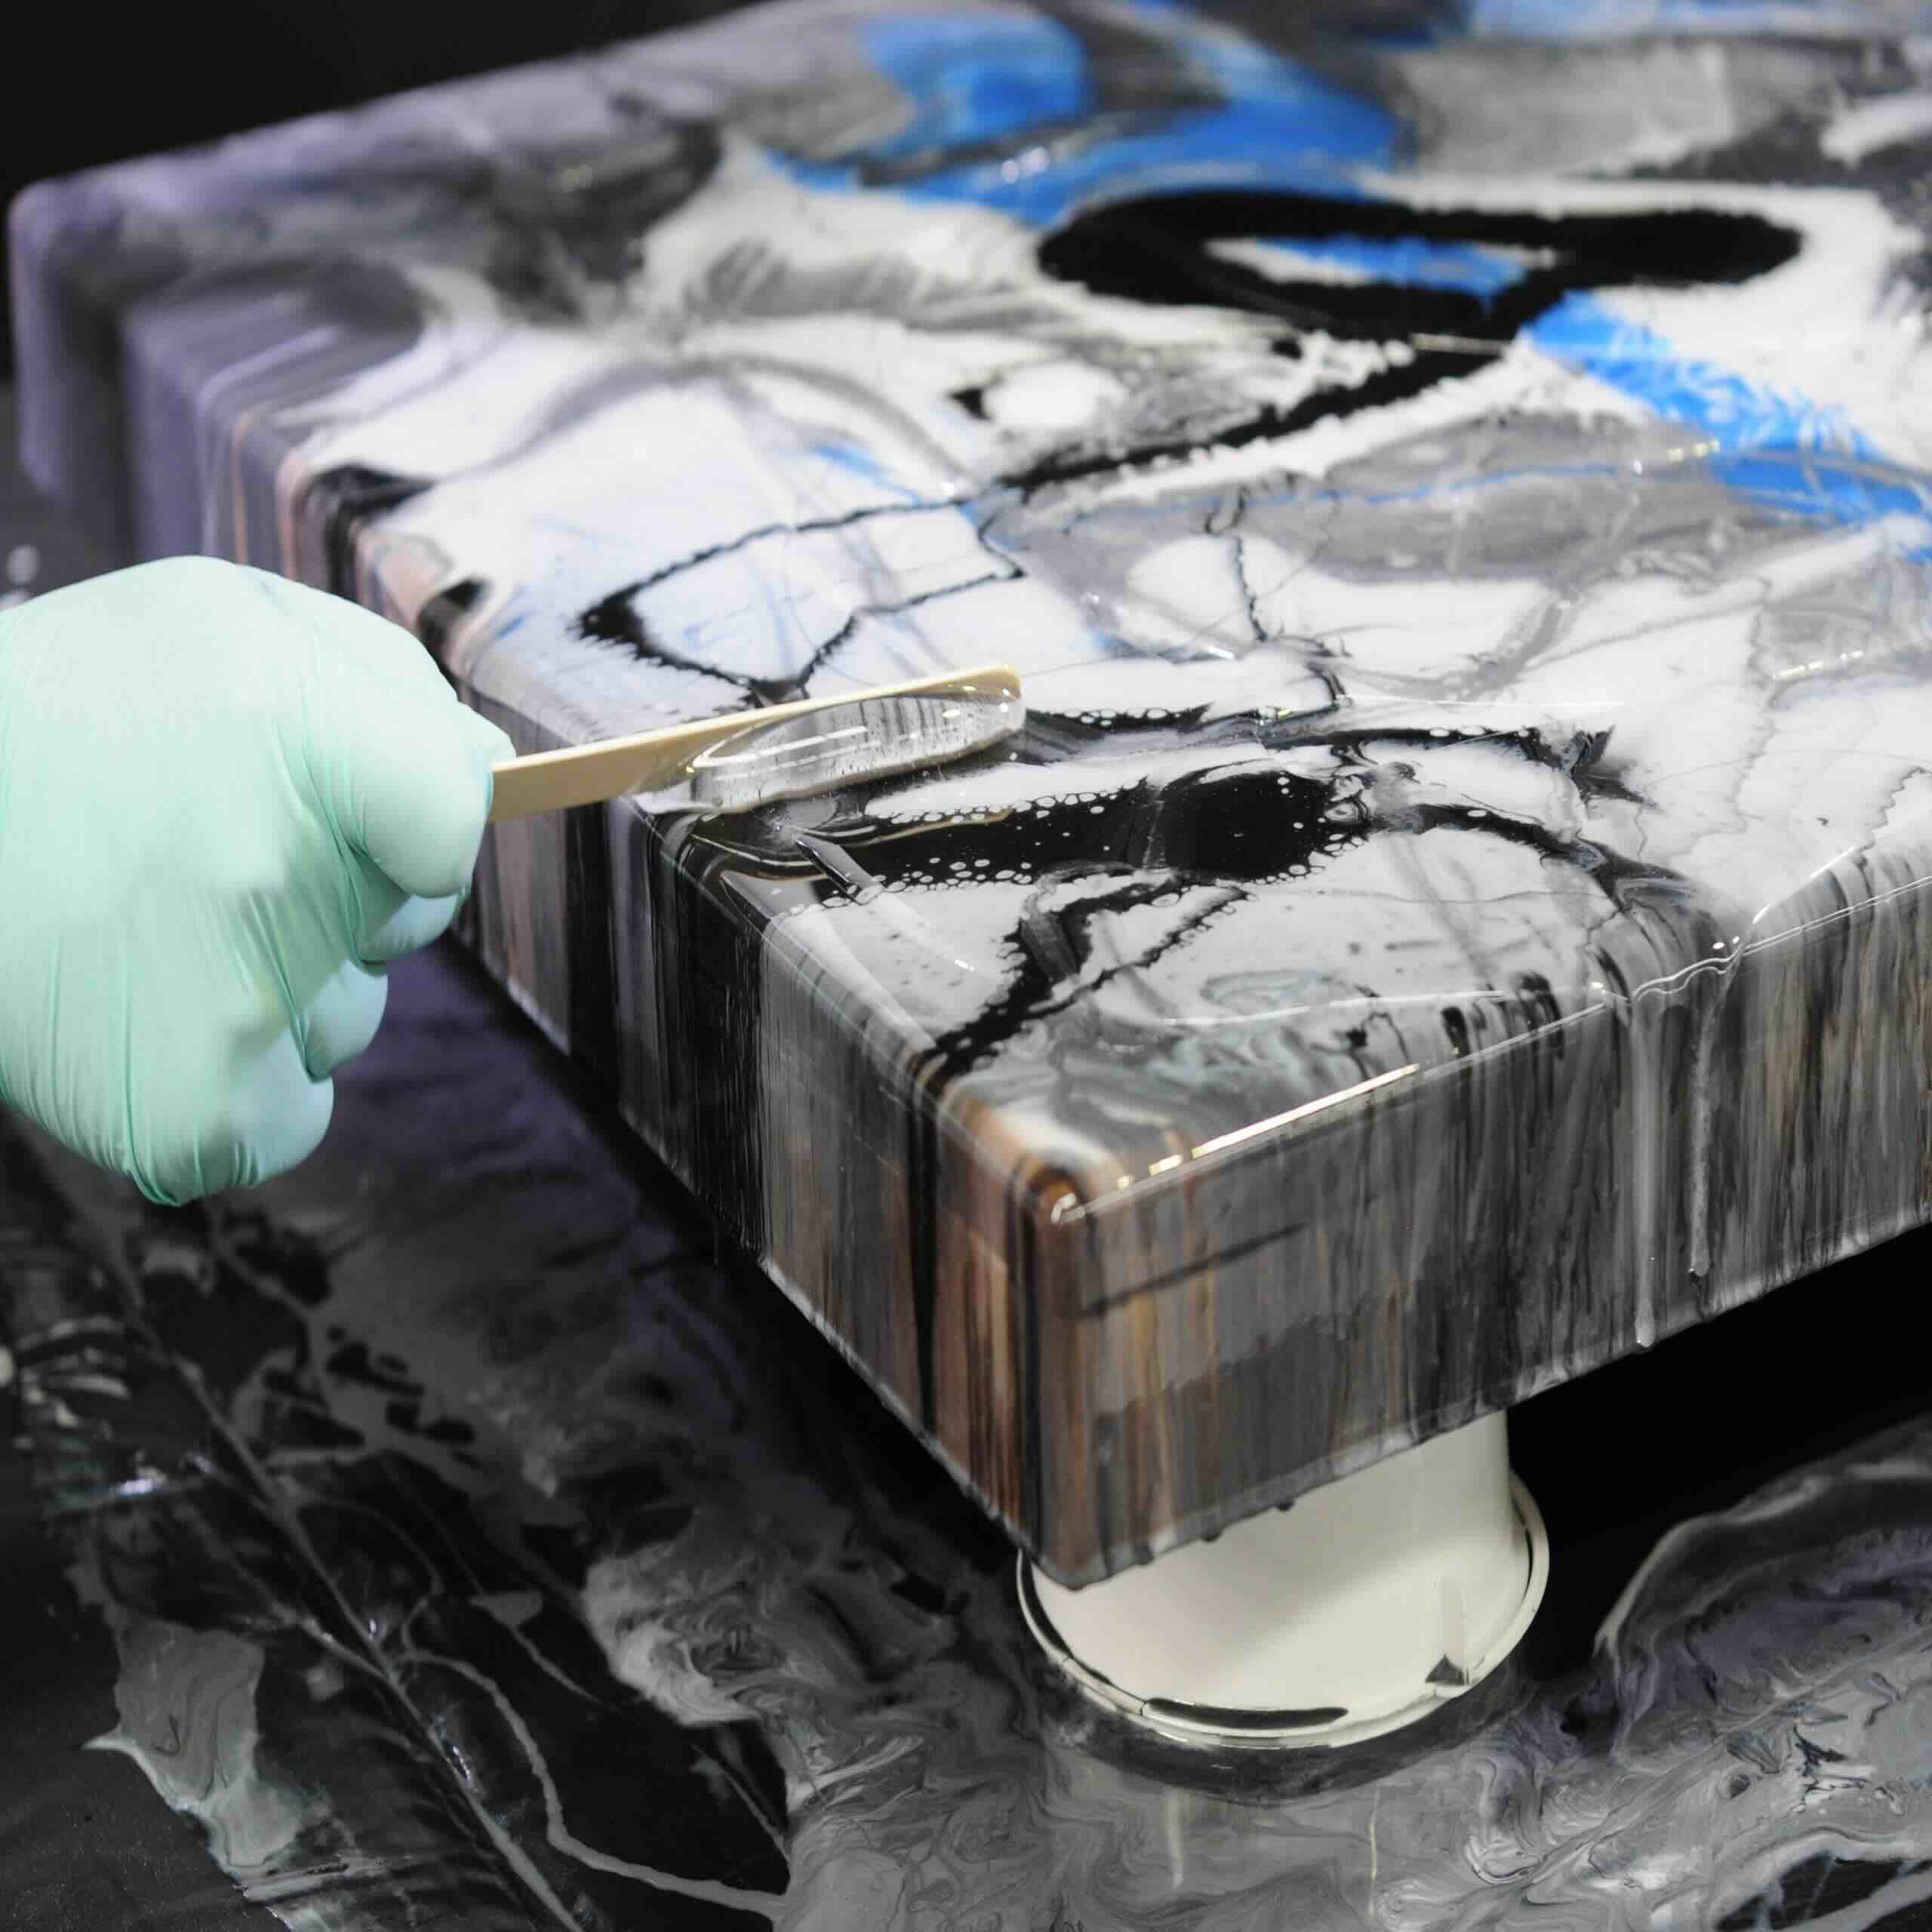
Step 5: Apply the Plaster
Now that you have the prepared plaster mixture, it’s time to apply it to your plaster wall art base. This step allows you to add texture and bring your design to life. Follow these steps to apply the plaster:
- Prepare your work area: Place your plaster wall art base on a flat and stable surface. Ensure that you have easy access to the entire surface of the base.
- Start with a thin layer: Using a spatula or trowel, start by applying a thin layer of plaster onto the base. Spread it evenly, covering the entire surface. This will serve as the foundation for building up the texture.
- Add depth and texture: Once the thin layer is applied, you can begin adding depth and texture to your plaster wall art. Use the spatula or trowel to create patterns, swirls, or any desired texture. Experiment with different techniques to achieve the desired look.
- Work in small sections: To prevent the plaster from drying too quickly, work in small sections at a time. This allows you to focus on creating the desired texture without rushing.
- Smooth out any imperfections: As you work, smooth out any rough spots or imperfections in the plaster. Use the spatula or a damp cloth to gently blend and refine the texture.
- Pay attention to details: If your design includes intricate details, use a smaller tool or brush to carefully apply plaster to those areas. Take your time and be precise to ensure the details are well-defined.
- Step back and assess: Periodically step back and assess your progress. Make any necessary adjustments or additions to ensure the overall balance and cohesion of the plaster wall art.
Applying the plaster requires patience and creativity. Take your time, experiment with different techniques, and have fun with the process. This step allows you to add your personal touch to the artwork and make it truly unique.
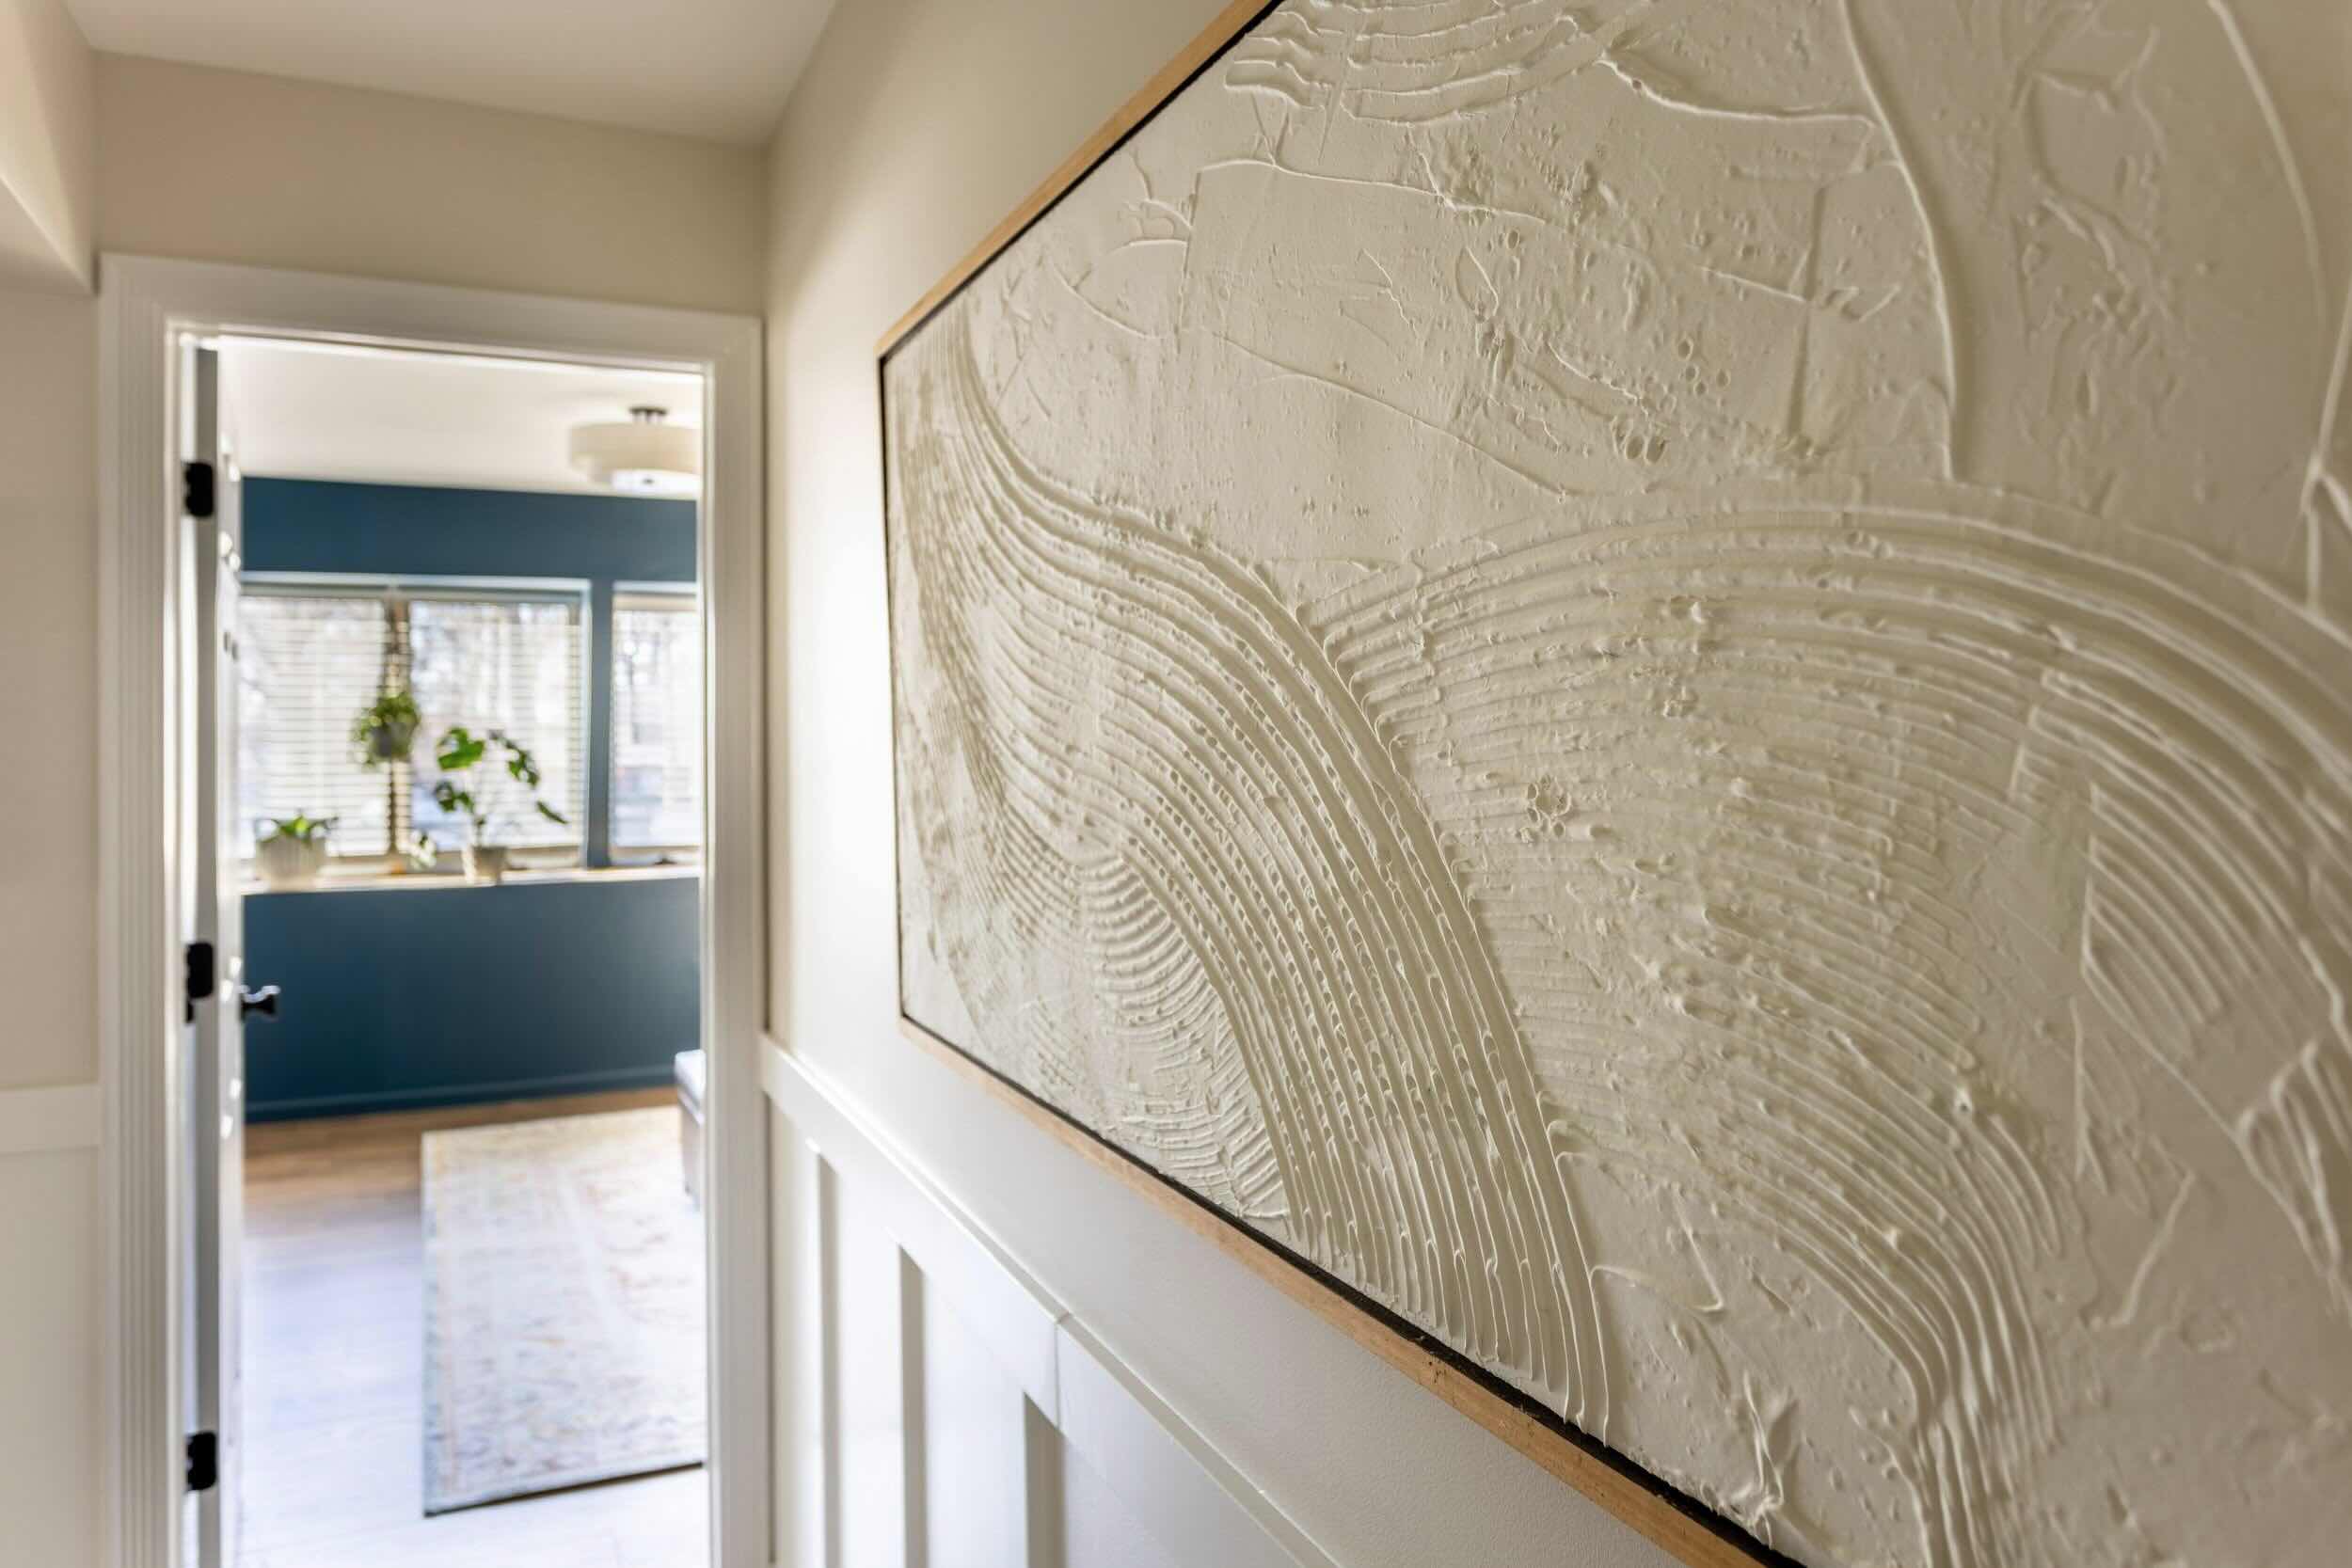
Step 6: Add Texture and Details
Now that you have applied the base layer of plaster to your wall art, it’s time to add texture and details to bring your piece to life. This step allows you to enhance the visual appeal and depth of your artwork. Follow these steps to add texture and details:
- Choose your tools: Select various tools and objects that can be used to create texture and add details to the plaster. This can include brushes, sponges, combs, or even everyday objects like toothpicks or forks.
- Experiment with techniques: Explore different techniques to create texture and depth. You can stipple the surface using a brush, create patterns using a comb, or make indentations using a toothpick or other pointed object. Don’t be afraid to experiment and try different techniques to achieve the desired effect.
- Pay attention to the design: Refer to your chosen design and consider ways to enhance it through texture and details. For example, if your design includes flower petals, create realistic textures by gently pressing petals onto the plaster or using a brush to mimic the texture.
- Work in layers: Build up the texture and details in layers, allowing each layer to dry before adding the next. This will give your artwork depth and dimension.
- Blend and refine: Use a brush or damp cloth to blend and refine the texture, ensuring a seamless transition between different elements of the design. Smooth out any rough edges or uneven surfaces for a polished look.
- Step back and assess: Take breaks and step back periodically to assess your progress. Evaluate the overall texture and details, making any necessary adjustments to achieve the desired outcome.
Adding texture and details is where your artistic skills really shine. Embrace the creative process and let your imagination guide you. The textures and details you add will give your plaster wall art a unique and captivating aesthetic.
Step 7: Let it Dry
After putting in all the hard work of applying texture and details to your plaster wall art, it’s crucial to allow sufficient time for it to dry. This step is vital to ensure a sturdy and durable finish. Here’s what you should do:
- Find a dry and well-ventilated area: Choose a location where there is good airflow and low humidity. This will help speed up the drying process and prevent any moisture-related issues.
- Avoid touching or disturbing the artwork: While it may be tempting to check on the drying progress, it’s important to resist the urge to touch or disturb the plaster. Doing so can result in smudges or damage to the surface.
- Follow the recommended drying time: Refer to the instructions on the plaster of Paris packaging for the recommended drying time. Typically, it can take anywhere from 24 to 48 hours for the plaster to fully dry and harden.
- Observe color changes: As the plaster dries, it may undergo color changes. It may appear darker when wet and lighten as it dries. This is normal and should not cause concern.
- Avoid moisture exposure: Keep the drying plaster away from any water sources or humid environments. Moisture can compromise the integrity of the plaster and result in cracking or warping.
- Patience is key: Be patient during the drying process. Rushing it can lead to disappointing results. Allow sufficient time for the plaster to dry completely before moving on to the next step.
Properly drying the plaster is crucial for a successful outcome. Give your plaster wall art the time it needs to fully set and cure before proceeding to the next step. This will ensure a strong and long-lasting piece of artwork.
Read more: How To Make Glass Wall Art
Step 8: Paint and Finish
Now that your plaster wall art is fully dry, it’s time to add color and bring it to life with paint and finishing touches. This step allows you to personalize your artwork and make it truly unique. Follow these steps to paint and finish your plaster wall art:
- Prepare your paint and brushes: Gather the paint colors you’ll be using and prepare your brushes or sponges. Acrylic paint is a popular choice for painting plaster as it adheres well and offers vibrant colors.
- Prime the surface (optional): If desired, you can apply a layer of primer before painting. This will create an even base and ensure better paint adhesion. Allow the primer to dry according to the instructions.
- Select your color scheme: Choose a color scheme that complements your design and fits the overall aesthetic you’re trying to achieve. Consider using multiple shades and blending techniques to create depth and dimension.
- Apply the paint: Using a brush or sponge, begin applying the paint to your plaster wall art. Start with broad strokes to cover larger areas, then add finer details as you go. Be mindful of your design and take your time to ensure precision.
- Consider layering and blending: To create depth and visual interest, consider layering different shades of paint. This can be done by applying a base color, allowing it to dry, and then adding highlights or shadows on top.
- Add finishing details: Once the main colors are applied, you can add finishing details to enhance your plaster wall art. This can include adding metallic accents, fine lines, or intricate patterns. Use a fine brush or a toothpick for these delicate details.
- Allow the paint to dry: Give the paint ample time to dry completely. This will vary depending on the type and brand of paint used. Follow the instructions on the paint packaging for the recommended drying time.
- Protect with a sealant (optional): If desired, you can apply a sealant or varnish to protect the finish and enhance the longevity of your plaster wall art. Choose a sealant suitable for the type of paint used and follow the instructions for application.
Painting and finishing your plaster wall art is an exciting step that allows you to add your personal touch. Take your time and let your creativity guide you. Enjoy the process of bringing your artwork to life with beautiful colors and intricate details.
Step 9: Hang and Display
Congratulations! You have successfully completed your plaster wall art masterpiece. Now it’s time to hang it up and proudly display it in your desired space. Follow these steps to hang and display your plaster wall art:
- Choose the perfect location: Select a wall or area where you want to showcase your plaster wall art. Consider factors such as the room’s lighting, existing decor, and the size and placement of other artworks or furniture.
- Measure and mark the hanging position: Using a tape measure, determine the desired height and position for your wall art. Mark this spot on the wall using a pencil or painter’s tape.
- Install hanging hardware: Based on the weight and size of your plaster wall art, choose appropriate hanging hardware such as hooks, anchors, or picture wire. Follow the instructions provided with the hardware to ensure proper installation.
- Hang your artwork: With the hanging hardware in place, carefully hang your plaster wall art on the designated spot. Use a level to ensure it is straight and aligned with other elements in the room.
- Secure the artwork: Once the plaster wall art is hung, make sure it is securely attached to the wall. Give it a gentle tug or shake to ensure it stays in place.
- Step back and admire: Take a step back and admire your completed plaster wall art. Marvel at the beauty and craftsmanship you have achieved.
- Make adjustments if needed: If you notice any imperfections or elements that need tweaking, make the necessary adjustments. This could include touching up paint, straightening the artwork, or adding additional embellishments.
Displaying your plaster wall art provides an opportunity to showcase your creativity and add a unique focal point to your space. Whether it’s in your living room, bedroom, or office, your artwork will undoubtedly become a conversation starter and a source of inspiration.
Now, sit back, relax, and enjoy the beauty of your handmade plaster wall art. Take pride in the time and effort you put into creating a truly one-of-a-kind piece that adds personality and charm to your home. Well done!
Conclusion
Congratulations on completing your plaster wall art project! You have embarked on a creative journey, transforming a plain wall into a stunning display of your artistic expression. By following the step-by-step process outlined in this guide, you have learned how to prepare the workspace, choose a design, create the base, apply the plaster, add texture and details, let it dry, paint and finish, and finally, hang and display your masterpiece.
Throughout this journey, you have unleashed your creativity, honed your skills, and transformed ordinary materials into a work of art. Your plaster wall art is not only a visual delight but also a reflection of your unique style and taste. Its presence on your wall will undoubtedly bring joy, inspiration, and admiration from others.
Remember, the key to creating captivating plaster wall art lies in attention to detail, patience, and allowing your imagination to run wild. Experiment with different techniques, colors, and textures to create a piece that truly speaks to you. Don’t be afraid to make mistakes and learn from them, as each project is an opportunity for growth as an artist.
Now, it’s time to take a moment to appreciate your accomplishment. Stand back and admire the beauty you have created. Share your artwork with friends and loved ones, and bask in the compliments and conversations it will spark. Your plaster wall art has the power to transform any space into a gallery of creativity and inspiration.
Thank you for joining us on this journey of making plaster wall art. We hope this guide has provided you with valuable insights and guidance to create stunning pieces that bring beauty and joy to your surroundings. Happy crafting!
Frequently Asked Questions about How To Make Plaster Wall Art
Was this page helpful?
At Storables.com, we guarantee accurate and reliable information. Our content, validated by Expert Board Contributors, is crafted following stringent Editorial Policies. We're committed to providing you with well-researched, expert-backed insights for all your informational needs.


0 thoughts on “How To Make Plaster Wall Art”