Home>Interior Design>How To Remove A Wallpaper Border
Interior Design
How To Remove A Wallpaper Border
Modified: December 7, 2023
Learn the best techniques for removing a wallpaper border and transform your interior design with ease. Discover expert tips and tricks for a flawless result.
(Many of the links in this article redirect to a specific reviewed product. Your purchase of these products through affiliate links helps to generate commission for Storables.com, at no extra cost. Learn more)
Introduction
Welcome to our comprehensive guide on how to remove a wallpaper border. Whether you want to freshen up your space or update your interior design, removing a wallpaper border can be a necessary step. Wallpaper borders can add a unique touch to a room, but over time, they can become outdated or damaged. By following the steps outlined in this article, you’ll be able to successfully remove a wallpaper border without causing damage to your walls.
Removing a wallpaper border may seem like a daunting task, but armed with the right tools and techniques, it can be a straightforward process. In this guide, we’ll walk you through each step, from gathering the necessary tools to completing the final touches. By the end, you’ll have the knowledge and confidence to tackle this home improvement project like a pro.
Before we dive into the steps, it’s important to note that the specific methods for removing a wallpaper border may vary depending on the type of material used and the condition of your walls. It’s always a good idea to test a small area first to ensure that your chosen method won’t damage your walls or leave behind any residue.
So, let’s get started with the first step: gathering the necessary tools.
Key Takeaways:
- Say goodbye to outdated wallpaper borders by following our comprehensive guide. Gather the right tools, protect your space, and transform your walls with confidence.
- Removing a wallpaper border is a manageable task with the right techniques. Test the adhesive, soak, scrape, and clean for a fresh canvas to unleash your design creativity.
Read more: How To Remove Wallpaper With Steamer
Gathering the necessary tools
Before you begin the process of removing a wallpaper border, it’s essential to gather the necessary tools. Having the right tools on hand will make the task much easier and ensure that you can complete the job effectively. Here are the tools you’ll need:
- Wallpaper scoring tool: This tool is used to create small perforations in the wallpaper surface, allowing the removal solution to penetrate and loosen the adhesive.
- Scraping tool: A scraping tool, such as a putty knife or a wallpaper scraper, is crucial for scraping off the wallpaper border. Opt for a tool with a wide, flat blade to make the process more efficient.
- Spray bottle: Fill a spray bottle with warm water or a wallpaper removal solution to moisten the wallpaper surface and effectively loosen the adhesive.
- Protective gear: To ensure your safety, wear gloves, safety goggles, and a dust mask to protect your hands, eyes, and respiratory system.
- Drop cloths or plastic sheets: To protect your floor and furniture from any water or adhesive spills, cover the area with drop cloths or plastic sheets.
- Stepladder: Depending on the height of the wallpaper border, you may need a stepladder to reach higher areas safely.
- Sponge: A sponge is useful for applying the wallpaper removal solution or water to the wallpaper surface.
Make sure to gather all the necessary tools before you begin the wallpaper border removal process. Having these items readily available will save you time and frustration when you’re in the middle of the project. If you don’t already have these tools on hand, you can find them at your local hardware store or online.
Preparing the workspace
Now that you’ve gathered all the necessary tools, it’s time to prepare your workspace before removing the wallpaper border. Proper preparation will help protect your surrounding areas from potential damage and make the removal process more efficient. Follow these steps to get your workspace ready:
- Clear the area: Remove any furniture, decorations, or obstructions near the wallpaper border. This will give you more space to work and prevent anything from getting accidentally damaged during the removal process.
- Cover the floor and nearby surfaces: Lay down drop cloths or plastic sheets to protect your floor and any nearby furniture or surfaces. Removing a wallpaper border can be a messy process, with water, adhesive, and debris potentially splattering onto the floor or furniture.
- Turn off the power: If there are electrical outlets or switches near the wallpaper border, turn off the power to ensure your safety while working. This will eliminate the risk of accidentally electrocuting yourself or causing damage to electrical components.
- Open windows and doors: Good ventilation is important when working with wallpaper removal solutions. Open windows and doors to allow fresh air to circulate in the room, reducing the concentration of any fumes and promoting faster drying of the walls.
With your workspace prepared, you’re ready to move on to the next step: protecting the surrounding areas. Taking the time to protect your walls, baseboards, and other adjoining surfaces will help prevent accidental damage during the removal process.
Protecting the surrounding areas
When removing a wallpaper border, it’s important to take precautions to protect the surrounding areas. By properly preparing and covering your walls, baseboards, and other adjoining surfaces, you can prevent any accidental damage or staining. Follow these steps to protect the surrounding areas:
- Cover the walls: Use plastic sheets or painter’s tape to cover the walls adjacent to the wallpaper border. This will create a barrier and prevent any water or adhesive from seeping onto the walls, potentially causing damage or staining. Ensure that the plastic sheets or tape are securely in place.
- Protect the baseboards: Apply painter’s tape along the baseboards or use a plastic adhesive film to cover them. This will protect the baseboards from any drips or splatters during the removal process.
- Mask off switch plates and outlets: Use painter’s tape to cover switch plates and outlets near the wallpaper border. This will prevent any water or adhesive from entering the electrical components and causing damage or safety hazards.
- Seal any gaps: Check for any gaps or openings along the edges of the wallpaper border. Use painter’s tape or caulk to seal these gaps and prevent any of the removal solution or water from seeping underneath the wallpaper.
By taking these steps to protect the surrounding areas, you can minimize the risk of accidental damage or staining on your walls, baseboards, and electrical components. Taking the time to properly prepare and cover these areas will make the wallpaper border removal process smoother and leave you with a clean and undamaged space once the project is complete.
Now that you’ve protected the surrounding areas, it’s time to move on to the next step: testing the adhesive. This will help you determine the best method for removing the wallpaper border.
Testing the adhesive
Before you begin the process of removing a wallpaper border, it’s crucial to test the adhesive to determine the best method for removal. Different types of wallpaper and adhesives may react differently to various removal solutions. By conducting a simple adhesive test, you can ensure that you choose the most effective method for your specific wallpaper border. Follow these steps to test the adhesive:
- Select a small inconspicuous area: Choose a small section of the wallpaper border that is not easily visible, such as behind a piece of furniture or in a corner.
- Score the wallpaper: Use a wallpaper scoring tool to create small perforations in the wallpaper surface. This will help the removal solution penetrate and loosen the adhesive.
- Apply the removal solution: Spray a small amount of wallpaper removal solution or warm water onto the scored section of the wallpaper. Allow it to sit for a few minutes.
- Test the wallpaper: Using a scraping tool, gently attempt to peel or lift the wallpaper border from the tested section. If it comes off easily and without damaging the wall, the removal solution is effective. If it doesn’t budge, you may need to try a different removal method or opt for professional assistance.
- Observe the results: Take note of the effectiveness of the removal solution and how the wallpaper reacts. This will guide you in choosing the most suitable method for the rest of the wallpaper border.
Remember, each wallpaper and adhesive may require a different approach, so it’s essential to conduct this adhesive test before proceeding with the rest of the removal process. By determining the best method for your specific wallpaper, you can minimize the risk of damage to the walls and achieve optimal results.
Now that you’ve tested the adhesive and determined the best removal method, it’s time to move on to the next step: removing the top layer of the wallpaper border.
Removing the top layer
Once you’ve tested the adhesive and determined the best removal method, it’s time to start removing the top layer of the wallpaper border. This step involves removing the visible layer of the wallpaper, leaving behind the adhesive layer that is attached to the wall. Follow these steps to effectively remove the top layer:
- Score the wallpaper: Use a wallpaper scoring tool to create small perforations in the top layer of the wallpaper. This will help the removal solution penetrate and loosen the adhesive.
- Mist the wallpaper surface: Spray a generous amount of wallpaper removal solution or warm water onto the scored section of the wallpaper. Allow it to sit for a few minutes to soak into the paper.
- Gently peel off the top layer: Starting from a corner or an edge, use a scraping tool to gently lift and peel off the top layer of the wallpaper. Take your time and be careful not to damage the wall underneath. If the top layer doesn’t come off easily, reapply the removal solution or mist with water and wait a few more minutes before attempting to remove it again.
- Continue removing the top layer: Work your way across the wallpaper border, peeling off the top layer as you go. If the wallpaper tears or breaks apart, score and mist the area again and carefully peel off the remaining pieces.
As you remove the top layer, you may come across stubborn spots or areas where the adhesive is still intact. Don’t worry, as we will address this in the next steps. The goal at this stage is to remove as much of the visible wallpaper as possible, leaving behind the adhesive layer.
Once you’ve successfully removed the top layer of the wallpaper border, it’s time to move on to the next step: soaking the adhesive.
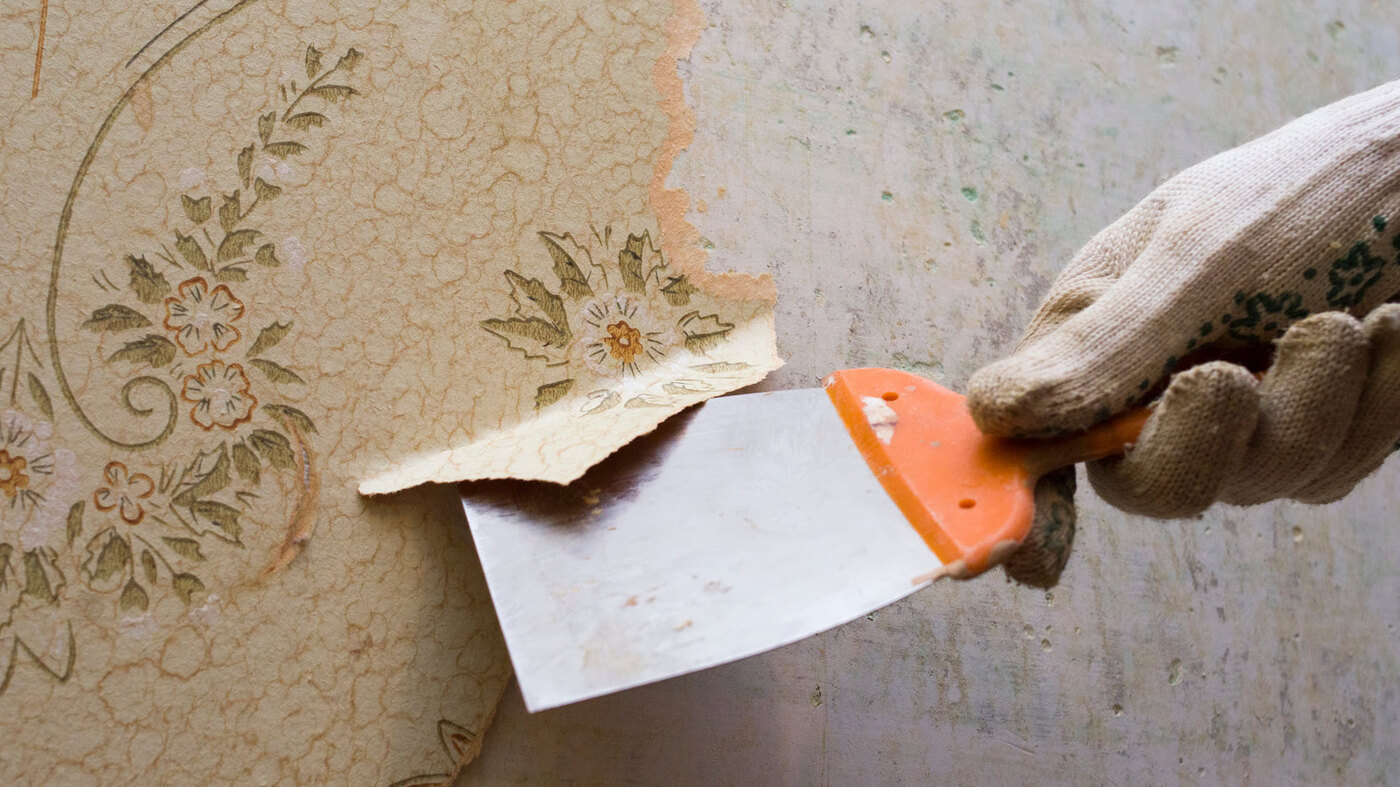
Use a scoring tool to create perforations in the wallpaper border, then apply a wallpaper removal solution and let it soak in. Finally, use a putty knife to gently peel off the border.
Soaking the adhesive
After removing the top layer of the wallpaper border, you’ll need to soak the adhesive to make it easier to remove. This step is crucial for loosening the adhesive and ensuring a smoother removal process. Follow these steps to effectively soak the adhesive:
- Mix a wallpaper removal solution: If you haven’t already, prepare a wallpaper removal solution by following the instructions on the product packaging. Alternatively, you can use warm water mixed with a small amount of liquid dish soap or vinegar.
- Dampen a sponge or cloth: Dip a sponge or cloth into the prepared wallpaper removal solution, ensuring it is thoroughly saturated but not dripping.
- Apply the solution to the adhesive: Gently press the damp sponge or cloth against the adhesive layer of the wallpaper border. Allow the solution to soak into the adhesive for about 10-15 minutes. This will help loosen the adhesive and make it easier to remove.
During the soaking process, you may notice that the wallpaper border starts to bubble or become soft. This is a good sign that the adhesive is loosening. If the adhesive doesn’t seem to be softening after the allotted time, you may need to reapply the wallpaper removal solution and wait a bit longer.
It’s important to note that the soaking time may vary depending on the type of adhesive used and how well it adhered to the wall. Be patient and allow enough time for the solution to work its magic.
Once the adhesive has had sufficient time to soak, it’s time to move on to the next step: scraping off the border.
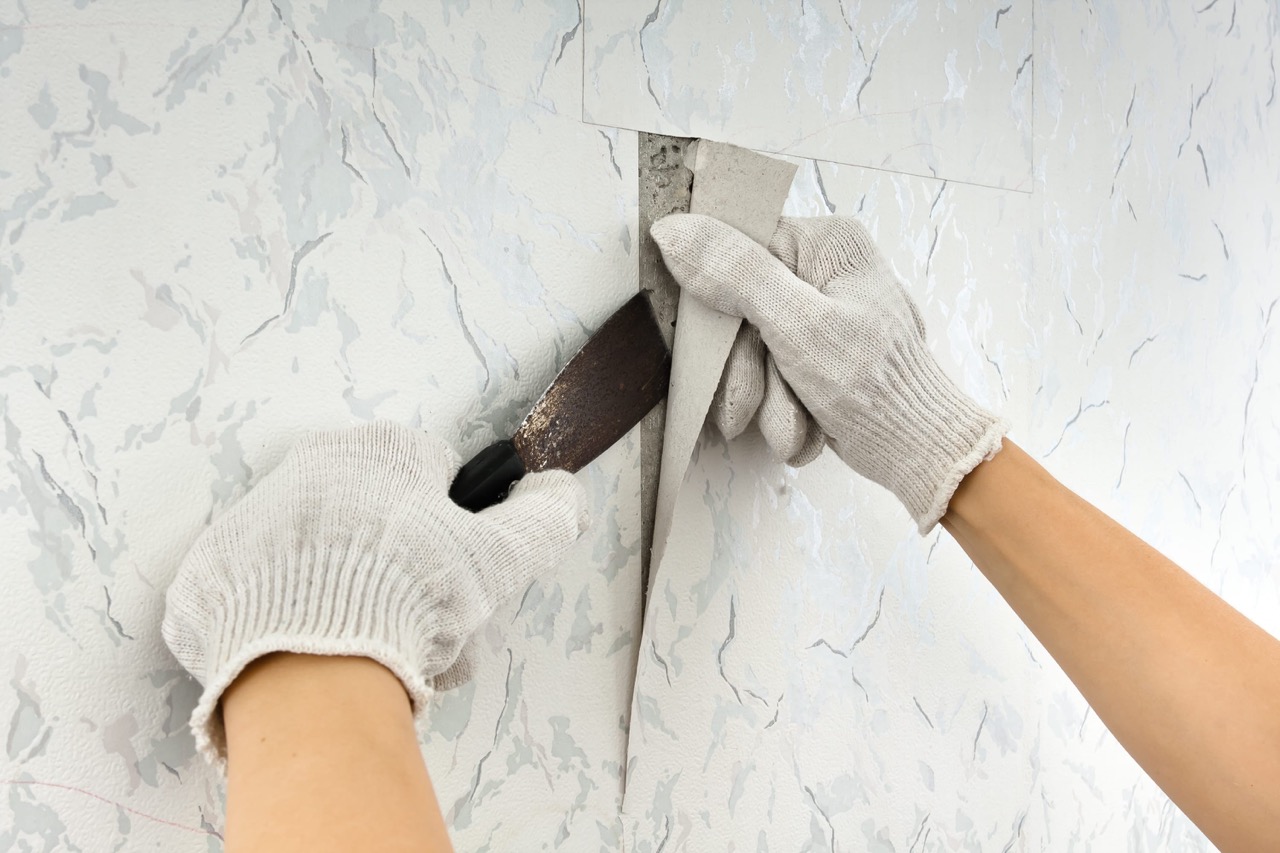
Scraping off the border
With the adhesive properly soaked, it’s time to start scraping off the wallpaper border. This step requires patience and caution to ensure that the adhesive is removed smoothly without causing any damage to the underlying wall surface. Follow these steps to effectively scrape off the border:
- Start from a corner or edge: Choose a corner or edge of the wallpaper border to begin scraping. This will make it easier to lift and remove the border.
- Use a scraping tool: Hold a scraping tool, such as a putty knife or a wallpaper scraper, at a low angle against the wall. Gently scrape the adhesive layer, applying even pressure as you work in small sections.
- Work in a downward motion: Scrape the adhesive layer in a downward motion, following the line of the wallpaper border. Avoid applying excessive force, as this can damage the wall surface.
- Remove small sections at a time: Focus on removing small sections of the adhesive layer at a time. If the adhesive starts to harden or dry out, reapply the wallpaper removal solution or mist with water to keep it moist and easier to scrape.
- Take breaks if necessary: Removing a wallpaper border can be a physically demanding task. Take breaks as needed to rest your hands and prevent fatigue or strain.
- Continue scraping across the entire border: Work your way across the entire wallpaper border, scraping off the adhesive layer in small sections. Be thorough but gentle to avoid damaging the wall underneath.
As you scrape off the border, you may encounter stubborn areas where the adhesive is more resistant or difficult to remove. In such cases, you can try applying a bit more wallpaper removal solution or water, letting it soak for a few minutes, and then resume scraping.
Once you have successfully scraped off the entire wallpaper border, it’s time to move on to the next step: cleaning the wall.
Cleaning the wall
After removing the wallpaper border and scraping off the adhesive, it’s important to clean the wall to ensure a smooth and pristine surface. Cleaning the wall will help remove any remaining adhesive residue, dust, or debris that may have accumulated during the removal process. Follow these steps to effectively clean the wall:
- Prepare a cleaning solution: Mix a mild detergent or wallpaper cleaner with warm water in a bucket or spray bottle. Follow the instructions on the product packaging for the correct dilution ratio.
- Dampen a sponge or cloth: Dip a sponge or cloth into the cleaning solution, making sure it is thoroughly damp but not soaking wet.
- Wipe the wall: Starting from the top and working your way down, gently wipe the wall surface with the damp sponge or cloth. Use a back-and-forth motion and apply even pressure to remove any remaining adhesive residue, dust, or debris.
- Pay attention to stubborn spots: If you come across stubborn spots that are difficult to clean, you can try using a soft-bristle brush or a non-abrasive scrubbing pad to gently scrub the area. Be careful not to apply too much pressure, as this may damage the wall surface.
- Rinse the wall: Once you have finished cleaning the wall, rinse off any residual cleaning solution with a clean, damp sponge or cloth. This will ensure that no cleaning residue is left behind.
- Dry the wall: Allow the wall to air dry naturally or use a dry, clean cloth to gently pat it dry. Avoid using excessive heat or direct airflow, as this may cause the wall to warp or damage the paint.
By thoroughly cleaning the wall, you’ll create a smooth and pristine surface for any future paint or wallpaper application. It’s important to note that if you plan to repaint the wall, it’s recommended to prime it prior to painting to ensure better adhesion and a more seamless finish.
With the wall now clean and ready, it’s time to move on to the final step: adding the finishing touches.
Read more: How To Remove Grass Cloth Wallpaper
Final touches
After removing the wallpaper border, scraping off the adhesive, and cleaning the wall, it’s time to add the final touches to complete the process. These final touches will ensure that your wall looks polished and ready for any further design or décor updates. Follow these steps to add the finishing touches:
- Inspect the wall: Take a close look at the wall and check for any remaining adhesive residue or imperfections. If you notice any stubborn spots or lingering adhesive, you can try using a mild adhesive remover or a damp cloth to carefully remove it.
- Repair any damage: If you accidentally caused any damage to the wall during the removal process, such as small scratches or dents, now is the time to repair them. Fill in any holes or indentations with a spackling compound and smooth it out with a putty knife. Once dry, sand the repaired areas lightly and touch up the paint if necessary.
- Examine the wall surface: Run your hand across the wall to ensure that it feels smooth and free of any bumps or rough patches. If you come across any uneven areas, sand them gently until they are flush with the surrounding surface.
- Prime the wall (optional): If you plan on applying new wallpaper or painting the wall, it’s recommended to apply a primer before proceeding. Primer helps create a consistent base, improves paint adhesion, and ensures a more professional-looking result.
- Choose your next design: Now that your wall is clean and prepped, you have a blank canvas to work with. Consider if you want to repaint the wall, select new wallpaper, or explore other options like adding a decorative mural or stenciling. Take your time to browse and gather inspiration for your next design project.
- Complete the desired design changes: Finally, proceed with your chosen design update. Whether it’s applying wallpaper, painting the wall in a fresh color, or adding decorative elements, follow the recommended instructions and take your time to ensure a beautiful and well-executed transformation.
By adding these final touches, you’ll ensure that your wall is in optimal condition and ready for your desired design updates. Take pride in your hard work and enjoy the refreshed look of your space.
With the final touches complete, you have successfully removed the wallpaper border and transformed your wall. Congratulations! You have accomplished a significant step in updating your interior design. Remember, patience and attention to detail are key throughout the process. Now you can sit back, relax, and enjoy your newly transformed space.
If you found this guide helpful, be sure to share it with others who may be embarking on a wallpaper border removal project. Happy decorating!
Conclusion
Removing a wallpaper border may seem like a daunting task, but with the right tools, techniques, and a little bit of patience, you can successfully tackle this home improvement project. By following the steps outlined in this comprehensive guide, you’ll be able to remove the wallpaper border without causing damage to your walls and create a blank canvas for your future design updates.
Throughout the process, we learned about the importance of gathering the necessary tools, preparing the workspace, and protecting the surrounding areas to ensure a smooth and efficient removal process. We discussed the significance of testing the adhesive to determine the best method for removal and explored the steps involved in removing the top layer of the wallpaper border, soaking the adhesive, scraping off the border, and cleaning the wall. Finally, we addressed the final touches and the exciting possibilities that await as you embark on your next design endeavor.
Remember, each wallpaper removal project may have unique challenges and considerations, so it’s important to adapt the steps outlined in this guide to suit your specific situation. Additionally, always take precautions to protect yourself by wearing appropriate safety gear and testing small areas before proceeding with the full removal process.
By following the guidelines outlined in this article, you can confidently remove a wallpaper border and create a fresh canvas for your interior design vision. Whether you choose to repaint the wall, apply new wallpaper, or explore other creative options, this guide has equipped you with the knowledge and techniques to achieve beautiful and inspiring results.
So, roll up your sleeves, gather your tools, and get ready to transform your space. With a little effort and the right approach, you’ll be amazed at the impact that removing a wallpaper border can have on your home’s overall look and feel. Good luck, and enjoy the process of creating a space that reflects your personal style and enhances your living environment!
Frequently Asked Questions about How To Remove A Wallpaper Border
Was this page helpful?
At Storables.com, we guarantee accurate and reliable information. Our content, validated by Expert Board Contributors, is crafted following stringent Editorial Policies. We're committed to providing you with well-researched, expert-backed insights for all your informational needs.

0 thoughts on “How To Remove A Wallpaper Border”