Articles
How To Put A Crochet Edge On A Pillowcase
Modified: August 16, 2024
Learn how to put a beautiful crochet edge on a pillowcase with our informative articles. Enhance your pillowcases with this easy and stylish technique.
(Many of the links in this article redirect to a specific reviewed product. Your purchase of these products through affiliate links helps to generate commission for Storables.com, at no extra cost. Learn more)
Introduction
Adding a crochet edge to a pillowcase is a simple and delightful way to personalize and elevate your home decor. Whether you’re a seasoned crocheter or a beginner looking to enhance your crafting skills, this project is perfect for adding a touch of handmade charm to any pillowcase.
In this article, we will guide you through the steps of putting a crochet edge on a pillowcase. We will discuss the materials needed, the process of choosing a crochet pattern, preparing the pillowcase, and ultimately creating a beautiful crochet edge that will transform your plain pillowcase into a stylish statement piece.
By following these steps, you’ll not only learn a new crochet technique but also have the opportunity to explore your creativity and showcase your personal style. So let’s grab our crochet hooks and dive into the wonderful world of crochet-edged pillowcases!
Key Takeaways:
- Personalize and elevate your home decor by adding a crochet edge to a pillowcase. This simple project allows you to showcase your creativity and crafting skills while creating a charming and unique decorative piece.
- Crocheting a decorative edge onto a pillowcase is not only a creative endeavor but also a therapeutic outlet for relaxation and stress relief. Embrace the joy of crafting and transform plain pillowcases into stunning works of art.
Materials Needed
Before getting started, gather the following materials:
- A plain pillowcase
- Crochet thread or yarn in your desired color
- A crochet hook appropriate for the thickness of your thread or yarn (check the label for recommended hook size)
- Scissors
- A tapestry needle
- Pins (optional)
When choosing your materials, consider the style and theme of your pillowcase and the overall aesthetic you want to achieve. Opt for a crochet thread or yarn that complements or contrasts with the color of the pillowcase. Additionally, ensure that the crochet hook is suitable for the thickness of your chosen thread or yarn to achieve the desired stitch tension.
Now that you have everything you need, let’s move on to the next step: choosing the crochet pattern.
Step 1: Choosing the Crochet Pattern
The crochet pattern you choose will determine the design of your crochet edge. There are plenty of patterns available, ranging from simple and classic to intricate and decorative. Consider the style of your pillowcase and the level of difficulty you’re comfortable with.
If you’re a beginner, opt for a pattern that uses basic stitches like single crochet or double crochet. This will allow you to practice the fundamental techniques while still creating an attractive edge. Websites, books, and online tutorials are excellent resources for finding crochet patterns specifically designed for pillowcase edges.
For those with more advanced crochet skills, don’t be afraid to explore complex patterns that incorporate unique stitches, motifs, or lacework. These patterns can add an extra level of detail and visual interest to your finished crochet edge.
Once you’ve selected a pattern, make sure to read through the instructions carefully. Pay attention to any special stitches or techniques required and familiarize yourself with the pattern’s repeat sequence. Understanding the pattern before you start crocheting will help you create a more cohesive and professional-looking edge.
Remember, you can always modify the pattern to suit your preferences. Feel free to adjust the size of the stitches or alter the color sequences to make the design truly your own. Crocheting should be a fun and creative process, so don’t be afraid to experiment and add your personal touch!
Now that you have your crochet pattern selected, let’s move on to preparing the pillowcase.
Step 2: Preparing the Pillowcase
Before you can start crocheting the edge, it’s essential to prepare the pillowcase properly. Follow these steps to ensure a clean and smooth surface for your crochet work:
- Begin by washing and ironing the pillowcase to remove any wrinkles or sizing. This will provide a neater canvas for your crochet edge.
- Measure and mark the desired width of the crochet edge using a fabric pen or pins. You can choose a width that suits your preferences, but a typical range is between 1 and 4 inches.
- If you’re using pins, place them uniformly along the marked line to hold the fabric in place as you crochet.
Preparing the pillowcase ensures that your crochet edge will be even and straight. It also helps you visualize the size and positioning of the edge before you start crocheting.
Now that your pillowcase is ready, it’s time to move on to the exciting part: starting the crochet edge!
When adding a crochet edge to a pillowcase, make sure to choose a yarn that complements the fabric and use a smaller crochet hook to ensure a tight and neat finish.
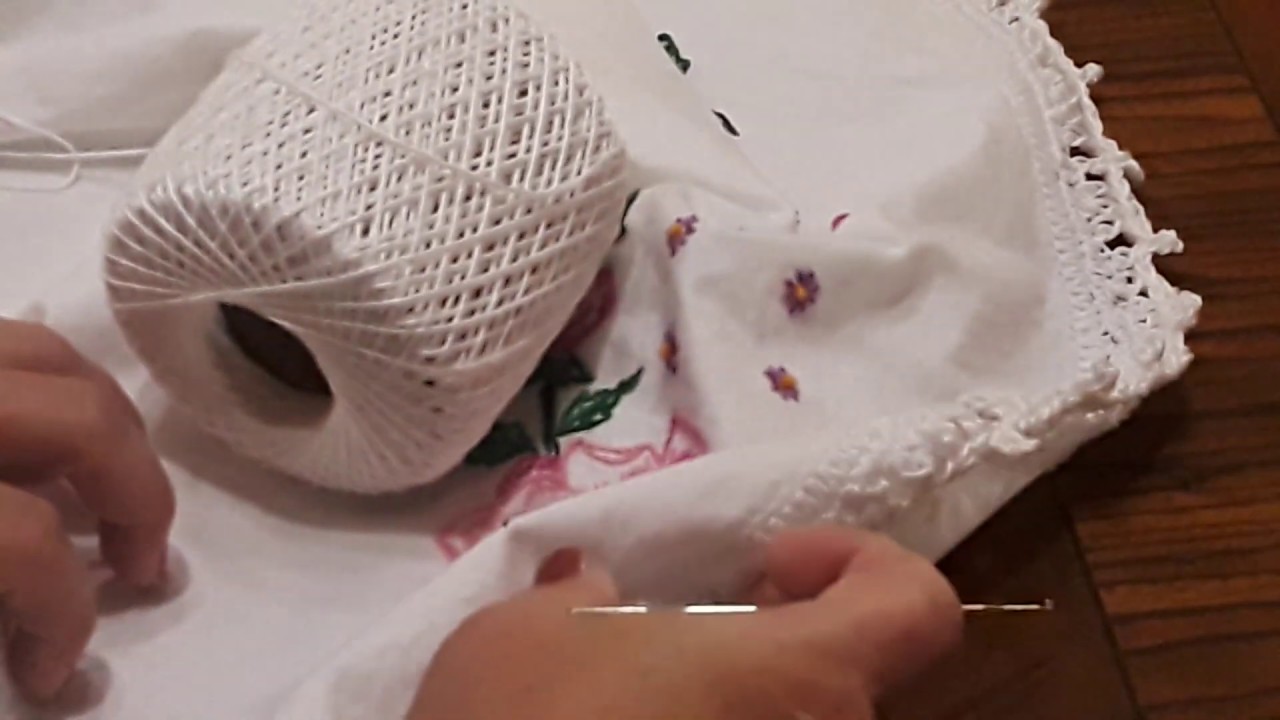
Step 3: Starting the Crochet Edge
Now that your pillowcase is prepped, it’s time to begin crocheting the edge. Follow these steps to get started:
- Select a corner of the pillowcase to begin. This will serve as your starting point for crocheting the edge.
- Attach the crochet thread or yarn to the corner using a slip stitch. To do this, create a loop with the thread, insert your crochet hook through the corner stitch, catch the thread with the hook, and pull it through the stitch and the loop.
- Create a chain stitch by yarn over, drawing the thread through the loop, creating a slipknot, and sliding it onto the crochet hook. This chain serves as the foundation for your crochet edge.
- Start working stitches along the side of the pillowcase, following the pattern instructions. The most common stitches used for crochet edges are single crochet, double crochet, and slip stitch. Continue stitching until you reach the next corner.
Repeat these steps for each side of the pillowcase, working the crochet stitches evenly and consistently. Take your time to ensure that each stitch is secure and evenly spaced. If you encounter any corners or curves, follow the pattern instructions for turning or shaping the edge.
Remember to maintain a relaxed and comfortable grip on your crochet hook while working. This will help prevent hand strain and ensure smoother and more consistent stitching.
By completing this step, you have successfully started the crochet edge on your pillowcase. Now it’s time to move on to the next step: crocheting around the entire pillowcase.
Read more: How To Fix Uneven Edges Of A Crochet Blanket
Step 4: Crocheting Around the Pillowcase
With the crochet edge started, you’re ready to continue working around the entire pillowcase. Follow these steps to crochet around the pillowcase:
- Continue working stitches along each side of the pillowcase, following the pattern instructions. Maintain a consistent tension and stitch size to ensure a uniform edge.
- If your pattern includes corners, work the corner stitches as indicated. This might involve adding extra stitches or working specific stitches in the corner space to maintain a neat and even edge.
- As you crochet, periodically step back and check your progress. Ensure that the edge is straight and even and adjust your tension or stitch count accordingly.
- If needed, weave in loose thread ends using a tapestry needle to keep your work neat and secure.
This step requires focus and attention to detail to maintain the desired pattern and stitch consistency. Take breaks as needed to rest your hands and eyes, especially if working on a larger pillowcase.
Crocheting around the entire pillowcase may take some time, but with each stitch, you’re bringing your crochet edge to life. Enjoy the rhythmic motion of crocheting and watch as your pillowcase transforms into a beautiful, handmade masterpiece.
Once you’ve completed crocheting around the entire pillowcase, it’s time to finish off the crochet edge. Let’s move on to the final step!
Step 5: Finishing the Crochet Edge
You’re almost there! The final step is to finish off the crochet edge and secure your stitches. Follow these steps to wrap up your crochet project:
- Cut the crochet thread or yarn, leaving a tail that is several inches long.
- Thread the tail through the tapestry needle.
- Insert the needle under the last stitch of your crochet work to secure it.
- Weave the needle back and forth through the crochet stitches along the edge, hiding the tail within the stitches.
- Trim any excess thread or yarn once the tail is securely woven in.
By weaving in the tail, you’re ensuring that your crochet edge remains intact and won’t unravel with use or washing. Take your time to weave the tail in neatly and securely.
Once you’ve finished securing the tail, admire your completed crochet edge! Step back and admire the beautiful transformation of your plain pillowcase into a unique and charming decorative piece.
Remember to care for your crochet-edged pillowcase with proper washing and maintenance. Follow the care instructions for both the pillowcase fabric and the crochet thread or yarn to keep your creation looking fresh and vibrant.
Congratulations on completing your crochet-edged pillowcase! You’ve not only added a personalized touch to your home decor but also honed your crochet skills along the way. Enjoy the satisfaction of showcasing your handmade creation and the cozy charm it brings to your living space.
Now, go ahead and explore more crochet projects and continue to embrace the joy of crafting!
Disclaimer: This article is for informational purposes only. Always follow safety guidelines and instructions provided by pattern creators.
Conclusion
Crocheting a beautiful edge onto a pillowcase is a wonderful way to showcase your creativity and add a personal touch to your home decor. By following the steps outlined in this article, you’ve learned how to choose a crochet pattern, prepare the pillowcase, start and continue the crochet edge, and finally finish it off with finesse.
Throughout this process, you’ve honed your crochet skills and exercised your artistic intuition. The result is a unique and charming pillowcase that reflects your style and craftsmanship.
Remember that the possibilities are endless when it comes to crochet-edged pillowcases. You can experiment with different patterns, colors, and stitch combinations to create custom designs that match your taste and home decor. The satisfaction of completing a handmade project and seeing it in everyday use is truly rewarding.
Aside from the aesthetic appeal, crocheting also offers a therapeutic outlet for relaxation and stress relief. It allows you to immerse yourself in a creative activity, disconnect from the outside world, and find solace in the rhythmic motion of crochet stitches.
So, whether you’re making pillowcases as gifts for loved ones or adding a personal touch to your own living space, the process of crocheting a decorative edge is a delightful journey of artistic expression and skill development.
Now that you’re equipped with the knowledge and inspiration to put a crochet edge on a pillowcase, it’s time to gather your materials, choose a pattern, and start crocheting. Let your creativity soar as you transform simple pillowcases into stunning works of art!
Remember, the key to successful crochet projects lies in practice and perseverance. Embrace the joy of crocheting, continuously learn and expand your skills, and be proud of each handmade creation you bring to life.
Frequently Asked Questions about How To Put A Crochet Edge On A Pillowcase
Was this page helpful?
At Storables.com, we guarantee accurate and reliable information. Our content, validated by Expert Board Contributors, is crafted following stringent Editorial Policies. We're committed to providing you with well-researched, expert-backed insights for all your informational needs.

0 thoughts on “How To Put A Crochet Edge On A Pillowcase”