Tableware
How To Crochet Cat Coasters
Modified: January 6, 2024
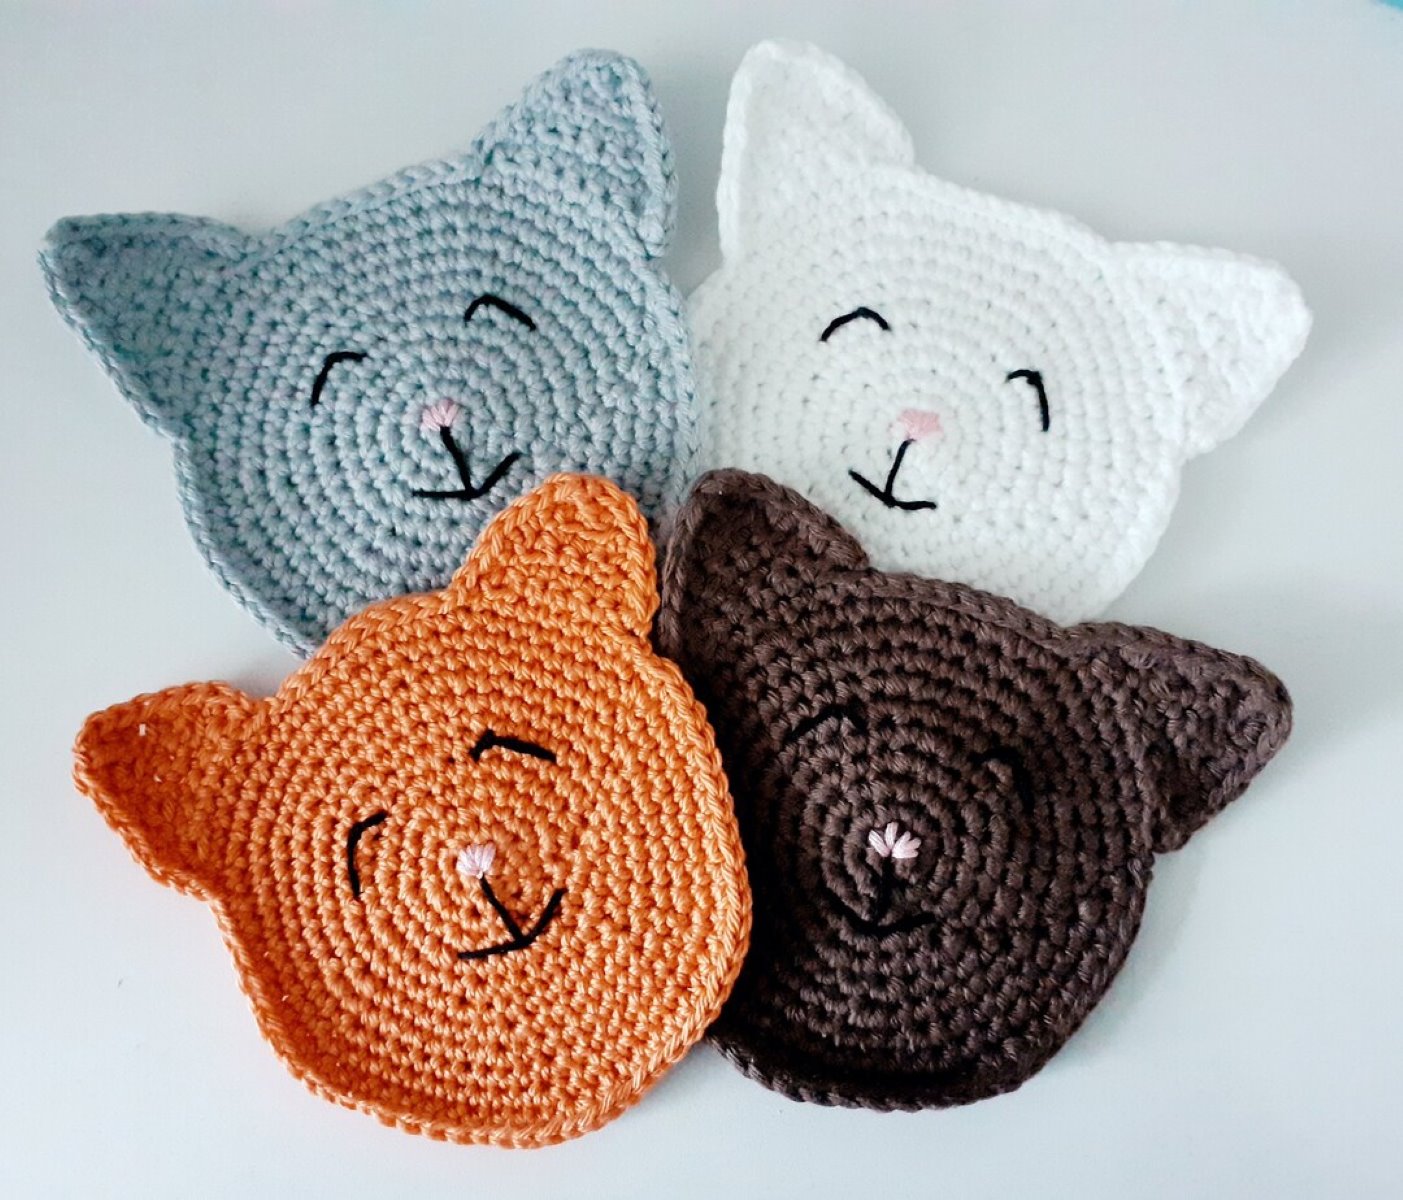
Learn how to crochet adorable cat coasters for your tableware. Find easy-to-follow instructions and patterns for this fun DIY project
(Many of the links in this article redirect to a specific reviewed product. Your purchase of these products through affiliate links helps to generate commission for Storables.com, at no extra cost. Learn more)
Introduction
Crocheting is a wonderful craft that allows you to create beautiful and functional items using yarn and a crochet hook. If you have a love for cats and want to add a touch of feline charm to your tableware, then crochet cat coasters are the perfect project for you. These adorable coasters not only serve the practical purpose of protecting your surfaces from drink spills and condensation, but they also add a whimsical and playful element to your home decor. Whether you’re a beginner or an experienced crocheter, this step-by-step guide will walk you through the process of creating your very own crochet cat coasters.
Key Takeaways:
- Create charming and functional cat coasters with this step-by-step guide. Add a playful touch to your tableware while honing your crochet skills and unleashing your creativity.
- Enjoy the satisfaction of crafting handmade cat coasters. Whether you’re a beginner or experienced crocheter, this project allows you to personalize your home decor with whimsical feline charm.
Read more: How To Make Crochet Coasters
Materials Needed
Before you begin crocheting your cat coasters, gather the following materials:
- Yarn: Choose a medium weight yarn in your desired cat colors. Opt for a soft and durable yarn that will withstand frequent use.
- Crochet Hook: Select a crochet hook size that is appropriate for the chosen yarn. Check the yarn label for the recommended hook size, usually stated in millimeters.
- Scissors: A pair of sharp scissors will be needed to trim the yarn and cut any excess thread.
- Tapestry Needle: You’ll need a tapestry needle with a large eye to weave in loose ends and sew on small details.
- Black Embroidery Floss or Safety Eyes: To create the eyes of your cat coasters, you can use either black embroidery floss to embroider the eyes or safety eyes for a more realistic look.
- Polyfill or Cotton: If you want your cat coasters to have a padded appearance, consider using polyfill or cotton to stuff them. Alternatively, you can leave them flat.
Once you have gathered all the necessary materials, you’re ready to move on to the next step in creating your charming crochet cat coasters.
Step 1: Starting the Coaster
To begin creating your crochet cat coaster, follow these steps:
- Make a slip knot: Start by making a slip knot in your yarn and placing it on your crochet hook.
- Create a foundation chain: Chain 21 stitches. This will serve as the base for your coaster.
- Single crochet in the second chain from the hook: Insert your hook into the second chain from the hook, yarn over, and pull through. Yarn over again and pull through both loops on your hook. This completes your first single crochet stitch.
- Continue single crocheting across the row: Single crochet in each chain stitch across until you reach the end of the row. You should have a total of 20 single crochet stitches.
- Turn your work: Once you reach the end of the row, turn your work to start the next row. This will create the foundation for the body of your cat coaster.
Congratulations! You have successfully started your crochet cat coaster. In the next step, we will continue crocheting the body and shaping it into a cat shape.
Step 2: Crocheting the Body
Now that you have completed the foundation row, it’s time to crochet the body of your cat coaster. Follow these steps:
- Single crochet in each stitch across: Start by chaining one and then single crocheting in each stitch across the row. This will maintain the width of your coaster.
- Continue single crocheting: Repeat the previous step for the desired number of rows, depending on how tall you want your cat coaster to be. You can make it as short or as tall as desired, typically ranging from 3 to 5 rows.
- Fasten off: Once you’ve reached the desired height, cut the yarn, leaving a tail of several inches. Pull the tail through the last loop on your hook to secure the end.
Great job! You have now crocheted the body of your cat coaster. In the next step, we will add the ears to give your coaster a whimsical touch.
When crocheting cat coasters, use a smaller hook size to create a tighter stitch, which will help the coaster hold its shape and provide better protection for your surfaces.
Step 3: Adding the Ears
Now it’s time to add the adorable ears to your crochet cat coaster. Follow these steps:
- Identify the top corners: Lay your coaster flat and identify the two top corners. These will be the positions where you will attach the ears.
- Attach the yarn: Attach your yarn in one of the top corners by making a slip knot and placing it on your crochet hook.
- Create the first ear: To create the first ear, make three chain stitches. Then, slip stitch into the same corner to create a small loop.
- Create the second ear: Repeat the previous step in the other top corner of your coaster.
- Secure the ends: Once you have completed both ears, weave in the loose ends using a tapestry needle to ensure they are secure and won’t unravel.
Fantastic! Your crochet cat coaster now has adorable ears, adding character and charm. In the next step, we will add the eyes and nose to complete the features of your cute little feline friend.
Read more: How To Crochet Curtains
Step 4: Attaching the Eyes and Nose
The eyes and nose are the finishing touches that bring your crochet cat coaster to life. Follow these steps to attach them:
- Choose your method: Decide whether you want to use black embroidery floss or safety eyes for the eyes of your cat. If you prefer the embroidery floss, thread a tapestry needle with the black thread. If you opt for safety eyes, follow the instructions on the packaging to securely attach them.
- Position the eyes: Determine the placement of the eyes on your cat coaster. Generally, they are positioned a few rows below the top edge, spaced evenly apart. Use straight pins to mark the spots where you want to attach the eyes.
- Embroider the eyes: If using black embroidery floss, make small and even stitches to embroider the eyes on the marked spots. You can create more defined eyes by using a backstitch or a satin stitch.
- Add the nose: Decide on the shape and size of the nose you want for your cat coaster. Using the same black embroidery floss or a different color to contrast, embroider or sew a small triangle-shaped or oval-shaped nose slightly below the eyes.
Well done! Your crochet cat coaster now has its eyes and nose, giving it a playful and whimsical look. In the final step, we will add some finishing touches to complete the project.
Step 5: Finishing Touches
To add the final touches to your crochet cat coaster, follow these steps:
- Stuff the coaster (optional): If you prefer a padded appearance for your cat coaster, you can stuff it with polyfill or cotton. Use a tapestry needle or your fingers to carefully stuff the coaster, making sure it’s evenly distributed.
- Secure the opening: If you chose to stuff your coaster, you’ll need to close the opening. Thread your tapestry needle with the yarn tail from the beginning and sew the opening closed using small whip stitches. Once secure, weave in the loose ends.
- Shape the coaster: Gently shape the cat coaster by molding the ears and adjusting the body to your liking. This will give your coaster a more three-dimensional appearance.
Congratulations! You have completed your crochet cat coaster and it’s ready to be used or displayed. Repeat the steps to create a set of coasters in different colors or variations to add a touch of whimsy to your home decor. These cat coasters also make great gifts for cat lovers in your life.
Remember to enjoy the process of creating and let your creativity shine through. As you gain more experience, feel free to modify the pattern by adding extra embellishments or personalizing it further. Crocheting is a versatile craft that allows you to unleash your imagination.
Enjoy using your delightful crochet cat coasters and cherish the satisfaction of making something handmade with love. Happy crocheting!
Conclusion
Crocheting cat coasters is a fun and creative way to add a touch of whimsy to your tableware. These adorable coasters not only serve a practical purpose but also make charming additions to your home decor. By following the step-by-step instructions in this guide, you’ve learned how to crochet your very own cat coasters from start to finish.
Throughout the process, you’ve honed your crochet skills and created a delightful set of coasters that can be enjoyed by both yourself and guests. The materials needed for this project are easily accessible, and once you’ve familiarized yourself with the steps, you can customize the cat coasters to reflect your own personal style.
Whether you’re a beginner or a seasoned crocheter, the process of making cat coasters provides an opportunity to explore your creativity and create something unique. The satisfaction of completing a crochet project and seeing it come to life is unmatched.
So, grab your crochet hook, choose your favorite cat colors, and start crocheting your own adorable cat coasters. Whether you choose to make them as gifts or keep them for yourself, these coasters are sure to bring a smile to your face and add a touch of feline charm to your home.
Happy crocheting!
Frequently Asked Questions about How To Crochet Cat Coasters
Was this page helpful?
At Storables.com, we guarantee accurate and reliable information. Our content, validated by Expert Board Contributors, is crafted following stringent Editorial Policies. We're committed to providing you with well-researched, expert-backed insights for all your informational needs.
0 thoughts on “How To Crochet Cat Coasters”