Home>Articles>Why Is There Water In The Bottom Of My Dishwasher
Articles
Why Is There Water In The Bottom Of My Dishwasher
Modified: October 28, 2024
Discover the reasons behind water collecting at the bottom of your dishwasher. Read our informative articles to troubleshoot and fix this common issue.
(Many of the links in this article redirect to a specific reviewed product. Your purchase of these products through affiliate links helps to generate commission for Storables.com, at no extra cost. Learn more)
Introduction
Have you ever opened your dishwasher after a cycle, only to find water pooled at the bottom? If so, you’re not alone. Many people encounter this frustrating issue, wondering why there is water in the bottom of their dishwasher. While it may seem like a simple inconvenience, this problem can impact the efficiency and effectiveness of your dishwasher, as well as potentially cause damage to your kitchen flooring and cabinets.
To understand why this happens, it’s important to have a basic understanding of how a dishwasher’s drainage system works. When you run a cycle, water fills the dishwasher through a supply line, gets sprayed onto the dishes through the spray arm, and drains out through a drain pump and hose. Ideally, all the dirty water and debris should be efficiently flushed out, leaving your dishes clean and dry.
However, there are various reasons why water may accumulate in the bottom of the dishwasher instead of completely draining out. In this article, we’ll explore some common causes of this issue and provide troubleshooting steps to help you resolve it.
It’s worth noting that the specific reasons for water accumulation can vary depending on the make and model of your dishwasher. Consult your dishwasher’s user manual or reach out to the manufacturer for specific instructions and troubleshooting tips. With that said, let’s dive into some of the commonly encountered causes of water in the bottom of the dishwasher.
Key Takeaways:
- Regularly cleaning the drain filter and checking for blockages can prevent water accumulation in your dishwasher, ensuring optimal performance and prolonging the appliance’s lifespan.
- Seeking professional assistance from a qualified technician is advisable if DIY troubleshooting steps fail to resolve water accumulation issues in your dishwasher.
Understanding the Dishwasher Drainage System
The dishwasher drainage system is a crucial component that ensures the proper disposal of dirty water and debris. Understanding how this system works can help you identify and address issues that may cause water accumulation.
When you start a dishwashing cycle, water is pumped into the dishwasher from your home’s water supply. The spray arm then sprays water onto the dishes, loosening food particles and detergent residue. This dirty water, along with the debris, flows down to the bottom of the dishwasher.
The drain pump, located at the base of the dishwasher, is responsible for forcing the water out of the dishwasher through a drain hose. The water is carried away to your home’s plumbing system or kitchen sink drain.
To prevent large debris from clogging the drain pump and hose, dishwashers are equipped with a drain filter, also known as a food filter or debris filter. This filter catches particles such as food scraps, bones, and other foreign objects, preventing them from entering the drainage system. It is important to regularly clean and maintain this filter to ensure the smooth operation of your dishwasher.
If any component of the dishwasher drainage system malfunctions or becomes clogged, it can hinder the proper drainage of water, leading to water accumulation at the bottom of the dishwasher. Let’s explore some of the common causes of water accumulation and how you can troubleshoot them.
Common Causes of Water Accumulation in the Dishwasher
Water accumulation in the bottom of the dishwasher can be caused by several factors. Understanding these common causes can help you diagnose and resolve the problem. Let’s explore some of the main culprits:
1. Insufficient Drainage
One of the most common reasons for water accumulation is insufficient drainage. If the drain hose is not positioned correctly or is bent, it can restrict the flow of water and prevent it from properly draining out of the dishwasher. Additionally, a kinked or damaged drain hose can also lead to water backup.
2. Clogged Drain Filter
The drain filter plays a vital role in catching food debris and preventing it from entering and clogging the drain pump and hose. However, over time, the filter can become clogged with food particles, grease, and other debris. This can obstruct the flow of water and cause it to accumulate in the bottom of the dishwasher.
Read more: Why Is My Dishwasher Not Working
3. Malfunctioning Drain Pump
If the drain pump is not functioning properly, it may not be able to effectively push the water out of the dishwasher. A malfunctioning pump can be caused by various issues, such as a faulty motor or a blockage in the pump assembly. When the pump fails to remove the water from the dishwasher, it results in water pooling at the bottom.
4. Improper Installation
Improper installation of the dishwasher can also contribute to water accumulation. If the dishwasher is not level or securely installed, it can affect the proper functioning of the drainage system. Water may not flow efficiently to the drain pump, causing it to collect at the bottom of the dishwasher.
5. Other Possible Causes
In some cases, there may be additional factors contributing to water accumulation in the dishwasher. These can include a malfunctioning float switch, a faulty water inlet valve, or a blocked air gap or garbage disposal connection. Consulting your dishwasher’s user manual or contacting a professional can help identify and address these less common causes.
Now that we’ve explored the common causes of water accumulation in the dishwasher, let’s move on to troubleshooting steps to help resolve these issues.
Insufficient Drainage
Insufficient drainage is a common issue that can lead to water accumulation in the bottom of the dishwasher. There are a few potential causes for this problem, and addressing them can help ensure proper drainage. Here are some steps you can take to troubleshoot insufficient drainage:
Read more: Why Is The Bottom Of My Hot Tub Slimy
1. Check the Drain Hose
Start by examining the drain hose connected to your dishwasher. Ensure it is not kinked or bent, as this can restrict the flow of water. Straighten any kinks and ensure the hose has a clear path for water to flow smoothly. If the hose is damaged or cracked, consider replacing it to prevent future issues.
2. Adjust the Height of the Drain Hose
Make sure the drain hose is positioned correctly. The drain hose should have a high loop or be secured to the underside of the countertop to prevent backflow of water from the sink. Improper positioning of the drain hose can result in water flowing back into the dishwasher instead of draining out.
3. Clean the Air Gap
If your dishwasher has an air gap, which is a device located on the sink countertop or nearby, make sure it is clean and not clogged. Remove any debris that may be blocking the air gap to ensure unrestricted water flow. A clogged air gap can hinder proper drainage and lead to water accumulation.
4. Verify the Sink Drain
Check the sink drain connected to the dishwasher. Ensure it is clear of any blockages or debris. A clogged sink drain can impact the dishwasher’s ability to effectively drain water and may cause it to accumulate at the bottom of the dishwasher. Use a sink plunger or a drain cleaning tool to clear any obstructions.
If you have followed these troubleshooting steps and are still experiencing insufficient drainage, it is advisable to seek professional assistance. A certified technician can diagnose and repair any underlying issues that may be causing the problem.
By addressing the issue of insufficient drainage, you can prevent water accumulation in your dishwasher and ensure its optimal performance. Regular maintenance, such as cleaning the drain hose and checking for any blockages, can also help prevent future occurrences of this problem. Remember to consult your dishwasher’s user manual or contact the manufacturer for specific instructions and recommendations.
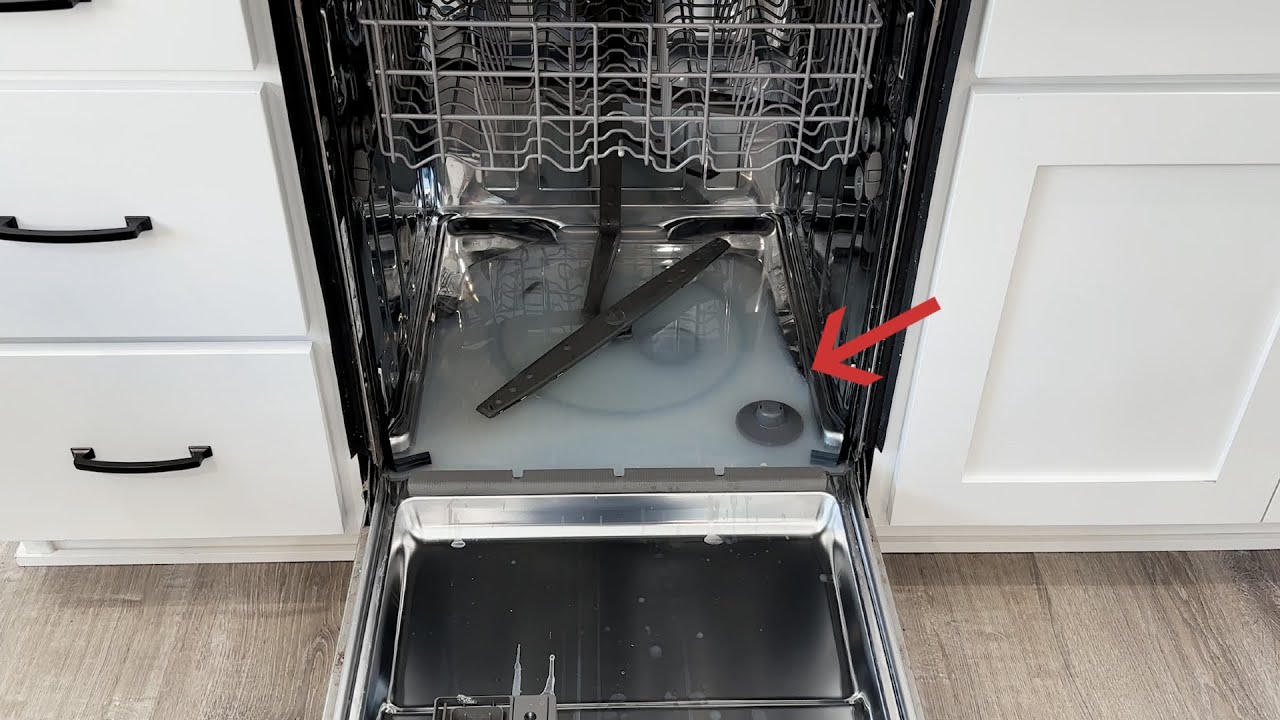
Clogged Drain Filter
A clogged drain filter is a common cause of water accumulation in the bottom of the dishwasher. Over time, food particles, grease, and other debris can accumulate in the drain filter, obstructing the flow of water and preventing proper drainage. However, you can easily resolve this issue by following these steps to clean the drain filter:
1. Locate and Access the Drain Filter
The drain filter is typically located at the bottom of the dishwasher. Consult your dishwasher’s user manual to find the exact location of the filter. Once located, you may need to remove the lower rack to gain access to the filter.
2. Remove and Rinse the Filter
Depending on the model of your dishwasher, the drain filter may be removable or require unscrewing. Carefully remove the filter and rinse it under running water to remove any visible debris and grime. Use a soft brush or toothbrush to gently scrub away stubborn residue.
3. Clean the Filter Housing
While the filter is removed, take a moment to clean the filter housing. Wipe down the area with a damp cloth to remove any dirt or buildup. This ensures a clean and smooth surface for the filter to be reinstalled.
Read more: Why Is My Blender Leaking From The Bottom
4. Reinstall the Filter
Once the filter and filter housing are clean and dry, carefully reinstall the filter back into its position. Make sure it is securely in place and properly aligned.
5. Run a Test Cycle
After cleaning and reinstalling the drain filter, run a test cycle to check if the water drains properly. Load the dishwasher with some dishes, add detergent, and start a wash cycle. Monitor the dishwasher during the cycle to ensure proper drainage and that no water accumulates in the bottom.
Regularly cleaning the drain filter is essential for maintaining the proper functioning of your dishwasher and preventing water accumulation. It is recommended to clean the filter at least once a month or more frequently if you notice a buildup of debris.
If you find that the drain filter is damaged or beyond cleaning, replace it with a new one. Contact the manufacturer or a professional technician for guidance on obtaining the correct replacement filter for your specific dishwasher model.
By regularly cleaning the drain filter, you can prevent water accumulation and ensure optimal performance from your dishwasher.
Malfunctioning Drain Pump
A malfunctioning drain pump can be a significant cause of water accumulation in the bottom of the dishwasher. The drain pump is responsible for forcing the water out of the dishwasher through the drain hose. If the pump is not functioning properly, water can’t be effectively drained, resulting in pooling at the bottom. Here are some troubleshooting steps to address a malfunctioning drain pump:
1. Check for Blockages
Start by inspecting the drain pump for any blockages. Debris, such as food particles or foreign objects, can clog the pump and hinder its operation. Disconnect the power supply to the dishwasher and carefully remove the pump cover or access panel. Examine the pump and its impeller for any obstructions, and use a soft brush or cloth to clean away any debris. Ensure that the impeller can freely rotate without any restrictions.
Read more: Why Is My Whirlpool Dishwasher Not Draining
2. Test the Pump Motor
If there are no visible blockages, the issue might lie with the pump motor. Use a multimeter to test the motor’s continuity. Follow the manufacturer’s instructions to properly check the motor’s functionality. If the multimeter indicates a lack of continuity, it suggests a faulty motor that requires replacement. Contact the manufacturer or a professional technician to obtain a new drain pump motor suitable for your dishwasher model.
3. Inspect the Pump Impeller
In some cases, the issue may be a damaged or broken pump impeller. The impeller is responsible for creating the water flow that pushes the water out of the dishwasher. Carefully remove the pump and inspect the impeller for any signs of damage or wear. If the impeller is broken or worn out, replace it with a new one. Make sure to follow the manufacturer’s instructions or seek professional assistance for proper installation.
4. Seek Professional Assistance
If you have performed the above troubleshooting steps and are still experiencing water accumulation due to a malfunctioning drain pump, it is advisable to seek professional help. A certified technician will have the expertise and specialized tools to diagnose and repair the pump or recommend the best course of action.
Remember to always follow safety precautions when working with electrical components and disconnect the power supply to the dishwasher before performing any maintenance or repairs. Consulting your dishwasher’s user manual or contacting the manufacturer can provide specific guidelines and recommendations for troubleshooting the drain pump.
Addressing a malfunctioning drain pump is essential to ensure proper drainage and prevent water accumulation in the dishwasher. By taking appropriate actions, you can restore the functionality of the drain pump and improve the overall performance of your dishwasher.
Improper Installation
Improper installation of a dishwasher can contribute to water accumulation in the bottom of the appliance. Issues such as incorrect leveling or insecure connections can hinder the proper functioning of the drainage system. Here are some important steps to address improper installation:
Read more: Why Is My Dishwasher Not Cleaning My Dishes
1. Check the Level of the Dishwasher
Start by confirming that the dishwasher is level. Use a bubble level to ensure that the dishwasher is not tilted in any direction. An uneven dishwasher can impact the flow of water towards the drain, causing water to accumulate at the bottom. Adjust the leveling legs or feet of the dishwasher to achieve proper alignment.
2. Secure the Dishwasher
Ensure that the dishwasher is securely installed and properly fastened to the countertop or cabinet. Loose connections can cause misalignment, leading to problems with drainage. Verify that the mounting brackets or screws holding the dishwasher in place are tight and secure.
3. Check the Connection to the Drain Hose
Inspect the connection between the dishwasher drain hose and the sink drain or garbage disposal. Ensure the connection is tight and properly sealed. A loose or poorly connected drain hose can result in water backup and accumulation. Consider using a clamp or hose clamp to secure the connection and prevent any leaks.
4. Verify the Air Gap Installation
If your dishwasher has an air gap, which is a device installed on the sink countertop or nearby, ensure it is correctly positioned and installed. The air gap prevents backflow of water from the sink into the dishwasher. Make certain that all the hose connections to the air gap are secure and properly attached.
Read more: Why Wont My Dishwasher Turn On
5. Readjust the Drain Hose
If you have confirmed that the drain hose is not kinked or bent, yet water accumulation persists, consider readjusting the positioning of the drain hose. Aim for a smooth, downward slope from the dishwasher to the drain connection. This helps facilitate the flow of water and prevents backups.
If you’re unsure about the correct installation requirements for your dishwasher, consult the manufacturer’s instructions or hire a professional installer. They can ensure that the dishwasher is properly aligned, leveled, and connected to prevent water accumulation and optimize its performance.
By addressing improper installation, you can alleviate water accumulation issues in your dishwasher and improve its overall efficiency and functionality.
Other Possible Causes
While insufficient drainage, a clogged drain filter, malfunctioning drain pump, and improper installation are common causes of water accumulation in the dishwasher, there are a few less common factors that could contribute to this issue as well. Let’s explore some of these other possible causes:
1. Malfunctioning Float Switch
The float switch is a small mechanism located inside the dishwasher that detects the water level. If the float switch is not functioning properly, it may fail to signal the dishwasher to stop filling with water or to begin draining. This can result in excessive water accumulation. If you suspect an issue with the float switch, consult a professional technician to diagnose and repair or replace the faulty component.
2. Faulty Water Inlet Valve
The water inlet valve controls the flow of water into the dishwasher during a wash cycle. If the valve is not closing properly or is stuck open, it can cause water to continuously fill the dishwasher, leading to overfilling and water accumulation. Replacing a faulty water inlet valve should be done by a professional to ensure proper installation and compatibility with your dishwasher.
Read more: Why Does My Dishwasher Not Dry
3. Blocked Air Gap or Garbage Disposal Connection
If your dishwasher is connected to an air gap or a garbage disposal unit, it’s important to check these connections for any blockages. A clogged air gap or garbage disposal can restrict the flow of water and prevent proper drainage. Remove any debris or buildup from these connections to facilitate smooth water flow.
If you have considered and addressed the more common causes of water accumulation in your dishwasher but are still experiencing the issue, it may be beneficial to seek professional assistance. A qualified technician can perform a thorough inspection of your dishwasher, diagnose any underlying problems, and recommend the appropriate solutions.
Remember that dishwasher models can vary, so it’s important to consult your dishwasher’s user manual or contact the manufacturer for specific troubleshooting tips and recommendations related to your particular model.
By identifying and addressing the less common causes, you can effectively resolve water accumulation issues in your dishwasher, ensuring its optimal performance and longevity.
Troubleshooting Steps for Water in the Bottom of the Dishwasher
If you’re experiencing water accumulation in the bottom of your dishwasher, there are several troubleshooting steps you can take to identify and resolve the issue. By following these steps, you can ensure proper drainage and optimize your dishwasher’s performance. Here’s what you can do:
1. Cleaning the Drain Filter
Start by locating and accessing the drain filter, usually found at the bottom of the dishwasher. Remove the filter and rinse it under running water to remove any debris. Use a soft brush or toothbrush to scrub away stubborn residue. Cleaning the drain filter regularly prevents clogs and helps maintain proper drainage.
2. Checking and Clearing the Drain Hose
Inspect the drain hose for any kinks, bends, or blockages. Straighten any kinks or bends in the hose to ensure a smooth water flow. Use a long, flexible brush or a wire to clear any debris that may be obstructing the hose. Ensuring a clear and unobstructed drain hose facilitates proper water drainage.
3. Verifying the Operation of the Drain Pump
Check the drain pump for proper functioning. Listen for any unusual noises or vibrations that may indicate a problem with the pump. If the drain pump is not working correctly, it may need to be repaired or replaced. Consult a professional technician for assistance in diagnosing and resolving any issues with the drain pump.
4. Adjusting the Dishwasher Installation
Check the levelness and stability of your dishwasher. Ensure that it is properly leveled by adjusting the leveling legs or feet. Make sure the dishwasher is securely installed and properly fastened to the countertop or cabinet. An appropriately installed dishwasher promotes proper drainage and prevents water accumulation.
5. Seeking Professional Assistance
If you have tried the above steps and are still experiencing water accumulation in the dishwasher, it may be time to seek professional assistance. A qualified technician can diagnose and resolve any underlying issues, ensuring your dishwasher operates efficiently.
Remember to consult your dishwasher’s user manual for specific troubleshooting tips and recommendations that are specific to your model. Additionally, contacting the manufacturer’s customer support or reaching out to a professional technician can provide invaluable guidance in troubleshooting and resolving the water accumulation problem in your dishwasher.
By following these troubleshooting steps, you can identify and address common causes of water accumulation, restoring proper drainage and ensuring the optimal performance of your dishwasher.
Cleaning the Drain Filter
Cleaning the drain filter is an essential step in maintaining the proper functioning of your dishwasher and preventing water accumulation at the bottom. Over time, debris such as food particles, grease, and other substances can build up in the filter, obstructing the flow of water and impairing the dishwasher’s performance. Here’s a step-by-step guide on how to clean the drain filter:
Read more: Why Are My Dishwasher Pods Not Dissolving
1. Locate the Drain Filter
The drain filter is typically located at the bottom of the dishwasher, near the back. Refer to your dishwasher’s user manual to find the exact location of the filter. You may need to remove the lower dishwasher rack to access it.
2. Remove the Filter
Gently remove the drain filter from its housing. Depending on your dishwasher model, you may need to unscrew or unclip the filter. Be cautious while removing it to avoid damaging the filter or any surrounding components.
3. Rinse Under Running Water
Rinse the drain filter thoroughly under warm running water. This will help remove any loose debris and food particles. Use your hands or a soft brush to gently scrub the filter, paying close attention to the areas with visible buildup. Avoid using harsh brushes or abrasive materials that may damage the filter.
4. Soak in Vinegar Solution (Optional)
If the filter has stubborn residue or hard water deposits, you may choose to soak it in a solution of vinegar and water. Mix equal parts of white vinegar and water in a container and submerge the filter for 15-20 minutes. The vinegar helps break down the buildup and remove any lingering odors. After soaking, rinse the filter again under running water.
5. Clean the Filter Housing
While the filter is removed, take the opportunity to clean the filter housing. Use a damp cloth to wipe away any debris or residue from the housing area. This helps ensure a clean surface for reinstallation and prevents any loose particles from recirculating in the dishwasher.
6. Reinstall the Filter
Once the filter and housing are clean and dry, carefully reinstall the filter back into its original position. Make sure it fits securely and aligns properly with the surrounding components. If necessary, refer to your user manual for guidance on proper installation.
7. Run a Test Cycle
To confirm that the drain filter is clean and functioning correctly, run a test cycle. Add some dirty dishes and a small amount of detergent, then start a wash cycle. Monitor the dishwasher during the cycle to ensure that the water drains properly and there is no water accumulation at the bottom.
Make cleaning the drain filter a regular part of your dishwasher maintenance routine. It is recommended to clean the filter at least once a month, or more frequently if you notice an excessive buildup of debris. Regularly cleaning the filter helps maintain optimal performance, prevents potential clogs, and ensures the efficiency of your dishwasher.
Checking and Clearing the Drain Hose
The drain hose plays a crucial role in the proper drainage of water from your dishwasher. Over time, the drain hose can become clogged or develop kinks, leading to water accumulation in the dishwasher. Checking and clearing the drain hose is an important troubleshooting step to resolve this issue. Here’s how you can do it:
Read more: Why Is The Water In My Toilet Brown
1. Disconnect the Power
Prior to checking or clearing the drain hose, it is essential to disconnect the power supply to the dishwasher. This ensures your safety and prevents any accidental operation of the appliance during the process. Unplug the dishwasher from the power outlet or turn off the circuit breaker that supplies power to it.
2. Locate the Drain Hose
The drain hose is usually located at the back of the dishwasher, leading to the sink drain or garbage disposal unit. Trace the hose from the dishwasher to its connection point. It may be helpful to consult your dishwasher’s user manual for specific instructions on locating the drain hose.
3. Inspect the Drain Hose
Examine the drain hose carefully for any visible signs of damage, such as cracks, splits, or leaks. Inspect the entire length of the hose, including bends and connections. If you notice any damage, you may need to replace the hose to ensure proper drainage. Consult a professional or contact the manufacturer for assistance in obtaining the correct replacement hose.
4. Clearing the Drain Hose
If the drain hose appears to be in good condition, the next step is to check for any obstructions. Carefully remove the drain hose from its connection point, ensuring you have a bucket or towel handy to catch any residual water. Inspect the hose for any clogs or blockages.
a. Manual Clearing
Use a long, flexible brush or a wire to gently clear any debris that may be blocking the hose. Start from one end of the hose and carefully insert the brush or wire, moving it back and forth to dislodge any obstructions. Repeat this process from the other end of the hose as well.
b. Water Pressure Flushing
Alternatively, you can use water pressure to flush out any clogs in the hose. Attach one end of the hose securely to a water source or a faucet, and direct the other end into a bucket or sink. Turn on the water supply gradually, allowing the water pressure to force the clog out of the hose. Ensure that the water flows freely through the hose.
Read more: Why Is There No Water In My Toilet Bowl
5. Reconnect the Drain Hose
Once you have cleared the drain hose, reconnect it securely to its original connection point. Ensure that it is correctly positioned and tightly fastened to prevent any leaks. Take care not to bend or kink the hose during reinstallation.
6. Test the Drainage
After reconnecting the drain hose, turn on the power supply to the dishwasher. Run a test cycle to ensure that the water drains properly and there is no accumulation at the bottom of the dishwasher. Load the dishwasher with some dishes, add detergent, and start a wash cycle. Monitor the dishwasher during the cycle for proper drainage.
By regularly checking and clearing the drain hose, you can prevent water accumulation and ensure optimal performance from your dishwasher. If you encounter any persistent issues or if the problem persists, contact a professional technician for further assistance and guidance.
Verifying the Operation of the Drain Pump
The drain pump is a critical component of your dishwasher’s drainage system. If the drain pump is not functioning properly, it can lead to water accumulation in the bottom of the dishwasher. Verifying the operation of the drain pump is an important troubleshooting step to address this issue. Here’s how you can do it:
1. Turn Off the Power
Prior to verifying the operation of the drain pump, ensure that the dishwasher is completely powered off. Unplug the dishwasher from the power outlet or turn off the circuit breaker that supplies power to the appliance. This will help avoid any electric shock hazards during the process.
2. Access the Drain Pump
The drain pump is typically located at the base of the dishwasher, near the back or side. Consult your dishwasher’s user manual for specific instructions on accessing the drain pump. You may need to remove the lower panel or other components to gain access to the pump.
3. Inspect the Drain Pump
Once you have accessed the drain pump, visually inspect it for any visible signs of damage or blockages. Look for cracks, leaks, or any foreign objects that may be obstructing the pump’s impeller. Ensure that the pump is securely connected to the dishwasher and that all electrical connections are intact.
4. Manually Rotate the Pump Impeller
Some dishwasher models allow you to manually rotate the drain pump’s impeller using your fingers or a tool (such as a screwdriver). Gently attempt to rotate the impeller in a clockwise direction. The impeller should move freely without any significant resistance. If you encounter resistance, there may be an obstruction or a mechanical issue with the pump that requires further attention.
5. Check for Unusual Noises or Vibrations
While inspecting and rotating the impeller, listen for any unusual noises or vibrations. Grinding, rattling, or squeaking sounds may indicate a problem with the motor or impeller. Excessive vibrations may also suggest a misalignment or damaged parts. Such signs may require professional assistance or further investigation.
Read more: Why Is My Bathtub Not Draining Water
6. Reassemble and Test
Once you have verified the condition and operation of the drain pump, reassemble any components that were removed to access it. Ensure all connections are securely fastened. Restore power to the dishwasher by plugging it back in or turning on the circuit breaker. Run a test cycle to observe the operation of the drain pump and check if water properly drains from the dishwasher.
If you encounter persistent issues with the drain pump, such as unusual noises or failure to drain water, it is recommended to contact a professional technician. They have the expertise and specialized tools to diagnose and repair drain pump problems, ensuring the optimal functioning of your dishwasher.
Regular maintenance and cleaning of the drain pump can help prevent issues and prolong its lifespan. Consult your dishwasher’s user manual for specific recommendations on maintenance and care of the drain pump.
Adjusting the Dishwasher Installation
Proper dishwasher installation is crucial for ensuring optimal performance and preventing water accumulation. If your dishwasher is not installed correctly, it can lead to issues with drainage and cause water to accumulate in the bottom of the appliance. Here are some steps to adjust the dishwasher installation:
Read more: Why Is My Dishwasher Not Cleaning My Dishes
1. Check the Level of the Dishwasher
Start by checking the levelness of your dishwasher. Place a bubble level on the top surface of the dishwasher, ensuring it is positioned front to back and side to side. If the dishwasher is not level, adjust the leveling legs or feet accordingly. Rotate each leg clockwise to raise it or counterclockwise to lower it until the dishwasher is level.
2. Secure the Dishwasher
Ensure that the dishwasher is securely fastened to the countertop or the surrounding cabinets. Loose installation can cause misalignment and affect the proper functioning of the drainage system. Verify that the mounting brackets or screws holding the dishwasher in place are tight and secure.
Read more: Why Is My Bathtub Not Draining Water
3. Align the Door
Check the alignment of the dishwasher door. If the door is misaligned, it may not form a proper seal, which can lead to water leakage and poor drainage. Adjust the door by loosening the hinge screws, aligning the door, and tightening the screws back in place. Consult your dishwasher’s user manual for detailed instructions on adjusting the door alignment.
4. Ensure Proper Connection to the Drain Hose
Inspect the connection between the dishwasher drain hose and the sink drain or garbage disposal unit. Ensure that the connection is tight and properly sealed to prevent any leaks or backflow of water. If necessary, use a clamp or hose clamp to secure the connection and ensure a proper fit.
5. Assess the Positioning of the Dishwasher
Check the positioning of the dishwasher within the allocated space. Ensure that there is sufficient clearance around the dishwasher, following the manufacturer’s recommendations. This allows for proper airflow and prevents any obstructions that could hinder drainage.
6. Test the Drainage
After adjusting the dishwasher installation, run a test cycle to verify that the water drains properly and there is no accumulation at the bottom of the dishwasher. Load the dishwasher with some dishes, add detergent, and start a wash cycle. Monitor the dishwasher during the cycle to ensure proper drainage.
If you continue to experience water accumulation in the dishwasher after adjusting the installation, it may be necessary to consult a professional technician for further assistance. They can assess the situation, identify any potential installation problems, and provide guidance on resolving the issue.
Remember to consult your dishwasher’s user manual for specific installation instructions and recommendations. Properly adjusting the installation of your dishwasher ensures proper drainage, prevents water accumulation, and promotes the efficient operation of your appliance.
Read more: Why Is My Bathtub Not Draining Water
Seeking Professional Assistance
If you have tried various troubleshooting steps and are still experiencing water accumulation in the bottom of your dishwasher, it may be time to seek professional assistance. A qualified technician can diagnose the issue and provide the expertise needed to resolve the problem effectively. Here’s why seeking professional assistance can be beneficial:
1. Expert Diagnosis
A professional technician has the knowledge and experience to accurately diagnose the underlying cause of the water accumulation in your dishwasher. They can thoroughly assess the various components and systems of your dishwasher to identify any malfunctions or issues that may be causing the problem.
2. Specialized Tools and Equipment
Professional technicians have access to specialized tools and equipment that are specifically designed for diagnosing and repairing dishwashers. These tools allow them to efficiently identify any issues and perform precise repairs or replacements when necessary.
3. Manufacturer Knowledge & Support
Professional technicians often have direct access to manufacturer support and resources. They are familiar with the specific requirements and recommendations of different dishwasher models, which allows them to provide accurate solutions for your particular appliance.
Read more: Why Is My Bathtub Not Draining Water
4. Safety Compliance
Dishwashers involve electrical components and water, making it crucial to prioritize safety. Professional technicians are trained to handle these potential hazards safely and adhere to industry standards. They can ensure that repairs or replacements are carried out in a secure and compliant manner.
5. Warranty Considerations
If your dishwasher is still under warranty, attempting DIY repairs may void the warranty. Seeking professional assistance ensures that any necessary repairs are carried out by certified technicians, protecting your warranty coverage. The technician can also advise you on the warranty terms and help you navigate any claim processes if needed.
6. Time & Cost Savings
While DIY troubleshooting can be a valuable first step, complex issues may require a significant amount of time, effort, and expenses. Professional technicians can save you time and frustration by efficiently diagnosing and resolving the problem. Additionally, they can provide insight into potential preventive maintenance measures to avoid future issues and expenses.
If you’re unsure about the cause of the water accumulation, lack the necessary expertise or tools, or simply prefer the peace of mind that comes with professional service, it is advisable to contact a reputable appliance repair company or the manufacturer’s authorized service center. They will have the skills and resources to effectively address the issue and restore your dishwasher’s proper functioning.
Remember to provide the technician with detailed information about the problem, any troubleshooting steps you have already taken, and the make and model of your dishwasher. This will help them better understand the situation and provide the most appropriate solution.
Conclusion
Water accumulation in the bottom of your dishwasher can be a frustrating and concerning issue. However, by understanding the various causes and implementing appropriate troubleshooting steps, you can effectively resolve the problem. In this article, we have explored common causes of water accumulation, such as insufficient drainage, a clogged drain filter, a malfunctioning drain pump, and improper installation. We have also discussed additional factors that may contribute to this issue.
To troubleshoot water accumulation in your dishwasher, you can start by cleaning the drain filter and checking for any blockages. Clearing the drain hose and verifying the operation of the drain pump are important steps to ensure proper drainage. Additionally, adjusting the dishwasher installation can help address any issues caused by misalignment or improper connection. If your efforts are unsuccessful, seeking professional assistance from a qualified technician is advisable.
Regular maintenance and cleaning of your dishwasher, including regular cleaning of the drain filter and checking for any clogs, can help prevent water accumulation and ensure the efficient operation of your appliance. Always refer to your dishwasher’s user manual for specific instructions and recommendations from the manufacturer.
Remember that safety should be a priority during any troubleshooting or repair process. Disconnect the power supply to the dishwasher and follow all safety precautions before attempting any maintenance or repairs.
By addressing the causes and following the troubleshooting steps outlined in this article, you can resolve water accumulation in the bottom of your dishwasher and enjoy its optimal performance once again. A properly functioning dishwasher not only ensures clean and dry dishes but also prolongs the lifespan of your appliance and helps maintain the overall efficiency of your kitchen.
If you’re unsure or uncomfortable with performing any troubleshooting steps, it’s always best to seek professional assistance. A certified technician can provide expert guidance and ensure that the issue is resolved effectively and safely.
Remember to prioritize regular maintenance and promptly address any issues to keep your dishwasher running smoothly. With proper care and attention, you can enjoy the convenience and efficiency of a fully functional dishwasher for years to come.
Frequently Asked Questions about Why Is There Water In The Bottom Of My Dishwasher
Was this page helpful?
At Storables.com, we guarantee accurate and reliable information. Our content, validated by Expert Board Contributors, is crafted following stringent Editorial Policies. We're committed to providing you with well-researched, expert-backed insights for all your informational needs.
0 thoughts on “Why Is There Water In The Bottom Of My Dishwasher”