Home>Construction & Tools>Building Materials>How To Fix Loose Brick Walkway
Building Materials
How To Fix Loose Brick Walkway
Modified: August 28, 2024
Learn how to fix a loose brick walkway using the right building materials and techniques. Our expert guide will help you restore your walkway quickly and efficiently.
(Many of the links in this article redirect to a specific reviewed product. Your purchase of these products through affiliate links helps to generate commission for Storables.com, at no extra cost. Learn more)
Introduction
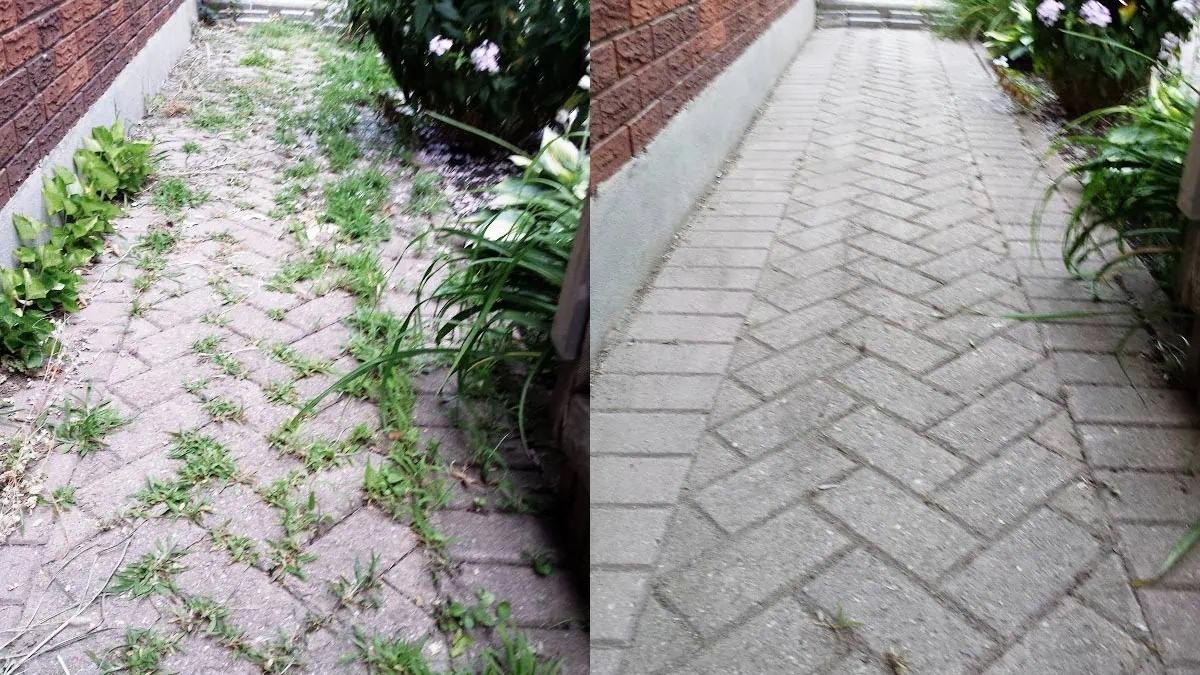
If you've noticed that your once pristine brick walkway is now plagued by loose and wobbly bricks, fear not! With a bit of know-how and some elbow grease, you can restore its former glory and ensure a safe and secure path for all who tread upon it. A loose brick walkway not only poses a tripping hazard but also detracts from the overall aesthetic appeal of your property. By addressing this issue promptly, you can prevent further damage and maintain the integrity of your walkway.
In this comprehensive guide, we'll walk you through the step-by-step process of fixing a loose brick walkway. From assessing the extent of the damage to gathering the necessary materials and tools, we've got you covered. Whether you're a seasoned DIY enthusiast or a novice homeowner looking to tackle your first repair project, you'll find valuable insights and practical tips to help you get the job done right.
So, roll up your sleeves and prepare to embark on a rewarding journey of restoration and rejuvenation. By the time you're finished, you'll take pride in knowing that you've not only repaired your walkway but also enhanced the overall curb appeal of your property. Let's dive in and reclaim the solid, stable, and visually appealing walkway you deserve!
Key Takeaways:
- Assess the damage to your brick walkway carefully to understand the root cause of the problem. Prioritize safety and consider the overall condition of the walkway to plan an effective repair strategy.
- Gather the necessary materials and tools before starting the repair process to streamline the project. By proactively gathering supplies, you can focus on restoring your walkway efficiently and with confidence.
Read more: How To Repair A Brick Walkway
Assessing the Damage
Before diving into the repair process, it's crucial to assess the extent of the damage to your brick walkway. Start by carefully inspecting the entire length of the walkway, paying close attention to any areas where the bricks appear loose, uneven, or wobbly. Take note of any visible cracks, gaps, or signs of shifting in the surrounding soil or base material.
Next, identify the underlying cause of the loose bricks. Common culprits include erosion of the base material, inadequate compaction during the initial installation, or the effects of prolonged exposure to harsh weather conditions. By understanding the root cause of the problem, you can implement effective solutions to prevent future issues.
It's also essential to consider the overall condition of the walkway. Are there areas where the bricks show signs of wear and deterioration? Are there any drainage issues that could be contributing to the instability of the walkway? By taking a comprehensive approach to your assessment, you can address multiple concerns in a single repair project.
Additionally, consider the safety implications of the loose bricks. If the walkway is located in a high-traffic area or is frequently used by family members and guests, prioritizing the repair is paramount. A proactive approach to addressing the damage will not only enhance safety but also prevent the need for more extensive and costly repairs down the line.
Finally, take note of any unique characteristics of your walkway, such as curves, slopes, or intricate patterns. These factors will influence the approach you take during the repair process and may require specific techniques to ensure a seamless and durable outcome.
By conducting a thorough assessment of the damage, you'll be equipped with the knowledge needed to plan and execute an effective repair strategy. With a clear understanding of the issues at hand, you can proceed with confidence, knowing that you're taking the necessary steps to restore your brick walkway to its former stability and visual appeal.
Gathering Materials and Tools
Once you’ve assessed the damage to your brick walkway, it’s time to gather the materials and tools necessary for the repair process. Having the right supplies on hand will streamline the project and ensure that you can address the issues with precision and efficiency.
Here’s a list of essential materials and tools you’ll need:
Materials:
- Replacement bricks: Ensure that the new bricks match the size, color, and texture of the existing ones to maintain a cohesive appearance.
- Masonry sand: Used for filling gaps and securing the bricks in place.
- Masonry adhesive: Provides added stability by bonding the bricks to the base material.
- Gravel or crushed stone: For repairing the base and addressing any drainage issues.
- Concrete mix: If the walkway's base requires significant repair or reinforcement.
- Protective gloves and eyewear: Essential for safety during the repair process.
Tools:
- Hammer and chisel: For carefully removing loose bricks and clearing debris from the base.
- Trowel: Used for applying masonry sand, adhesive, and concrete mix.
- Masonry brush: Helps clean the surfaces of the bricks and base material.
- Level: Ensures that the bricks are laid evenly and securely.
- Wheelbarrow: For mixing concrete, if needed, and transporting materials.
- Bucket and hose: Essential for cleaning the work area and addressing any drainage concerns.
Before starting the repair, double-check that you have all the necessary materials and tools readily available. This will prevent unnecessary delays and interruptions once you’re in the midst of the project. Additionally, ensure that you have adequate quantities of replacement bricks and other materials, accounting for any unforeseen circumstances or additional repair needs that may arise during the process.
By proactively gathering the required materials and tools, you’ll set the stage for a smooth and efficient repair experience. With everything at your fingertips, you can focus on the task at hand and work towards restoring your brick walkway to its former strength and visual appeal.
Read more: How To Clean Brick Walkway
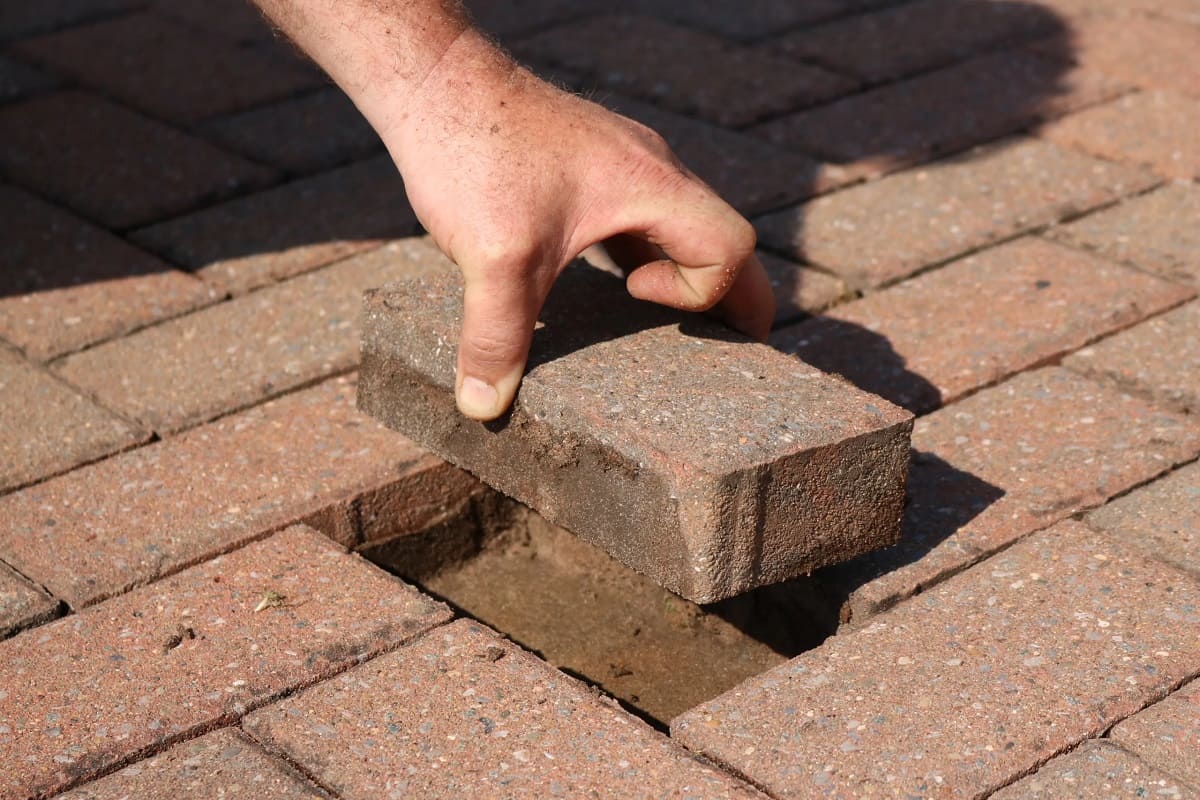
Removing Loose Bricks
With your materials and tools at the ready, it’s time to begin the repair process by addressing the loose bricks in your walkway. Start by carefully examining each unstable brick, noting its position and the surrounding base material. Here’s a step-by-step guide to safely and effectively remove the loose bricks:
1. Clear the Surrounding Area:
Begin by clearing any debris, dirt, or loose mortar surrounding the targeted brick. This will provide you with a clear workspace and prevent interference during the removal process.
2. Loosen the Brick:
Using a hammer and chisel, gently tap around the edges of the brick to loosen it from the surrounding mortar and base material. Exercise caution to avoid damaging adjacent bricks or the walkway’s foundation.
3. Lift and Remove:
Once the brick is loosened, carefully lift it from its position, taking care not to disturb the surrounding bricks. Place the removed brick aside, as it may be salvageable for reinstallation or serve as a reference for obtaining replacement bricks.
Read more: How To Fix Siding That Is Loose
4. Clean the Base:
Use a masonry brush or similar tool to clear away any residual mortar or debris from the space where the brick was situated. Ensure that the base is clean and level, ready to receive the necessary repairs and a new brick.
As you remove each loose brick, take note of its condition and any underlying issues with the base material. This information will guide your subsequent repair efforts and help you address the root causes of the instability in your walkway.
Throughout the removal process, prioritize safety by wearing protective gloves and eyewear. Additionally, exercise patience and precision to avoid causing further damage to the walkway or compromising the stability of adjacent bricks.
By methodically removing the loose bricks, you’re laying the groundwork for a thorough and effective repair. With the damaged bricks out of the way, you can focus on reinforcing the walkway’s base and securing the replacement bricks to restore its stability and visual appeal.
Repairing the Base
With the loose bricks removed, it’s time to turn your attention to the underlying base of your walkway. Repairing and reinforcing the base is crucial for ensuring the long-term stability and resilience of the restored walkway. Here’s a detailed guide to effectively address the base repair:
1. Assess the Base Condition:
Carefully examine the exposed base material, such as compacted gravel or crushed stone, to identify any areas of erosion, settling, or inadequate support. Address any drainage issues or soil compaction concerns that may have contributed to the instability of the walkway.
2. Add Gravel or Crushed Stone:
If the base material shows signs of erosion or settling, add a layer of fresh gravel or crushed stone to replenish and level the base. This will provide a stable foundation for repositioning the bricks and ensure even weight distribution across the walkway.
Read more: How To Fix A Loose Faucet
3. Level the Base:
Use a trowel or similar tool to smooth and level the base material, creating a uniform surface for reinstallation of the bricks. Pay attention to any slopes or uneven areas, as these can impact the stability and longevity of the repaired walkway.
4. Address Drainage Concerns:
If water accumulation or poor drainage contributed to the deterioration of the base, consider implementing drainage solutions, such as adding a slight slope to redirect water away from the walkway or installing a permeable base material to enhance water absorption.
5. Reinforce with Concrete Mix (if needed):
In cases where the base requires significant repair or reinforcement, consider using a concrete mix to fortify the foundation. Apply the concrete mix as per the manufacturer’s instructions, ensuring thorough compaction and a level surface for the reinstallation of the bricks.
By addressing the condition of the base material and implementing necessary repairs and reinforcements, you’re laying the groundwork for a durable and stable walkway. Taking the time to fortify the base will prolong the lifespan of the repair and minimize the risk of future issues with loose or shifting bricks.
Throughout the base repair process, maintain a keen eye for detail and ensure that the foundational elements of your walkway are restored to optimal condition. With a solid base in place, you’ll be well-prepared to securely reposition the bricks and complete the repair with confidence.
Replacing and Securing Bricks
With the base repaired and prepared, it’s time to focus on replacing and securely positioning the bricks in your walkway. This phase of the repair process is crucial for restoring the structural integrity and visual appeal of the walkway. Here’s a comprehensive guide to effectively reposition and secure the bricks:
Read more: How To Fix A Loose Showerhead Pipe
1. Select Replacement Bricks:
Choose replacement bricks that closely match the size, color, and texture of the existing ones. This will ensure a seamless integration of the new bricks with the overall aesthetic of the walkway. If possible, use salvaged bricks from the removal process to maintain consistency.
2. Apply Masonry Sand:
Spread a layer of masonry sand over the repaired base, creating a level and stable surface for laying the replacement bricks. The sand will help fill gaps and provide a cushioning effect, promoting even weight distribution across the walkway.
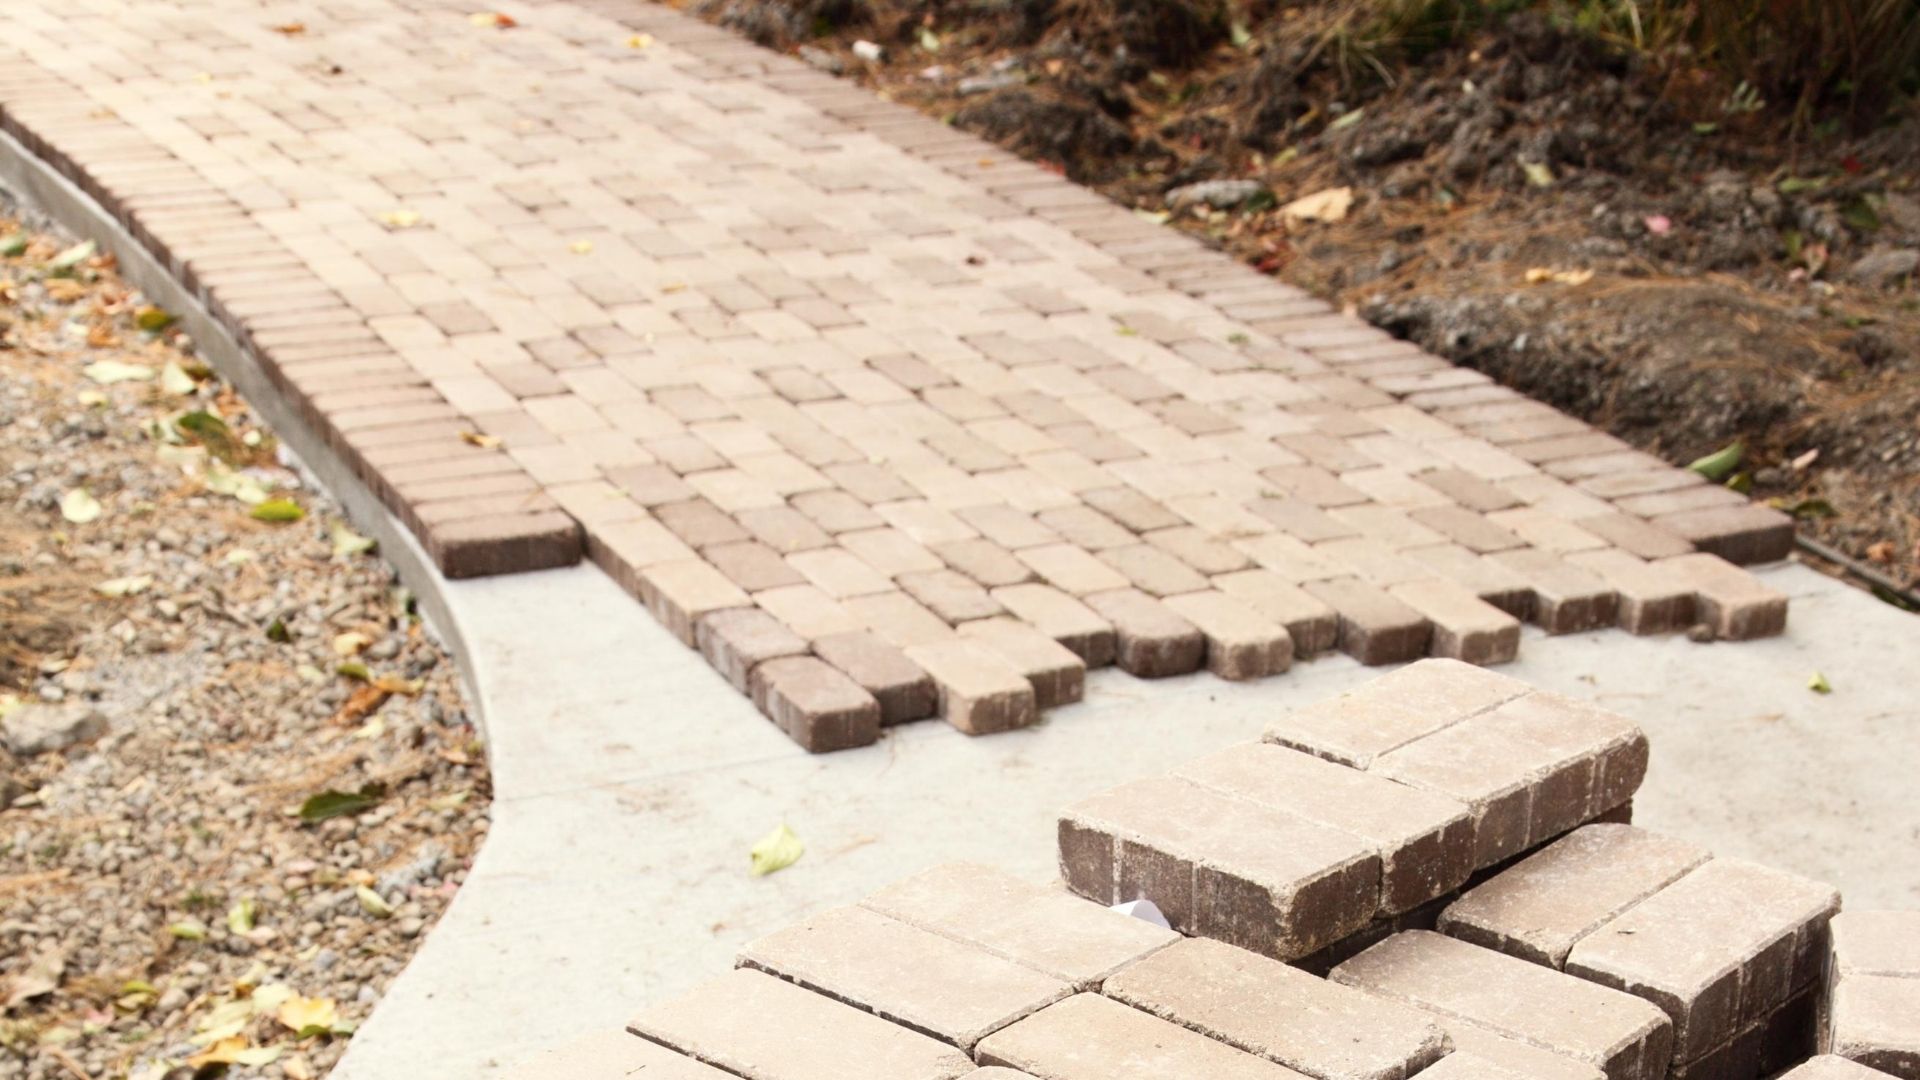
3. Position the Bricks:
Carefully place the replacement bricks in their designated positions, ensuring a snug fit and even alignment with the surrounding bricks. Use a level to confirm that the bricks are laid uniformly and at the appropriate height relative to the walkway’s surface.
4. Secure with Masonry Adhesive:
Apply masonry adhesive to the underside of each replacement brick before setting it in place. This adhesive will enhance the bond between the bricks and the base, preventing shifting or displacement due to foot traffic or environmental factors.
Read more: How To Fix Loose Electrical Box
5. Tap and Set:
Gently tap each replacement brick with a rubber mallet or similar tool to ensure that it is firmly seated in the masonry sand and adhesive. This process will eliminate air pockets and promote a secure connection between the bricks and the base.
6. Clean and Compact:
Use a masonry brush to remove any excess sand or adhesive that may have seeped out from the edges of the bricks. Once the bricks are in place, lightly compact the entire walkway surface to ensure uniform stability and cohesion.
By meticulously replacing and securing the bricks, you’re revitalizing the walkway and reinforcing its structural integrity. Each securely positioned brick contributes to the overall stability and longevity of the repair, ensuring that your walkway remains a reliable and visually appealing feature of your property.
Throughout the reinstallation process, exercise patience and precision to achieve a seamless and durable outcome. By taking the time to position and secure each brick with care, you’ll create a walkway that not only looks impeccable but also withstands the test of time.
Finishing Touches
As the replacement and securing of the bricks near completion, it’s time to add the finishing touches that will elevate the overall appearance and functionality of your restored walkway. These final steps will enhance the durability, aesthetics, and safety of the repaired area, ensuring that it remains a source of pride and a functional feature of your property. Here’s a detailed guide to the finishing touches:
1. Fill Gaps with Masonry Sand:
Once the replacement bricks are securely in place, fill any remaining gaps between the bricks with masonry sand. This will create a uniform and visually appealing surface while minimizing the risk of weed growth and soil erosion between the joints.
Read more: How To Fix Loose Patio Stones
2. Compact and Settle:
After filling the gaps with masonry sand, lightly compact the entire walkway surface to encourage settling and cohesion. This step will further stabilize the bricks and promote a solid, level foundation for foot traffic and environmental exposure.
3. Clean the Surface:
Use a hose or bucket of water to gently cleanse the walkway surface, removing any residual sand, adhesive, or debris. A clean and well-maintained appearance will enhance the visual appeal of the walkway and showcase the meticulous craftsmanship of the repair.
4. Consider Sealing the Bricks:
Depending on the specific characteristics of your walkway and the desired level of protection, consider applying a sealant to the surface of the bricks. This optional step can enhance the durability of the bricks and provide resistance to staining, moisture penetration, and UV damage.
5. Inspect and Address Any Remaining Concerns:
Conduct a thorough inspection of the repaired walkway, paying attention to the alignment, stability, and overall condition of the bricks. Address any remaining issues or imperfections to ensure that the walkway meets your expectations in terms of both functionality and visual appeal.
By attending to these finishing touches, you’re adding the final layer of care and attention to detail that will distinguish your walkway as a well-maintained and resilient feature of your property. The completed repairs and enhancements will not only restore the walkway’s functionality but also elevate its aesthetic charm, leaving a lasting impression on residents and visitors alike.
Throughout the finishing touches phase, maintain a meticulous approach and a commitment to achieving a flawless outcome. By investing the necessary effort and consideration, you’ll ensure that your walkway stands as a testament to your dedication to quality and craftsmanship.
Read more: How To Fix A Loose Fence Post
Conclusion
Congratulations on successfully restoring your loose brick walkway to its former strength and visual appeal! By embarking on this repair journey, you’ve not only enhanced the safety and functionality of your property but also demonstrated a commitment to proactive maintenance and preservation.
Throughout the repair process, you’ve embraced the role of a dedicated steward, safeguarding the integrity and aesthetic charm of your walkway. From the initial assessment of the damage to the meticulous replacement and securing of the bricks, your efforts have yielded a walkway that exudes durability, stability, and timeless elegance.
By addressing the underlying causes of the loose bricks and implementing effective repair strategies, you’ve fortified the foundation of your walkway, ensuring its resilience in the face of environmental elements and daily use. The attention to detail and precision you’ve applied to each step of the repair process reflect a commitment to craftsmanship and a genuine desire to maintain a property that exudes pride and care.
As you admire the completed restoration, take pride in knowing that your walkway now stands as a testament to your dedication and resourcefulness. The repaired walkway not only provides a safe and inviting path for residents and visitors but also serves as a reflection of your unwavering commitment to maintaining a property that exudes quality and attention to detail.
As you move forward, continue to monitor the condition of your walkway and address any maintenance needs promptly. By staying proactive and attentive, you’ll ensure that your walkway remains a source of pride and a functional asset for years to come.
Thank you for embarking on this repair journey with dedication and enthusiasm. Your commitment to preserving and enhancing your property has not gone unnoticed, and the restored walkway stands as a testament to your unwavering care and attention to detail.
Frequently Asked Questions about How To Fix Loose Brick Walkway
Was this page helpful?
At Storables.com, we guarantee accurate and reliable information. Our content, validated by Expert Board Contributors, is crafted following stringent Editorial Policies. We're committed to providing you with well-researched, expert-backed insights for all your informational needs.

0 thoughts on “How To Fix Loose Brick Walkway”