Articles
How To Fix Loose Electrical Box
Modified: March 1, 2024
Learn how to fix a loose electrical box with our informative articles. Find step-by-step instructions and helpful tips to ensure a secure electrical installation.
(Many of the links in this article redirect to a specific reviewed product. Your purchase of these products through affiliate links helps to generate commission for Storables.com, at no extra cost. Learn more)
Introduction
Loose electrical boxes can be a frustrating problem to deal with in your home. They can cause outlets or switches to become unstable, posing a potential safety hazard. Additionally, loose electrical boxes can lead to problems with electrical connections, potentially resulting in power outages or electrical fires.
Fortunately, fixing a loose electrical box is a relatively simple DIY task that you can tackle with the right tools and materials. In this article, we will guide you through the process of fixing a loose electrical box, step by step.
Before we dive into the details, it is essential to understand what causes electrical boxes to become loose in the first place. By understanding the common culprits, you can take preventative measures to avoid future issues.
Key Takeaways:
- Fixing a loose electrical box is a manageable DIY task that involves turning off the power, tightening screws, and checking for stability. Prioritize safety and consult a professional if unsure.
- Identify common causes of loose electrical boxes, such as improper installation and aging, to prevent future issues. Use the right tools and materials for a successful repair and ensure a secure electrical system.
Read more: How To Fix Siding That Is Loose
Common Causes of Loose Electrical Boxes
There are several common causes for electrical boxes to become loose over time. These include:
- Improper Installation: In some cases, electrical boxes may not have been installed securely in the first place. This can occur if the installer did not use the appropriate screws or if the box was not properly anchored to the wall.
- Aging and Wear: Over time, the screws holding the electrical box in place can loosen due to regular use and general wear and tear. This is especially common in older homes where the electrical system has been in place for many years.
- Vibration: If the electrical box is located near a vibrating source, such as a ceiling fan or an HVAC system, the constant movement can cause the screws to gradually loosen over time.
- Overloading: Electrical boxes that have been overloaded with too many wires or devices can put additional strain on the screws, causing them to become loose.
- Moisture Damage: Moisture infiltration, either from leaks or high humidity, can cause the electrical box and its components to deteriorate over time. This can weaken the screws and make the box more prone to becoming loose.
Identifying the cause of the loose electrical box is the first step in addressing the issue. Once you have determined the root cause, you can proceed with the necessary repairs.
Tools and Materials Needed
Before you begin fixing a loose electrical box, gather the following tools and materials:
- Flathead screwdriver
- Phillips screwdriver
- Power drill (optional, if you prefer to use a drill instead of a screwdriver)
- Electrical tape
- Wire cutters/strippers
- Wire nuts
- New screws (if necessary)
- Level
Having these tools and materials readily available will ensure that you can efficiently complete the task without any interruptions.
Additionally, it’s important to prioritize safety while working with electrical components. Therefore, it is recommended to wear safety goggles and gloves to protect yourself from any potential hazards.
Now that you have everything you need, let’s move on to the step-by-step process of fixing a loose electrical box.
Step 1: Turn off the Power
Before you begin working on your electrical box, it is crucial to turn off the power to the area. This will ensure your safety and prevent any potential electrical accidents.
Start by identifying the circuit breaker that controls the power supply to the electrical box you’ll be working on. Locate the corresponding switch and flip it to the “off” position. Alternatively, you may need to remove a fuse if your home’s electrical system uses fuses.
Once you’ve turned off the power, it’s a good idea to double-check that the electricity is truly off by using a non-contact voltage tester. This handy tool detects the presence of electricity without the need for direct contact.
Simply place the tip of the voltage tester near the outlet or switch in question. If the tester beeps or its LED light illuminates, this indicates that there is still electrical current present. In that case, go back and recheck your circuit breaker or fuse box until the tester registers no current.
Even though you’ve turned off the power, it’s important to remain cautious and avoid touching any exposed wires. Always assume that there is still some residual electricity in the circuit until you have confirmed it is completely shut off.
Now that you have confirmed that the power is off, you can proceed to the next step: removing the cover plate.
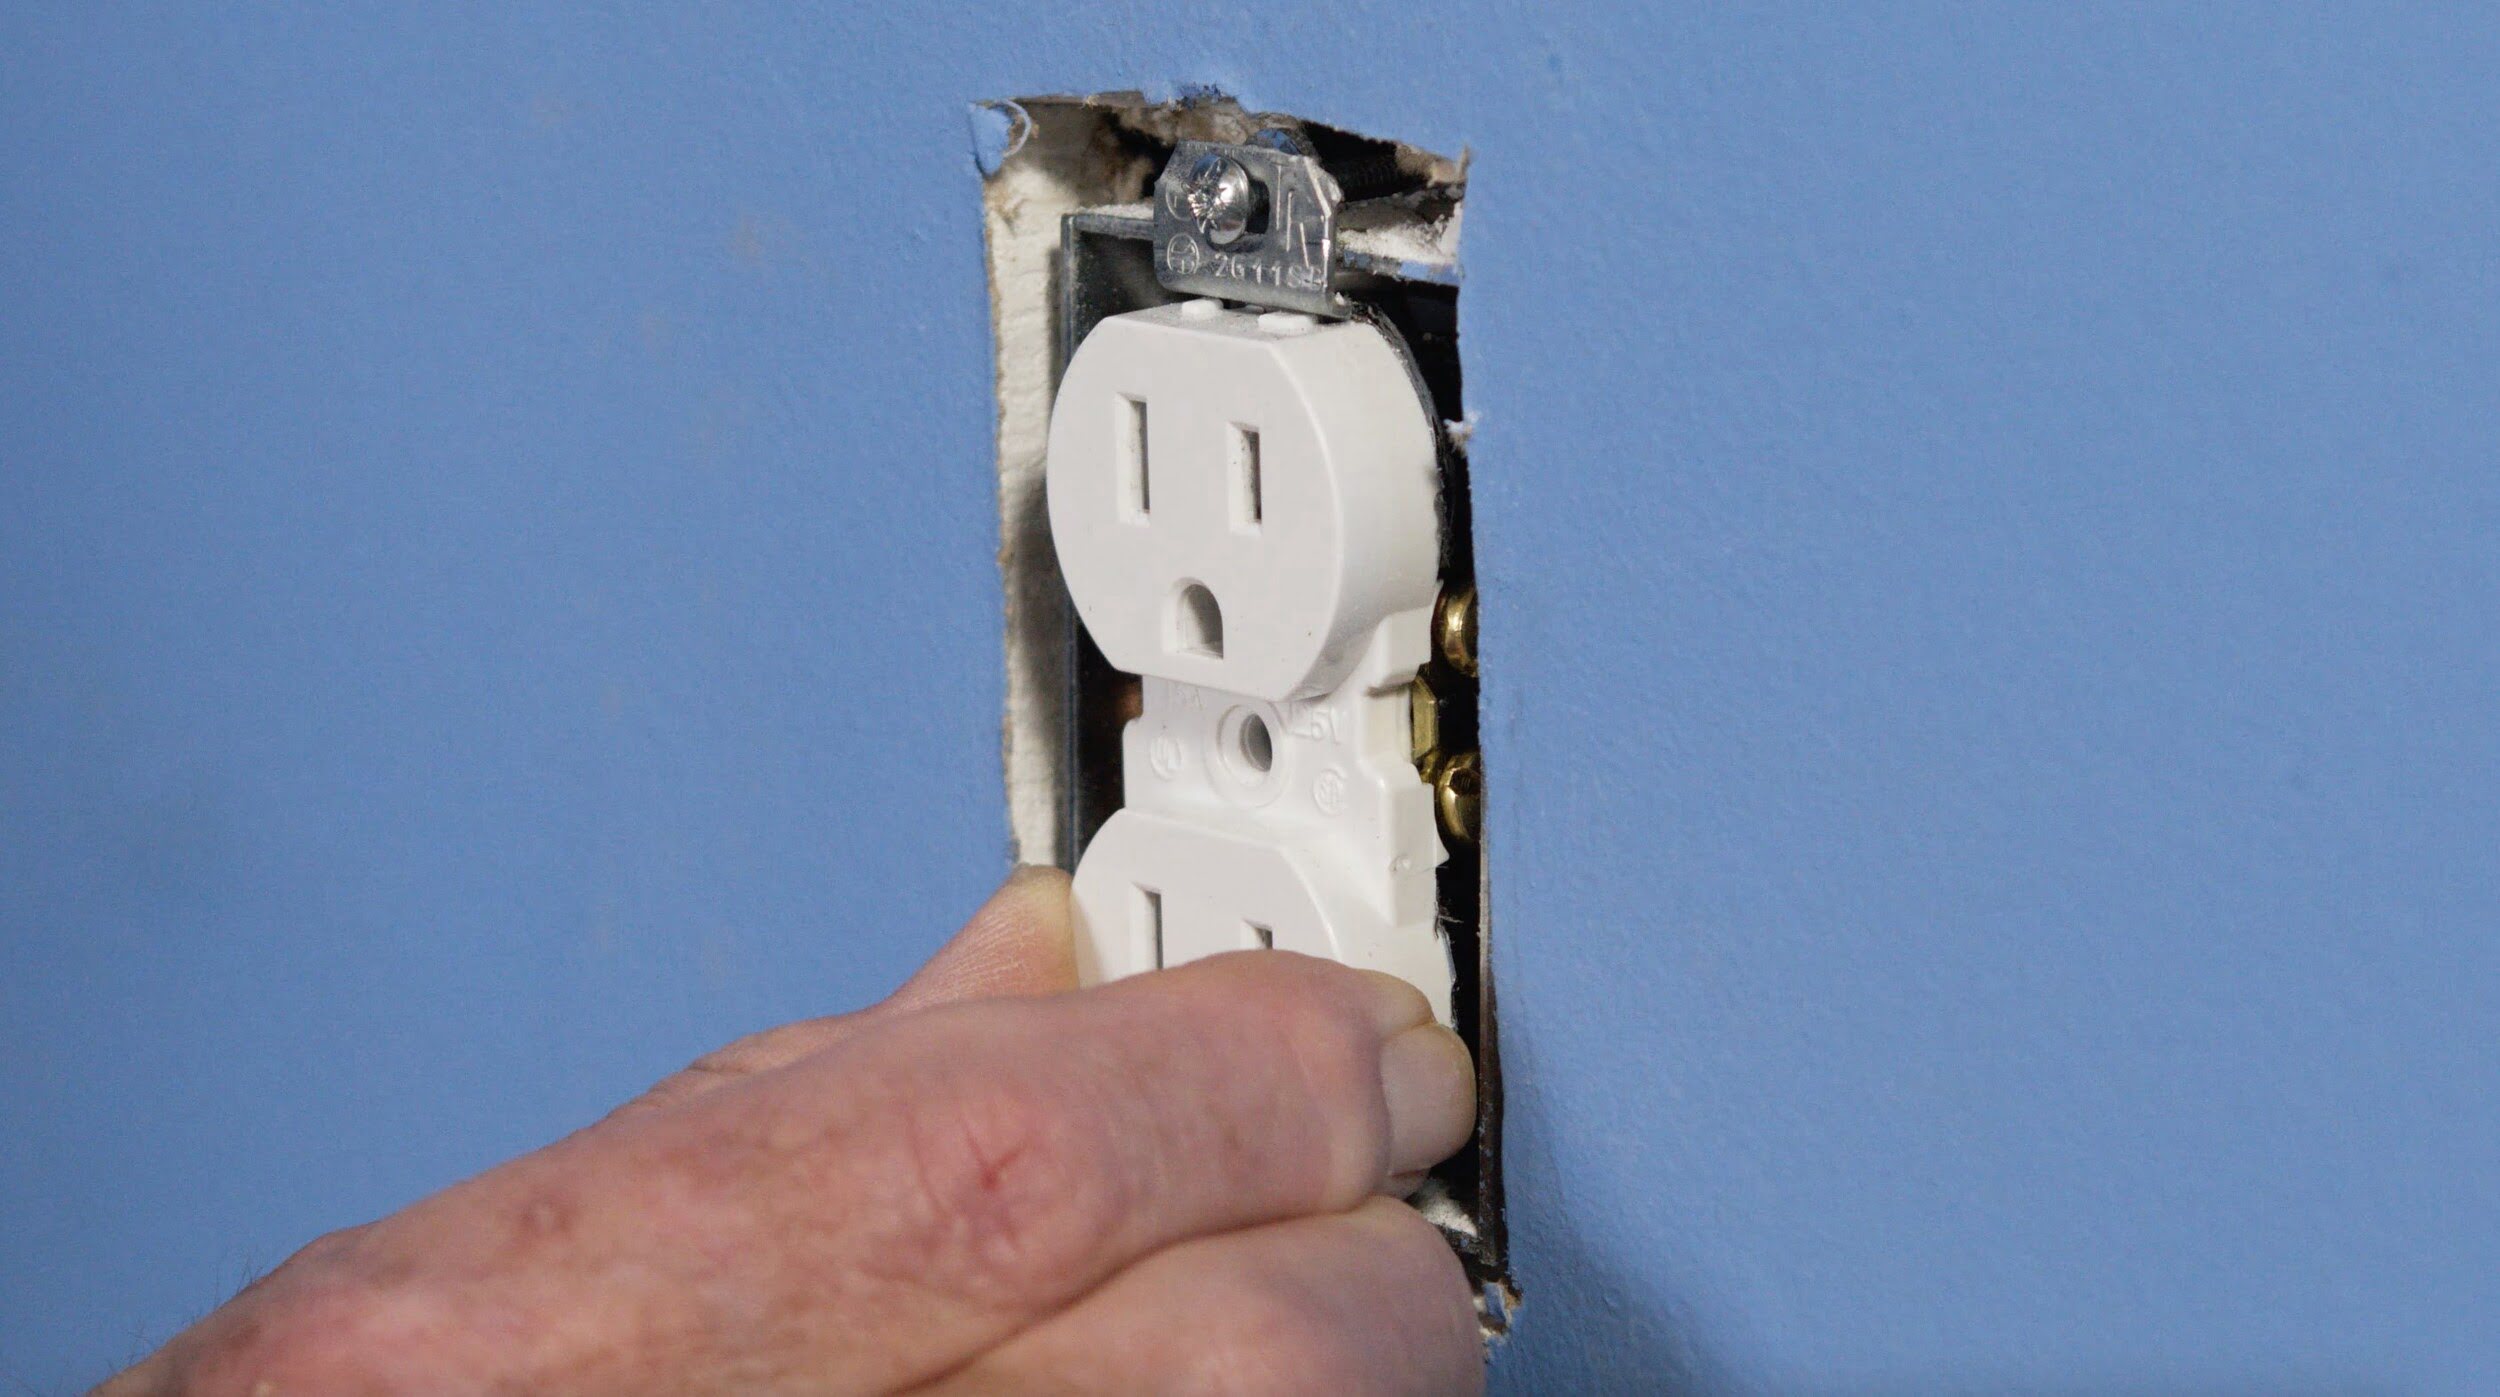
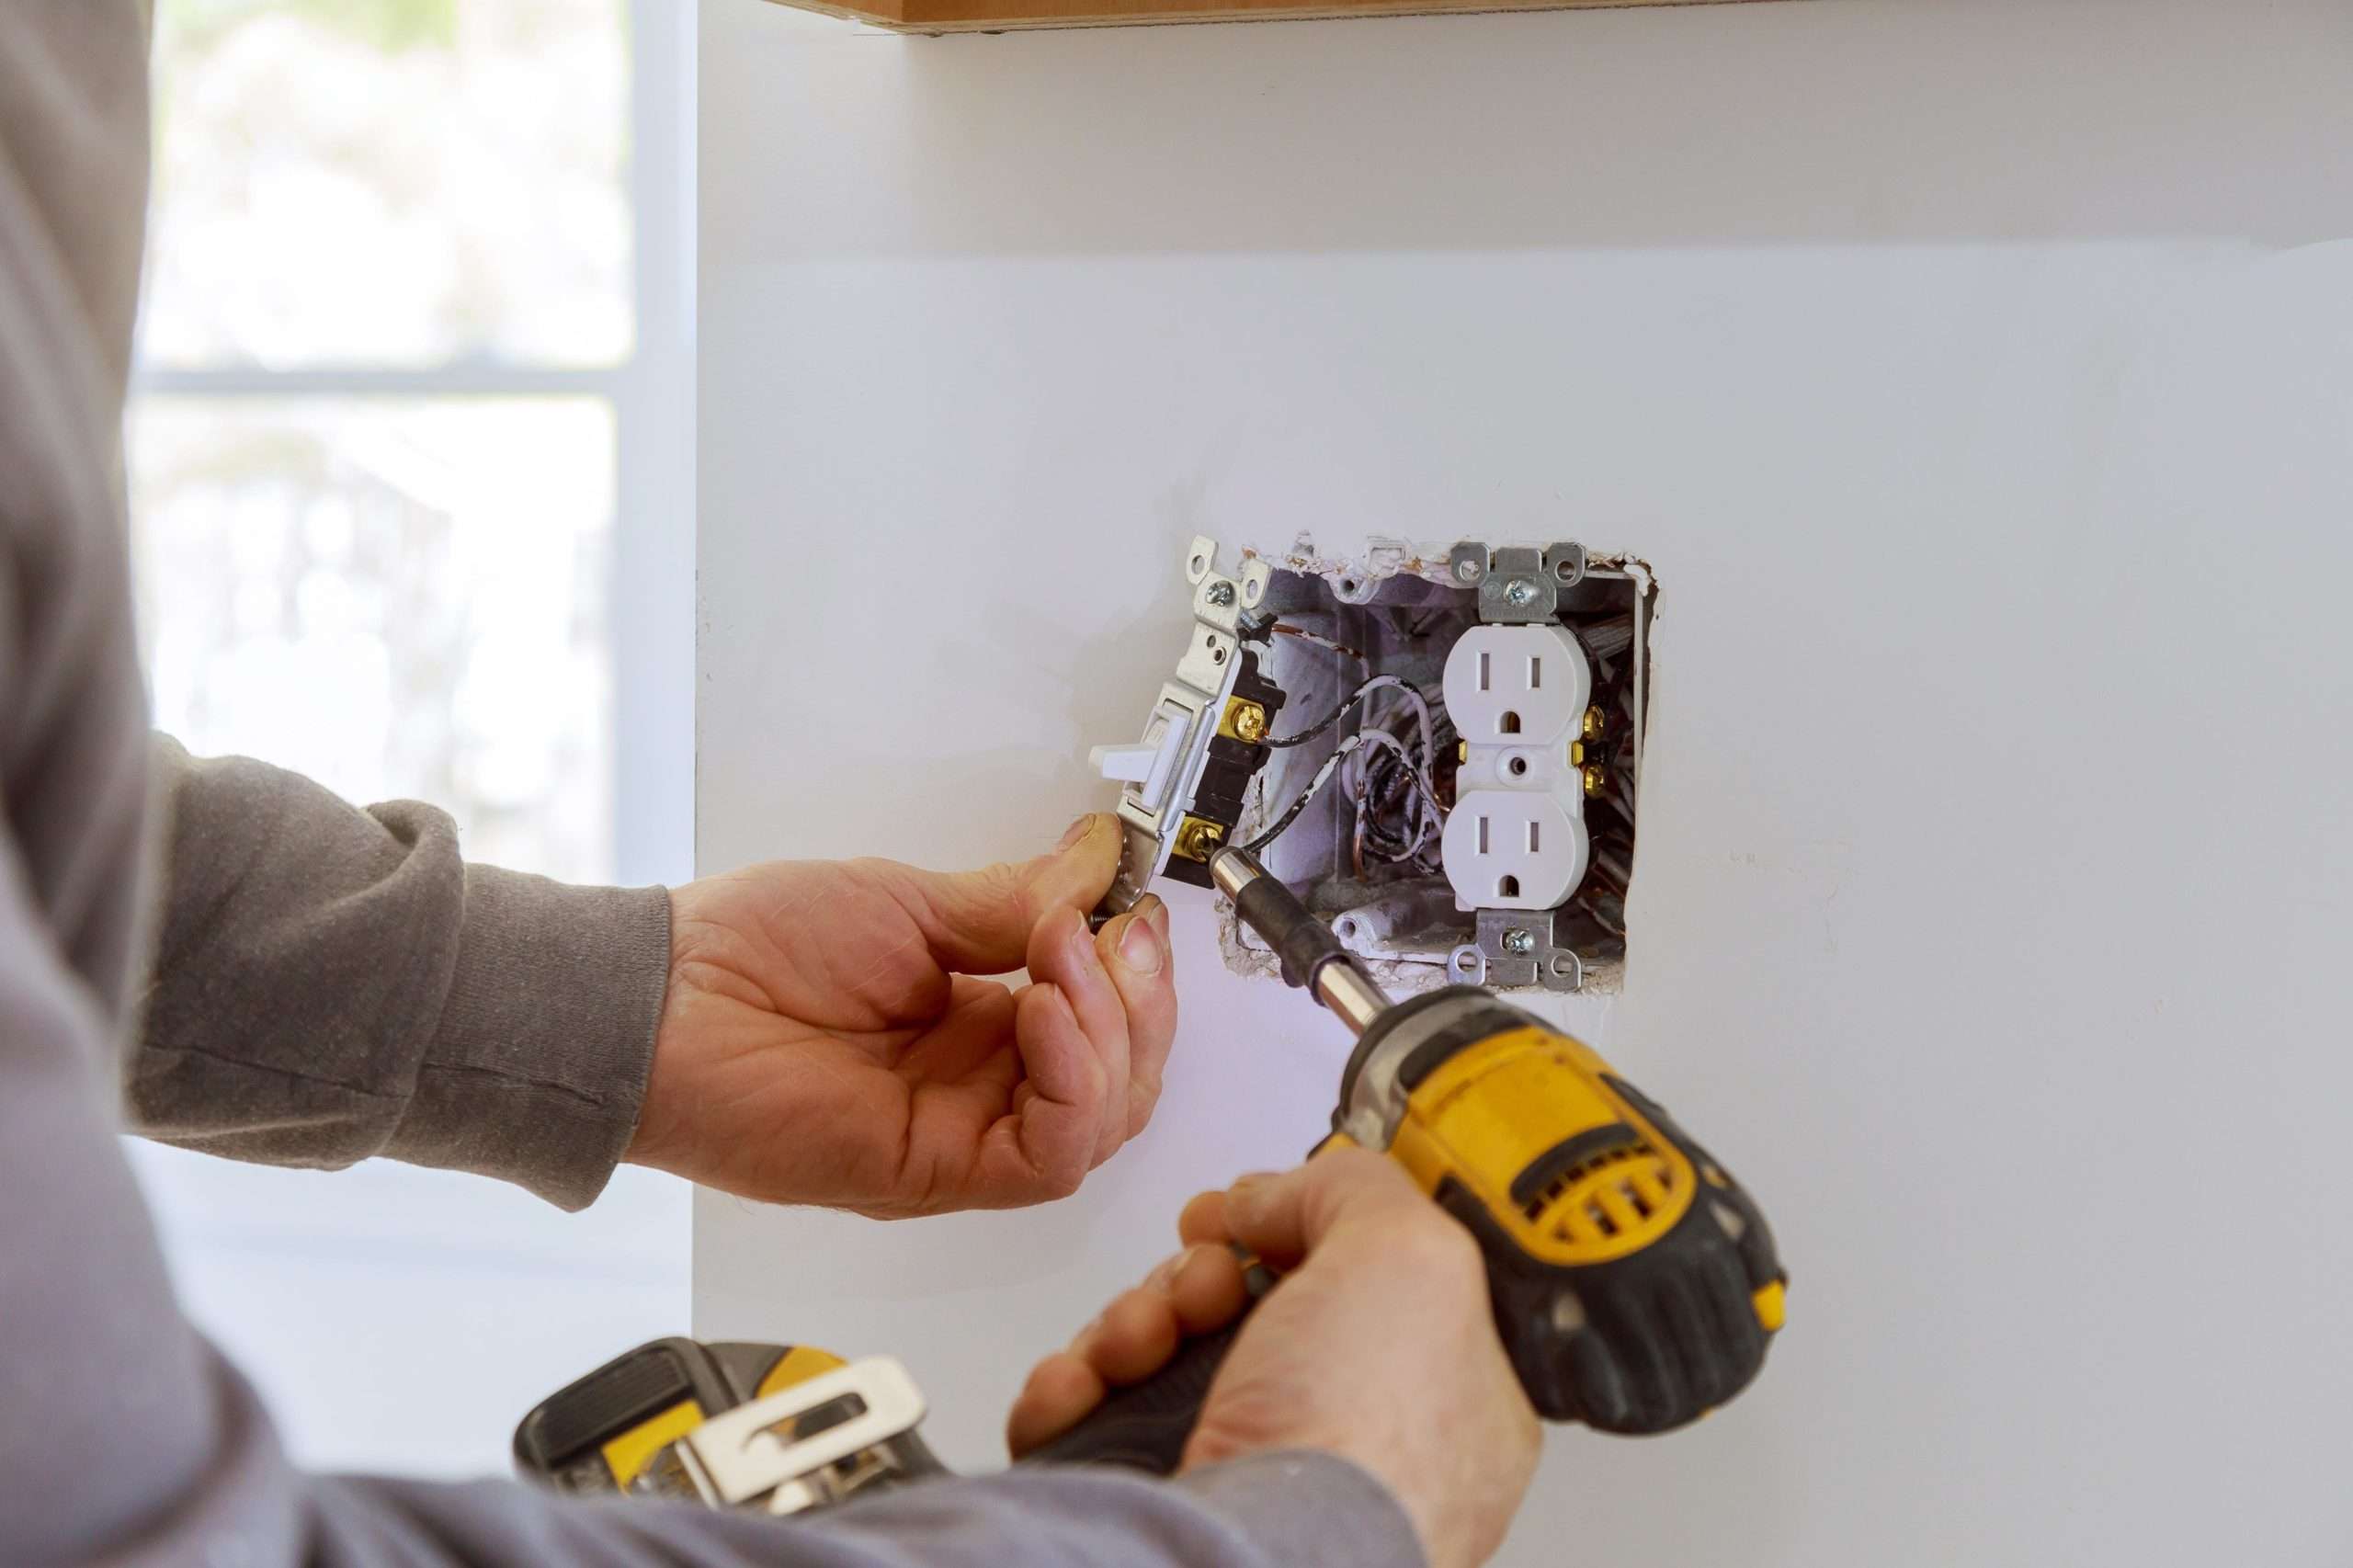
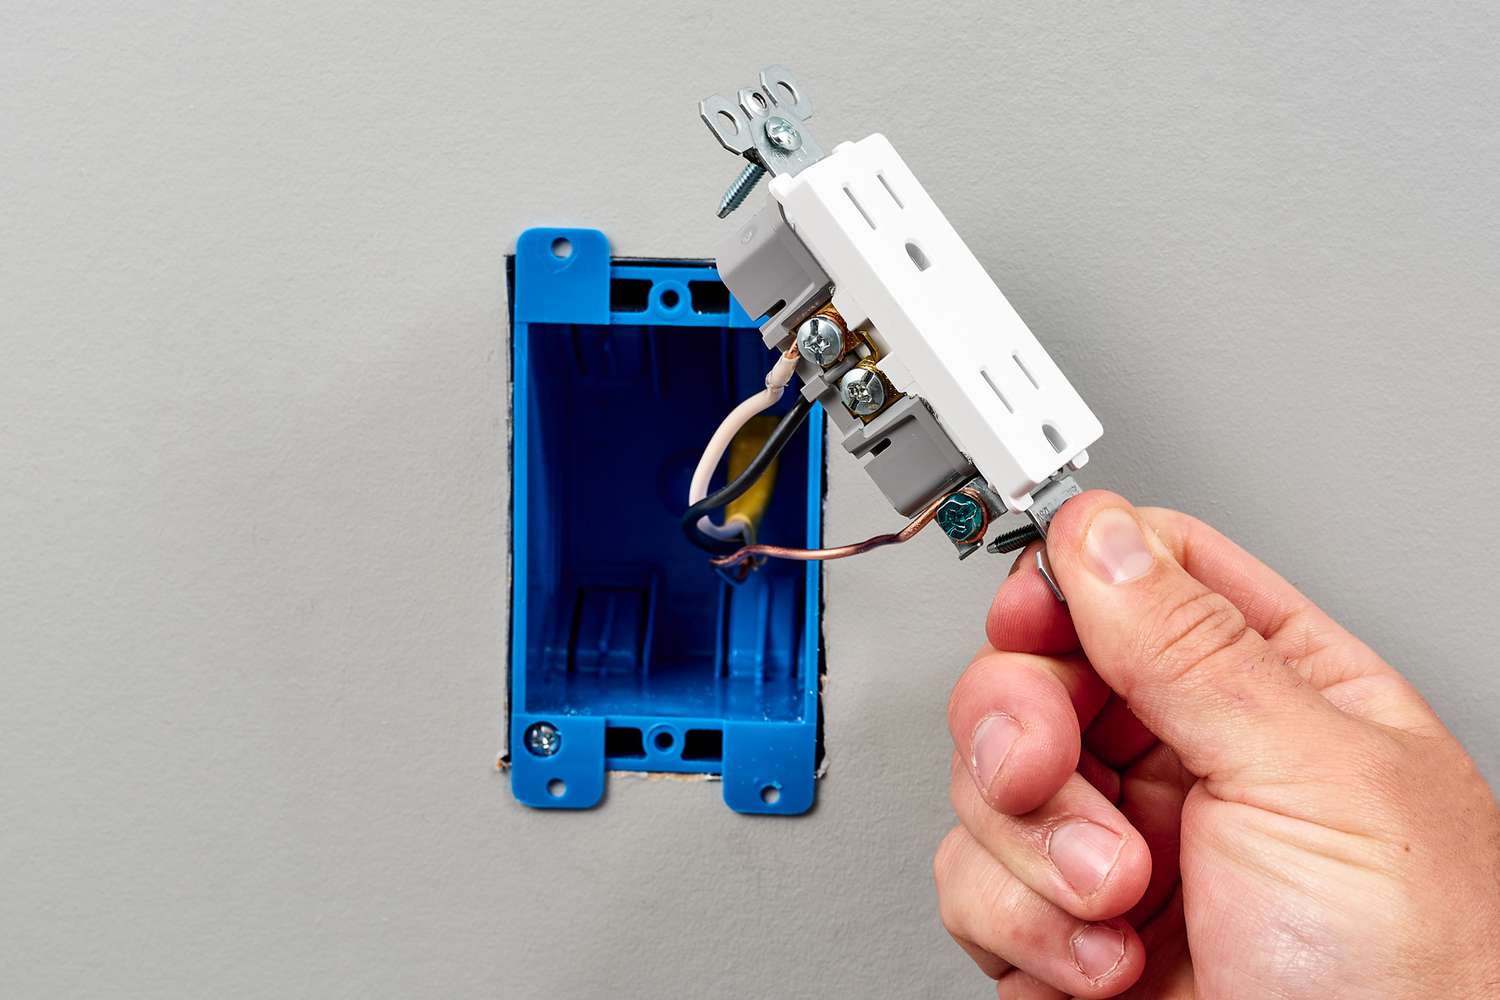
Step 2: Remove the Cover Plate
Now that you have turned off the power and ensured your safety, it’s time to remove the cover plate of the electrical box. The cover plate is the visible part of the outlet or switch, and it conceals the electrical wiring and the box itself.
Using a flathead or Phillips screwdriver, carefully unscrew the screws that hold the cover plate in place. Set the screws aside in a safe place, as you will need them later for reinstallation.
With the screws removed, gently pull the cover plate away from the wall. Be careful not to apply too much force, as you don’t want to damage the wires or the box behind it.
Once the cover plate is removed, you’ll have a clear view of the electrical box and the wires inside. Take a moment to inspect the existing screws that secure the box to the wall. If the screws are loose or worn, it’s a good idea to replace them with new ones during the repair process.
Now that the cover plate is out of the way, you can move on to the next step: tightening the screws to secure the electrical box.
When fixing a loose electrical box, turn off the power, remove the cover plate, and tighten the screws holding the box in place. If the box is damaged, replace it with a new one. Always follow safety precautions when working with electricity.
Read more: How To Fix A Loose Faucet
Step 3: Tighten the Screws
With the cover plate removed, you can now focus on tightening the screws to secure the electrical box in place. Loose screws are one of the main causes of a wobbly or unstable electrical box.
Using a screwdriver or a power drill with the appropriate bit, locate the screws that anchor the electrical box to the wall. These screws are typically found at the top and bottom of the box.
Start by tightening each screw in a clockwise direction until you feel resistance. Be careful not to overtighten the screws, as this can strip the holes or damage the box. Aim for a snug fit that ensures the box is securely fastened to the wall without causing any structural issues.
If you find that the existing screws are worn or stripped, it’s recommended to replace them with new screws. Choose screws that are the same size and type as the original ones. This will ensure a proper fit and secure attachment.
Once you have tightened or replaced the screws, check the stability of the electrical box by gently pushing on it with your hand. It should feel solid and not move or wobble. If the box still feels loose, you may need to explore additional measures to reinforce it.
Tightening the screws is a critical step in fixing a loose electrical box. Once you are satisfied with the tightened screws, you can proceed to the next step: checking for stability.
Step 4: Check for Stability
After tightening the screws, it’s important to check the stability of the electrical box. Ensuring that the box is securely fastened to the wall will prevent any future issues and maintain the safety of the electrical connections.
To check for stability, gently push on the electrical box from different angles and directions. It should feel firm and not move or shift. If you notice any movement or wobbling, this indicates that the box is still not adequately secured.
In such cases, you may need to use additional measures to reinforce the electrical box. One option is to use plastic or metal shims to fill in any gaps between the box and the wall. Insert the shims on the sides of the box and tap them gently with a hammer until they are snugly in place.
Another option is to use an electrical box brace. This is a metal bracket that provides additional support and stability to the electrical box. Follow the manufacturer’s instructions to install the brace securely behind the box.
Once you have taken the necessary steps to ensure the stability of the electrical box, proceed to the next step: reinstalling the cover plate.
Note: If you are unsure about reinforcing the electrical box, it is recommended to consult a licensed electrician for further guidance.
Step 5: Reinstall the Cover Plate
Now that you have secured the electrical box and checked for stability, it’s time to reinstall the cover plate. The cover plate not only provides a finished look to the outlet or switch but also protects the wiring and the box.
Align the cover plate with the screw holes on the electrical box and gently press it against the wall. Take care to ensure that the wiring is properly positioned and does not interfere with the cover plate.
Using the screws that you set aside earlier, insert them into the screw holes on the cover plate and tighten them clockwise until they are snug. Again, be careful not to overtighten the screws to avoid damaging the cover plate or the box.
Ensure that the cover plate is secure and flush against the wall. Give it a gentle tug to confirm that it is firmly attached and not loose.
With the cover plate securely in place, you have successfully completed the installation of the electrical box. However, before restoring power, it’s important to test the box to ensure everything is working correctly.
Proceed to the next step to learn how to test the electrical box.
Step 6: Test the Electrical Box
Before restoring power to the electrical box, it’s crucial to test it to ensure that everything is functioning correctly. Testing the box will verify that the electrical connections are secure and that there are no underlying issues.
Start by turning the power back on at the circuit breaker or fuse box. If you had used a non-contact voltage tester earlier, use it again to confirm that there is power flowing to the outlet or switch.
If the voltage tester indicates the presence of power, proceed with caution. You can now test the electrical box by plugging in a small electrical device or turning on the switch, depending on the type of box you are working on. However, exercise caution and do not touch any live wires or exposed terminals.
If everything is in order, the device should receive power, and the switch should activate the associated lights or appliances. Test each outlet or switch connected to the electrical box to ensure they are all functioning properly.
If there are any issues, such as the device not receiving power or the switch not functioning, it’s possible that there may be a wiring problem. It is advisable to consult a professional electrician to diagnose and rectify the issue.
Once you have confirmed that the electrical box is working correctly, you can safely reinstall any other components, such as switch plates or outlet covers, as needed.
Congratulations! You have successfully fixed a loose electrical box and restored stability to your electrical system. By following these steps, you have ensured the safety of your home and minimized the risk of electrical hazards.
Remember, if you ever encounter electrical issues beyond your expertise, it’s always wise to seek the assistance of a licensed electrician to ensure proper and safe repairs.
With the knowledge and skills acquired through this article, you can confidently handle minor electrical box repairs in the future and maintain a secure and functional electrical system throughout your home.
Disclaimer: This article provides general guidelines for fixing a loose electrical box. It is essential to follow local electrical codes and regulations and exercise caution while working with electricity. If you are uncertain or uncomfortable with any electrical repairs, it is recommended to consult a professional electrician.
Read more: How To Fix A Loose Showerhead Pipe
Conclusion
Fixing a loose electrical box is an important task that ensures the stability and safety of your electrical system. By addressing the issue promptly, you can prevent further damage, potential hazards, and ensure the smooth operation of your outlets and switches.
In this article, we have outlined a step-by-step guide on how to fix a loose electrical box. From turning off the power to tightening screws and checking for stability, each step is crucial in the repair process. By following these steps and using the necessary tools and materials, you can successfully secure the electrical box and restore its stability.
Remember to always prioritize safety when working with electricity, such as turning off the power before beginning any repairs and being cautious around exposed wires. If you are unsure or uncomfortable with any electrical tasks, it is recommended to consult a licensed electrician.
Now that you have a better understanding of how to fix a loose electrical box, you can confidently tackle this DIY project and ensure a secure and reliable electrical system in your home.
By addressing any loose electrical boxes promptly, you can enjoy peace of mind knowing that you have taken the necessary steps to safeguard your home and loved ones from electrical issues. Regular maintenance and inspections of your electrical system are essential to prevent potential hazards and ensure the longevity of your electrical components.
Remember, if you are ever in doubt or encounter more complex electrical problems, do not hesitate to seek professional assistance. Electricians have the knowledge, experience, and tools needed to handle any electrical issues efficiently and safely.
With proper care and maintenance, your electrical system will continue to serve you reliably, keeping your home powered and your appliances functioning flawlessly for years to come.
Frequently Asked Questions about How To Fix Loose Electrical Box
Was this page helpful?
At Storables.com, we guarantee accurate and reliable information. Our content, validated by Expert Board Contributors, is crafted following stringent Editorial Policies. We're committed to providing you with well-researched, expert-backed insights for all your informational needs.


0 thoughts on “How To Fix Loose Electrical Box”