Home>Furniture & Design>Bathroom Fixtures>How To Fix A Loose Shower Tile
Bathroom Fixtures
How To Fix A Loose Shower Tile
Modified: October 20, 2024
Learn how to fix a loose shower tile and prevent water damage with our expert tips. Get your bathroom fixtures secure and looking great again!
(Many of the links in this article redirect to a specific reviewed product. Your purchase of these products through affiliate links helps to generate commission for Storables.com, at no extra cost. Learn more)
Introduction
Welcome to the ultimate guide on how to fix a loose shower tile. A loose tile in your shower not only detracts from the aesthetic appeal of your bathroom but also poses the risk of water damage and mold growth. Fortunately, with the right tools, materials, and a little know-how, you can tackle this issue with confidence.
In this comprehensive tutorial, we will walk you through each step of the process, from safely removing the loose tile to properly reinstalling and grouting it. By the end, you’ll have the knowledge and skills to restore the integrity and beauty of your shower tiles, ensuring a long-lasting and secure finish.
So, roll up your sleeves, gather your tools, and let’s dive into the rewarding journey of fixing your loose shower tile.
Key Takeaways:
- Don’t let a loose shower tile ruin your bathroom! With the right tools and know-how, you can safely remove, clean, and reinstall the tile, restoring the beauty and integrity of your shower.
- Proper grouting and cleanup are crucial for a professional finish. Take pride in your newly acquired tile repair skills and enjoy a secure, beautiful shower space for years to come!
Read more: How To Repair Loose Floor Tiles
Tools and Materials Needed
Before embarking on the task of fixing a loose shower tile, it’s essential to gather the necessary tools and materials. Here’s what you’ll need:
Tools:
- Grout saw or utility knife
- Putty knife
- Chisel
- Hammer
- Small paintbrush
- Mixing container
- Notched trowel
- Rubber grout float
- Tile spacer or toothpicks
- Level
- Caulking gun
- Clean sponge
- Bucket
- Protective eyewear and gloves
Materials:
- Replacement tile
- Adhesive or thin-set mortar
- Grout
- Grout sealer
- Caulk
- Waterproofing membrane (if needed)
Having these tools and materials on hand will ensure that you’re well-equipped to carry out the necessary steps for fixing your loose shower tile. Now that you’re prepared, let’s move on to the first step of the process.
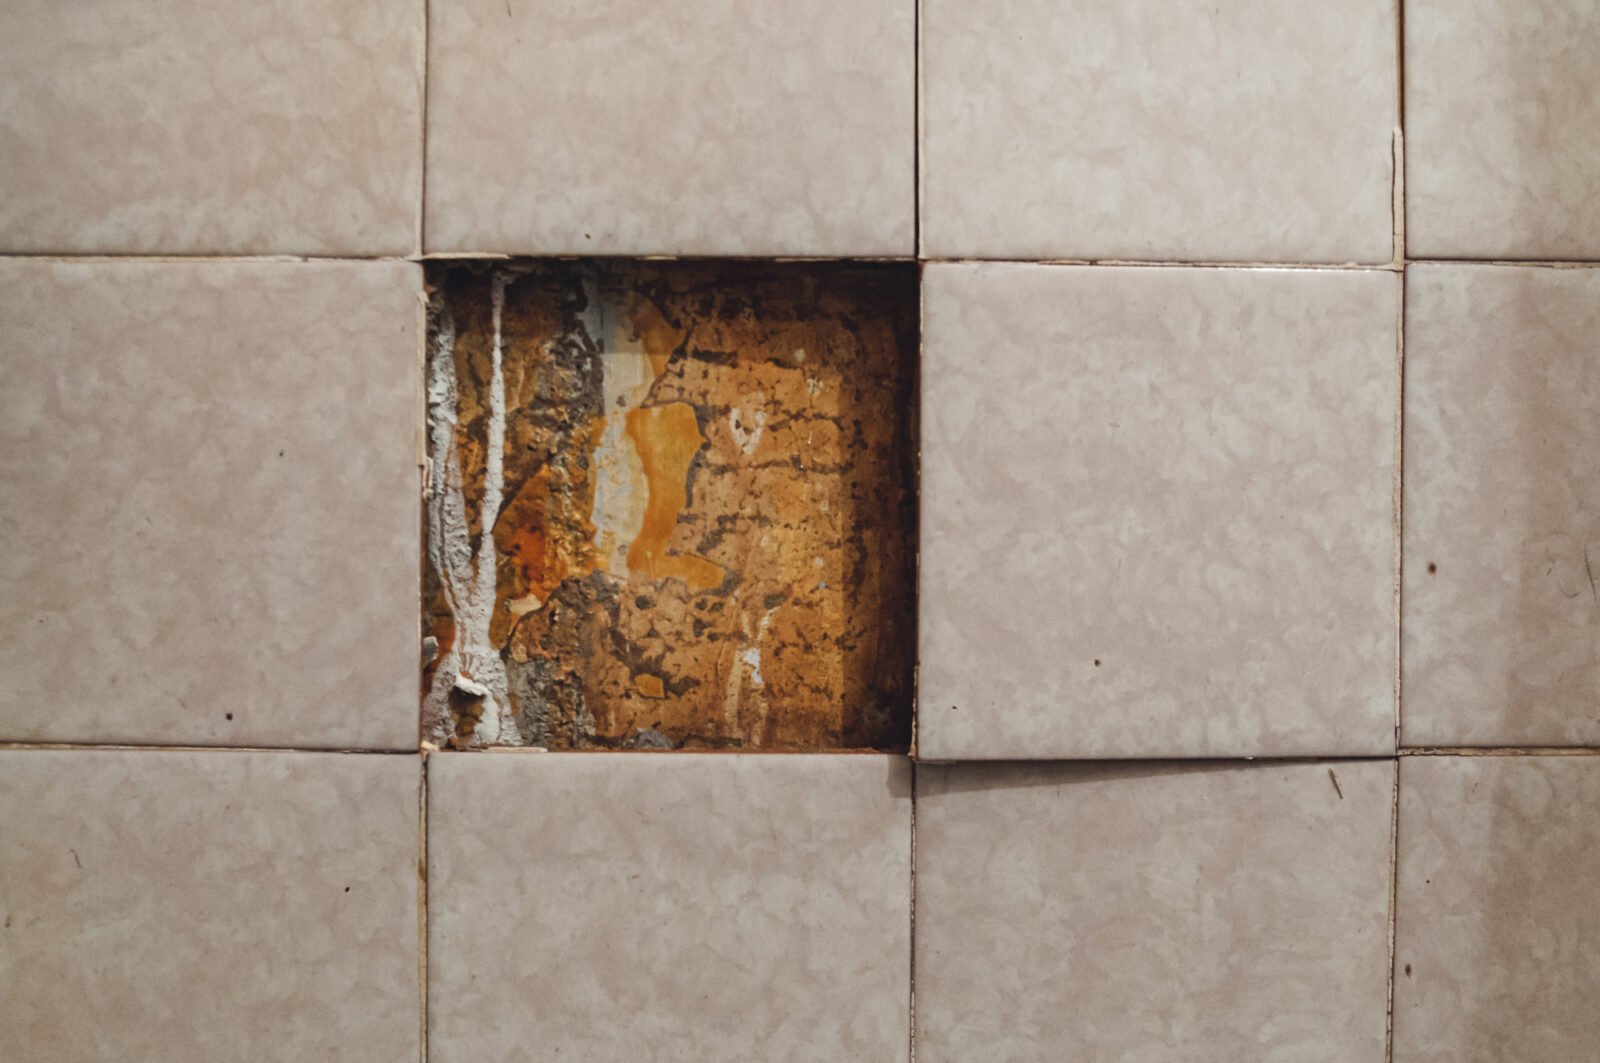
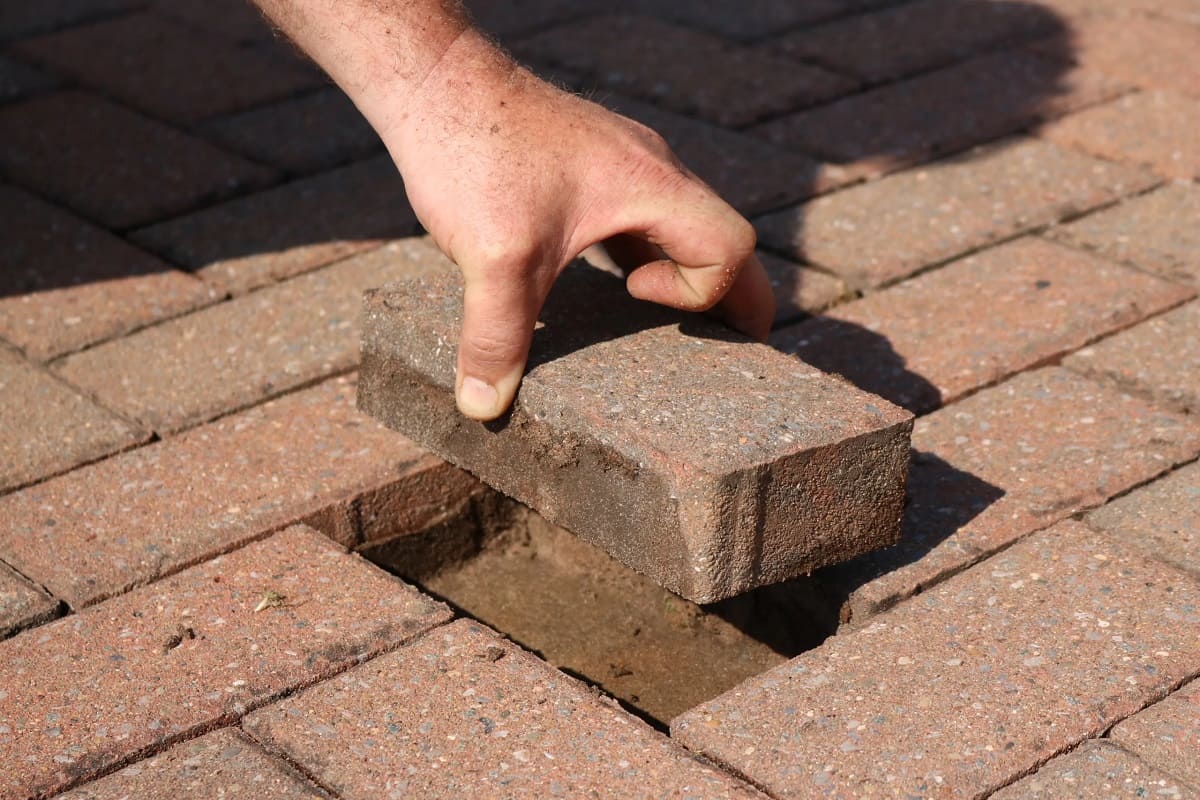
Step 1: Remove the Loose Tile
The initial step in fixing a loose shower tile is to carefully remove the problematic tile without causing damage to the surrounding tiles. Here’s how to do it:
1. Assess the Damage: Before starting, evaluate the extent of the damage and determine if there’s any water infiltration or mold growth behind the tile. If there are signs of significant water damage, it’s crucial to address these issues before proceeding with the repair.
2. Prepare the Area: Clear the space around the loose tile to create a safe and accessible work area. Lay down a drop cloth or old towels to catch any debris and protect the shower floor from scratches.
3. Loosen the Grout: Use a grout saw or utility knife to carefully remove the grout surrounding the loose tile. This step is essential for releasing the tile from its position without causing unnecessary damage.
4. Loosen the Tile: Once the grout is cleared, gently insert a putty knife or chisel under the edge of the tile and carefully tap it with a hammer to loosen the adhesive bond. Work gradually around the tile until it can be lifted out without resistance.
5. Clean the Substrate: After removing the tile, use a small paintbrush or vacuum to clean the substrate and remove any remaining adhesive or debris. It’s important to ensure that the surface is smooth and free of any obstacles before proceeding with the repair.
By following these steps, you can safely remove the loose tile and prepare the substrate for the next phase of the repair process. With the tile out of the way, you’re ready to move on to the next step: cleaning the area in preparation for the new tile installation.
Read more: How To Fix Siding That Is Loose
Step 2: Clean the Area
With the loose tile successfully removed, it’s time to focus on preparing the area for the installation of the new tile. Cleaning the substrate and ensuring a smooth, debris-free surface is crucial for the adhesion and longevity of the replacement tile. Here’s how to clean the area effectively:
1. Remove Residual Adhesive: Inspect the substrate for any remaining adhesive or debris from the previous tile. Use a chisel or putty knife to gently scrape away any remnants, ensuring that the surface is clean and level.
2. Smooth the Surface: If there are any uneven patches or rough areas on the substrate, use a sanding block or abrasive tool to smooth out the surface. This step is essential for promoting proper adhesion of the new tile and preventing any irregularities from affecting the finished result.
3. Clean and Dry the Area: Wipe the cleaned substrate with a damp sponge or cloth to remove any dust or loose particles. Allow the area to dry completely before proceeding to the next step. A dry surface is essential for ensuring a strong bond between the new tile and the substrate.
4. Check for Levelness: Use a level to verify that the substrate is even and free of any significant dips or bumps. Making adjustments at this stage will contribute to a professional and long-lasting tile installation.
By meticulously cleaning and preparing the area, you’re setting the stage for a successful and durable repair. With the substrate primed and ready, you’re now prepared to move on to the next step: preparing the surface for the application of adhesive.
Step 3: Prepare the Surface
As you progress in fixing the loose shower tile, it’s crucial to ensure that the surface is adequately prepared to receive the new tile and adhesive. Proper surface preparation is key to achieving a secure and long-lasting installation. Here’s how to prepare the surface effectively:
1. Apply Waterproofing Membrane (if needed): If the substrate is located in an area prone to moisture, such as a shower enclosure, consider applying a waterproofing membrane to enhance the tile assembly’s resistance to water penetration. Follow the manufacturer’s instructions for proper application and drying times.
2. Mix the Adhesive: If using thin-set mortar or adhesive, carefully follow the manufacturer’s instructions for mixing the product. Achieving the correct consistency is essential for ensuring optimal adhesion and stability of the new tile.
3. Apply the Adhesive: Using a notched trowel, apply a thin, even layer of adhesive to the prepared substrate. Ensure that the adhesive covers the entire area where the new tile will be placed, with no gaps or excess buildup.
4. Use Tile Spacers or Toothpicks: Place tile spacers or strategically positioned toothpicks along the edges of the adhesive-covered area to maintain consistent spacing and alignment for the new tile. This step is crucial for achieving a professional and uniform finish.
5. Check for Even Coverage: Before placing the new tile, inspect the adhesive to ensure that it has been applied evenly and consistently across the substrate. This visual check is crucial for confirming that the tile will adhere securely and uniformly.
By diligently preparing the surface and applying the adhesive, you’re laying the groundwork for a successful tile installation. With the substrate primed and the adhesive in place, you’re now ready to proceed to the next step: reinstalling the tile in its rightful position.
Step 4: Apply Adhesive
With the surface prepared, it’s time to apply the adhesive and secure the new tile in place. The proper application of adhesive is crucial for ensuring a strong bond and a durable installation. Here’s how to apply the adhesive effectively:
1. Position the Tile: Carefully place the new tile onto the adhesive-covered surface, ensuring that it aligns with the surrounding tiles and sits level with the rest of the tiled area. Press gently to ensure that the tile makes full contact with the adhesive.
2. Adjust Alignment: Use a level to verify that the newly placed tile is perfectly aligned with the surrounding tiles. Making any necessary adjustments at this stage will contribute to a professional and visually appealing finish.
3. Remove Excess Adhesive: If any adhesive has oozed out around the edges of the tile, use a damp sponge or cloth to carefully remove the excess. Ensuring clean edges and minimal mess will facilitate a tidy and polished result.
4. Allow for Setting Time: Follow the manufacturer’s instructions regarding the recommended setting time for the adhesive. Allowing the adhesive to cure undisturbed is essential for achieving a strong and secure bond between the tile and the substrate.
5. Clean Up Any Residue: Once the adhesive has set, inspect the tile and surrounding area for any residual adhesive. Use a clean, damp sponge or cloth to carefully wipe away any remaining adhesive and ensure a clean and professional finish.
By meticulously applying the adhesive and securing the new tile in place, you’re one step closer to completing the repair and restoring the integrity of your shower tiles. With the tile firmly in position, you’re now prepared to move on to the next step: grouting the tile to achieve a seamless and polished look.
Use a grout saw to remove old grout around the loose tile. Clean the area and apply new grout, pressing it firmly into the space. Allow it to dry completely before using the shower.
Step 5: Reinstall the Tile
With the adhesive applied and the new tile in place, the next crucial step in fixing a loose shower tile is to ensure that the tile is securely reinstalled and aligned with the surrounding tiles. Properly reinstalling the tile is essential for achieving a seamless and professional finish. Here’s how to proceed:
1. Check Alignment: Verify that the newly installed tile aligns perfectly with the surrounding tiles and sits level with the rest of the tiled area. Making any necessary adjustments at this stage will contribute to a visually appealing and cohesive finish.
2. Remove Spacers or Toothpicks: If tile spacers or toothpicks were used to maintain consistent spacing during the installation, carefully remove them to ensure that the tile is properly positioned and ready for grouting.
3. Press Firmly: Using a clean, dry cloth or a rubber grout float, gently press the tile to ensure that it makes full contact with the adhesive and sits securely in place. This step is crucial for achieving a strong and durable bond between the tile and the substrate.
4. Allow the Adhesive to Cure: Follow the manufacturer’s instructions regarding the recommended curing time for the adhesive. Allowing the adhesive to set undisturbed is essential for ensuring a secure and long-lasting installation.
5. Verify Stability: Once the adhesive has cured, gently test the stability of the newly installed tile to ensure that it is firmly secured in place. Any movement or instability should be addressed before proceeding to the next step.
By diligently reinstalling the tile and ensuring its alignment and stability, you’re one step closer to completing the repair and achieving a professional and enduring finish. With the tile securely in place, you’re now prepared to move on to the next step: grouting the tile to achieve a seamless and polished look.
Read more: How To Fix A Loose Faucet
Step 6: Grout the Tile
Grouting the tile is a critical step in the process of fixing a loose shower tile. Proper grouting not only enhances the visual appeal of the tiled surface but also seals the gaps and ensures the stability of the tiles. Here’s how to effectively grout the tile:
1. Choose the Grout: Select a high-quality grout that complements the color and style of your tiles. Ensure that the grout is suitable for use in wet areas such as showers and is compatible with the type of tile you’re working with.
2. Mix the Grout: Follow the manufacturer’s instructions to prepare the grout to the correct consistency. Use a mixing container and a margin trowel to achieve a smooth and lump-free grout mixture.
3. Apply the Grout: Using a rubber grout float, apply the grout diagonally across the tile joints, ensuring that the grout fills the spaces completely. Work in small sections to prevent the grout from drying before it can be properly smoothed and cleaned.
4. Remove Excess Grout: Once the grout is applied, use the rubber grout float to remove excess grout from the tile surface, holding the float at a 45-degree angle. This step helps to ensure that the grout lines are level with the tile surface.
5. Clean the Tile Surface: After allowing the grout to set for a few minutes, use a damp sponge to gently clean the tile surface and remove any grout residue. Rinse the sponge frequently to ensure a thorough cleaning process without disturbing the grout lines.
6. Final Cleaning: Once the grout has dried to a haze, use a clean, dry cloth to buff the tile surface and remove any remaining grout residue. This final cleaning step will reveal the beauty of the tiled surface and ensure a polished finish.
By meticulously grouting the tile and ensuring a clean and level finish, you’re one step closer to completing the repair and restoring the integrity and beauty of your shower tiles. With the grouting process complete, you’re now prepared to move on to the final step: cleaning up and putting the finishing touches on your newly repaired shower tile.
Step 7: Clean Up
As you near the completion of the process of fixing a loose shower tile, it’s essential to focus on cleaning up the work area and ensuring that the newly repaired tile is polished and ready for use. Proper cleanup not only adds the finishing touches to the repair but also ensures a safe and tidy environment. Here’s how to effectively clean up after repairing the loose shower tile:
1. Clean Grout Residue: Use a clean, damp sponge to gently wipe the tile surface and remove any remaining grout residue or haze. Pay attention to the grout lines and edges of the tiles to ensure a clean and polished appearance.
2. Buff the Tiles: Once the grout residue has been removed, use a dry, lint-free cloth to gently buff the tiles and achieve a smooth and polished finish. This step will enhance the visual appeal of the tiled surface and ensure that it is ready for use.
3. Inspect the Surrounding Area: Take a moment to inspect the surrounding area for any stray grout particles, adhesive residue, or debris. Use a vacuum or a clean, dry brush to carefully remove any remaining particles and ensure a tidy and safe environment.
4. Seal the Grout (if needed): If the type of grout used requires sealing, carefully apply a high-quality grout sealer to the grout lines. Follow the manufacturer’s instructions for proper application and drying times to ensure long-lasting protection and a pristine finish.
5. Allow for Drying Time: Once the cleanup is complete, allow the repaired tile and grout to dry completely before using the shower. This drying period is essential for ensuring that the repair fully sets and achieves optimal strength and stability.
By thoroughly cleaning up the work area and putting the finishing touches on the repaired shower tile, you’ve successfully completed the repair process. With the cleanup complete, you can now step back and admire your handiwork, knowing that your shower tile is once again secure, beautiful, and ready to stand the test of time.
Conclusion
Congratulations on successfully fixing the loose shower tile! By following the comprehensive steps outlined in this guide, you’ve not only restored the integrity of your shower tiles but also gained valuable skills in tile repair and maintenance. As you reflect on the journey from removing the loose tile to grouting and cleaning up, it’s evident that attention to detail and proper technique are key to achieving a professional and enduring result.
Remember, the maintenance of your shower tiles is an ongoing process. Regular inspection and prompt repair of any loose or damaged tiles can prevent more extensive issues and preserve the beauty of your bathroom. Additionally, investing in high-quality tools, materials, and adhesives will contribute to the longevity and resilience of your tile repairs.
As you enjoy the revitalized appearance of your shower, take pride in the knowledge that you’ve mastered the art of fixing a loose tile. Your efforts have not only enhanced the aesthetics of your bathroom but also contributed to the overall safety and durability of your shower enclosure.
Should you encounter similar issues in the future, you now have the confidence and expertise to address them effectively. Embrace the satisfaction of a job well done, and revel in the comfort and beauty of your fully restored shower space.
With your newly acquired skills and the guidance of this tutorial, you’re well-equipped to tackle future tile maintenance and repairs with confidence and precision. Your dedication to maintaining a functional and visually appealing shower environment will undoubtedly yield long-lasting benefits for you and your home.
Thank you for embarking on this rewarding journey of tile repair and restoration. As you continue to care for your home, may the knowledge and skills gained from this experience serve you well in all your future endeavors.
Frequently Asked Questions about How To Fix A Loose Shower Tile
Was this page helpful?
At Storables.com, we guarantee accurate and reliable information. Our content, validated by Expert Board Contributors, is crafted following stringent Editorial Policies. We're committed to providing you with well-researched, expert-backed insights for all your informational needs.


0 thoughts on “How To Fix A Loose Shower Tile”