Home>Construction & Tools>Building Materials>How To Repair A Brick Walkway
Building Materials
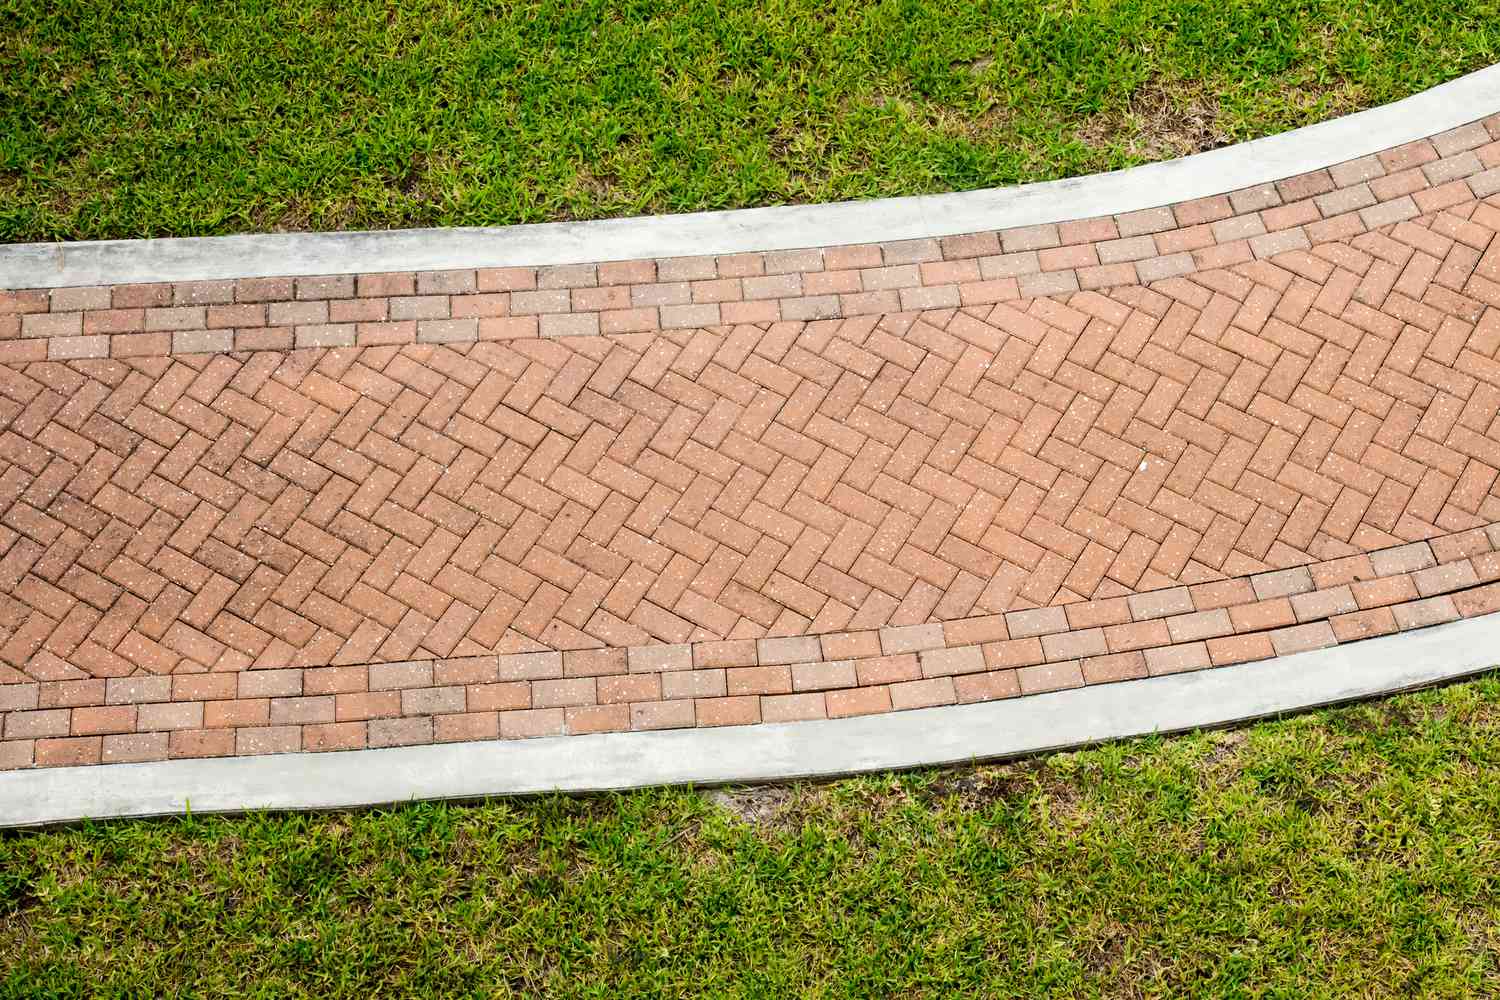
How To Repair A Brick Walkway
Modified: March 9, 2024
Learn how to repair a brick walkway with our expert tips and advice on building materials, tools, and techniques. Restore your walkway with ease!
(Many of the links in this article redirect to a specific reviewed product. Your purchase of these products through affiliate links helps to generate commission for Storables.com, at no extra cost. Learn more)
Introduction
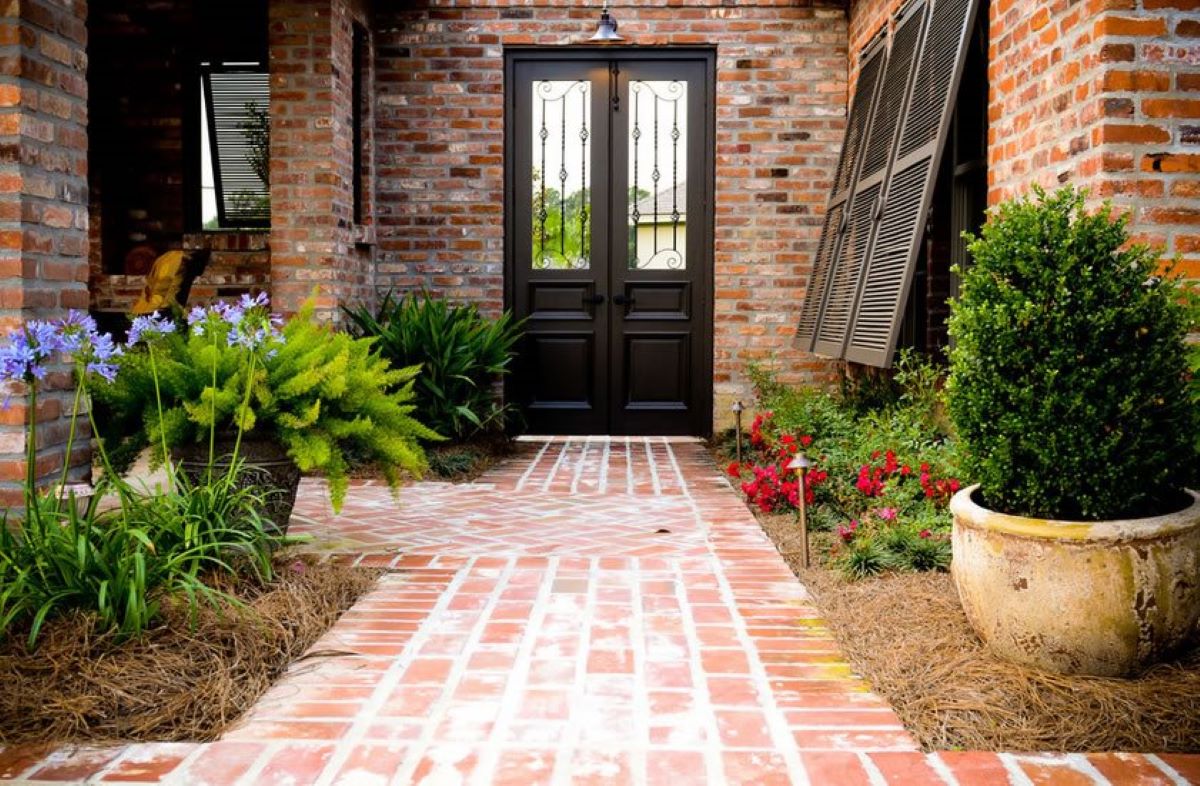
Welcome to the comprehensive guide on repairing a brick walkway. Over time, wear and tear can take a toll on the charm and functionality of your outdoor brick pathway. Cracked or sunken bricks not only detract from the aesthetic appeal of your property but also pose a potential hazard. However, with the right tools, materials, and know-how, you can restore your walkway to its former glory.
In this guide, we will walk you through the step-by-step process of assessing the damage, gathering the necessary materials and tools, removing damaged bricks, preparing the base, installing new bricks, and adding the finishing touches. Whether you’re a seasoned DIY enthusiast or a first-time homeowner, this article will equip you with the knowledge and confidence to tackle this project with ease.
Before we dive into the nitty-gritty of brick walkway repair, it’s important to emphasize the significance of maintaining a safe and visually appealing pathway. A well-maintained walkway not only enhances the curb appeal of your home but also ensures a hazard-free passage for you, your family, and your guests. With that in mind, let’s embark on this journey to revitalize your brick walkway and elevate the overall allure of your outdoor space.
Key Takeaways:
- Repairing a brick walkway involves assessing damage, gathering materials, removing damaged bricks, preparing the base, installing new bricks, and adding finishing touches. It’s a DIY project that enhances safety and curb appeal.
- Proper base preparation and meticulous brick installation are crucial for a successful restoration. Finishing touches, such as applying a brick sealer and regular maintenance, ensure the walkway’s longevity and visual appeal.
Read more: How To Lay Brick Walkway
Assessing the Damage
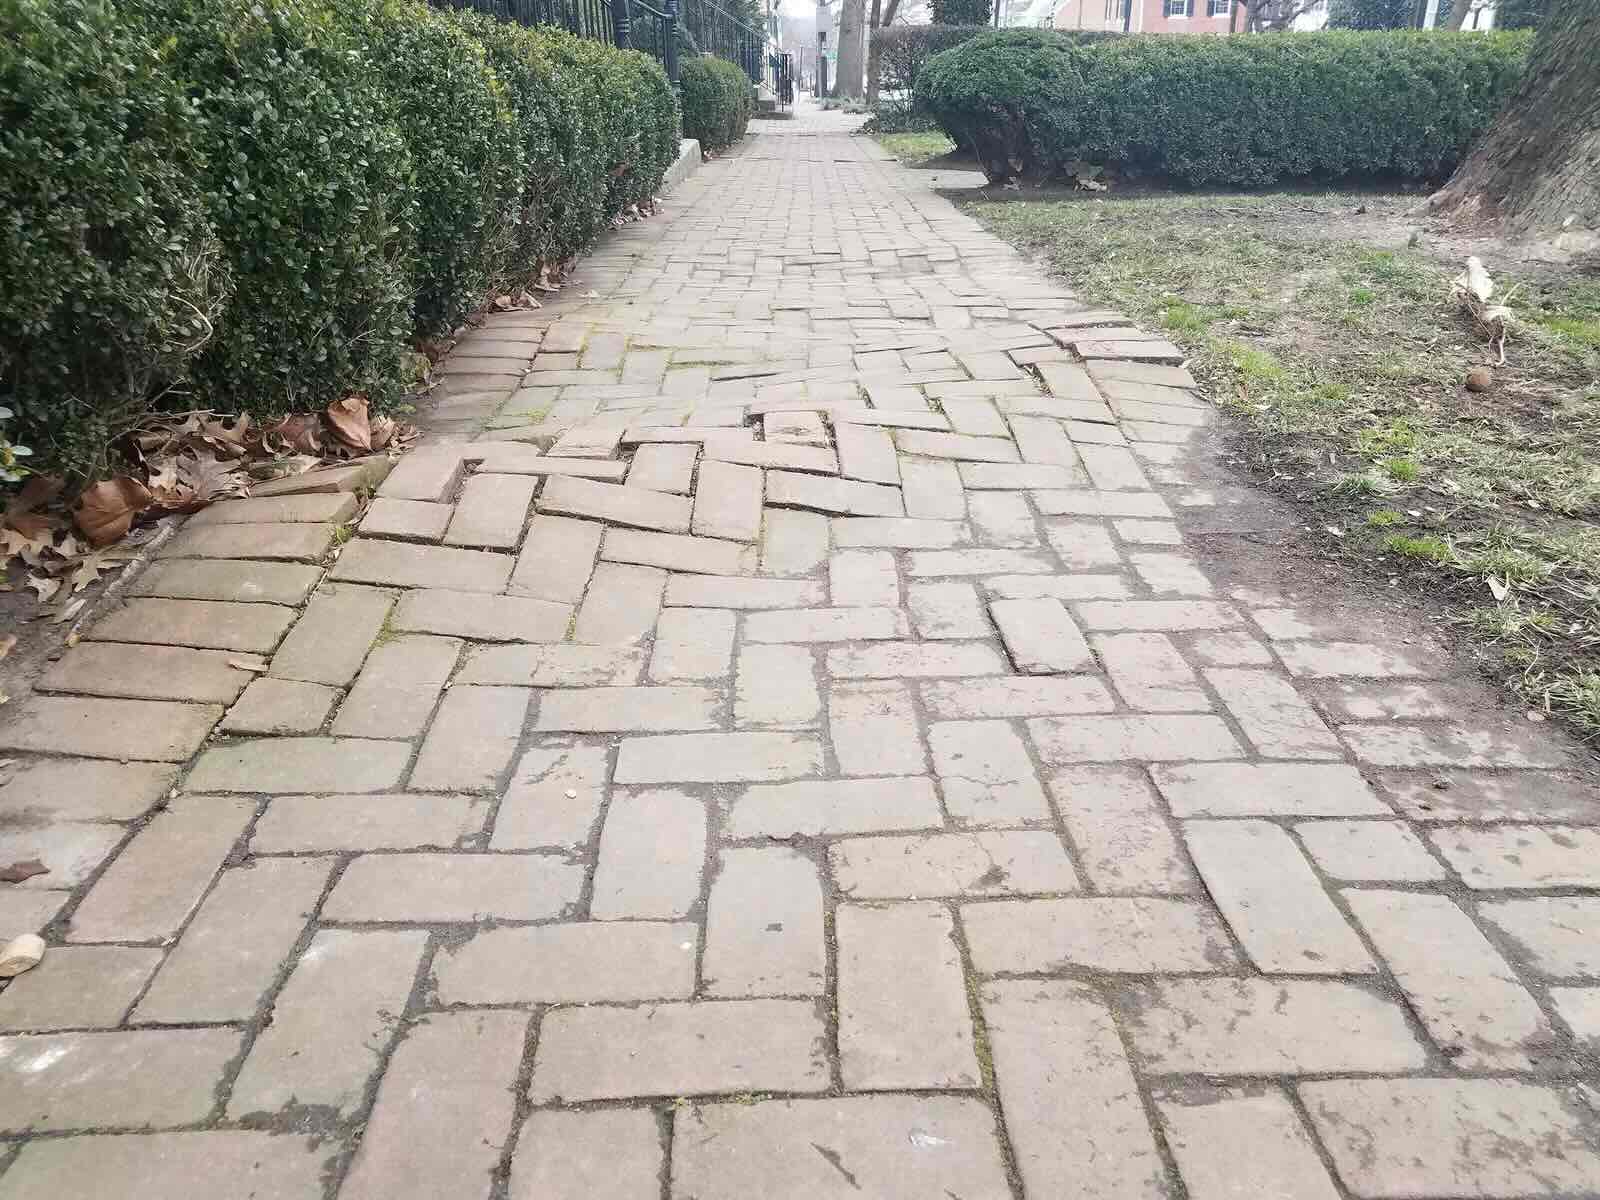
Before diving into the repair process, it’s crucial to assess the extent of damage to your brick walkway. This initial step will help you determine the scope of the project and the materials needed for a successful restoration.
Start by carefully inspecting the entire length of the walkway. Look for any cracked, chipped, or sunken bricks, as well as areas where the grout or sand between the bricks may have eroded. Note any areas where water may be pooling or where the soil has shifted, as these could be indicators of underlying issues that need to be addressed during the repair.
Pay close attention to the alignment of the bricks. Over time, natural settling or external factors such as heavy rainfall or root growth can cause the bricks to shift, resulting in uneven surfaces and potential tripping hazards. Additionally, look for signs of wear and discoloration that may detract from the overall appearance of the walkway.
Once you’ve identified the areas in need of repair, take note of the specific dimensions and quantities of replacement bricks required. This will streamline the process of gathering the necessary materials and ensure that you have everything on hand when you begin the repair.
Assessing the damage also involves considering the underlying causes of the wear and tear. Factors such as poor drainage, inadequate base preparation, or heavy traffic can contribute to the deterioration of a brick walkway. By understanding the root causes, you can take proactive measures to address these issues during the repair process, thereby prolonging the longevity of the restored walkway.
By thoroughly assessing the damage, you’ll be well-equipped to plan and execute an effective repair strategy. With a clear understanding of the areas needing attention and the underlying causes of the damage, you can proceed to gather the necessary materials and tools for the restoration process.
Gathering Materials and Tools
Once you’ve assessed the damage and determined the scope of the repair, it’s time to gather the materials and tools necessary for the restoration of your brick walkway. Having the right supplies on hand will streamline the repair process and ensure a professional-quality result.
Here’s a comprehensive list of materials and tools you’ll need:
Materials:
- New bricks: Ensure that the replacement bricks match the size, style, and color of the existing ones to maintain a cohesive look.
- Masonry sand: This will be used for the base and to fill the gaps between the bricks.
- Masonry cement: Essential for securing the bricks in place and creating a durable bond.
- Landscape fabric: Helps prevent weed growth and stabilizes the base.
- Gravel or crushed stone: Provides a stable base for the walkway and aids in drainage.
- Brick sealer: Optional but recommended for protecting the restored walkway from the elements and enhancing its longevity.
Tools:
- Chisel and hammer: For removing damaged bricks and cleaning the edges of the existing ones.
- Trowel: Essential for applying masonry sand and cement during the installation process.
- Masonry saw: Useful for cutting bricks to fit specific dimensions if needed.
- Level: Ensures the bricks are laid evenly and at the correct height.
- Broom: For sweeping and cleaning the work area before and after the repair.
- Wheelbarrow: Helpful for mixing and transporting gravel, sand, and cement.
- Protective gear: Including gloves, safety goggles, and a dust mask to ensure safety during the repair process.
Before purchasing the materials, take precise measurements of the damaged area to determine the quantity of bricks, sand, and other supplies needed. It’s advisable to purchase a few extra bricks to account for any unexpected breakages or miscalculations during the repair.
Once you have all the necessary materials and tools assembled, you’ll be ready to embark on the next steps of the repair process. With careful preparation and attention to detail, you can ensure a smooth and successful restoration of your brick walkway.
Read more: How To Clean Brick Walkway
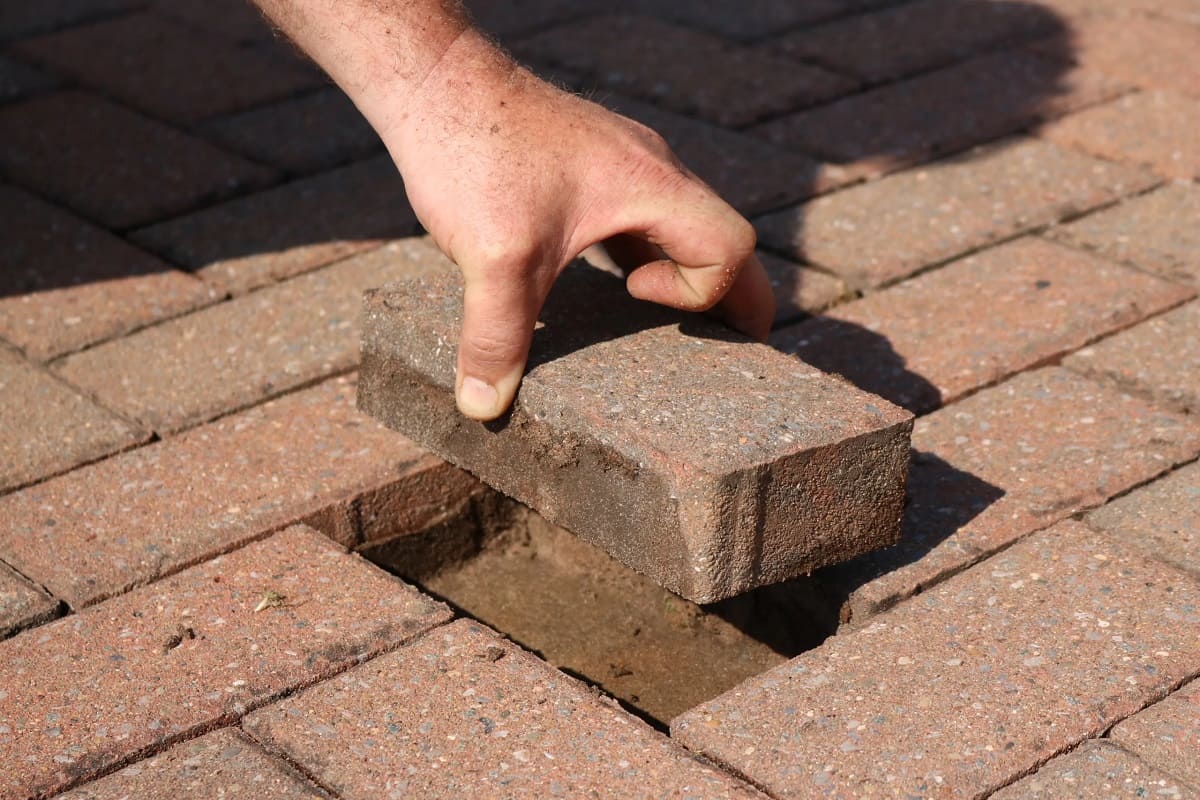
Removing Damaged Bricks
With the materials and tools gathered, it’s time to begin the repair process by removing the damaged bricks from the walkway. This step is crucial for creating a clean slate and preparing the area for the installation of new bricks.
Follow these steps to effectively remove the damaged bricks:
- Prepare the Work Area: Clear the surrounding area to create a safe and accessible workspace. Use a broom to remove any debris, dirt, or loose materials from the surface of the walkway.
- Loosen the Damaged Bricks: Use a chisel and hammer to carefully loosen the damaged bricks. Work around the edges of the brick, applying gentle pressure to dislodge it from the surrounding mortar and base.
- Remove the Bricks: Once the damaged bricks are loosened, carefully lift them out of place. Be mindful of any remaining mortar or debris in the area where the bricks were situated.
- Clean the Area: Use the chisel and a stiff brush to clean the edges and surface of the surrounding bricks, removing any residual mortar or debris to ensure a smooth, even base for the new bricks.
- Inspect the Base: Take a moment to inspect the base and underlying soil for any signs of erosion, settling, or inadequate compaction. Address any issues to ensure a stable and level foundation for the new bricks.
During the removal process, handle the bricks with care to avoid damaging the surrounding structures or creating additional repair needs. If any bricks are salvageable, set them aside for potential future use in smaller repair projects or as replacement pieces for similar areas in the walkway.
By methodically removing the damaged bricks and preparing the base for the installation of new ones, you’re laying the groundwork for a successful restoration of your brick walkway. With a clear work area and a keen eye for detail, you’re ready to proceed to the next phase of the repair process.
Preparing the Base
With the damaged bricks removed, it’s time to focus on preparing the base of the walkway to ensure a stable and long-lasting foundation for the new bricks. Proper base preparation is essential for preventing future issues such as settling, uneven surfaces, and water drainage problems.
Follow these steps to effectively prepare the base for the installation of new bricks:
- Excavate the Area: Use a shovel to carefully excavate the soil to the desired depth, accounting for the thickness of the new bricks and the necessary base materials. Aim for a depth that allows for a layer of gravel or crushed stone, as well as the masonry sand and new bricks.
- Compact the Soil: Once the area is excavated, use a hand tamper or plate compactor to compact the soil evenly. This step is crucial for creating a stable base and minimizing the risk of future settling.
- Install Landscape Fabric: Lay a sheet of landscape fabric over the compacted soil to inhibit weed growth and provide an additional layer of stabilization for the base materials.
- Add Gravel or Crushed Stone: Pour a layer of gravel or crushed stone over the landscape fabric, ensuring an even distribution across the excavated area. Use a rake to level the surface and achieve the desired thickness of the base layer.
- Compact the Base Layer: Use a hand tamper or plate compactor to compact the gravel or crushed stone, creating a solid and level base for the masonry sand and new bricks.
- Spread Masonry Sand: Once the base layer is compacted, evenly spread a layer of masonry sand over the surface. The sand will provide a level bedding for the new bricks and aid in the interlocking and stability of the walkway.
- Level the Sand: Use a straight board or a screed to level the masonry sand, ensuring a uniform surface that will support the new bricks at the correct height.
Proper base preparation is essential for the longevity and stability of your brick walkway. By meticulously following these steps, you’ll create an optimal foundation for the installation of new bricks, setting the stage for the next phase of the repair process.
To repair a brick walkway, start by removing any damaged bricks and replacing them with new ones. Use a chisel and hammer to carefully remove the old bricks, then clean the area and lay the new bricks in place, making sure they are level and secure. Finally, fill in the gaps with sand or mortar to finish the repair.
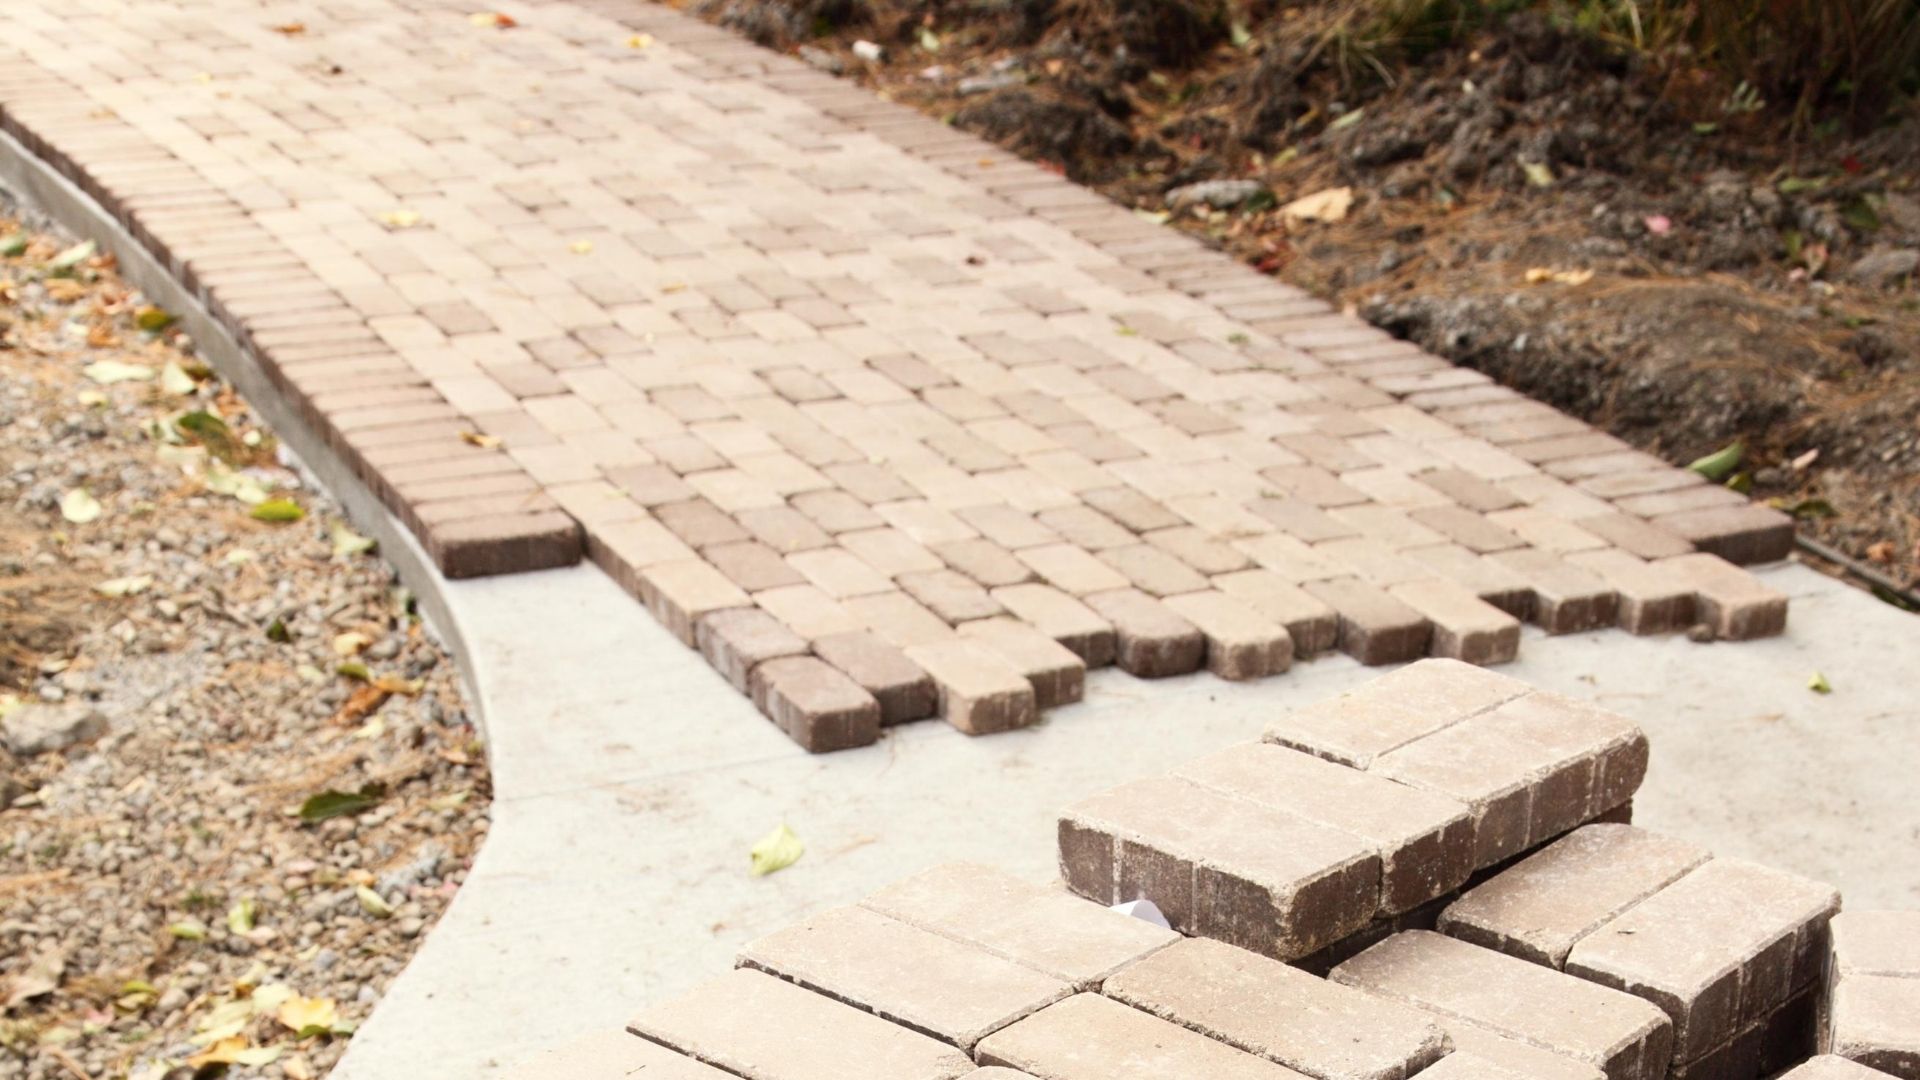
Installing New Bricks
With the base meticulously prepared, it’s time to embark on the installation of new bricks, the pivotal phase that will breathe new life into your walkway. The proper installation of the bricks is essential for ensuring a visually appealing, durable, and structurally sound pathway.
Follow these steps to effectively install the new bricks:
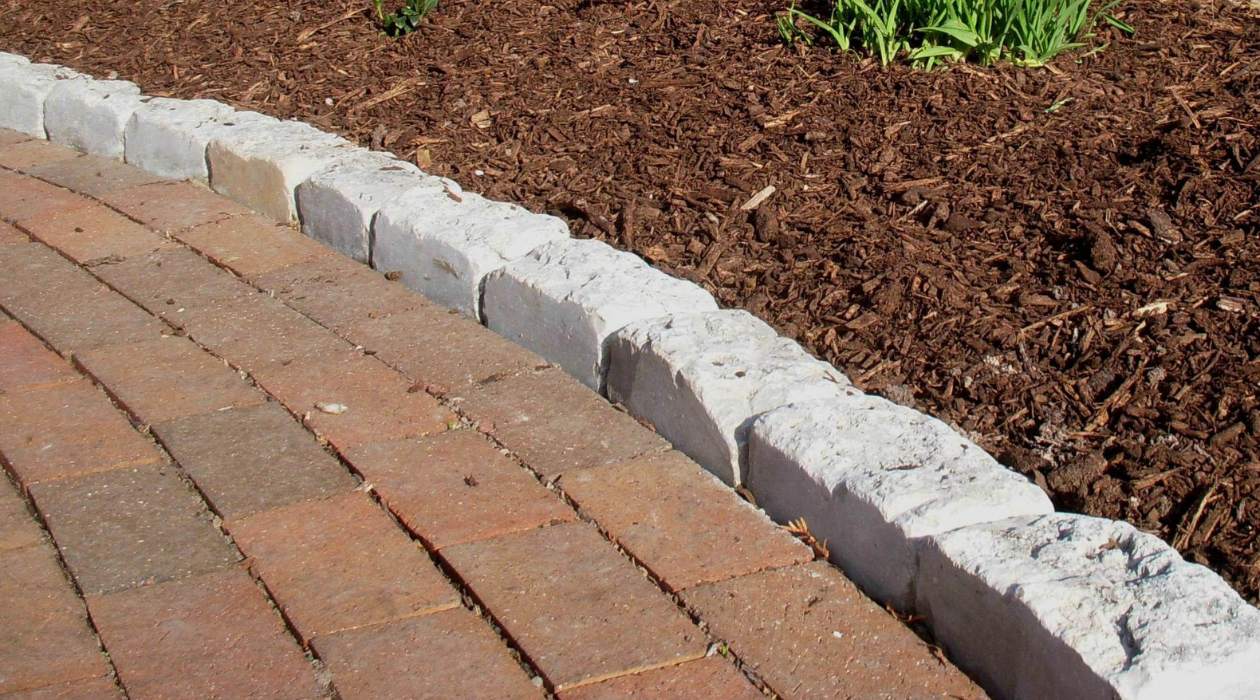
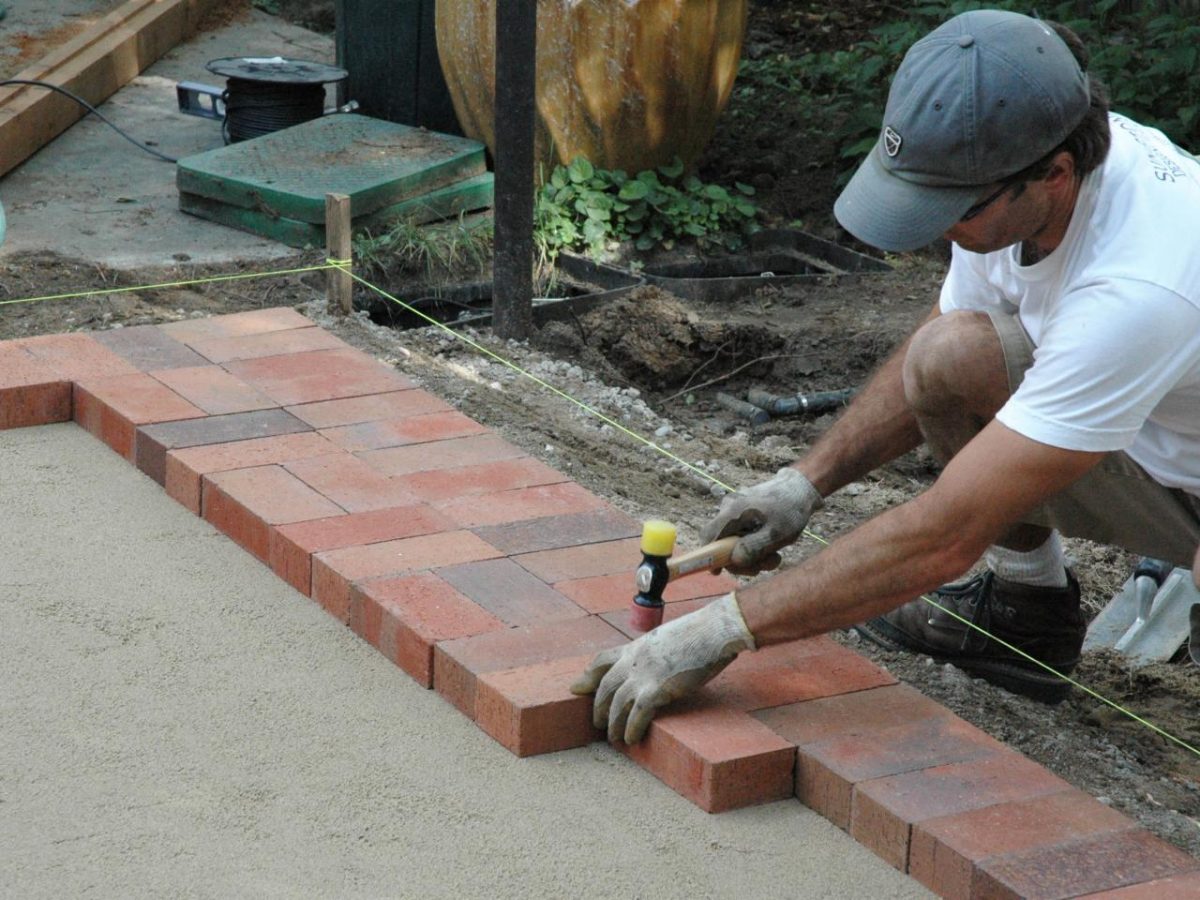
- Lay the First Row: Begin by placing the first row of bricks along one edge of the walkway, ensuring they are snug against each other and aligned with the edge of the pathway. Use a level to confirm that the bricks are even and at the desired height.
- Continue Laying Bricks: Proceed to lay the subsequent rows of bricks, staggering the joints to create a stable and visually appealing pattern. Use a masonry saw to cut bricks to fit at the edges or around obstacles, ensuring a precise and tailored fit.
- Secure the Bricks: As you lay each brick, apply a thin layer of masonry sand on the prepared base to create a stable bedding. Press each brick firmly into place, ensuring they are level and aligned with the surrounding bricks.
- Check for Evenness: Periodically use a level to confirm that the bricks are even and at the correct height. Make any necessary adjustments to maintain a uniform and level surface throughout the installation process.
- Fill the Joints: Once all the bricks are in place, fill the joints with masonry sand, ensuring that it is evenly distributed and compacted to create a solid and stable surface.
- Compact the Bricks: Use a plate compactor or a hand tamper to gently compact the surface of the bricks, ensuring that they are set firmly in place and creating a cohesive walkway.
Throughout the installation process, pay close attention to the alignment, levelness, and overall aesthetic appeal of the walkway. Taking the time to ensure precision and attention to detail during this phase will result in a visually striking and structurally robust brick pathway.
By meticulously following these steps, you’ll successfully breathe new life into your walkway, transforming it into a revitalized and inviting feature of your outdoor space. With the new bricks securely in place, you’re one step closer to completing the restoration of your brick walkway.
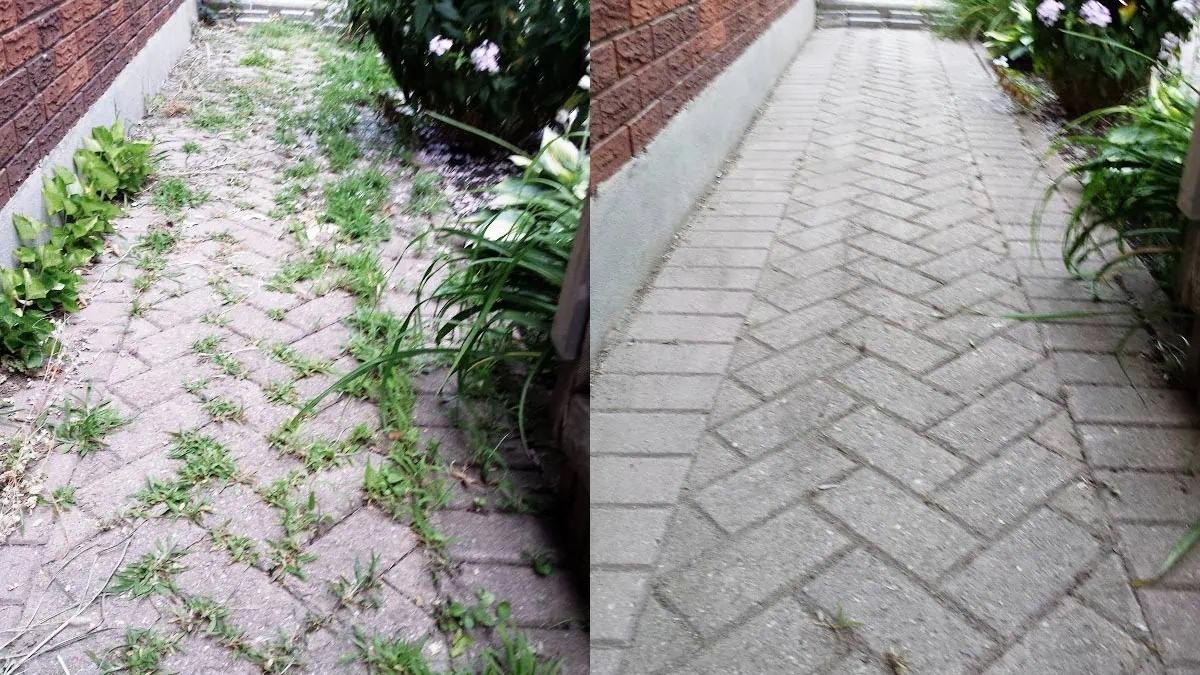
Finishing Touches
As the installation of new bricks nears completion, it’s time to focus on the finishing touches that will elevate the aesthetic appeal and longevity of your restored brick walkway. These final steps will add a polished and professional touch to the project, ensuring that your walkway stands the test of time and enhances the overall charm of your outdoor space.
Follow these essential finishing touches to complete the restoration of your brick walkway:
- Apply Brick Sealer: Consider applying a high-quality brick sealer to protect the newly installed bricks from the elements, including moisture, UV rays, and general wear and tear. The sealer will enhance the color and texture of the bricks while providing a protective barrier against staining and deterioration.
- Inspect and Adjust: Take a moment to inspect the entire walkway, ensuring that the bricks are securely in place, the joints are filled evenly, and the surface is level and visually appealing. Make any necessary adjustments to address minor imperfections and ensure a flawless finish.
- Clean the Surface: Use a broom or a gentle spray of water to clean the surface of the walkway, removing any residual sand or debris. This final cleaning step will reveal the full beauty of the restored walkway and prepare it for regular use and enjoyment.
- Enhance the Surroundings: Consider landscaping and enhancing the surrounding area to complement the revitalized walkway. Adding potted plants, garden lighting, or decorative elements can further elevate the visual impact of the walkway and create a cohesive outdoor environment.
- Maintain Regularly: Establish a routine maintenance schedule to preserve the beauty and functionality of your brick walkway. Regular sweeping, weed control, and occasional resealing will prolong the life of the walkway and ensure that it remains a stunning focal point of your outdoor space.
By meticulously attending to these finishing touches, you’ll ensure that your restored brick walkway exudes timeless elegance and durability. The combination of protective measures, meticulous inspection, and thoughtful integration with the surrounding environment will result in a walkway that enhances the overall appeal and functionality of your outdoor space.
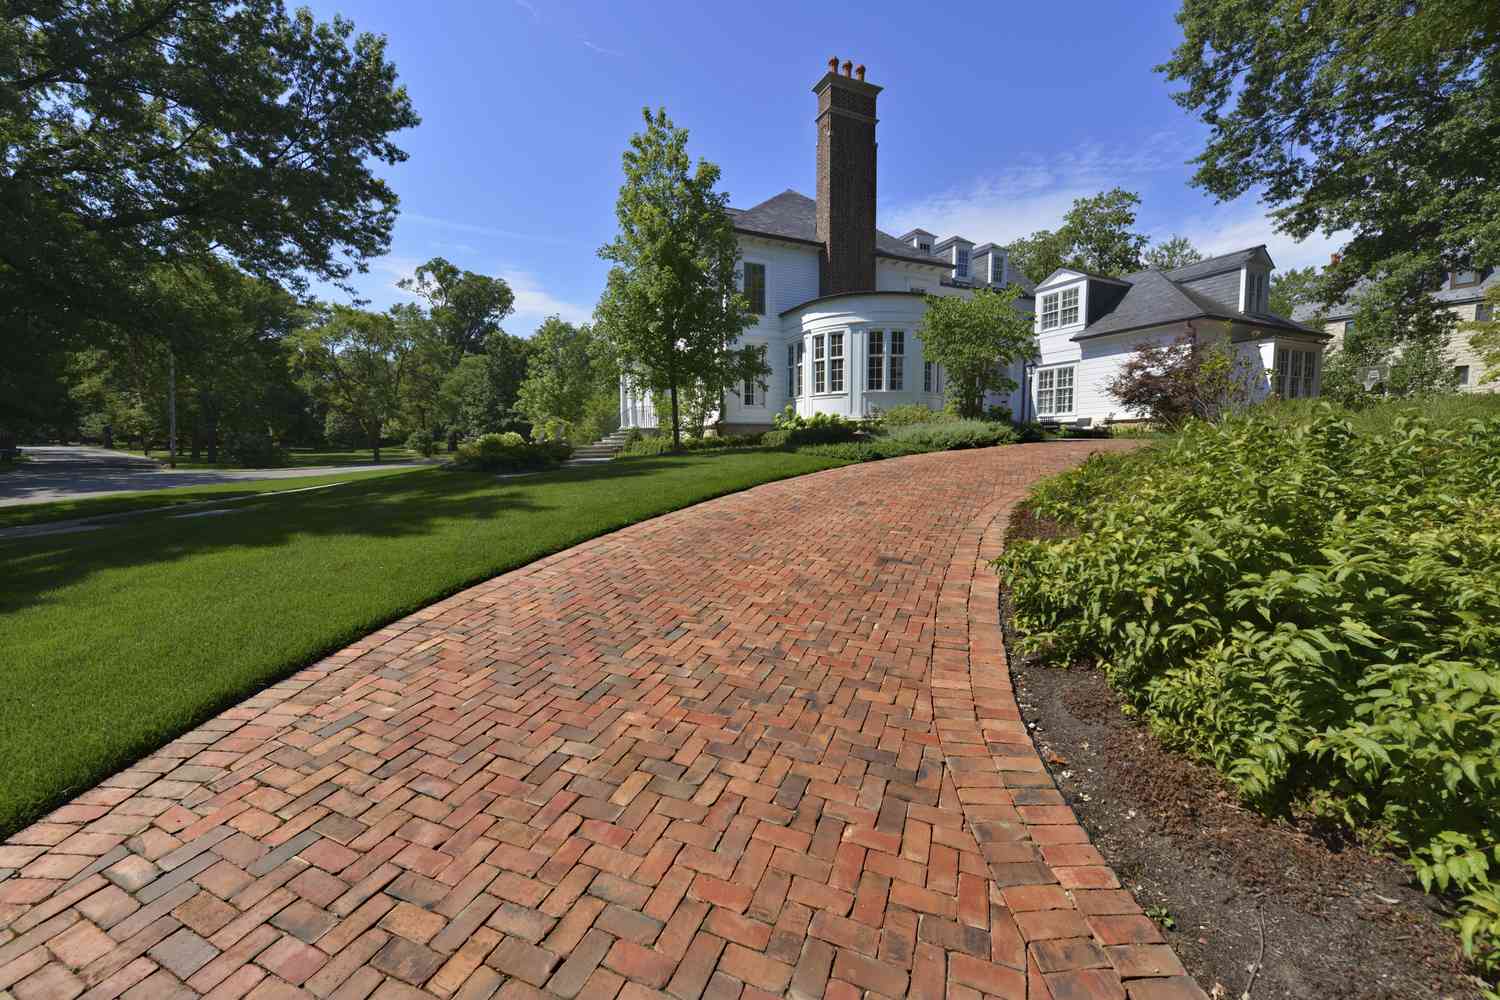
With the finishing touches complete, step back and admire the transformation of your brick walkway. The revitalized pathway is now ready to welcome you, your family, and your guests, providing a visually captivating and safe passage through your outdoor oasis.
Read more: How To Repair A Brick Walkway
Conclusion
Congratulations on successfully completing the restoration of your brick walkway! Through careful assessment, meticulous preparation, and skilled execution, you’ve revitalized a key feature of your outdoor space, enhancing both its visual appeal and functionality. As you reflect on this accomplishment, consider the broader significance of a well-maintained walkway within your property.
By investing time and effort in the repair and restoration process, you’ve not only improved the aesthetics of your outdoor environment but also prioritized safety and convenience for yourself, your family, and your guests. A well-maintained walkway serves as a welcoming and secure passage, contributing to the overall allure and functionality of your property.
Furthermore, the successful restoration of your brick walkway underscores the value of proactive maintenance and repair. By addressing issues promptly and comprehensively, you’ve prolonged the life of this essential feature, mitigated potential hazards, and preserved the overall integrity of your outdoor space.
As you enjoy the fruits of your labor, take pride in the transformation you’ve achieved. Your revitalized brick walkway stands as a testament to your dedication to maintaining a beautiful and safe home environment. Moreover, it serves as an inspiration for future projects and a reminder of the transformative power of thoughtful maintenance and repair.
Remember that the completion of this project is not just an endpoint but a new beginning. Embrace a regular maintenance routine to safeguard the beauty and functionality of your walkway, ensuring that it continues to enrich your outdoor space for years to come.
With your revitalized brick walkway now ready to welcome you and your guests, take a moment to appreciate the impact of your efforts. Your outdoor space has been elevated, and the pathway now stands as a testament to the care and attention you bring to your home. As you bask in the beauty of your restored walkway, may it inspire you to continue enhancing and preserving the spaces that bring joy and comfort to your life.
Frequently Asked Questions about How To Repair A Brick Walkway
Was this page helpful?
At Storables.com, we guarantee accurate and reliable information. Our content, validated by Expert Board Contributors, is crafted following stringent Editorial Policies. We're committed to providing you with well-researched, expert-backed insights for all your informational needs.

0 thoughts on “How To Repair A Brick Walkway”