Home>Construction & Tools>Building Materials>How To Replace Shutters On A Brick House
Building Materials
How To Replace Shutters On A Brick House
Modified: August 28, 2024
Learn how to replace shutters on a brick house using high-quality building materials. Follow our step-by-step guide for a seamless and durable installation.
(Many of the links in this article redirect to a specific reviewed product. Your purchase of these products through affiliate links helps to generate commission for Storables.com, at no extra cost. Learn more)
Introduction
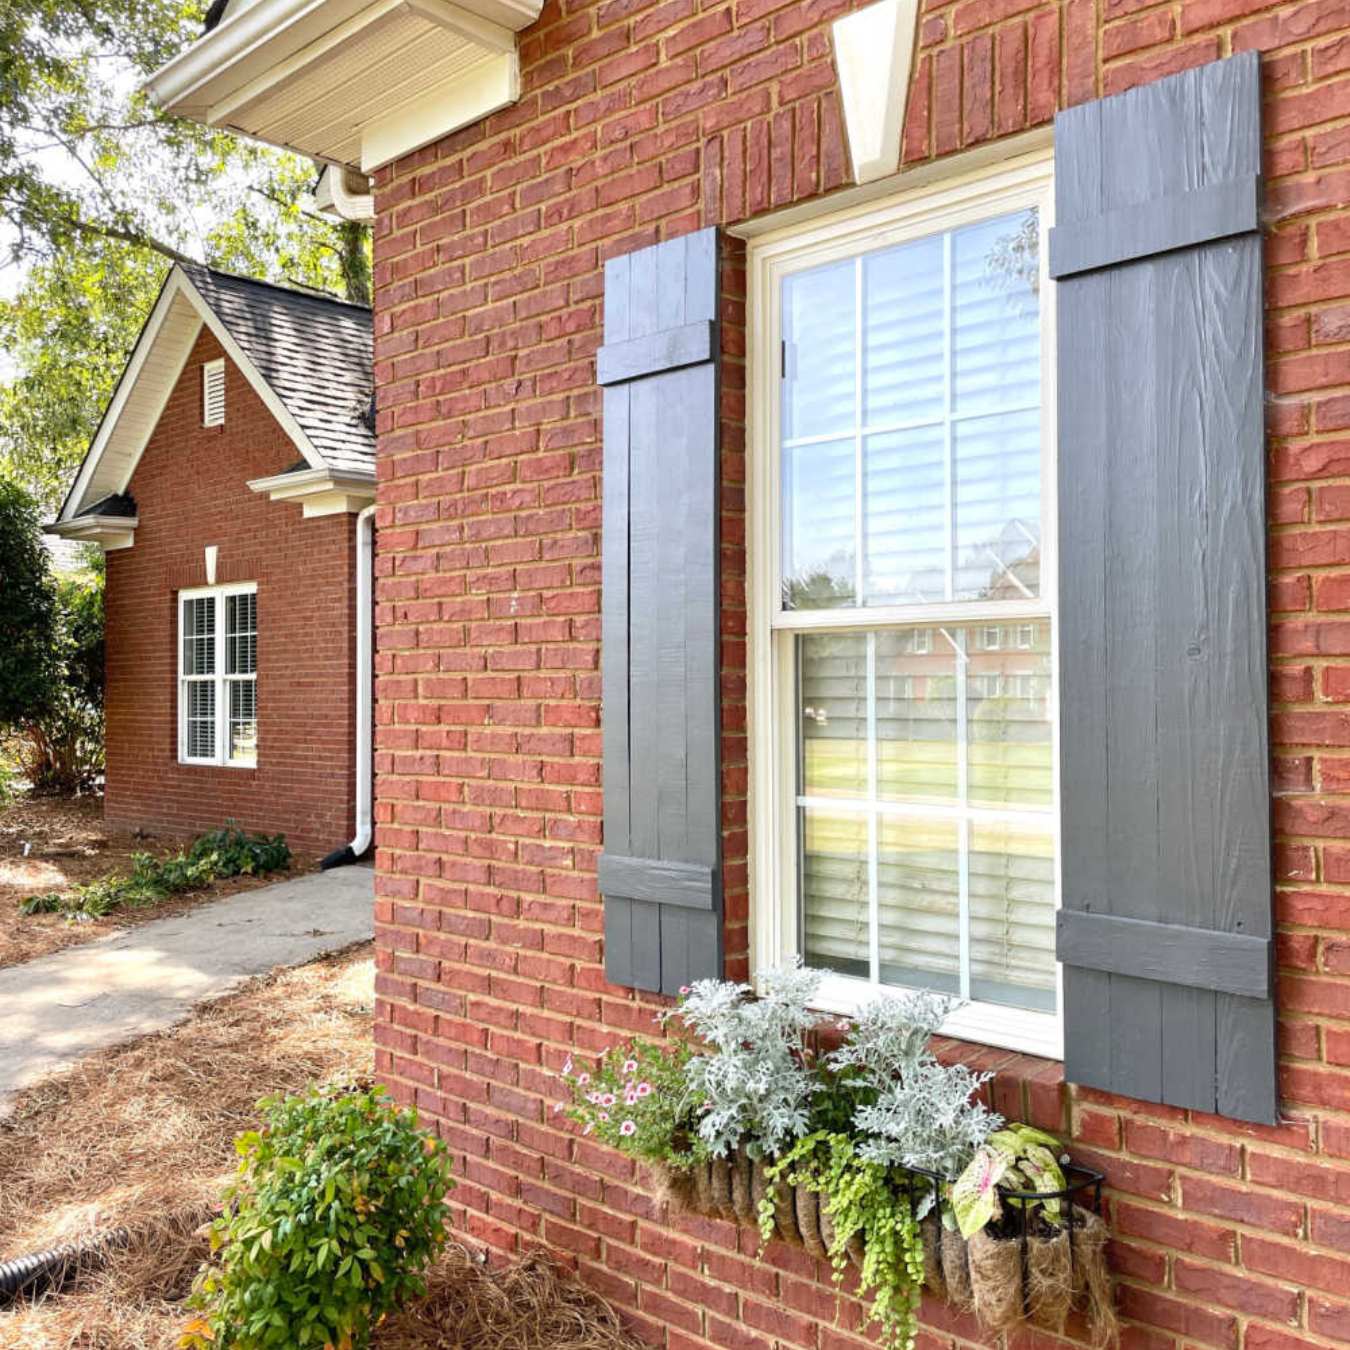
When it comes to enhancing the exterior aesthetics of your home, few elements can make as striking an impact as well-maintained shutters. These architectural accents not only add character to a house but also serve practical purposes, such as protecting windows during storms and providing shade. If you have a brick house, replacing the shutters can breathe new life into its appearance. Whether your existing shutters are worn, outdated, or damaged, swapping them out for fresh ones can revitalize the entire facade.
In this comprehensive guide, we will walk you through the process of replacing shutters on a brick house. From assessing the condition of your current shutters to the final touches and maintenance tips, each step is crucial in ensuring a successful and visually appealing outcome. By following these instructions and utilizing the right tools and materials, you can tackle this project with confidence and achieve professional-looking results.
So, roll up your sleeves and get ready to embark on this rewarding home improvement journey. With a bit of patience and attention to detail, you can elevate the charm and functionality of your brick house by installing new shutters that complement its architectural style. Let's dive into the first step: assessing the condition of your shutters.
Key Takeaways:
- Assess the condition of your current shutters by looking for wear, damage, and functionality. Consider the style, material, and design to guide your choices for replacements, ensuring a successful and visually appealing outcome.
- Gather essential tools and materials, such as screwdrivers, new shutters, and fasteners, to streamline the replacement process. Measure and mark the mounting locations accurately, setting the stage for a smooth and successful shutter installation.
Read more: What Color Shutters For Red Brick House
Assessing the Condition of Your Shutters
Before diving into the process of replacing your shutters, it is essential to thoroughly evaluate the current state of the existing ones. This step will help you determine the extent of the replacement project and identify any underlying issues that need to be addressed.
Start by visually inspecting each shutter for signs of wear, damage, or rot. Look for peeling paint, cracks, warping, or any other visible defects. Additionally, check the hardware, such as hinges and fasteners, to ensure they are in good condition. If the shutters are made of wood, pay close attention to areas that may have been exposed to moisture, as this can lead to decay and structural instability.
Next, test the functionality of the shutters. Open and close each one to see if they operate smoothly or if they are stuck or misaligned. Properly functioning shutters not only contribute to the overall appearance of your home but also serve their practical purposes effectively.
Consider the style and design of the existing shutters. Are they outdated or mismatched with the architectural features of your home? Assess whether the size, shape, and color of the shutters complement the overall aesthetic of your brick house. If they appear out of place or detract from the curb appeal, replacing them presents an opportunity to enhance the visual harmony of the exterior.
Lastly, evaluate the material of the current shutters. Common materials include wood, vinyl, aluminum, or composite. Each material has its own set of characteristics and maintenance requirements. Understanding the composition of your existing shutters will help you make informed decisions when selecting replacements.
By conducting a thorough assessment, you will gain valuable insights into the condition and suitability of your current shutters. This knowledge will guide your choices as you proceed to gather the necessary tools and materials for the replacement project.
Gathering the Necessary Tools and Materials
Once you have assessed the condition of your shutters and decided to proceed with the replacement, the next step is to gather the essential tools and materials required for the project. Having the right equipment at your disposal will streamline the process and ensure that you can complete the installation with precision and efficiency.
Tools:
- Screwdriver or drill: For removing old fasteners and installing new ones.
- Hammer: To gently tap and adjust the position of the shutters.
- Caulking gun: For sealing gaps and joints around the shutters.
- Level: To ensure the shutters are installed straight and aligned properly.
- Saw (if necessary): For cutting new shutters to the required size.
- Measuring tape: To accurately measure the dimensions for the new shutters.
- Safety goggles and gloves: For personal protection during the installation process.
Materials:
- New shutters: Choose shutters that are suitable for exterior use and complement the style of your brick house. Consider the material, color, and design that will best enhance the overall aesthetic.
- Fasteners: Select durable screws or nails that are appropriate for securing the shutters to the brick surface. Stainless steel or corrosion-resistant fasteners are ideal for longevity.
- Caulk: Invest in high-quality exterior caulk to seal gaps between the shutters and the brick, preventing moisture intrusion and ensuring a finished look.
- Primer and paint (if applicable): If you opt for wooden shutters, ensure you have primer and paint suitable for exterior applications to protect the shutters from the elements.
Before purchasing the new shutters, measure the dimensions of the existing ones to ensure the replacements align with the size and shape of the original shutters. Additionally, consider any specific requirements based on the material of the new shutters, such as pre-drilling holes for installation or applying special treatments for long-term durability.
By preparing a comprehensive list of tools and materials and acquiring them ahead of time, you can set the stage for a smooth and successful shutter replacement project. With everything in hand, you are ready to move on to the next step: removing the old shutters.
Read more: How To Replace Windows On A Brick House
Removing the Old Shutters
With the necessary tools and materials gathered, it’s time to begin the process of removing the old shutters from your brick house. This step requires careful attention to detail and a methodical approach to ensure that the existing shutters are safely and effectively detached from the exterior surface.
Step 1: Preparation
Before starting the removal process, ensure that you have the appropriate safety gear, including gloves and safety goggles, to protect yourself from any debris or sharp edges. Additionally, organize the tools you will need, such as a screwdriver or drill, and have them readily accessible.
Step 2: Loosening the Fasteners
Identify the fasteners securing the shutters to the brick. Depending on the installation method, these may be screws, nails, or other types of fasteners. Use a screwdriver or drill to carefully loosen and remove the fasteners, taking care not to damage the surrounding brick or mortar.
Step 3: Detaching the Shutters
Once the fasteners are removed, gently pry the old shutters away from the brick surface. If the shutters are painted or caulked to the brick, use a putty knife or similar tool to carefully separate the edges without causing damage to the underlying structure. Work methodically and patiently to avoid any unnecessary strain on the shutters or the surrounding area.
Read more: How To Replace A Hose Bib On A Brick House
Step 4: Inspection and Clean-Up
After the old shutters have been successfully removed, inspect the brick surface for any remaining fasteners, adhesive residue, or other debris. Clean the area thoroughly to ensure a smooth and clean foundation for installing the new shutters. Use a brush or vacuum to remove any loose particles and prepare the surface for the next phase of the project.
By following these steps, you can safely and effectively remove the old shutters from your brick house, setting the stage for the subsequent installation of the new shutters. With the old shutters out of the way, you are ready to prepare the brick surface for the upcoming installation.
Preparing the Brick Surface for New Shutters
Before installing the new shutters on your brick house, it is essential to ensure that the brick surface is properly prepared to facilitate a secure and visually appealing installation. This step involves addressing any imperfections, applying necessary treatments, and creating an optimal foundation for the new shutters.
Step 1: Cleaning the Surface
Begin by thoroughly cleaning the brick surface where the new shutters will be installed. Use a mild detergent or brick cleaner and a stiff-bristled brush to remove dirt, debris, and any existing residue. Pay close attention to areas around the previous shutter locations to ensure that the surface is free from any obstructions that could affect the new installation.
Step 2: Repairing and Patching
Inspect the brick surface for any visible damage, such as cracks, chips, or mortar deterioration. Address any minor imperfections by filling them with a suitable masonry patching compound. For larger or more significant issues, consider consulting a professional to assess and repair the brickwork before proceeding with the shutter installation.
Read more: How To Remove Shutters From Brick
Step 3: Sealing and Priming (if necessary)
Depending on the condition of the brick and the type of new shutters being installed, you may need to apply a primer or sealant to the surface. This step is particularly important if the new shutters are made of wood or if the brick requires additional protection against moisture. Follow the manufacturer’s recommendations for the appropriate primer or sealant application process.
Step 4: Marking the Mounting Locations
Prior to installing the new shutters, carefully measure and mark the precise locations where the fasteners will be attached to the brick. Use a level to ensure that the markings are straight and aligned according to your design preferences. Taking the time to accurately position the mounting locations will contribute to a professional and polished final result.
By meticulously preparing the brick surface, you can create an optimal environment for installing the new shutters. This proactive approach not only ensures the structural integrity of the installation but also sets the stage for a visually pleasing and long-lasting enhancement to your brick house’s exterior. With the surface prepared, you are now ready to move on to the next phase: installing the new shutters.
Installing the New Shutters
With the brick surface prepared and the old shutters removed, it’s time to embark on the exciting phase of installing the new shutters. This step involves carefully positioning and securing the fresh architectural accents to enhance the visual appeal and functionality of your brick house’s exterior.
Step 1: Positioning the Shutters
Begin by holding the new shutters against the prepared brick surface to determine their optimal placement. Ensure that the shutters align with the previously marked mounting locations and visually assess their positioning to achieve a balanced and symmetrical appearance. Enlist the assistance of a second person if necessary to hold the shutters in place during the installation process.
Read more: How To Whitewash A Brick House
Step 2: Attaching the Fasteners
Using the appropriate fasteners, such as screws or nails designed for exterior applications, secure the shutters to the brick surface. Exercise caution and precision to avoid damaging the shutters or the surrounding brickwork. A power drill or hammer may be used to drive the fasteners into place, ensuring a firm and stable attachment for each shutter.
Step 3: Checking Alignment and Level
Once the shutters are secured in place, use a level to verify that they are aligned horizontally and vertically. Adjust the positioning as needed to achieve a straight and uniform appearance. This attention to detail will contribute to a polished and professional outcome that enhances the overall aesthetic of your brick house.
Step 4: Sealing and Finishing Touches
After the shutters are securely installed, apply exterior caulk around the edges to seal the gaps between the shutters and the brick surface. This step not only provides a finished look but also helps prevent moisture intrusion and enhances the longevity of the installation. Wipe away any excess caulk to achieve a clean and seamless appearance.
By following these steps, you can successfully install the new shutters on your brick house, elevating its visual appeal and adding a touch of character to the exterior. With the shutters securely in place, the final touches and maintenance tips are the next focus as you bring this project to completion.
Final Touches and Maintenance Tips
With the new shutters installed, attention turns to the final touches that will ensure a polished and enduring enhancement to your brick house’s exterior. Additionally, understanding the maintenance requirements for the shutters will help preserve their appearance and functionality over time.
Read more: How To Insulate A Brick House
Step 1: Painting and Finishing (if applicable)
If your new shutters are made of wood or require a fresh coat of paint, consider applying a high-quality exterior paint to protect and enhance their appearance. Ensure that the paint is suitable for the material and designed to withstand outdoor elements. A well-executed paint job can contribute to the overall visual impact of the shutters and complement the aesthetic of your home.
Step 2: Regular Inspection and Cleaning
Make it a habit to periodically inspect the shutters for any signs of wear, damage, or discoloration. Address any issues promptly to prevent further deterioration. Additionally, clean the shutters as part of your routine exterior maintenance, using a mild detergent and water to remove dirt, pollen, and other debris that may accumulate over time.
Step 3: Hardware and Fastener Maintenance
Check the fasteners and hardware securing the shutters to the brick surface to ensure they remain tight and secure. If any fasteners show signs of corrosion or weakening, replace them promptly to maintain the structural integrity of the installation. Regularly lubricate hinges or moving parts to facilitate smooth operation and prevent rust or corrosion.
Step 4: Addressing Environmental Factors
Consider the impact of environmental factors, such as exposure to sunlight, moisture, and extreme temperatures, on the longevity of the shutters. Choose materials and finishes that are resilient and resistant to weather-related wear. Additionally, consider installing awnings or using UV-protective coatings to shield the shutters from prolonged sun exposure.
By attending to these final touches and incorporating proactive maintenance practices, you can ensure that the new shutters on your brick house remain visually appealing and structurally sound for years to come. This commitment to care and maintenance will preserve the investment you’ve made in enhancing the exterior of your home.
With the final touches and maintenance tips addressed, you have successfully completed the process of replacing the shutters on your brick house. This project not only adds aesthetic value to your home but also contributes to its overall curb appeal and functionality. As you admire the newly installed shutters, take pride in the transformation you’ve achieved and the enduring impact it will have on your brick house’s exterior.
Read more: How To Repaint A Brick House
Conclusion
Embarking on the journey of replacing the shutters on your brick house has not only revitalized its exterior but also added a touch of character and charm to your home. From assessing the condition of the old shutters to meticulously installing the new ones, each step has contributed to the enhancement of your brick house’s visual appeal and functionality.
By carefully evaluating the condition of the existing shutters, you gained valuable insights into the scope of the replacement project and the opportunities it presented for improving the aesthetics of your home. Gathering the necessary tools and materials equipped you with the resources needed to execute the replacement with precision and efficiency, setting the stage for a successful installation.
Removing the old shutters required attention to detail and a methodical approach to ensure that the process was carried out safely and effectively. Preparing the brick surface for the new shutters involved proactive measures to create an optimal foundation for the installation, ensuring the longevity and visual appeal of the architectural accents.
The installation of the new shutters marked a significant transformation, elevating the exterior of your brick house and adding a touch of elegance and character. The final touches and maintenance tips underscored the importance of proactive care and attention to preserve the investment you’ve made in enhancing your home’s curb appeal.
As you stand back and admire the newly installed shutters, take pride in the impact you’ve made on your home’s exterior. The process of replacing the shutters on your brick house not only refreshed its appearance but also reflected your commitment to maintaining and enhancing its visual appeal for years to come.
With the completion of this project, you’ve not only added a personal touch to your brick house but also contributed to its enduring beauty and functionality. As you revel in the transformation, remember that the journey of homeownership is filled with opportunities to infuse your personal style and care into every aspect of your home.
Congratulations on successfully replacing the shutters on your brick house, and may the newly installed architectural accents continue to enrich the character and charm of your cherished abode for years to come.
Excited to tackle more home improvement projects? If you're curious about the time commitment required for larger tasks, our guide on how long it takes to brick a house offers valuable insights. For those eager to try their hand at various enhancements around the home, don't miss our comprehensive tips on DIY home projects. And, if you're planning a major undertaking like a roof overhaul, our article with renovation tips ensures your project runs smoothly, saving you time and stress.
Frequently Asked Questions about How To Replace Shutters On A Brick House
Was this page helpful?
At Storables.com, we guarantee accurate and reliable information. Our content, validated by Expert Board Contributors, is crafted following stringent Editorial Policies. We're committed to providing you with well-researched, expert-backed insights for all your informational needs.


0 thoughts on “How To Replace Shutters On A Brick House”