Home>diy>Building & Construction>How To Create A New Project In BIM 360
Building & Construction
How To Create A New Project In BIM 360
Modified: January 9, 2024
Learn how to create a new project in BIM 360 for building construction. Streamline your workflow and maximize efficiency with our step-by-step guide.
(Many of the links in this article redirect to a specific reviewed product. Your purchase of these products through affiliate links helps to generate commission for Storables.com, at no extra cost. Learn more)
Introduction
In the fast-paced world of construction, effective project management is essential for successful outcomes. Building Information Modeling, commonly known as BIM, has revolutionized the construction industry by providing a collaborative platform for project teams to streamline workflows and improve communication.
One popular BIM software that has gained significant traction in recent years is BIM 360. Developed by Autodesk, BIM 360 offers a complete suite of tools and features to facilitate project management, document control, and collaboration.
In this article, we will guide you through the process of creating a new project in BIM 360. Whether you are a contractor, architect, or project manager, this step-by-step guide will help you set up your project and optimize your workflow.
Before we dive into the details, it’s important to note that you will need a valid BIM 360 account to follow this guide. If you don’t have an account, you can easily sign up for a trial version on the Autodesk website.
Now, let’s get started with creating your new project in BIM 360!
Key Takeaways:
- Efficient Project Setup
Streamline project management in BIM 360 by signing in, creating project details, configuring settings, adding team members, and organizing files. Customization and publishing mark the start of a successful project journey. - Collaborative Construction Success
Harness the power of BIM 360 for optimal collaboration, streamlined workflows, and efficient communication. Embrace technology to transform project management and achieve exceptional construction outcomes.
Read more: What Is BIM 360?
Step 1: Sign in to BIM 360
The first step to creating a new project in BIM 360 is to sign in to your BIM 360 account. Open your preferred web browser and navigate to the BIM 360 login page. Enter your login credentials (username and password) and click on the “Sign In” button to access your account.
If you’re using the Autodesk single sign-on, simply click on the “Sign In with Autodesk” button and enter your Autodesk credentials to log in.
Once you have successfully signed in, you will be directed to the BIM 360 dashboard, where you can access all the projects you are involved in and manage project-related tasks.
Note: If you do not have a BIM 360 account, you will need to sign up for one before proceeding with the remaining steps in this guide. Click on the “Sign Up” button on the login page and follow the prompts to create your account.
Now that you are signed in to BIM 360, you are ready to create your new project. In the next step, we will guide you on how to access the projects dashboard.
Step 2: Access Projects Dashboard
After signing in to your BIM 360 account, you need to access the projects dashboard to create a new project. The projects dashboard is where you will find all your existing projects and have the ability to manage and organize them.
To access the projects dashboard, look for the “Projects” tab or icon. This is typically located at the top navigation bar of the BIM 360 interface. Click on the “Projects” tab to proceed.
Once you click on the “Projects” tab, you will be directed to the projects dashboard. Here, you will see a list of all the projects associated with your account. This includes any projects you have created in the past, as well as projects you have been invited to collaborate on.
The projects dashboard provides an overview of your projects, displaying key information such as project names, dates, project types, and project owners. You can sort and filter the projects based on different criteria to easily locate the specific project you want to work on.
If you don’t have any existing projects listed in your dashboard, don’t worry! Creating a new project is just a few clicks away, and we will guide you through the process in the upcoming steps.
Now that you have accessed the projects dashboard, let’s move on to the next step and create your new project in BIM 360.
Step 3: Select “Create New Project”
Now that you are on the projects dashboard in BIM 360, it’s time to create your new project. To do this, you need to select the “Create New Project” option, which will guide you through the process of setting up your project.
To find the “Create New Project” option, look for a button or link that stands out from the rest of the interface. It is usually prominently displayed on the projects dashboard, often in a contrasting color or with an easily identifiable icon.
Once you have located the “Create New Project” option, click on it to begin the project creation process. This will open a new window or dialog box where you can enter the necessary details for your new project.
Before you proceed, make sure you have a clear understanding of the project requirements, goals, and scope. This will help you provide accurate information during the project creation process.
Now that you have selected “Create New Project” and are ready to proceed, let’s move on to the next step and enter the project details.
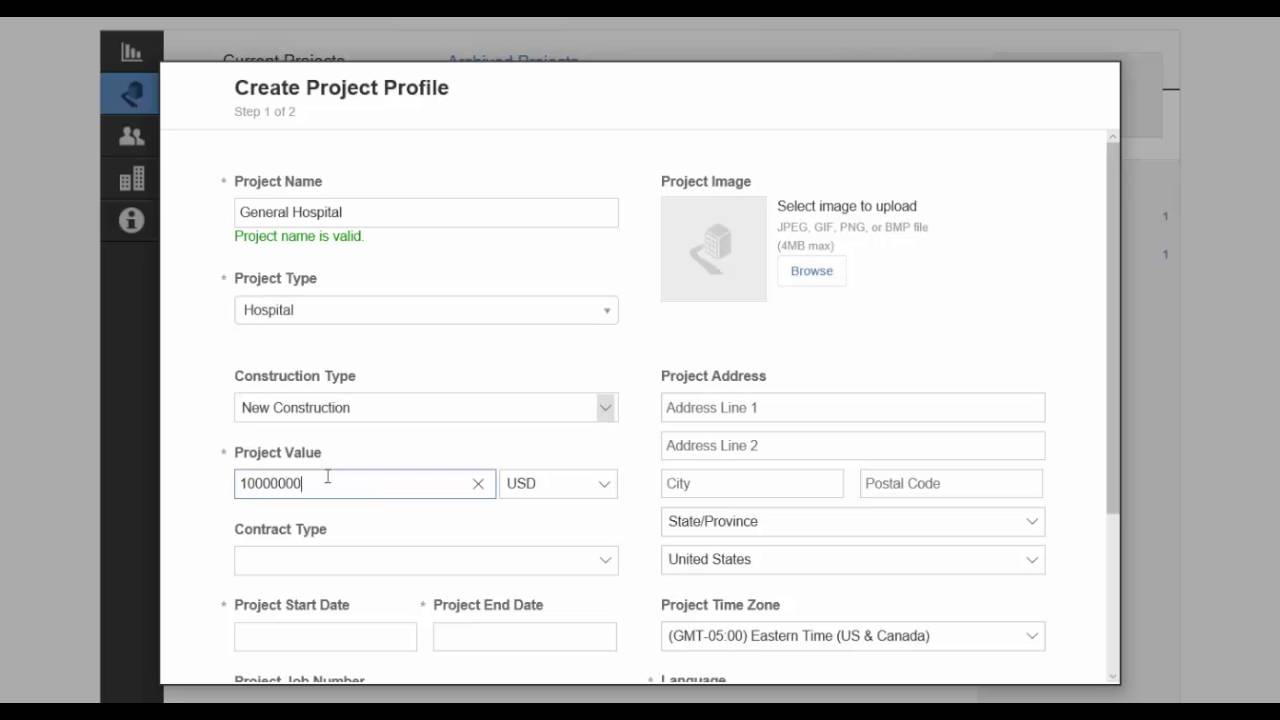
Step 4: Enter Project Details
Entering the project details is a crucial step in creating a new project in BIM 360. This information will provide a clear understanding of the project scope and requirements to all team members and stakeholders involved.
When you click on the “Create New Project” option, you will be prompted to enter various project details. Here is a breakdown of the key information you will need to provide:
Project Name: Give your project a unique and descriptive name. This will help distinguish it from other projects in your BIM 360 account.
Start Date: Specify the start date of the project. This will help track the project’s timeline and milestones.
End Date: Indicate the projected end date of the project. This will provide an estimated timeframe for project completion.
Description: Provide a brief summary or description of the project. This should include relevant details such as the project type, location, and any other pertinent information that helps clarify the project’s purpose.
Project Number: Assign a unique identifier or project number to your project for better organization and referencing.
Project Template: Depending on your BIM 360 setup, you may have the option to select a project template. Templates can be preconfigured with specific settings, folders, and permissions, saving you time and ensuring consistency in project setup.
Once you have filled in all the required project details, review the information to ensure accuracy. You may also have the option to add additional custom fields or project-specific information depending on your organization’s BIM 360 configuration.
When you are satisfied with the entered project details, proceed to the next step where you will configure the project settings.
Read more: How To Upgrade A Revit Model On BIM 360
Step 5: Configure Project Settings
Configuring the project settings in BIM 360 is an important step to ensure the project is set up according to your specific needs and requirements. These settings will determine how the project functions, permissions for team members, and how information is organized and shared.
After entering the project details, you will typically be directed to the project settings page. Here, you will find various options and configurations to customize your project. Let’s explore some key settings:
Project Permissions: Determine the access and permissions for different team members within the project. You can assign roles such as Project Administrator, Manager, Contributor, Viewer, etc., with different levels of access and capabilities.
Folder Structure: Organize the project files and documents by creating a logical folder structure. Consider the project’s workflow and hierarchy to create folders for design documents, drawings, specifications, and other project-related files.
Document Management: Set up document management protocols, such as version control, file naming conventions, and document approval workflows. This ensures that the project team can easily find and use the most up-to-date documents.
Notifications: Configure notification settings to receive updates and notifications about project activities, document changes, or user interactions. This helps keep all team members informed and promotes effective collaboration.
Integration: Explore integration options with other software or platforms that you may be using for design, scheduling, or project management. BIM 360 offers several integrations to enhance your project workflow.
Take your time to review each setting and customize them according to your project’s requirements. Consult with key stakeholders and project team members to ensure the settings align with the project’s goals and desired outcomes.
Once you have configured the project settings, you are ready to move on to the next step where you will add team members to the project.
When creating a new project in BIM 360, make sure to define the project’s location, units, and project type accurately to ensure proper organization and management of project data.
Step 6: Add Team Members
Collaboration is key in construction projects, and BIM 360 allows you to easily add team members to your project. By adding team members, you can ensure that everyone has access to the project’s information, files, and communication channels.
To add team members, navigate to the project’s settings or administrative menu. Look for the “Team” or “Members” section, where you can manage the project’s user list.
In this section, you will have the option to invite new team members to the project. Enter their email addresses, and BIM 360 will send them an invitation to join the project. Depending on your project settings, team members may have to accept the invitation and create their own BIM 360 accounts if they don’t already have one.
Once team members have been added, you can assign roles and set permissions for each individual based on their responsibilities and level of access required. This allows you to control who can make changes to project files, upload new documents, or manage project settings.
It’s important to ensure that you add all relevant team members to the project. This includes architects, engineers, contractors, project managers, and any other key stakeholders involved in the project. Open communication and collaboration among the team members can lead to increased efficiency and improved project outcomes.
Remember to periodically review and update the team members’ list as the project progresses. As team members join or leave the project, make the necessary adjustments to keep the project’s user list up to date.
Once you have added all the necessary team members, let’s move on to the next step where you will define roles and permissions for each team member.
Step 7: Define Roles and Permissions
Defining roles and permissions is an essential step in BIM 360 to ensure that team members have appropriate access levels and responsibilities assigned to them. By defining roles and permissions, you can control who can perform specific actions within the project and maintain data security.
To define roles and permissions, navigate to the project settings or administrative menu and locate the “Roles” or “Permissions” section. Here, you will find a list of predefined roles, such as Project Administrator, Manager, Contributor, and Viewer.
Each role has different levels of access and capabilities within the project. For example:
- Project Administrator: This role has full control over the project settings, user management, and permissions. They can manage the project’s overall configuration.
- Manager: Managers have access to project settings, can create and update folders, and can manage project files and document control.
- Contributor: Contributors can upload files, make edits, and collaborate with other team members within their assigned folders.
- Viewer: Viewers have read-only access to project files and can view and comment on project information.
Review the predefined roles and their associated permissions to determine which roles are suitable for your project. It’s important to assign roles based on team members’ responsibilities and the access levels required to perform their tasks.
In addition to the predefined roles, BIM 360 allows you to create custom roles with specific permissions tailored to your project’s unique requirements. This gives you greater flexibility in assigning access rights to team members.
Consider the project workflow, team structure, and data sensitivity when assigning roles and permissions. Regularly review and adjust the roles and permissions as the project evolves and team dynamics change.
With the roles and permissions defined, your team members will have the appropriate access levels to contribute and collaborate effectively within the project. In the next step, we will discuss setting up project folders and files.
Step 8: Set up Project Folders and Files
Setting up project folders and organizing files is crucial to maintain a well-structured and easily accessible repository of project information in BIM 360. By organizing project files into folders, you can streamline collaboration and improve efficiency within the team.
To set up project folders and files, navigate to the project’s document management section or file explorer. Here, you will have the option to create new folders to categorize different types of project information.
Consider the project’s workflow and the types of documents and files that will be generated throughout the project lifecycle. Common folder categories include:
- Design Documents: This folder can include drawings, models, and specifications related to the design phase of the project.
- Construction Documents: This folder can house construction drawings, RFIs (Request for Information), submittals, and other documents related to the construction process.
- Schedules: A folder dedicated to project schedules, Gantt charts, and other time-related documents.
- Contracts and Agreements: Keep track of project contracts, agreements, and legal documentation.
- Meeting Minutes: Store meeting minutes, agendas, and any other records related to project meetings.
Create additional folders as needed, based on the specific needs of your project. Within each folder, you can further organize files by subfolders and use naming conventions to ensure consistency and easy retrieval of information.
Once you have set up the project folders, you can start adding files to each folder. Upload relevant project documents, drawings, and files from your local computer or cloud storage. BIM 360 allows you to easily upload files, and you can also choose to synchronize files between your local device and BIM 360 for seamless access.
Consider establishing clear file naming conventions to make it easier for team members to locate and identify specific files. Use descriptive names that include project names, dates, versions, and relevant keywords.
Regularly review and maintain the project folders and files as the project progresses. Remove any outdated or unnecessary files and ensure that new files are placed in the appropriate folders.
By setting up project folders and organizing your files effectively, you can enhance collaboration, eliminate confusion, and improve overall project efficiency.
In the next step, we will discuss how to customize the project settings further to align with your project’s specific needs.
Read more: How To Archive A Revit Model In BIM 360
Step 9: Customize Project Settings
Customizing the project settings in BIM 360 allows you to tailor the platform to your project’s specific needs and requirements. By making these customizations, you can optimize your workflow, enhance collaboration, and improve overall project management.
To customize the project settings, navigate to the project’s settings or administrative menu. Here, you will find various options and configurations that you can adjust to align with your project’s unique specifications. Let’s explore some possible customizations:
- Notifications: Configure notification settings to ensure that you and your team members receive timely updates and reminders for project-related activities. Customize the frequency and format of notifications to suit your preferences.
- Project Units: Specify the units of measurement to be used throughout the project, such as inches, feet, or metric units. Consistency in units helps avoid confusion and ensures accurate measurement across all project documentation.
- Project Templates: If your organization has project templates preconfigured with specific settings, folders, and permissions, you can apply a template to your project to expedite the setup process.
- Forms and Field Management: Customize the forms and fields within BIM 360 to capture project-specific information. Create custom fields to track project milestones, budget allocations, or any other relevant data.
- Integrations: Explore integration options with other software or platforms that you may be using for design, scheduling, or project management. BIM 360 offers several integrations that can further enhance your project workflow.
- Project Dashboard: Customize the project dashboard by adding widgets and panels that display relevant project information, such as upcoming tasks, project progress, or any other key performance indicators.
Take the time to explore the various customization options available in BIM 360 and determine which settings will best support your project’s objectives. Consult with key stakeholders and project team members to ensure that the customizations align with their needs and preferences.
Remember to periodically review and update the project settings as the project evolves and new requirements arise. Being able to adapt the settings to changing circumstances ensures that BIM 360 remains a valuable tool throughout the entire project lifecycle.
With the project settings customized to fit your project’s requirements, you are now ready to save and publish the project. Let’s move on to the final step.
Step 10: Save and Publish the Project
After configuring and customizing the project settings to your satisfaction, it’s time to save and publish your project in BIM 360. Saving and publishing the project makes it accessible to all team members and allows them to begin collaborating and working on the project.
To save and publish the project, locate the “Save” or “Publish” button within the project settings or administrative menu. Click on it to initiate the saving and publishing process. BIM 360 may prompt you to confirm your action before proceeding.
When you save and publish the project, BIM 360 will make the project visible and available to all team members who have been added to the project. They will receive notifications and invitations to access the project and start collaborating.
Before saving and publishing the project, it’s crucial to double-check all the project settings, permissions, and configurations to ensure that everything is set up correctly. Take the time to review all the information and consult with the project team to address any last-minute changes or concerns.
Once you are confident that the project is ready, proceed with the save and publish action. BIM 360 will take care of indexing and organizing the project data, making it easily accessible and searchable for all team members.
Remember that saving and publishing the project does not mean that the work is done. Project management and collaboration continue throughout the project’s lifecycle. Regularly monitor and update the project as needed, linking new documents, tracking progress, and facilitating effective communication.
By saving and publishing your project in BIM 360, you ensure that it is readily available to all team members, streamlining collaboration and promoting efficient project management.
With the completion of this final step, you have successfully created a new project in BIM 360! Congratulations on setting up your project and taking advantage of the powerful collaboration tools offered by BIM 360.
Good luck with your project, and may BIM 360 help you achieve success in your construction endeavors!
Conclusion
Creating a new project in BIM 360 is a critical step in harnessing the power of technology and collaboration for successful construction project management. By following the step-by-step guide outlined in this article, you can ensure that your project is set up for efficient communication, streamlined workflows, and optimal collaboration among team members.
From signing in to your BIM 360 account to customizing project settings and adding team members, each step has been carefully crafted to guide you through the process. By entering project details accurately, defining roles and permissions, and organizing project folders and files, you create a solid foundation for effective project management in the BIM 360 platform.
Additionally, by customizing project settings to fit your project’s unique needs and requirements, you can tailor BIM 360 to optimize your workflow and enhance collaboration. Finally, the act of saving and publishing the project makes it accessible to all team members, marking the official start of the project’s lifecycle.
Remember that while creating a new project in BIM 360 is an important step, it is only the beginning of a successful construction project. Regularly reviewing and updating project information, communicating with team members, and leveraging the collaborative features of BIM 360 will contribute to the overall success of your project.
Embrace the power of BIM 360 and its capacity to transform the way you manage construction projects. With effective project management, streamlined workflows, and enhanced collaboration, your project is poised for success.
So, take the knowledge and steps outlined in this guide and embark on your BIM 360 project journey. Utilize the tools and features to optimize your project’s outcome and deliver exceptional results.
Good luck and happy building!
Frequently Asked Questions about How To Create A New Project In BIM 360
Was this page helpful?
At Storables.com, we guarantee accurate and reliable information. Our content, validated by Expert Board Contributors, is crafted following stringent Editorial Policies. We're committed to providing you with well-researched, expert-backed insights for all your informational needs.


0 thoughts on “How To Create A New Project In BIM 360”