Home>diy>Building & Construction>How To Upload A Revit Model To BIM 360
Building & Construction
How To Upload A Revit Model To BIM 360
Modified: January 4, 2024
Learn how to seamlessly upload your Revit model to BIM 360 for efficient collaboration and streamlined building construction.
(Many of the links in this article redirect to a specific reviewed product. Your purchase of these products through affiliate links helps to generate commission for Storables.com, at no extra cost. Learn more)
Introduction
Welcome to the world of Building Information Modeling (BIM) and the exciting possibilities it brings to the construction industry. BIM revolutionizes the way buildings are designed, constructed, and operated by integrating all aspects of a project into a collaborative digital platform. One of the key components of the BIM process is the ability to upload and share Revit models on the BIM 360 platform.
In this article, we will guide you through the process of uploading a Revit model to BIM 360, step by step. Whether you are an architect, engineer, contractor, or construction manager, understanding how to effectively collaborate and share Revit models on BIM 360 is essential for seamless project coordination and improved project outcomes.
Before we dive into the steps, let’s briefly explore why BIM 360 is a game-changer in the construction industry. BIM 360 offers a cloud-based platform that allows multiple stakeholders to access, review, and collaborate on a project in real-time. This eliminates the need for manual file sharing and ensures that everyone is working with the most up-to-date version of the model.
Furthermore, BIM 360 provides powerful tools for collaboration, communication, and data management. It enables teams to track project progress, monitor changes, streamline document management, and generate insightful reports. By leveraging the capabilities of BIM 360, construction professionals can reduce errors, save time, and improve overall project efficiency.
Now that we have a strong understanding of the benefits of BIM 360, let’s move on to the step-by-step process of uploading a Revit model to this innovative platform. By the end of this article, you will have the knowledge and confidence to navigate BIM 360 and fully leverage its collaborative features for your construction projects.
Key Takeaways:
- BIM 360 revolutionizes construction collaboration by offering a cloud-based platform for seamless project management, real-time access, and powerful tools for communication, data management, and insightful reporting.
- Leveraging BIM 360’s features, from uploading Revit models to collaborating and extracting data, enhances project efficiency, reduces errors, and transforms construction projects with a digital, data-driven approach.
Read more: How To Consume A Revit Model In BIM 360
Step 1: Creating a BIM 360 Project
Before you can upload your Revit model to BIM 360, you need to create a project on the BIM 360 platform. Follow these steps to create a new project:
- Log in to your BIM 360 account or create a new one if you don’t have an account already.
- Once logged in, navigate to the BIM 360 homepage.
- Click on the “Create Project” button.
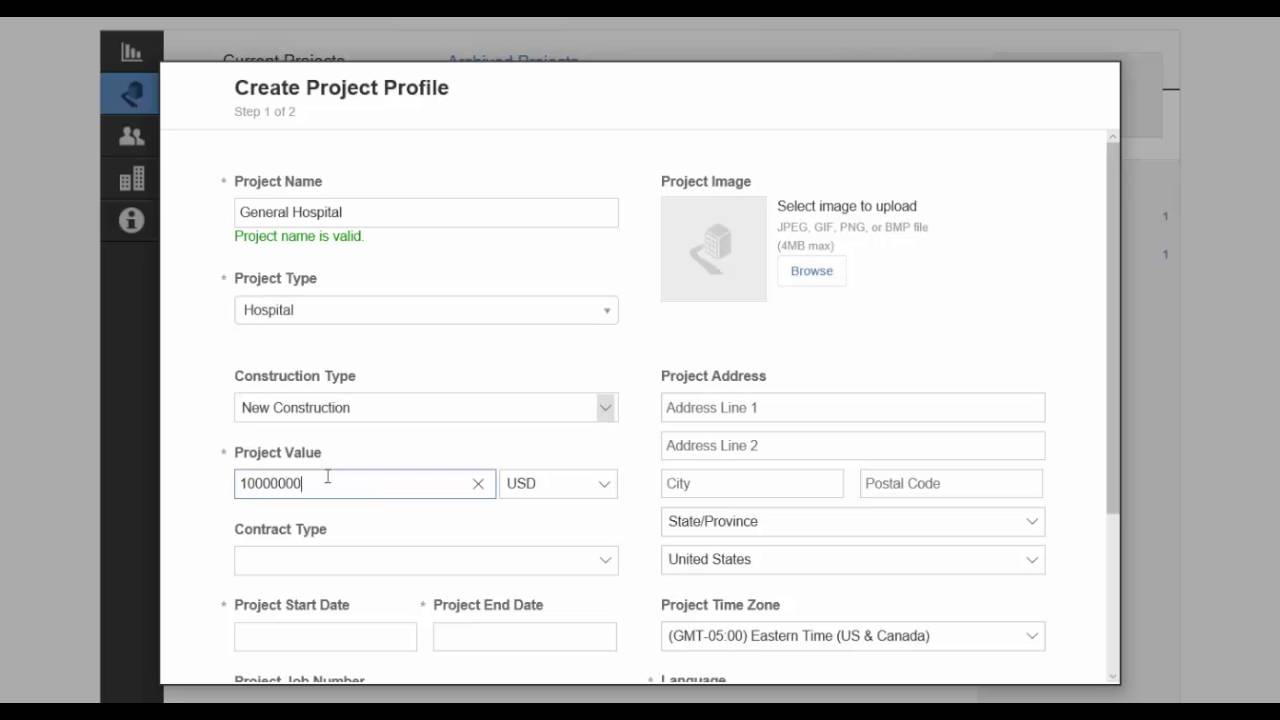
- Provide the necessary information for your project, such as project name, description, and start/end dates. You may also need to select the industry and project type.
- Choose the desired services and modules you want to include in your project. BIM 360 offers a range of services, including Document Management, Field Management, Model Coordination, and more.
- Click on the “Create Project” button to finalize the project creation.
Once your project is created, you will have a dedicated space within BIM 360 to manage all project-related files, models, and documents. You can invite team members to join the project, assign roles and permissions, and collaborate in real-time.
Note that creating a BIM 360 project requires an active subscription or trial account. If you are new to BIM 360, you can sign up for a free trial to explore the platform’s capabilities and determine if it aligns with your project needs.
Creating a BIM 360 project is the first essential step towards harnessing the power of BIM for your construction project. By having a centralized digital workspace, you can streamline communication, access project information on-the-go, and ensure that everyone is working on the same page.
Now that you have created a BIM 360 project, let’s move on to the next step: setting up Revit for BIM 360 collaboration.
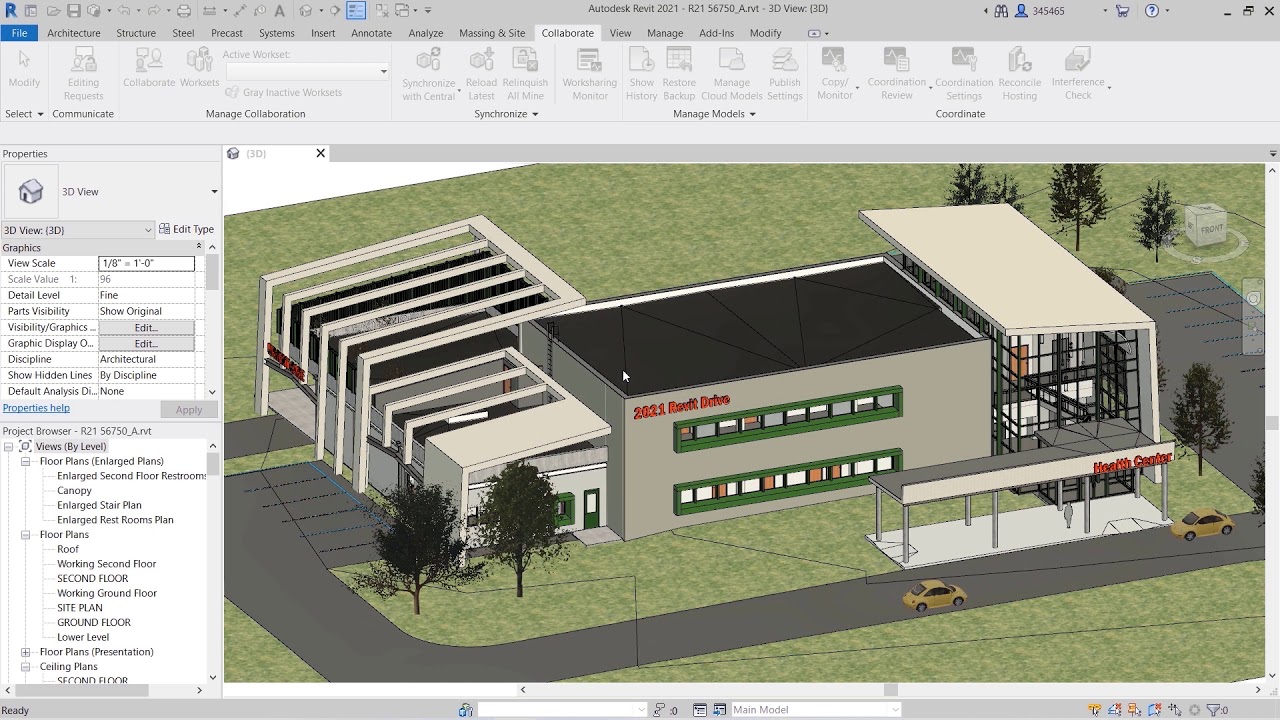
Step 2: Setting up Revit for BIM 360 Collaboration
In order to smoothly upload your Revit model to BIM 360, you need to configure Revit to integrate with the BIM 360 platform. Follow these steps to set up Revit for BIM 360 collaboration:
- Open Revit and navigate to the “Collaborate” tab.
- Click on the “Collaborate” button to access the collaboration settings.
- In the collaboration settings, click on the “BIM 360” button.
- Sign in to your BIM 360 account using your login credentials.
- Once signed in, select the project you created in Step 1 from the project list.
- Click on the “Next” button to continue.
- Review and adjust the settings as per your project requirements. You can choose to enable or disable specific collaboration features such as worksharing, model coordination, or linking external files.
- Click on the “Finish” button to complete the setup process.
With Revit now connected to your BIM 360 project, you can take advantage of the collaborative features offered by BIM 360. This integration allows you to publish your Revit model to the cloud, synchronize changes with other team members, and track project progress in real-time.
It is worth mentioning that the collaboration setup may differ depending on the version of Revit and BIM 360 you are using. It is recommended to refer to the official documentation or seek assistance from Autodesk support for any specific configuration issues or questions.
Once you have successfully set up Revit for BIM 360 collaboration, you are ready to save your Revit model in the appropriate format for uploading to BIM 360. We will discuss this in the next step.
Step 3: Saving the Revit Model in the Correct Format
Before you can upload your Revit model to BIM 360, it is important to save the model in the correct format to ensure compatibility and optimal performance on the BIM 360 platform. Follow these steps to save your Revit model in the appropriate format:
- Open your Revit model in Revit.
- Navigate to the “File” menu and click on “Save As”.
- In the “Save As” dialog box, choose a location on your computer or network to save the file.
- Specify a filename for the model, ensuring it is concise and descriptive.
- Next, select the desired file format for the model. BIM 360 supports multiple file formats, including Revit Project (.rvt), Revit Family (.rfa), and Industry Foundation Classes (.ifc).
- If you are collaborating with other team members or stakeholders who do not have access to Revit, it is recommended to save the model in the IFC format. This ensures that the model can be viewed and accessed by a wider audience.
- Click on the “Save” button to save the Revit model in the selected format.
By saving your Revit model in the correct format, you ensure that it can be successfully uploaded and accessed on the BIM 360 platform. It is important to note that BIM 360 supports both 2D and 3D views of Revit models, allowing users to navigate and interact with the model in a collaborative environment.
Once you have saved your Revit model in the appropriate format, you are ready to upload it to BIM 360. We will cover the uploading process in detail in the next step.
Step 4: Uploading the Revit Model to BIM 360
Now that you have prepared and saved your Revit model in the correct format, it’s time to upload it to the BIM 360 platform. Follow these steps to upload your Revit model to BIM 360:
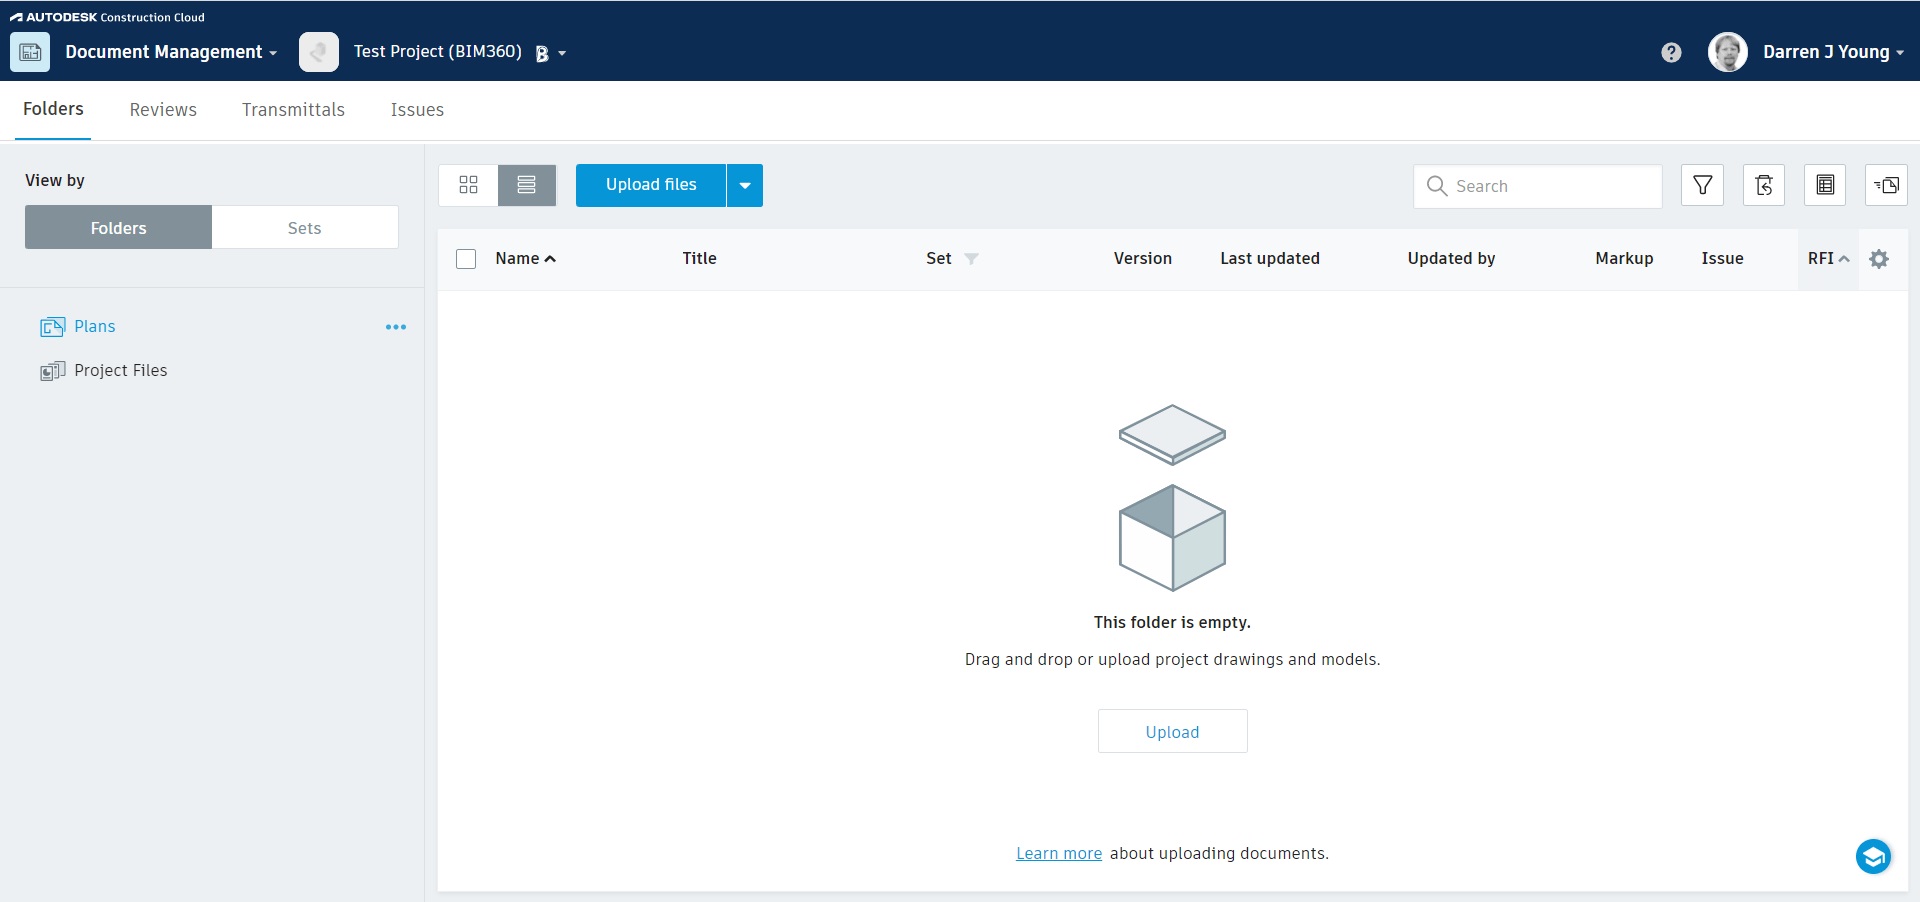
- Ensure you are logged into your BIM 360 account and have access to the project where you want to upload the Revit model.
- Navigate to the project dashboard or the document management section of BIM 360.
- Click on the “Upload” button or the “+” icon to initiate the upload process.
- In the upload dialog box, select the Revit model file that you saved in Step 3 from your computer or network location.
- Once the file is selected, you may have the option to choose additional settings or parameters for the upload process. These may include specifying the file version or adding metadata to the model.
- Review the settings and click on the “Upload” button to start the uploading process.
The time taken to upload the Revit model to BIM 360 may vary depending on the file size and your internet connection speed. It is recommended to have a stable and reliable internet connection for a smooth uploading experience.
Once the upload is complete, you will be able to see the Revit model in the document management section of your BIM 360 project. The model will be accessible to all project members who have the necessary permissions to view and edit the model.
It is important to note that BIM 360 allows you to upload multiple versions of the Revit model, enabling you to track changes and revisions throughout the project lifecycle. This versioning feature ensures that everyone is working with the most up-to-date model at all times.
With your Revit model successfully uploaded to BIM 360, it’s time to move on to the next step: reviewing and sharing the uploaded model.
When uploading a Revit model to BIM 360, make sure to use the “Collaborate” tab in Revit and select “BIM 360” as the location to save the model. This will ensure that the model is properly linked to your BIM 360 project.
Read more: How To Publish A Revit Model To BIM 360
Step 5: Reviewing and Sharing the Uploaded Model
Now that you have uploaded your Revit model to BIM 360, it’s time to review and share the model with your project team and stakeholders. Follow these steps to review and share the uploaded model:
- Navigate to the document management section of your BIM 360 project where the Revit model is located.
- Select the uploaded Revit model from the file list to open it for review.
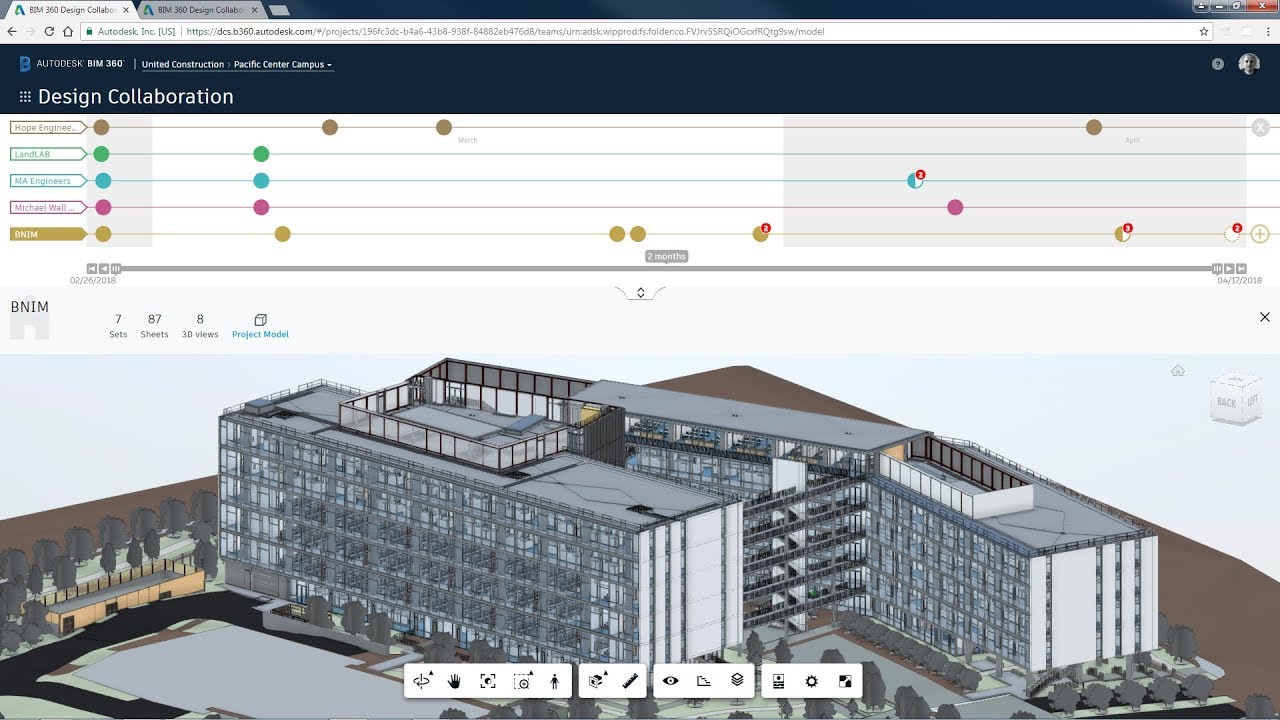
- Within the model viewer, you can navigate through the model using pan, zoom, and rotate controls. You can also switch between different views, such as 2D plans, 3D perspectives, or specific sheets.
- Utilize the markup and comment tools provided by BIM 360 to add annotations, highlight specific areas, and provide feedback to your project team. This helps facilitate communication and collaboration within the platform.
- If you need to share the model with external stakeholders who do not have access to BIM 360, you can use the sharing options provided. BIM 360 allows you to generate a shareable link or invite specific individuals via email to view the model.
- Set the necessary permissions and access levels for each recipient to ensure the right level of interaction with the model.
- Encourage your team members and stakeholders to review the model and provide their feedback or suggestions. BIM 360’s commenting and notification features make it easy to track and respond to comments in real-time.
The ability to review and share the uploaded model in BIM 360 streamlines the review process, eliminates the need for multiple file exchanges, and ensures that everyone is on the same page. It allows for effective collaboration and enables key stakeholders to contribute their expertise to the project.
Next, let’s move on to Step 6, where we will explore how to collaborate on the model in BIM 360.
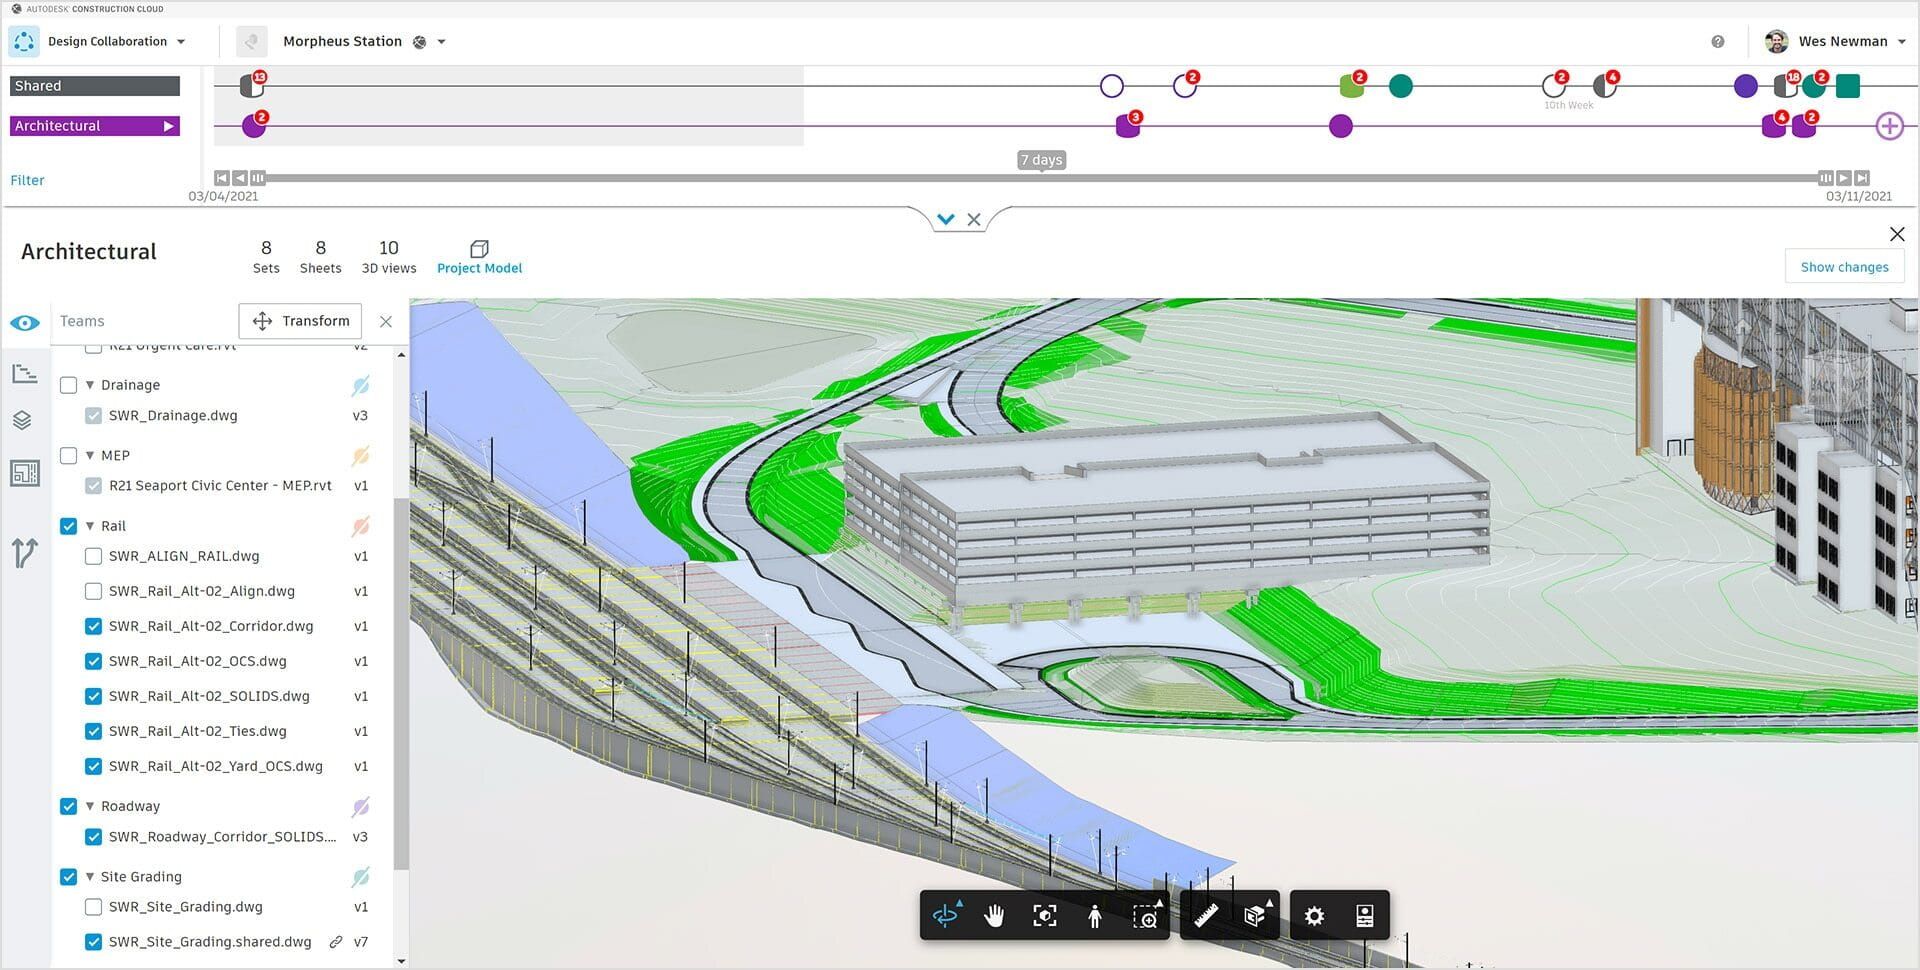
Step 6: Collaborating on the Model in BIM 360
Collaboration is at the heart of BIM 360, and it offers a range of tools and features to facilitate seamless collaboration on the uploaded Revit model. Follow these steps to collaborate effectively on the model in BIM 360:
- Invite team members to the BIM 360 project and provide them with the necessary permissions to access and collaborate on the Revit model.
- Set up workflows and processes to outline the roles and responsibilities of each team member. This ensures a structured collaboration approach and smooth project coordination.
- Encourage team members to actively participate in the collaboration process by reviewing the model, adding comments, and making suggestions for improvement.
- Utilize BIM 360’s issue tracking and resolution capabilities to address and resolve any design or coordination issues that arise.
- Take advantage of the model coordination features of BIM 360 to clash detect and resolve clashes between different building elements, thereby minimizing construction errors and rework.
- Enable worksharing within Revit by utilizing BIM 360’s cloud worksharing capabilities. This allows multiple team members to work on the model simultaneously, improving productivity and reducing design conflicts.
- Regularly sync the Revit model with BIM 360 to ensure that all team members have access to the latest version of the model and are working with the most up-to-date information.
- Communicate and collaborate with project stakeholders, contractors, and suppliers using BIM 360’s communication tools, such as chat and project timeline features.
By leveraging the collaboration features of BIM 360, you can enhance project communication, coordination, and efficiency. The ability to collaborate in a centralized environment eliminates the need for manual coordination and ensures that all project participants are aligned and working towards a common goal.
Now that you have a good understanding of how to collaborate on the model in BIM 360, let’s move on to the next step: generating reports and extracting data from BIM 360.
Step 7: Generating Reports and Extracting Data from BIM 360
BIM 360 provides powerful reporting and data extraction capabilities that allow you to gain valuable insights from your Revit model and project data. Follow these steps to generate reports and extract data from BIM 360:
- Access the reporting and data management section of your BIM 360 project.
- Explore the available reporting templates or create custom reports as per your project requirements.
- Select the specific parameters and filters for the report, such as project phases, disciplines, or specific elements of the model.
- Generate the report and review the results. BIM 360 offers various types of reports, ranging from clash detection and coordination reports to quantity takeoffs and progress tracking.
- Export the report in a desired format, such as PDF, Excel, or CSV, for easy sharing and analysis.
- Utilize the data extraction tools in BIM 360 to extract specific data points or attributes from the Revit model or project data.
- Analyze the extracted data using third-party software or tools to gain insights and make informed decisions.
- Leverage BIM 360’s integration capabilities to connect with other software platforms, such as ERP systems or scheduling tools, to streamline project management and data exchange.
Generating reports and extracting data from BIM 360 not only helps you track project progress and identify potential issues but also enables data-driven decision-making, resulting in improved efficiency and project outcomes.
In addition to standard reports, BIM 360 offers customizable dashboards and visualizations that allow you to monitor key performance indicators (KPIs) and project metrics in real-time. This provides a holistic view of the project’s health and performance, enabling proactive management and timely decision-making.
By effectively leveraging the reporting and data extraction features of BIM 360, you can harness the power of data and analytics for enhanced project management and performance monitoring.
Congratulations! You have now successfully completed all the steps to upload, collaborate, and extract insights from your Revit model in BIM 360. By following these steps, you have maximized the potential of BIM and embraced a collaborative and data-driven approach to construction project management.
Conclusion
Building Information Modeling (BIM) and the BIM 360 platform have revolutionized the construction industry, offering powerful tools for collaboration, coordination, and data management. In this article, we have walked you through the step-by-step process of uploading a Revit model to BIM 360, from creating a BIM 360 project to generating reports and extracting data.
By following these steps, you have learned how to effectively leverage BIM 360 to streamline communication, improve project coordination, and enhance overall project efficiency. From setting up Revit for BIM 360 collaboration to uploading the model, reviewing, and sharing it with stakeholders, and finally generating reports and extracting data, you have gained a comprehensive understanding of the entire process.
BIM 360 offers a collaborative platform where multiple stakeholders can access, review, and collaborate on the Revit model in real-time. The integration of Revit with BIM 360 enhances communication, reduces errors, and ensures that everyone is working with the most up-to-date version of the model.
Furthermore, BIM 360’s reporting and data extraction capabilities enable you to gain valuable insights from your project data. By generating reports and extracting specific data points, you can track project progress, identify potential issues, and make informed decisions based on data-driven analysis.
Remember, successful implementation of BIM and BIM 360 requires continuous collaboration, effective communication, and a willingness to embrace a digital workflow. By leveraging the power of BIM 360, you can transform your construction projects, streamline processes, and deliver projects with increased efficiency and higher quality.
So, whether you are an architect, engineer, contractor, or construction manager, take advantage of the capabilities of BIM 360 and elevate your construction projects to new heights.
Start your BIM 360 journey today and experience the transformation it can bring to your construction projects.
Frequently Asked Questions about How To Upload A Revit Model To BIM 360
Was this page helpful?
At Storables.com, we guarantee accurate and reliable information. Our content, validated by Expert Board Contributors, is crafted following stringent Editorial Policies. We're committed to providing you with well-researched, expert-backed insights for all your informational needs.


0 thoughts on “How To Upload A Revit Model To BIM 360”