Home>diy>Building & Construction>How To Archive A Revit Model In BIM 360
Building & Construction
How To Archive A Revit Model In BIM 360
Modified: January 4, 2024
Learn how to efficiently archive your Revit models in BIM 360 for seamless collaboration and enhanced building construction workflows.
(Many of the links in this article redirect to a specific reviewed product. Your purchase of these products through affiliate links helps to generate commission for Storables.com, at no extra cost. Learn more)
Introduction
Welcome to the world of building construction, where every detail matters and precision is key. In the realm of construction projects, collaboration and efficient data management are crucial for success. This is where Building Information Modeling (BIM) comes into play.
One of the most widely used BIM platforms is Autodesk”s BIM 360. It offers various functionalities to streamline the construction process, from project management to data sharing and collaboration. In this article, we will focus on one essential aspect of BIM 360: archiving a Revit model.
Archiving a Revit model in BIM 360 is a necessary step to preserve project history, ensure data integrity, and free up storage space. Whether you need to store older versions of the model for reference or meet project documentation requirements, archiving is a vital process that every construction professional should be familiar with.
In this step-by-step guide, we will explore the process of archiving a Revit model using BIM 360. From accessing the platform to restoring an archived model, we will cover all the necessary steps to help you navigate this crucial aspect of the construction process.
Be prepared to dive into the world of BIM 360 as we walk you through the archiving process. So, let’s get started!
Key Takeaways:
- Efficiently manage and preserve project data by archiving Revit models in BIM 360. Ensure data integrity, compliance, and streamlined collaboration for successful construction projects.
- Seamlessly navigate the archiving process in BIM 360, from selection to restoration, to optimize project management and leverage the power of BIM for construction success.
Read more: How To Upgrade A Revit Model On BIM 360
Step 1: Accessing the BIM 360 Platform
Before you can begin archiving your Revit model in BIM 360, the first step is to access the BIM 360 platform. Here’s how:
- Launch your preferred web browser and navigate to the BIM 360 website.
- Log in to your BIM 360 account using your credentials.
- Once logged in, you will be directed to the BIM 360 dashboard. This dashboard serves as the central hub for all your BIM 360 projects.
- From the dashboard, locate and select the project that contains the Revit model you wish to archive.
- You will now be taken to the project page, where you can access various project-specific features and tools.
Once you have successfully accessed the BIM 360 platform and navigated to your project, you are ready to proceed to the next step of archiving your Revit model.
Note: If you do not have a BIM 360 account, you will need to create one in order to access the platform. Contact your project administrator to request access or obtain information on creating a new account.
Now that you’re all set, let’s move on to the next step, where we will select the Revit model for archiving.
Step 2: Selecting the Revit Model
Once you have accessed the BIM 360 platform and navigated to your project, the next step is to select the specific Revit model that you want to archive. Follow these steps:
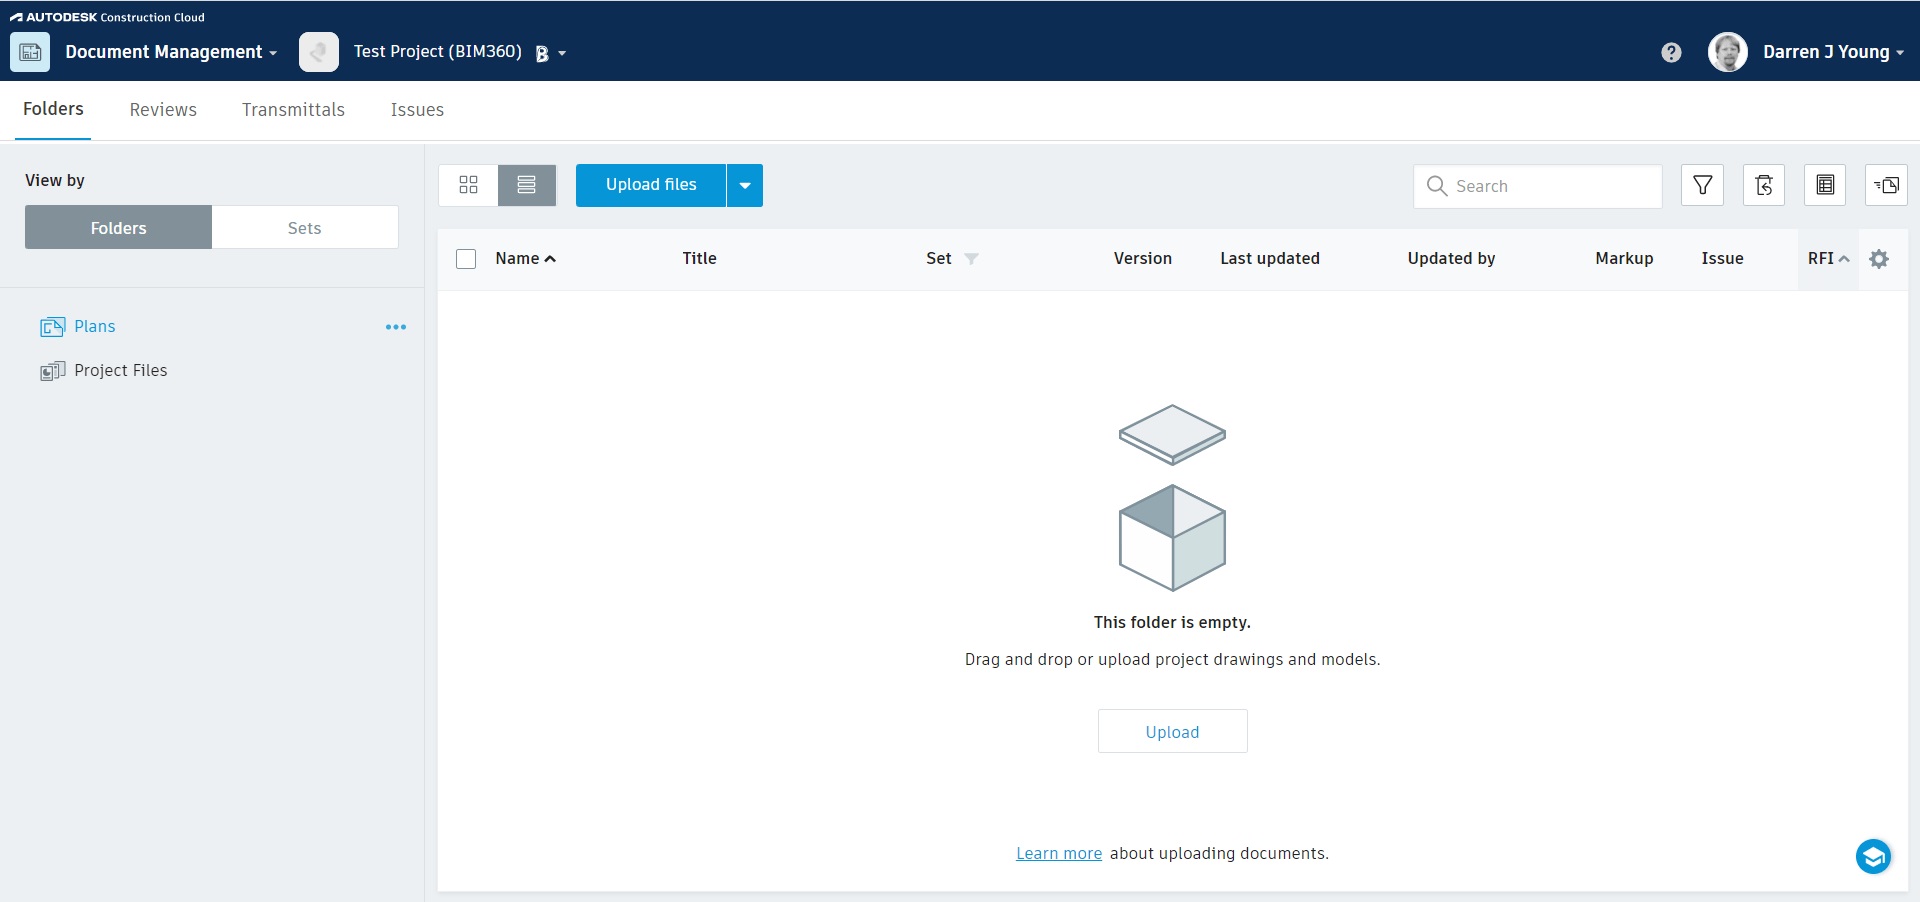
- On the project page, navigate to the “Documents” tab or the designated location where the Revit model is stored.
- Locate the Revit model that you intend to archive. You can use the search function or browse through the folders to find it.
- Once you have located the Revit model, click on it to select it.
- Review the model information displayed, such as the file size, version history, and any associated metadata.
This step is crucial as it ensures that you are archiving the correct Revit model and not accidentally selecting the wrong file. Take a moment to double-check before proceeding to the next step.
If the Revit model you want to archive is not in the designated location, you may need to upload it to the BIM 360 platform first. Consult the platform’s documentation or reach out to your project administrator for guidance on uploading Revit models to the platform.
Now that you have selected the appropriate Revit model, let’s move on to the next step, where we will review the model information.
Step 3: Reviewing Model Information
Before proceeding with archiving your Revit model in BIM 360, it’s essential to review the model information to ensure accuracy and make any necessary notes. Follow these steps:
- Upon selecting the Revit model, a window or sidebar will appear displaying the model’s information.
- This information includes the file size, version history, name, and any associated metadata.
- Take a moment to review the model information and ensure it aligns with your expectations. Verify that you have selected the correct version of the model and that any metadata associated with it is accurate.
- If needed, make any notes or record any relevant details about the model for future reference.
Reviewing the model information not only helps prevent archiving the wrong version but also enables better organization and retrieval of archived models in the future. It ensures that you have a complete understanding of the model’s status and its relevance to your project.
Once you have completed reviewing the model information and making any necessary notes, you are ready to move on to the next step – archiving the Revit model.
Step 4: Archiving the Revit Model
Now that you have selected the correct Revit model and reviewed its information, it’s time to proceed with archiving the model in BIM 360. Follow these steps:
- While still in the model information window, look for the “Archive” option or button. This can usually be found in the toolbar or menu at the top of the page.
- Click on the “Archive” option to initiate the archiving process.
- A confirmation prompt may appear, asking you to confirm your action. Read the prompt carefully, ensuring that you want to proceed with archiving the model.
- If you are certain about archiving the Revit model, click “Confirm” or “Archive” to start the archiving process.
- Depending on the size and complexity of the model, the archiving process may take a few moments. You might see a progress indicator or a notification indicating that the model is being archived.
- Once the archiving process is complete, you will receive a notification confirming that the model has been successfully archived. This notification might also include details such as the date and time of archiving.
Archiving your Revit model ensures that it remains accessible for future reference while freeing up storage space and promoting data organization. It is a crucial step in maintaining an efficient and streamlined BIM process.
With the Revit model successfully archived, we can move on to the next step – verifying the archiving process and ensuring everything is in order.
When archiving a Revit model in BIM 360, make sure to remove any unnecessary elements and use the “Purge Unused” tool to reduce file size and improve performance.
Read more: What Is BIM In Revit?
Step 5: Verifying the Archiving Process
After archiving your Revit model in BIM 360, it is important to verify that the archiving process was successful and that the model is properly archived. Follow these steps to ensure everything is in order:
- Check the notifications or confirmation message you received after the archiving process. This should indicate that the model has been successfully archived. Take note of the date and time of archiving for future reference.
- Navigate back to the project page or the “Documents” section in BIM 360 where the model was originally located.
- Look for a designated folder or section specifically for archived models. This may be labeled as “Archives,” “Archived Models,” or something similar. Click on this folder to access the archived models.
- Locate the archived Revit model within the designated folder. Verify that it is present and that all the associated files and data are intact.
- If there are multiple versions of the model, ensure that the archived version matches the one you intended to archive. Double-check the file name, version number, and any other relevant details to confirm its accuracy.
Verifying the archiving process helps to ensure the integrity of your archived Revit model and provides peace of mind that it is securely stored for future retrieval. It also enables you to easily locate the model when needed, saving time and effort in the long run.
If, for any reason, you encounter any issues or inconsistencies during the verification process, consult the BIM 360 documentation or contact your project administrator for assistance and guidance.
With the archiving process successfully verified, we can move forward to the next step – accessing the archived models in BIM 360.
Step 6: Accessing Archived Models in BIM 360
Once you have successfully archived your Revit model in BIM 360, accessing the archived models is a straightforward process. Follow these steps to retrieve your archived model:
- Return to the BIM 360 dashboard and navigate to the project that contains the archived Revit model.
- On the project page, locate and click on the “Documents” tab or the designated location where the archived models are stored.
- Look for the folder or section specifically dedicated to archived models. This is where you will find all the Revit models that have been archived.
- Click on the folder or section to access the archived models.
- Browse through the archived models to find the specific Revit model you are looking for. You can use the search function or manually scroll through the list.
- Once you have located the archived Revit model, click on it to open and view its contents.
By following these steps, you can easily access and retrieve your archived Revit models whenever necessary. Whether you need to refer to previous iterations, retrieve specific data, or perform further analysis, the archived models are readily available within the BIM 360 platform.
It’s important to note that accessing archived models might have certain restrictions or limitations based on your user role and permissions within the BIM 360 project. Make sure you have the appropriate access rights to view and download the archived Revit models as needed.
With access to the archived models established, we can move on to the final step – restoring an archived Revit model.
Step 7: Restoring an Archived Revit Model
Restoring an archived Revit model in BIM 360 allows you to bring the model back to the active project and make it accessible for further modifications and collaboration. Follow these steps to restore an archived Revit model:
- Navigate to the folder or section in BIM 360 where the archived models are stored.
- Locate the specific Revit model that you want to restore.
- Select the archived Revit model by clicking on it.
- Look for the “Restore” option or button, usually found in the toolbar or menu at the top of the page. Click on it to initiate the restoration process.
- A confirmation prompt may appear, asking you to confirm the restoration. Read the prompt carefully and ensure that you want to proceed with restoring the model.
- If you are certain about restoring the archived Revit model, click “Confirm” or “Restore” to initiate the restoration process.
- Depending on the size and complexity of the model, the restoration process may take a few moments.
- Once the restoration process is complete, you will receive a notification confirming that the Revit model has been successfully restored.
After restoring the archived Revit model, it will be available for further modifications and collaboration within the active project. You can now access the model, make changes, and share it with other project stakeholders as needed.
Keep in mind that restoring an archived Revit model does not delete the archived version. It simply brings the model back to the active project, allowing you to work on it without affecting the archived version. This ensures that you have a copy of the original archived model for reference and historical purposes.
With the restoration process complete, you have successfully gone through all the necessary steps to archive, verify, access, and restore a Revit model in BIM 360. Congratulations on mastering this essential aspect of project management and data organization within the BIM environment!
At this point, it is crucial to regularly manage and organize your archived models to ensure efficient workflow and adherence to project requirements. Refer to the BIM 360 documentation or consult with your project team for best practices on managing archived Revit models.
Thank you for following this step-by-step guide, and may your future BIM projects be smoother and more successful with the power of BIM 360’s archiving capabilities!
Conclusion
Congratulations! You have now learned how to effectively archive a Revit model in BIM 360, an essential process for managing and preserving project data within the construction industry. By following the step-by-step guide outlined in this article, you can ensure that your Revit models are securely stored, easily accessible, and properly organized.
Archiving a Revit model in BIM 360 provides numerous benefits. It allows you to preserve project history, comply with documentation requirements, and free up storage space by removing older versions from active projects. Additionally, archiving enables better collaboration, version control, and efficient data management throughout the construction process.
Remember to access the BIM 360 platform, select the appropriate Revit model, review its information, and proceed with archiving. Verify that the archiving process was successful and gain access to the archived models. If needed, restore an archived Revit model to continue working on it within the active project.
As a construction professional, it is crucial to embrace the power of BIM and leverage BIM 360’s features for seamless collaboration, improved efficiency, and effective project management. Archiving Revit models is just one aspect that contributes to a successful BIM workflow.
Stay organized, communicate effectively with your project team, and ensure compliance with industry standards and best practices when utilizing BIM 360 and other BIM tools. This will help you streamline your construction processes, reduce errors, and ultimately achieve better project outcomes.
Thank you for joining us on this journey of archiving Revit models in BIM 360. We hope this guide has provided you with valuable insights and practical knowledge to enhance your construction projects.
Remember, as technology advances and construction methodologies evolve, it is essential to stay updated with the latest tools and techniques to excel in the competitive construction industry. Embrace the power of BIM and continue to explore innovative ways to leverage BIM 360 and other BIM platforms for improved project management success!
Frequently Asked Questions about How To Archive A Revit Model In BIM 360
Was this page helpful?
At Storables.com, we guarantee accurate and reliable information. Our content, validated by Expert Board Contributors, is crafted following stringent Editorial Policies. We're committed to providing you with well-researched, expert-backed insights for all your informational needs.


0 thoughts on “How To Archive A Revit Model In BIM 360”