Home>diy>Building & Construction>How To Upgrade A Revit Model On BIM 360

Building & Construction
How To Upgrade A Revit Model On BIM 360
Modified: January 24, 2024
Learn how to upgrade your Revit model on BIM 360 for seamless collaboration in the building construction industry.
(Many of the links in this article redirect to a specific reviewed product. Your purchase of these products through affiliate links helps to generate commission for Storables.com, at no extra cost. Learn more)
Introduction
Welcome to the world of building construction and the exciting realm of BIM (Building Information Modeling). In this article, we will explore the process of upgrading a Revit model on the BIM 360 platform. BIM 360 is a cloud-based collaboration platform that allows multiple stakeholders to access and work on a construction project in real-time. Revit, on the other hand, is a powerful architectural design software that enables detailed modeling and documentation of building projects. By combining these two technologies, construction professionals can streamline the design process and enhance project collaboration.
As building projects progress, it is common for changes to occur that necessitate the upgrade of the Revit model. These changes can range from minor design modifications to major scope alterations. Upgrading the Revit model ensures that all project stakeholders have the most up-to-date information, minimizing the risk of errors and miscommunications.
Before we delve into the process of upgrading a Revit model on BIM 360, let’s take a moment to understand the importance of BIM 360 and the capabilities of Revit models.
BIM 360 provides a centralized platform where project teams can collaborate, share files, and manage project data. It offers features such as document management, issue tracking, and model coordination, making it an essential tool for construction professionals. With BIM 360, architects, engineers, contractors, and owners can work together seamlessly, promoting effective communication and reducing delays.
Revit is a Building Information Modeling (BIM) software developed by Autodesk. It allows architects, engineers, and other building professionals to create detailed 3D models of building projects. Revit models contain intelligent objects and parametric data, enabling accurate design representations and facilitating changes throughout the project lifecycle. Revit’s integrated design and documentation tools make it a preferred choice for architectural and engineering firms worldwide.
Now that we have a solid understanding of BIM 360 and Revit models, let’s explore when and why we may need to upgrade a Revit model on the BIM 360 platform.
Key Takeaways:
- Upgrading a Revit model on BIM 360 is crucial for accurate project information, streamlined collaboration, and enhanced project outcomes. Understanding BIM 360 and Revit models is essential for successful model upgrades.
- Assessing the need for a model upgrade, preparing meticulously, and verifying the upgrade results are vital steps in ensuring the accuracy and reliability of the upgraded Revit model on the BIM 360 platform. Troubleshooting common issues promptly is key to maintaining the functionality of the upgraded model.
Read more: How To Archive A Revit Model In BIM 360
Understanding BIM 360 and Revit Models
In order to effectively upgrade a Revit model on the BIM 360 platform, it is crucial to have a clear understanding of both BIM 360 and Revit models. Let’s take a deeper dive into these two technologies.
BIM 360 is a cloud-based construction management platform developed by Autodesk. It offers a wide range of tools and features to streamline project collaboration, documentation, and coordination. With BIM 360, project teams can securely store and access project files, track issues and changes, and collaborate in real-time, making it an invaluable resource for modern construction projects.
One of the key features of BIM 360 is its document management functionality. Within the platform, project teams can upload, organize, and share project files, ensuring that all stakeholders have access to the most up-to-date information. This eliminates the need for multiple versions of files and minimizes the risk of conflicting information.
Additionally, BIM 360 provides model coordination capabilities. This allows project teams to detect clashes and conflicts between different models, such as architectural, structural, and MEP (mechanical, electrical, and plumbing) models. By identifying clashes early on, construction professionals can mitigate potential issues and minimize rework.
Revit, on the other hand, is a BIM software developed by Autodesk. It is widely used by architects, engineers, and other building professionals to create detailed 3D models of building projects. Revit models are intelligent and parametric, meaning that they contain information-rich objects and data that can be modified and updated throughout the design process.
Revit models are created using a database-driven approach, which allows information to be easily shared and updated across all project stakeholders. This parametric nature of Revit models makes them well-suited for design changes and revisions, as every modification is automatically reflected in all related elements of the model.
BIM 360 and Revit are highly interoperable, meaning that they can be seamlessly integrated to enhance project collaboration and efficiency. Upgrading a Revit model on the BIM 360 platform ensures that all project participants are working with the most current version of the model, facilitating effective communication and coordination.
Now that we have a clear understanding of BIM 360 and Revit models, let’s move on to assessing the need for a model upgrade.
Assessing the Need for Model Upgrade
As construction projects evolve, it is common for design changes and revisions to occur. These changes can arise due to various reasons, such as client requirements, design enhancements, or unforeseen challenges during the construction process. Assessing the need for a model upgrade is crucial to ensure that all project stakeholders are working with the most accurate and up-to-date information.
There are several key factors to consider when determining whether a Revit model upgrade is necessary:
- Scope Changes: If there have been significant changes to the project scope, such as a modification to the building layout, added or removed elements, or alterations to the structural design, a model upgrade is essential. It ensures that the model accurately reflects the current state of the project and allows stakeholders to make informed decisions based on the latest information.
- Design Revisions: If there have been design changes, such as the addition of new architectural features or revised MEP systems, it is important to upgrade the Revit model to incorporate these modifications. This ensures that the model accurately represents the intended design and allows for coordination and clash detection with other disciplines.
- Coordination Issues: If clashes or conflicts have been identified between different model disciplines (architectural, structural, MEP), a model upgrade may be necessary to resolve these issues. Upgrading the model allows for clash detection and coordination, minimizing potential construction delays and rework.
- Project Collaboration: If there are multiple project teams or stakeholders working on the project, it is crucial to upgrade the Revit model to the latest version on the BIM 360 platform. This ensures that all teams are accessing the same information and working with a synchronized model, promoting effective communication and collaboration.
Regular communication and coordination meetings with project stakeholders are essential to stay informed about any changes or revisions that might require a model upgrade. These meetings allow for the exchange of information, identification of potential issues, and alignment of design decisions.
In summary, assessing the need for a model upgrade involves considering scope changes, design revisions, coordination issues, and project collaboration requirements. By staying proactive and ensuring that the Revit model is continuously updated, construction professionals can work with accurate information, streamline project coordination, and minimize costly errors.
Now that we have identified the need for a model upgrade, let’s move on to preparing for the upgrade process.
Preparing for Model Upgrades
Before embarking on the process of upgrading a Revit model on the BIM 360 platform, it is important to properly prepare to ensure a smooth and successful upgrade. Taking the time to plan and organize the upgrade process will minimize potential issues and maximize efficiency. Here are some essential steps to follow when preparing for a model upgrade:
- Review Revision History: Start by reviewing the revision history of the Revit model to understand the changes that have been made and track the evolution of the project. This will provide valuable insights into the scope of the upgrade and help identify any specific areas that need attention.
- Document Changes: Document any recent changes or updates that have been made to the project, whether through client requests, design revisions, or coordination resolutions. This documentation will serve as a reference during the upgrade process and ensure that all modifications are properly incorporated into the upgraded model.
- Backup Current Model: Before initiating the upgrade, it is crucial to create a backup of the current Revit model to ensure data integrity. This backup will serve as a fallback option in case any issues arise during the upgrade process. Store the backup in a secure location to prevent any accidental loss or deletion.
- Coordinate with Project Stakeholders: Collaborate and communicate with all relevant project stakeholders, including architects, engineers, contractors, and owners, to inform them about the upcoming model upgrade. Ensure that everyone is aware of the timing and potential impact of the upgrade to minimize any disruptions.
- Create a Detailed Upgrade Plan: Develop a comprehensive plan that outlines the specific steps and procedures for upgrading the Revit model. Consider factors such as the order of model disciplines to be upgraded, the sequence of upgrades, and any specific coordination requirements. This plan will serve as a roadmap during the upgrade process and provide a clear path for execution.
- Allocate Sufficient Resources: Allocate adequate resources, such as time, personnel, and equipment, for the model upgrade process. Depending on the complexity and size of the project, upgrading the Revit model may require significant computational power and storage space. Ensure that the necessary resources are readily available to avoid any workflow interruptions.
- Communicate the Upgrade Schedule: Inform all project stakeholders about the planned upgrade schedule well in advance. Clearly communicate the start and end dates, as well as any anticipated downtime or restrictions during the upgrade process. Set realistic expectations regarding the duration of the upgrade to minimize any disruptions to the project workflow.
By following these preparatory steps, you can ensure that the model upgrade process is well-coordinated and executed smoothly. Planning and organizing the upgrade will help mitigate potential risks and ensure that all project stakeholders can effectively transition to the upgraded Revit model on the BIM 360 platform.
Next, we will explore the actual process of upgrading a Revit model on BIM 360.
When upgrading a Revit model on BIM 360, make sure to save a new version of the model before making any changes. This will help you track the progress and easily revert back if needed.
Upgrading Revit Models on BIM 360
Once you have completed the necessary preparations, it’s time to dive into the process of upgrading a Revit model on the BIM 360 platform. Here are the steps to follow:
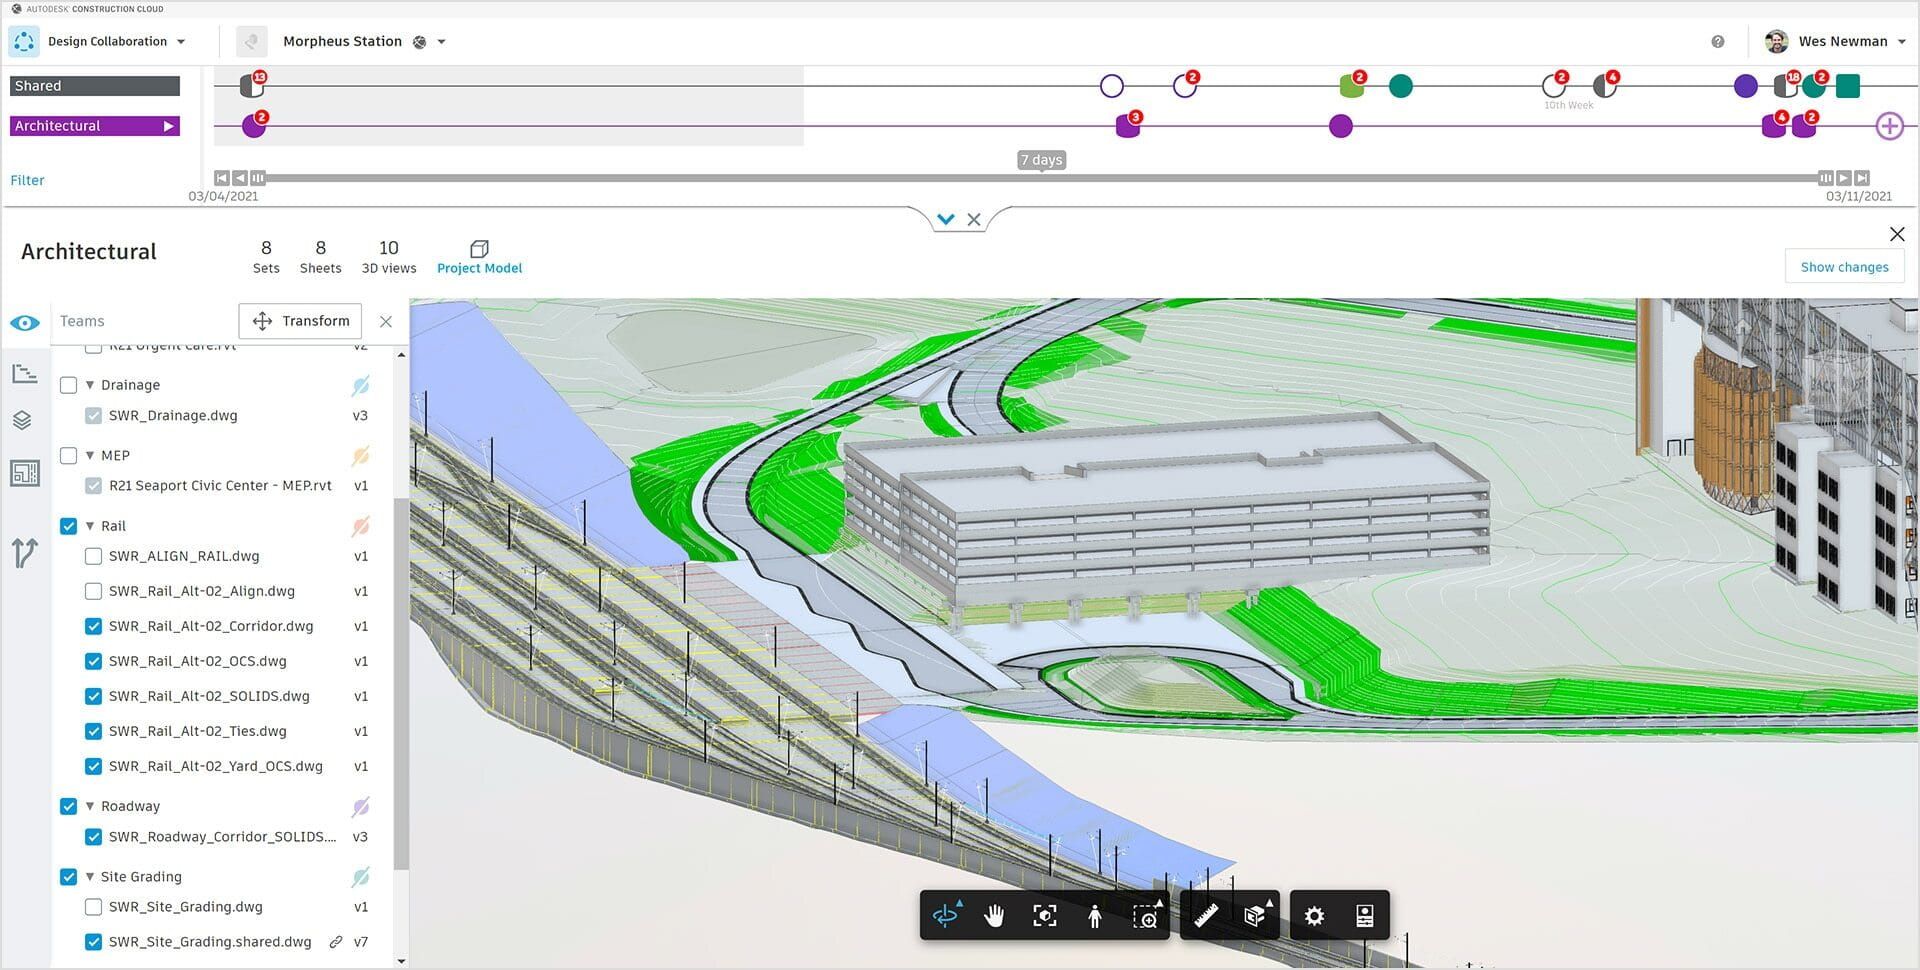
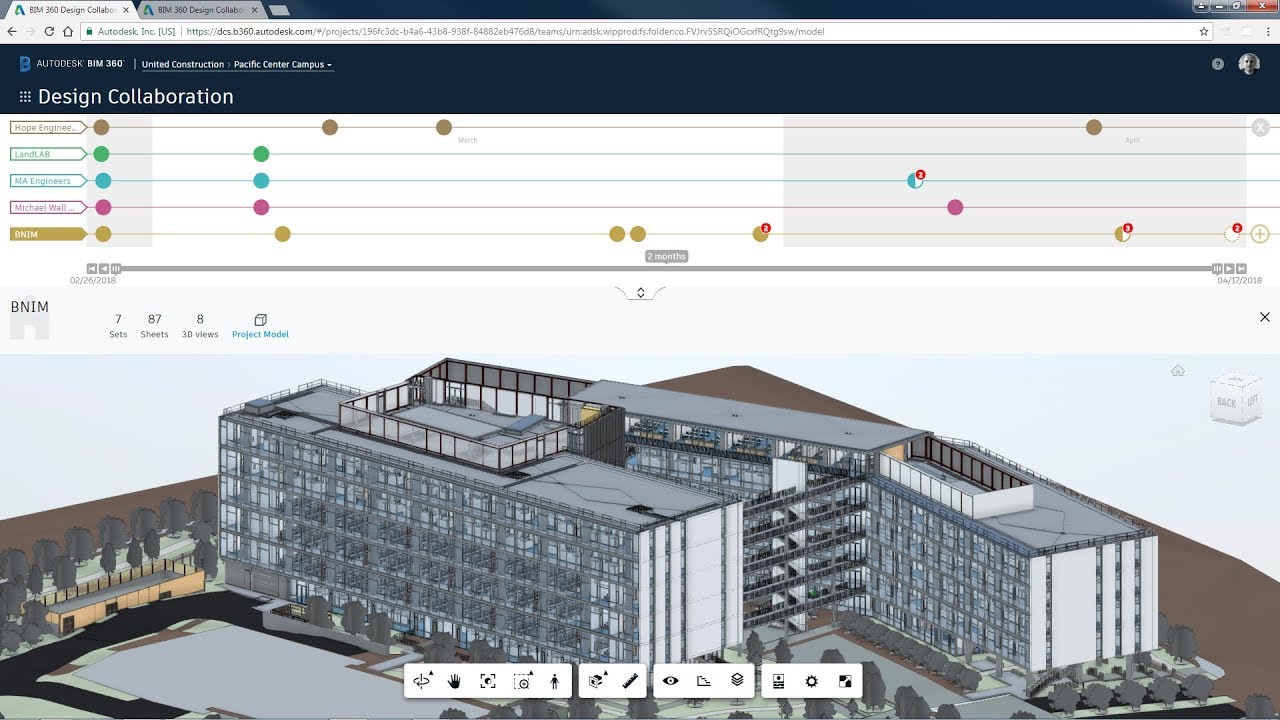
- Access the Model: Log in to your BIM 360 account and navigate to the project where the Revit model is stored. Locate the current version of the Revit model that needs to be upgraded.
- Create a New Version: Before upgrading the model, create a new version to serve as your upgraded model. This allows you to preserve the existing version as a backup and ensures that you have a clean slate for the upgrade.
- Upload the Existing Model: Upload the existing Revit model to the newly created version. Be sure to select the correct file and verify that the file is intact without any corruption.
- Perform the Model Upgrade: Initiate the upgrade process by selecting the option to upgrade the Revit model. BIM 360 may prompt you to confirm the upgrade, as this process cannot be reversed. Once confirmed, the upgrade process will begin.
- Monitor the Upgrade Progress: Monitor the progress of the model upgrade. BIM 360 will provide updates on the status of the upgrade, which may take some time depending on the size and complexity of the model.
- Verify Model Compatibility: After the upgrade is complete, verify the compatibility of the upgraded model. Ensure that all design elements, parameters, and BIM data are accurately transferred to the upgraded version. Perform a thorough review to identify any issues or discrepancies that may have occurred during the upgrade process.
- Notify Project Stakeholders: Once you have verified the compatibility of the upgraded model, notify the relevant project stakeholders that the new version is available. Provide guidance on accessing and working with the upgraded model, ensuring a smooth transition for all team members.
- Update Project Documentation: Update any project documentation or records to reflect the upgraded Revit model. Communicate any changes or modifications that have occurred as a result of the upgrade to keep all stakeholders informed.
It is worth noting that the process of upgrading a Revit model on the BIM 360 platform may vary slightly depending on the specific software versions and project settings. It is always recommended to follow the guidelines provided by Autodesk and consult any project-specific documentation or tutorials.
The upgraded Revit model on BIM 360 provides a synchronized and up-to-date representation of the project. This enables all project stakeholders to access the latest information, collaborate effectively, and make informed decisions based on accurate data.
In the next section, we will explore the importance of verifying the model upgrade results.
Read more: What Is BIM In Revit?
Verifying Model Upgrade Results
After completing the process of upgrading a Revit model on the BIM 360 platform, it is crucial to verify the results to ensure the accuracy and integrity of the upgraded model. Verifying the model upgrade is an important step to identify any potential issues or discrepancies that may have occurred during the upgrade process. Here are some key steps to follow when verifying the model upgrade results:
- Review Model Elements: Take a comprehensive look at all the elements in the upgraded Revit model. Compare it to the previous version to ensure that all design elements, components, and annotations have been carried forward correctly. Pay special attention to any customized or parametric elements to ensure their integrity.
- Check Model Parameters: Verify that all model parameters, such as dimensions, materials, and properties, have been accurately transferred to the upgraded version. Confirm that any changes or revisions made to the model are reflected correctly, and there are no inconsistencies or missing data.
- Perform a Clash Detection Test: If applicable, conduct a clash detection test to identify any conflicts or clashes between different model disciplines. Use the coordination and clash detection features offered by BIM 360 to ensure that the upgraded model is clash-free and that all coordination issues have been resolved.
- Update Views and Sheets: Review the views and sheets in the upgraded Revit model to ensure that they are properly updated and correctly represent the latest design changes. Verify that all annotations, dimensions, and graphical elements are aligned with the upgraded model.
- Validate Data Transfer: If the upgraded Revit model includes linked models or external data sources, verify that the data transfer has been successful. Check the integrity and accuracy of the linked information to ensure that it functions as intended in the upgraded model.
- Collaborate and Seek Feedback: Engage with project stakeholders, such as architects, engineers, and contractors, to collaborate and gather their feedback on the upgraded model. Encourage them to review the model and provide insights or suggestions to further enhance its accuracy and usability.
- Document and Address Issues: Document any issues or discrepancies identified during the verification process. Communicate these findings to the necessary individuals involved in the project to address and resolve any concerns. Regularly update the project documentation to reflect the verified model upgrade results.
By following these verification steps, you can confirm the accuracy and reliability of the upgraded Revit model on the BIM 360 platform. This ensures that all project stakeholders can confidently rely on the upgraded model for their decision-making and coordination efforts.
In the next section, we will explore some common issues that may arise during the model upgrade process and how to troubleshoot them effectively.
Troubleshooting Common Issues
While upgrading a Revit model on the BIM 360 platform, you may encounter certain common issues that can affect the upgrade process or the functionality of the upgraded model. Addressing these issues promptly can help ensure a successful upgrade and minimize any disruptions to the project workflow. Here are some common issues that may arise during the model upgrade process and how to troubleshoot them effectively:
- File Corruption: If you encounter issues with a corrupted Revit model file, try using a backup file or a previous version that is known to be in a stable condition. Alternatively, you can use Revit’s built-in file repairing tools to attempt to recover the corrupted file. If all else fails, consult Autodesk support for further assistance.
- Linked Model Errors: If the upgraded model includes linked models, check for any errors or discrepancies in the linked models’ visibility, positioning, or data. Verify that the linked models are using the correct reference files and that their data has been successfully transferred to the upgraded model.
- Missing Elements: If you notice that certain elements are missing after the model upgrade, ensure that they were present in the previous version and that they were properly transferred. Check if any filters, view settings, or visibility overrides are causing elements to be hidden or not visible. Revit’s “Reveal Hidden Elements” option can help reveal any hidden elements.
- Dimension and Annotation Issues: Verify that all dimensions, annotations, and graphic elements are properly aligned and displayed in the upgraded Revit model. If any dimensions or annotations are missing or misplaced, review the associated families or annotation settings to ensure they are correctly defined and placed.
- Failed Model Upgrade: In case the model upgrade process fails or encounters errors, double-check that all necessary software updates and prerequisites have been installed. Review any error messages or logs generated during the upgrade process to identify the specific cause of the failure. Consult technical resources, such as Autodesk forums or support, for further assistance with troubleshooting the upgrade failure.
- Performance Issues: If you experience performance issues with the upgraded model, such as slow response times or lag, consider optimizing the model by removing unnecessary or excessive elements, reducing the level of detail in certain views, or adjusting graphic settings. Upgraded models may require additional system resources, so ensure that your hardware meets the recommended requirements for optimal performance.
It is important to address these common issues promptly and efficiently to ensure a smooth upgrade process and maintain the functionality and integrity of the upgraded Revit model on the BIM 360 platform. Seeking assistance from technical support, online communities, or consulting experienced professionals can provide invaluable guidance in resolving complex issues.
Now that we have covered the common issues and their troubleshooting, let’s wrap up our article.
Conclusion
Upgrading a Revit model on the BIM 360 platform is a critical step in ensuring that all project stakeholders have access to the most accurate and up-to-date information. By leveraging the capabilities of BIM 360 and the powerful design tools of Revit, construction professionals can streamline collaboration, improve coordination, and enhance project outcomes.
Understanding BIM 360 and Revit models is essential in successfully upgrading a Revit model on the BIM 360 platform. BIM 360 provides a centralized platform for project collaboration, while Revit allows for detailed 3D modeling and design. These two technologies complement each other, enabling efficient communication and streamlined workflows.
Assessing the need for a model upgrade involves considering scope changes, design revisions, coordination issues, and project collaboration requirements. By staying proactive and ensuring that the Revit model is continuously updated, construction professionals can mitigate risks and work with accurate information throughout the project.
Preparing for a model upgrade involves reviewing revision history, documenting changes, creating backups, coordinating with stakeholders, and developing a detailed upgrade plan. By following these preparatory steps, you can ensure a smooth and successful upgrade process.
The actual process of upgrading a Revit model on the BIM 360 platform involves accessing the model, creating a new version, uploading the existing model, performing the upgrade, monitoring the progress, verifying model compatibility, and notifying project stakeholders. Regular communication and collaboration are essential during this process to ensure a seamless transition to the upgraded model.
After upgrading the model, it is crucial to verify the model upgrade results. This involves reviewing model elements, checking parameters, performing clash detection tests, updating views and sheets, validating data transfer, collaborating with stakeholders, and addressing any identified issues. Verifying the upgraded model ensures its accuracy and reliability for project coordination and decision-making.
In the event that common issues arise during the model upgrade process, troubleshooting steps can be taken to address file corruption, linked model errors, missing elements, dimension and annotation issues, upgrade failures, and performance issues. Timely resolution of these issues is key to minimizing disruptions and maintaining the functionality of the upgraded model.
In conclusion, upgrading a Revit model on the BIM 360 platform is a crucial aspect of modern construction project management. By following the steps outlined in this article, construction professionals can ensure accurate information, improved collaboration, and enhanced project outcomes. Embracing the power of BIM 360 and Revit models will revolutionize how construction projects are designed, constructed, and managed, leading to more efficient and successful construction projects in the future.
Frequently Asked Questions about How To Upgrade A Revit Model On BIM 360
Was this page helpful?
At Storables.com, we guarantee accurate and reliable information. Our content, validated by Expert Board Contributors, is crafted following stringent Editorial Policies. We're committed to providing you with well-researched, expert-backed insights for all your informational needs.


0 thoughts on “How To Upgrade A Revit Model On BIM 360”