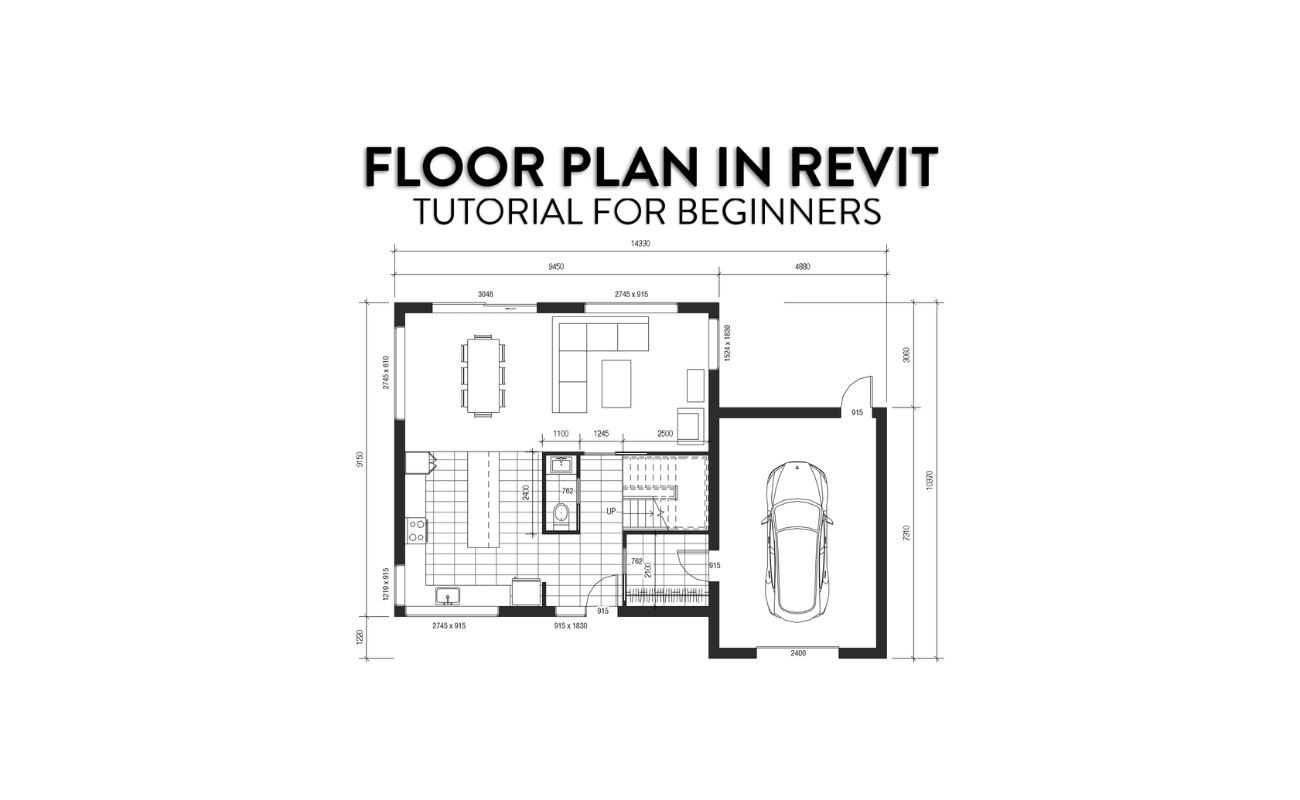
Home>diy>Architecture & Design>How To Create A New Floor Plan In Revit
Architecture & Design
How To Create A New Floor Plan In Revit
Modified: January 4, 2024
Learn how to create a new floor plan in Revit and enhance your architecture design skills with step-by-step instructions and expert tips.
(Many of the links in this article redirect to a specific reviewed product. Your purchase of these products through affiliate links helps to generate commission for Storables.com, at no extra cost. Learn more)
Introduction
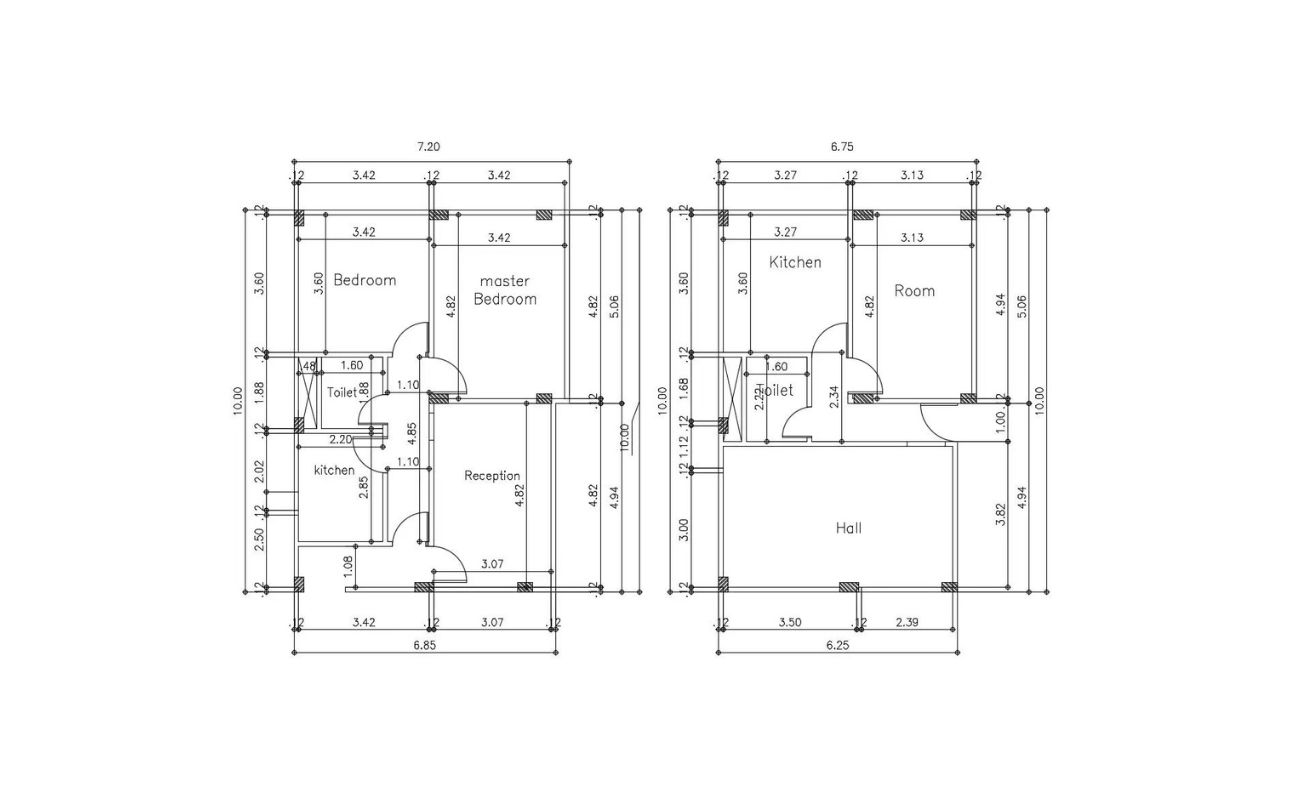
In the world of architecture and design, creating a new floor plan is an essential step in the process of bringing a vision to life. A floor plan is a visual representation of a building’s layout, showing the arrangement of rooms, walls, doors, windows, and other architectural elements. With the advent of technology, architects and designers now have access to powerful software tools that streamline the floor plan creation process.
One such software is Autodesk Revit, a Building Information Modeling (BIM) tool that allows architects and designers to create accurate and detailed floor plans in a digital environment. Revit provides a comprehensive set of features and tools that enable users to design, visualize, and document their architectural projects with ease.
In this article, we will walk you through the steps of creating a new floor plan in Revit. Whether you are a seasoned architect or a beginner looking to explore the world of architectural design, this guide will provide you with the knowledge and skills to bring your floor plan ideas to life.
Before we dive into the technical aspects of using Revit, it’s important to understand the significance of a well-designed floor plan. A floor plan is like a blueprint, serving as the foundation for the entire design process. It allows architects, designers, and even clients to visualize the spatial organization of a building, understand how different spaces relate to each other, and make informed decisions about the use of space.
Creating a new floor plan involves careful consideration of various factors, such as the building’s purpose, functionality, aesthetics, and compliance with building codes and regulations. By leveraging the power of Revit, architects and designers can efficiently design and modify floor plans, collaborate with team members, and present their ideas in a visually appealing manner.
In the following sections, we will guide you through the step-by-step process of creating a new floor plan in Revit. From opening the software to saving and exporting the final floor plan, we will cover all the essential aspects of creating a successful floor plan using Revit.
So, let’s embark on this exciting journey of architectural design and learn how to create a new floor plan in Revit!
Key Takeaways:
- Creating a new floor plan in Revit involves a step-by-step process, from setting up a new project to adding walls, doors, windows, rooms, furniture, annotations, and dimensions. The software’s user-friendly interface and extensive customization options enable architects and designers to create accurate, detailed, and visually appealing floor plans.
- By integrating annotations, dimensions, and carefully placing furniture and fixtures, architects and designers can enhance the clarity and communicability of their designs. The ability to modify and refine the floor plan ensures that it aligns with project requirements and allows for design iterations.
Read more: How To Create A Floor Plan For Free
Step 1: Opening Revit
Before you can start creating a new floor plan in Revit, you need to open the software and set up a new project. Here’s how to do it:
- First, launch the Revit software on your computer. You will be greeted with the Revit home screen, which displays various options for creating new projects.
- Click on the “New” button to start a new project. This will open the New Project dialog box.
- In the New Project dialog box, you will see a list of project templates to choose from. Revit offers several templates for different types of projects, such as architectural, structural, and MEP (Mechanical, Electrical, and Plumbing) designs.
- Select the appropriate template for your floor plan. If you’re creating a floor plan for a residential building, the “Architectural Template” would be a good choice.
- After selecting the template, click on the “OK” button to create a new project based on the chosen template.
- Revit will now open a new project window, where you can start designing your floor plan.
It’s important to note that Revit offers a user-friendly interface with various tabs and panels that provide access to different functionalities and tools. Familiarize yourself with the different parts of the Revit interface, such as the ribbon, project browser, and properties palette, as these will be essential for creating your floor plan.
Once you have successfully opened Revit and set up a new project, you are ready to move on to the next step of creating a new floor plan in Revit.
Step 2: Starting a New Project
After opening Revit and setting up a new project, the next step is to configure the project settings and define the project’s parameters. Here’s how to start a new project in Revit:
- In the Revit project window, go to the “Manage” tab in the ribbon.
- Click on the “Project Settings” button in the “Settings” panel. This will open the Project Settings dialog box.
- In the Project Settings dialog box, you can customize various project parameters, such as units of measurement, project location, and project information.
- Start by setting the units of measurement. Revit allows you to work with different unit systems, such as metric or imperial. Choose the unit system that is most appropriate for your project.
- Next, define the project location. This step is particularly important if you want to generate accurate building information, such as solar studies or energy analysis. Enter the project’s geographical coordinates or select the project location from a predefined list.
- Provide the necessary project information, such as the project name, client name, and project number. These details will appear in the title block and other project-related documentation.
- Once you have configured the project settings, click on the “OK” button to save the changes and close the Project Settings dialog box.
By starting a new project and configuring the project settings in Revit, you ensure that the floor plan you create is based on the correct parameters and aligns with the project requirements. It provides a solid foundation for the rest of the design process.
Now that you have successfully started a new project in Revit, you can proceed to the next step of creating a new floor plan: creating a new floor plan view.
Step 3: Creating a New Floor Plan View
Once you have set up a new project in Revit, the next step in creating a new floor plan is to create a new floor plan view. A floor plan view is a 2D representation of a specific level or floor of the building. Here’s how to create a new floor plan view in Revit:
- In the Revit project window, go to the “View” tab in the ribbon.
- Click on the “Floor Plan” button in the “Create” panel. This will open a drop-down menu with various floor plan options.
- Select the desired floor plan type from the drop-down menu. The options might include “Architectural Plan,” “Structural Plan,” or “Mechanical Plan,” depending on the project template you chose.
- Choose the specific floor or level for which you want to create a floor plan view. Revit allows you to create multiple views for different floors of the building.
- After selecting the floor plan type and level, click on the “OK” button to create the new floor plan view.
Revit will now generate the new floor plan view based on the selected floor and floor plan type. The floor plan view will be displayed in the project browser, where you can easily access and navigate between different views.
It’s important to note that Revit provides various tools to customize and modify the floor plan view. You can change the scale, adjust the display of certain elements, and add annotations or dimensions to the view. Familiarize yourself with these tools to enhance the clarity and readability of your floor plan.
Now that you have created a new floor plan view in Revit, you are ready to move on to the next step: adding walls to the floor plan.
Step 4: Adding Walls to the Floor Plan
With the floor plan view created, the next step in creating a new floor plan in Revit is to add walls to the view. Walls are essential elements in any floor plan as they define the layout and boundaries of the different rooms and spaces in a building. Here’s how to add walls to the floor plan in Revit:
- In the Revit project window, make sure you are in the floor plan view where you want to add walls.
- Go to the “Architecture” tab in the ribbon.
- In the “Build” panel, click on the “Wall” button. This will activate the wall tool.
- Choose the desired wall type from the type selector dropdown. Revit provides a library of pre-defined wall types to choose from or you can create your own custom wall types.
- Click on the starting point of the wall in the floor plan view and drag the mouse to the desired endpoint. You can use the snaps and inferencing tools in Revit to align the wall accurately.
- Specify the length, height, and other dimensions of the wall by entering the values in the options bar. You can also use temporary dimensions and constraints to adjust the wall’s position and size.
- Continue adding walls to define the layout and shape of the rooms and spaces in the floor plan. Revit automatically joins adjacent walls, creating clean intersections.
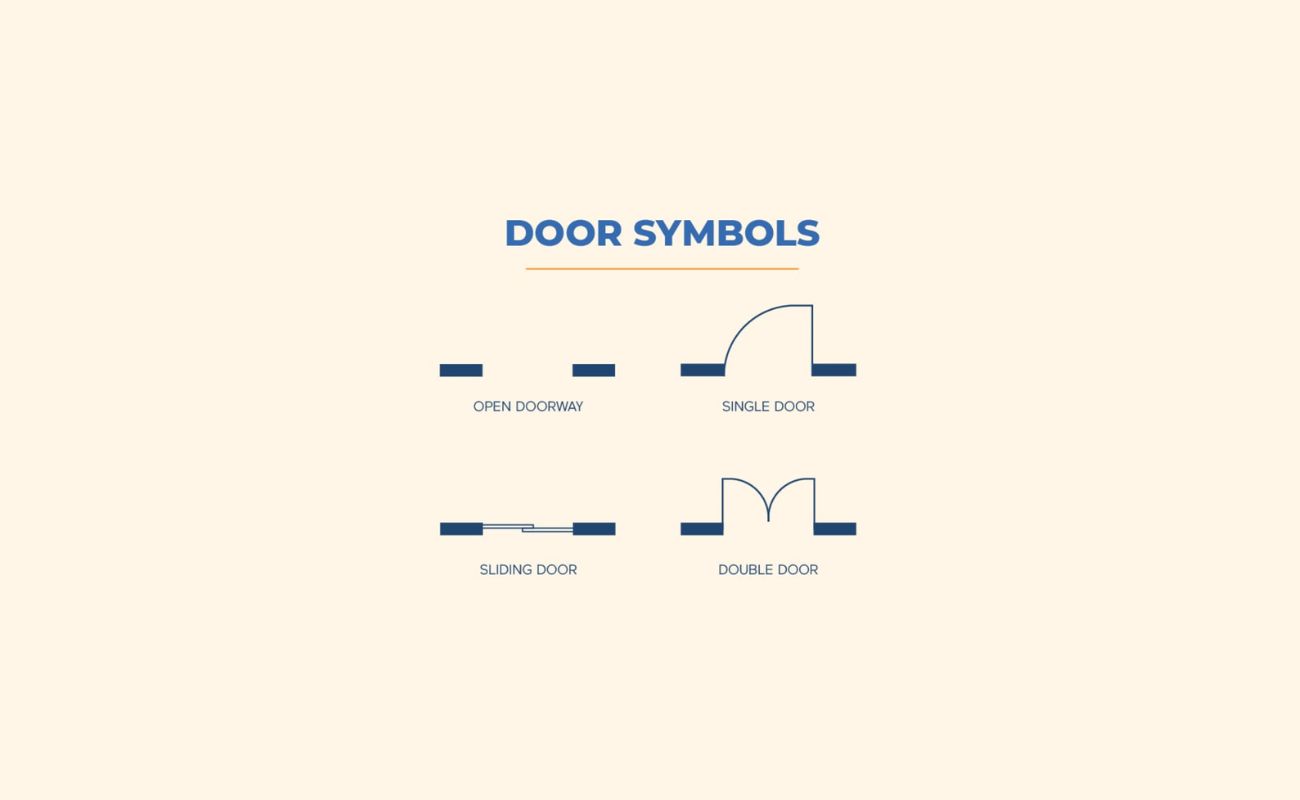
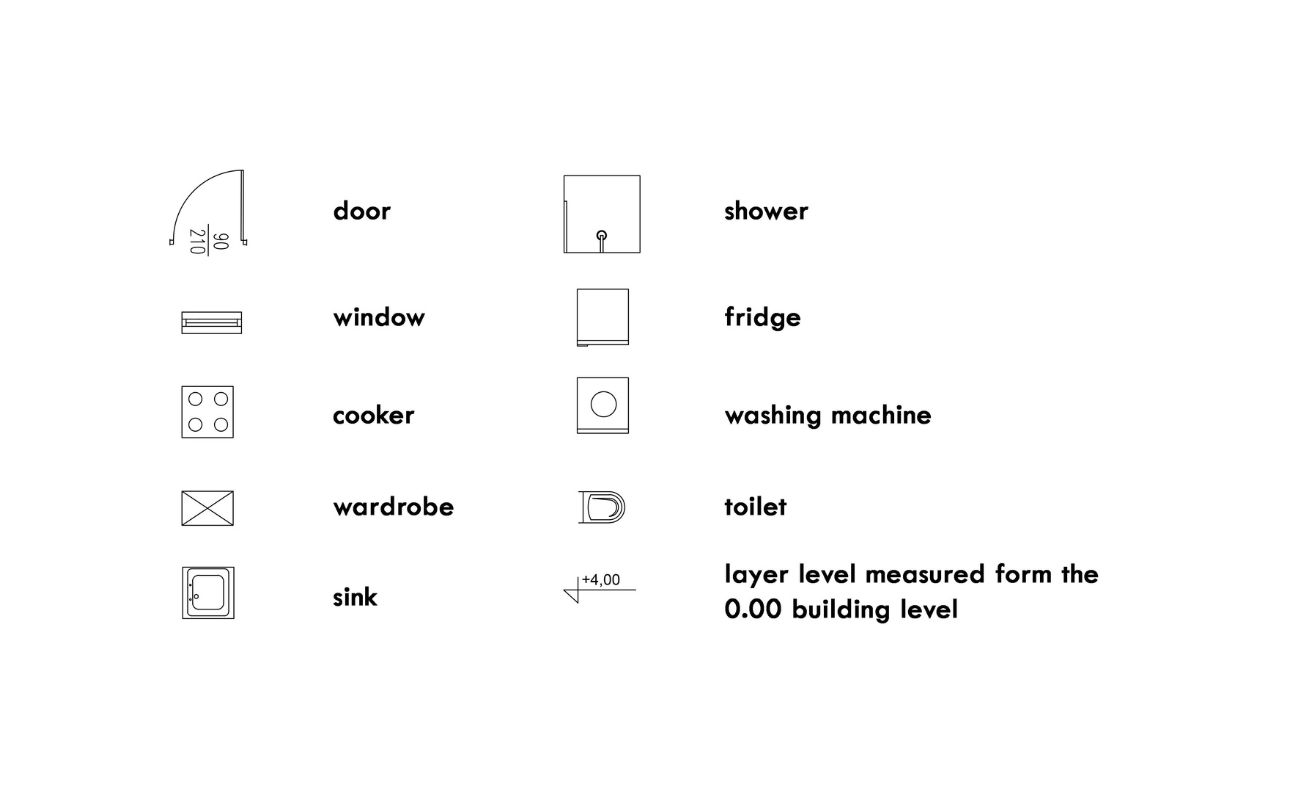
- To create openings for doors and windows, simply draw a wall segment between two points and Revit will detect the gap. You can then insert doors and windows into these openings.
Revit allows you to customize various properties of the walls, such as thickness, height, and materials. You can also add wall components, such as baseboards and crown moldings, to enhance the visual appeal of the floor plan.
By adding walls to the floor plan in Revit, you establish the basic structure of the building and define the spatial arrangement of the rooms. Walls play a crucial role in the overall design and functionality of the floor plan.
Now that you have successfully added walls to the floor plan, you can proceed to the next step: inserting doors and windows.
Read more: How To Create A Floor Plan In Word
Step 5: Inserting Doors and Windows
After adding walls to the floor plan in Revit, the next step is to insert doors and windows into the openings you have created. Doors and windows are essential components of a floor plan as they provide access, light, and ventilation to the different spaces in a building. Here’s how to insert doors and windows in Revit:
- In the Revit project window, make sure you are in the floor plan view where you want to insert doors and windows.
- Go to the “Architecture” tab in the ribbon.
- In the “Build” panel, click on the “Door” or “Window” button, depending on what you want to insert. This will activate the door or window tool.
- Choose the desired door or window type from the type selector dropdown. Revit provides a library of pre-defined door and window types to choose from or you can create custom types.
- Click on the wall opening where you want to insert the door or window. Revit will automatically detect the opening and place the element accordingly.
- Specify the dimensions and other properties of the door or window by entering the values in the options bar. You can adjust the swing direction, sill height, and other parameters as needed.
- Continue inserting doors and windows into the appropriate openings in the floor plan. Revit will automatically adjust the wall geometry to accommodate the elements.
- To modify the properties of doors and windows, such as materials or hardware, you can select the element and access the properties palette or use the Modify tools in the ribbon.
Revit allows you to customize various aspects of doors and windows, such as size, style, and performance parameters. You can also add additional detailing, such as window grids or door hardware, to enhance the visual representation of the floor plan.
By inserting doors and windows into the floor plan in Revit, you refine the layout and functionality of the building. These elements contribute to the overall design and play a crucial role in creating a comfortable and inviting space.
Now that you have successfully inserted doors and windows, you can proceed to the next step: adding rooms and spaces to the floor plan.
When creating a new floor plan in Revit, start by setting the correct project units and levels to ensure accuracy and consistency throughout the design process.
Step 6: Adding Rooms and Spaces
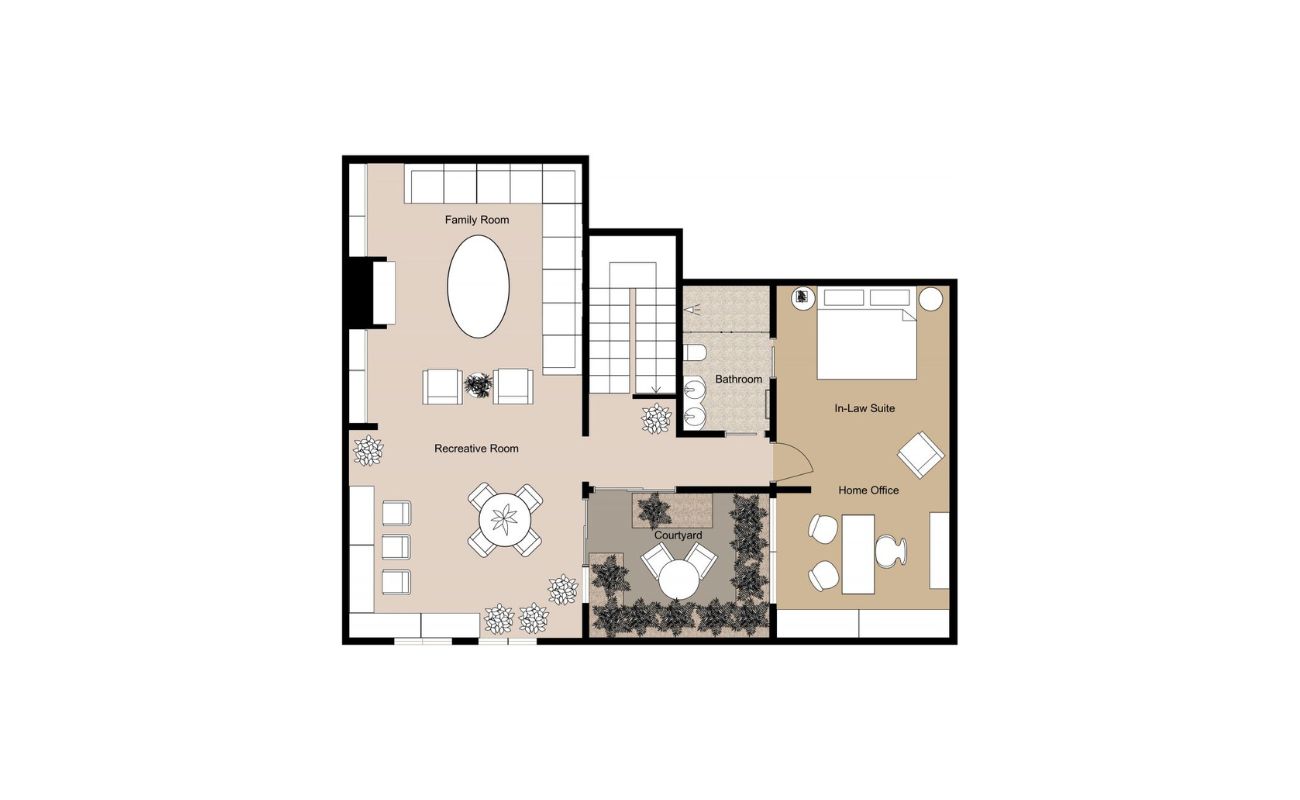
Once you have inserted doors and windows into the floor plan in Revit, the next step is to add rooms and spaces. Rooms are specific areas within a building that serve a particular purpose, such as bedrooms, living rooms, or kitchens. Spaces, on the other hand, represent generic areas without a specific function. Adding rooms and spaces helps to define the functionality and organization of the floor plan. Here’s how to add rooms and spaces in Revit:
- In the Revit project window, make sure you are in the floor plan view where you want to add rooms and spaces.
- Go to the “Architecture” tab in the ribbon.
- In the “Room & Area” panel, click on the “Room” or “Space” button, depending on what you want to add. This will activate the room or space tool.
- Click on a closed area in the floor plan to add a room or space. Revit will detect the boundaries and assign the respective category.
- Specify the room or space properties by entering the values in the options bar. You can assign a name, define the occupancy, and set the room or space parameters.
- Continue adding rooms and spaces to the floor plan, ensuring that they accurately reflect the layout and intended use of the building.
- To modify the properties of a room or space, such as size or category, you can select the element and access the properties palette or use the Modify tools in the ribbon.
Revit allows you to customize various aspects of rooms and spaces, such as occupancy load, finishes, and color schemes. You can also add room tags to provide labels and additional information about each area.
By adding rooms and spaces to the floor plan in Revit, you bring clarity and organization to the design. This step helps to define the functional areas of the building and ensures that the layout meets the project requirements.
Now that you have successfully added rooms and spaces, you can proceed to the next step: placing furniture and fixtures in the floor plan.
Step 7: Placing Furniture and Fixtures
After adding rooms and spaces to the floor plan in Revit, the next step is to place furniture and fixtures. Furniture and fixtures are essential elements that bring functionality, aesthetics, and a sense of livability to a space. Adding furniture and fixtures helps to visualize the layout and scale of the different areas in the building. Here’s how to place furniture and fixtures in Revit:
- In the Revit project window, make sure you are in the floor plan view where you want to place furniture and fixtures.
- Go to the “Architecture” or “Component” tab in the ribbon.
- In the “Build” or “Component” panel, click on the “Place Component” button. This will activate the component placement mode.
- Choose the desired furniture or fixture type from the component selector. Revit provides a library of pre-defined furniture and fixture families to choose from or you can create your own custom families.
- Click on the desired location in the floor plan to place the furniture or fixture. Revit will insert the component and allow you to adjust its position and rotation.
- Repeat the process to place additional furniture and fixtures throughout the floor plan. Consider the functionality and arrangement of each space when selecting and placing the components.
- To modify the properties of a furniture or fixture, such as size or material, you can select the component and access the properties palette or use the Modify tools in the ribbon.
Revit provides a wide range of furniture and fixture families, including chairs, tables, beds, appliances, and sanitary fixtures. You can also access manufacturer-specific libraries or create custom families to match the specific design requirements.
By placing furniture and fixtures in the floor plan in Revit, you bring life and character to the design. These elements contribute to the overall functionality, comfort, and visual aesthetics of the space.
Now that you have successfully placed furniture and fixtures, you can proceed to the next step: adding annotations and dimensions to the floor plan.
Step 8: Adding Annotations and Dimensions
After placing furniture and fixtures in the floor plan in Revit, the next step is to add annotations and dimensions. Annotations and dimensions provide crucial information about the layout, size, and relationships between the different elements in the floor plan. They help to communicate design intent and ensure accurate construction and implementation. Here’s how to add annotations and dimensions in Revit:
- In the Revit project window, make sure you are in the floor plan view where you want to add annotations and dimensions.
- Go to the “Annotate” tab in the ribbon.
- In the “Label” or “Dimension” panel, choose the desired annotation or dimension type. Revit provides a range of options, such as text, tags, leaders, and various dimension types.
- Click on the element or location in the floor plan where you want to add the annotation or dimension. Revit will place the annotation or create the dimension.
- Adjust the position and alignment of the annotation or dimension if needed. You can use grips, constraints, and alignment tools to precisely position and align the annotations and dimensions.
- Continue adding annotations and dimensions throughout the floor plan to provide clarity and precise information about the design.
- To modify the properties of an annotation or dimension, such as text size or style, you can select the element and access the properties palette or use the Modify tools in the ribbon.
Revit offers various formatting and customization options for annotations and dimensions. You can define the text style, font size, arrow style, and other properties to match the requirements of your floor plan.
By adding annotations and dimensions in Revit, you enhance the clarity and comprehensiveness of the floor plan. These elements facilitate the understanding of the design intent and assist during the construction and implementation stages.
Now that you have successfully added annotations and dimensions, you can proceed to the next step: modifying the floor plan.
Read more: How To Create Floor Plan In Excel
Step 9: Modifying the Floor Plan
After adding furniture, fixtures, annotations, and dimensions to the floor plan in Revit, the next step is to modify and refine the design. Modifying the floor plan allows you to make adjustments, iterate on the design, and ensure that it meets the project requirements. Here’s how to modify the floor plan in Revit:
- In the Revit project window, navigate to the floor plan view that you want to modify.
- Use the selection tools to select the elements you want to modify, such as walls, doors, windows, or furniture.
- Access the Modify tools in the ribbon, or right-click on the selected elements to access context-sensitive modifying options.
- Make the necessary changes to the floor plan. You can move, rotate, resize, or delete elements as needed.
- Use the various modification tools, such as align, mirror, and copy, to streamline the modification process and ensure consistency throughout the design.
- Pay attention to the relationships and connectivity of the elements in the floor plan. Ensure that walls are properly connected, doors and windows align correctly, and furniture is appropriately placed.
- Continuously evaluate and refine the design as you make modifications. Consider the functionality, aesthetics, and overall vision of the project.
Revit provides a wide range of powerful modification tools and features that make it easy to modify the floor plan. Whether it’s adjusting the layout, refining the dimensions, or fine-tuning the details, Revit offers the flexibility and precision needed to achieve the desired outcome.
By modifying the floor plan in Revit, you can address design changes, client feedback, or improve the overall functionality and aesthetics of the space. This step ensures that the floor plan accurately represents the design intent and meets the project goals.
Now that you have successfully modified the floor plan, you are ready for the final step: saving and exporting the floor plan.
Step 10: Saving and Exporting the Floor Plan
After creating, modifying, and finalizing the floor plan in Revit, the last step is to save and export the floor plan. Saving the floor plan ensures that your work is securely stored and can be easily accessed for future modifications or reference. Exporting the floor plan allows you to share it with others or generate high-quality outputs. Here’s how to save and export the floor plan in Revit:
- In the Revit project window, go to the “File” tab in the ribbon.
- Click on the “Save” button to save the current state of the floor plan. Give the file a name and choose the desired location on your computer.
- Revit automatically saves the floor plan as an .rvt file, which is the native file format for Revit projects. This file format retains all the information and details of the floor plan, including the 3D model, elements, annotations, and dimensions.
- To export the floor plan for sharing or printing purposes, go to the “File” tab again and click on the “Export” button.
- Choose the desired export format, such as PDF, DWG, or DWF. The format you choose will depend on the specific requirements of your project and the intended use of the exported floor plan.
- Specify the export settings, such as paper size, resolution, and layer visibility, if applicable.
- Click on the “Export” button to generate the exported floor plan file.
- Save the exported file with a descriptive name and choose the desired location on your computer.
Once the floor plan is saved and exported, you can easily share it with clients, colleagues, or other project stakeholders. They can view and review the floor plan using compatible software without needing access to Revit.
Additionally, the exported floor plan can be printed or included in project presentations, reports, or documentation. It serves as a clear and professional representation of your design work.
By saving and exporting the floor plan in Revit, you ensure the preservation, accessibility, and dissemination of your design efforts. It marks the completion of the floor plan creation process in Revit.
Congratulations! You have successfully created a new floor plan in Revit and are now equipped to delve further into the world of architectural design with this powerful software.
Conclusion
Creating a new floor plan in Revit is a fulfilling and essential part of the architectural design process. With the powerful tools and features offered by Revit, architects and designers can bring their visions to life with precision and efficiency.
In this comprehensive guide, we walked through the step-by-step process of creating a new floor plan in Revit. From opening the software and setting up a new project to adding walls, doors, windows, rooms, furniture, annotations, dimensions, and modifying the design, we covered each stage in detail.
We emphasized the importance of thoughtful design considerations and paying attention to various aspects, such as functionality, aesthetics, scale, and relationships of the elements in the floor plan. Revit provides a user-friendly interface and extensive customization options that enable users to create accurate, detailed, and visually appealing floor plans.
By integrating annotations, dimensions, and carefully placing furniture and fixtures, architects and designers can enhance the clarity and communicability of their designs. The ability to modify and refine the floor plan ensures that it aligns with project requirements and allows for design iterations.
Once the floor plan is complete, saving and exporting it provides the convenience of future modification and sharing with collaborators and clients. The exported floor plan serves as a valuable visual representation of the design and can be used for presentations, documentation, and construction purposes.
By following this guide, you have gained the knowledge and skills required to navigate through Revit and create outstanding floor plans. However, it’s important to remember that architectural design is a continuous learning process, and there’s always room for exploration and improvement. Embrace your creativity, stay updated with the latest trends and features in Revit, and continue expanding your knowledge in the field of architectural design.
Now that you are equipped with the tools and understanding to create remarkable floor plans, it’s time to unleash your design prowess and turn your visions into reality. Happy designing!
Frequently Asked Questions about How To Create A New Floor Plan In Revit
Was this page helpful?
At Storables.com, we guarantee accurate and reliable information. Our content, validated by Expert Board Contributors, is crafted following stringent Editorial Policies. We're committed to providing you with well-researched, expert-backed insights for all your informational needs.


0 thoughts on “How To Create A New Floor Plan In Revit”