Home>diy>Building & Construction>How To Repair Cinder Block Foundation Cracks
Building & Construction
How To Repair Cinder Block Foundation Cracks
Modified: January 9, 2024
Learn how to repair cinder block foundation cracks in your building construction project with expert tips and techniques.
(Many of the links in this article redirect to a specific reviewed product. Your purchase of these products through affiliate links helps to generate commission for Storables.com, at no extra cost. Learn more)
Introduction
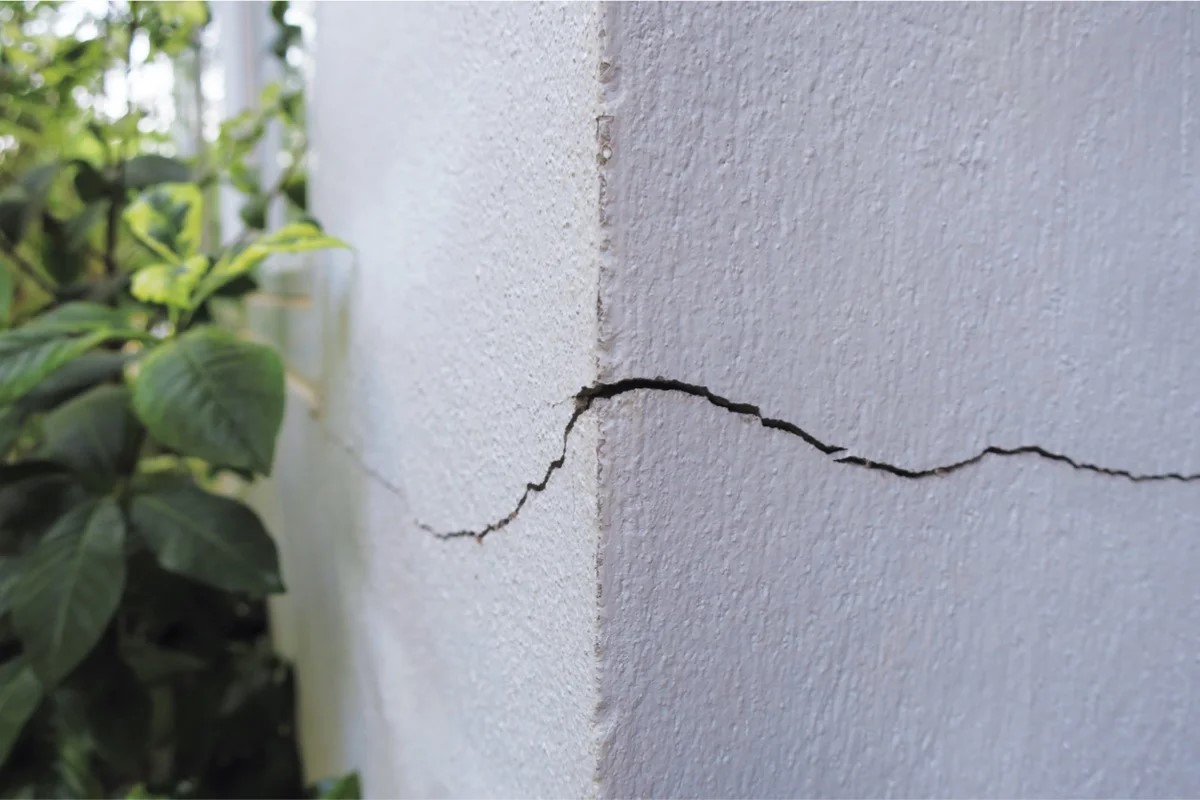
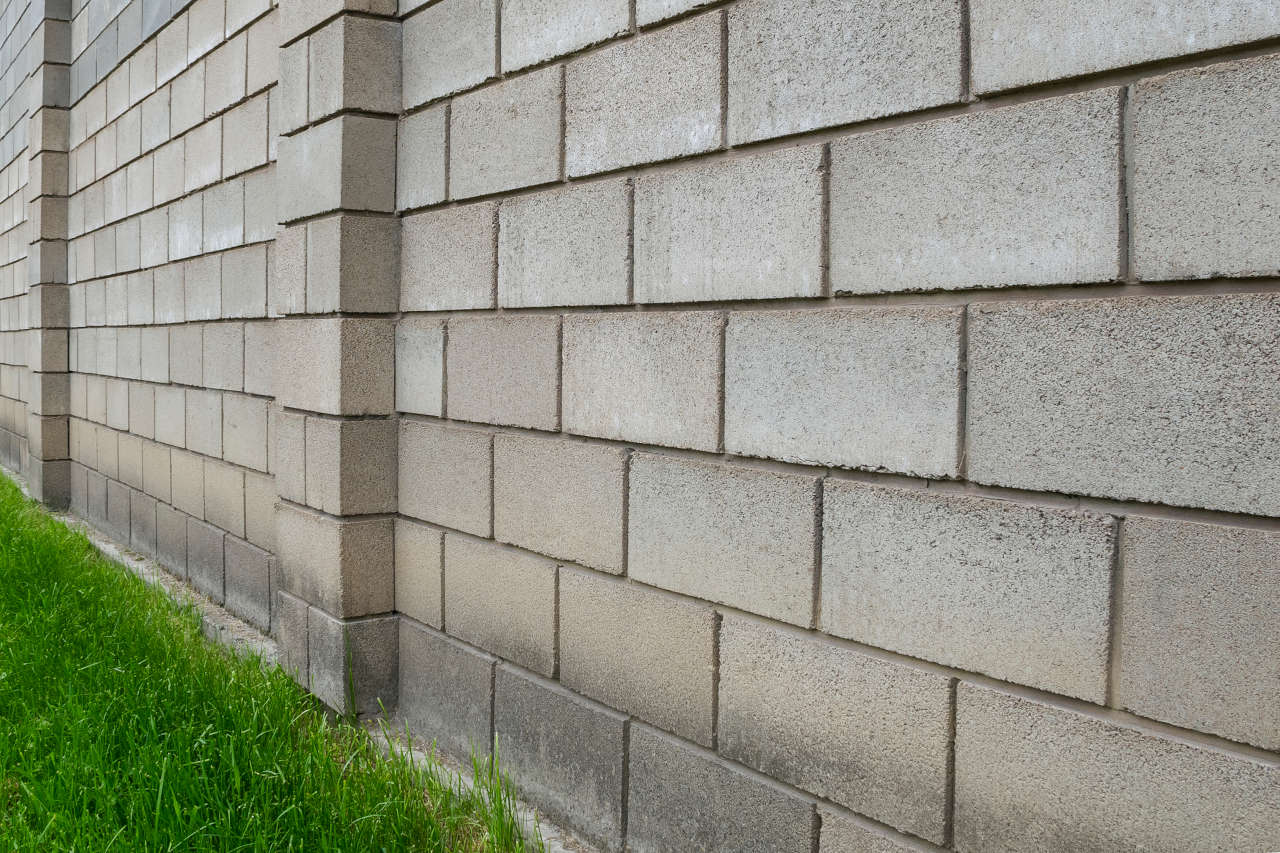
When it comes to building construction, a solid foundation is essential for the stability and durability of the structure. However, over time, even well-built foundations can develop cracks, and this includes cinder block foundations. These cracks can be caused by various factors such as settling of the soil, moisture penetration, and temperature changes.
Repairing cinder block foundation cracks is crucial to prevent further damage and maintain the structural integrity of the building. In this article, we will guide you through the step-by-step process of repairing cinder block foundation cracks.
Before diving into the repair process, it is important to inspect the cracks thoroughly to determine the severity and extent of the damage. This will help you understand the scope of the repair work and identify any underlying issues.
Once you have inspected the cracks and prepared the necessary tools and materials, you can proceed with the repair process. This typically involves cleaning the cracks, applying patching compound, and injecting epoxy to ensure a strong and durable repair.
Throughout the repair process, it is crucial to pay attention to detail and follow the manufacturer’s instructions for the patching compound and epoxy. This will help you achieve a successful and long-lasting repair.
By following this comprehensive guide, you will be able to repair cinder block foundation cracks effectively and ensure the stability and longevity of your building. So, let’s dive in and get started with the repair process!
Key Takeaways:
- Thoroughly inspecting cinder block foundation cracks and gathering the necessary tools and materials are crucial initial steps in the repair process. Proper preparation sets the stage for a successful and long-lasting repair.
- Monitoring and maintaining the repaired cracks, along with addressing any underlying structural issues, are essential for ensuring the long-term stability and durability of the building’s foundation. Regular inspections and proactive maintenance are key to preventing future problems.
Read more: How To Repair Cinder Block Foundation
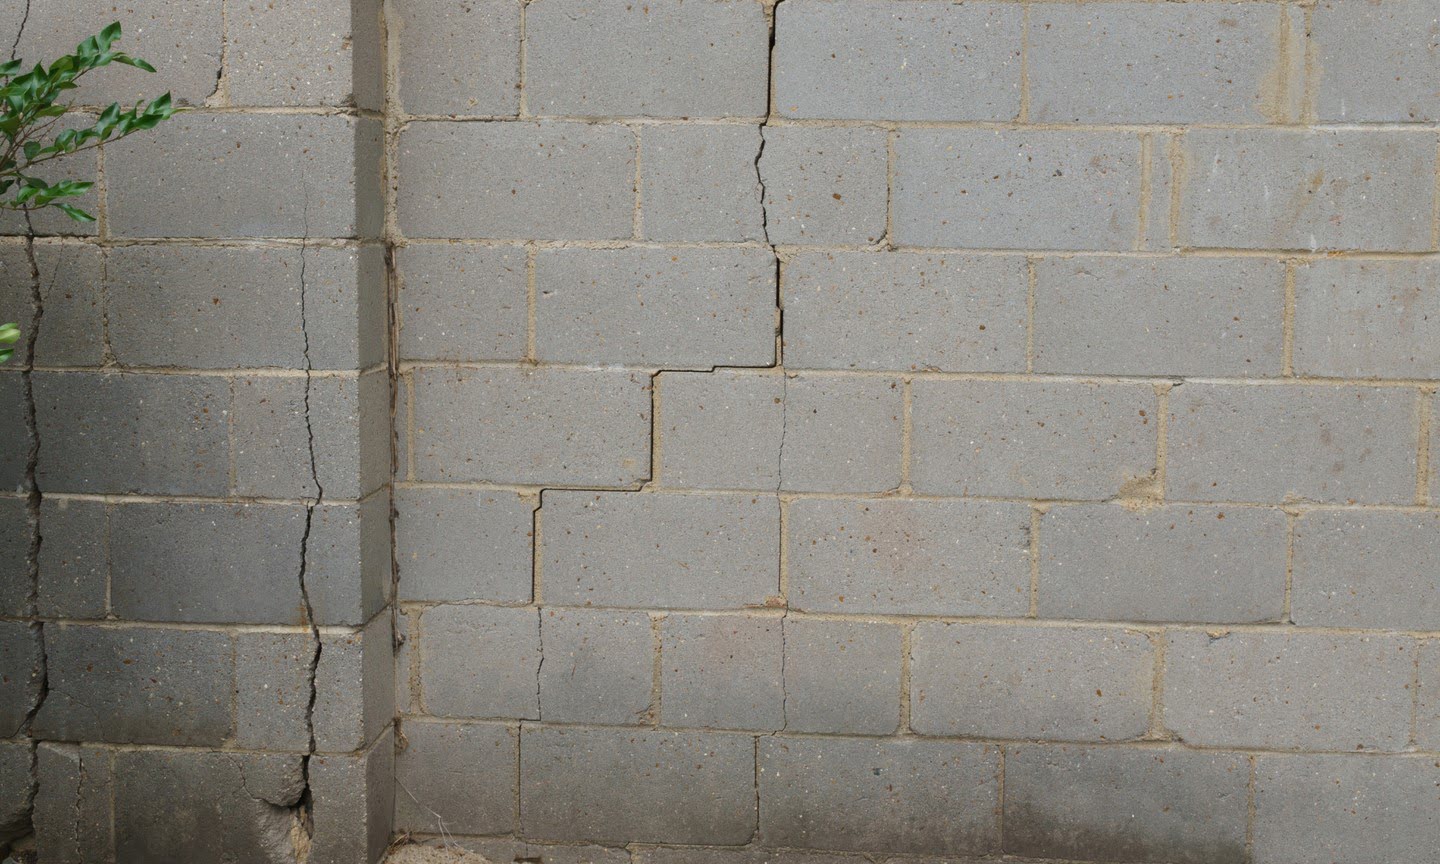
Step 1: Inspecting the Cracks
Before beginning any repair work, it is important to thoroughly inspect the cinder block foundation cracks. This step will help you understand the nature and severity of the damage, which will then guide your repair approach.
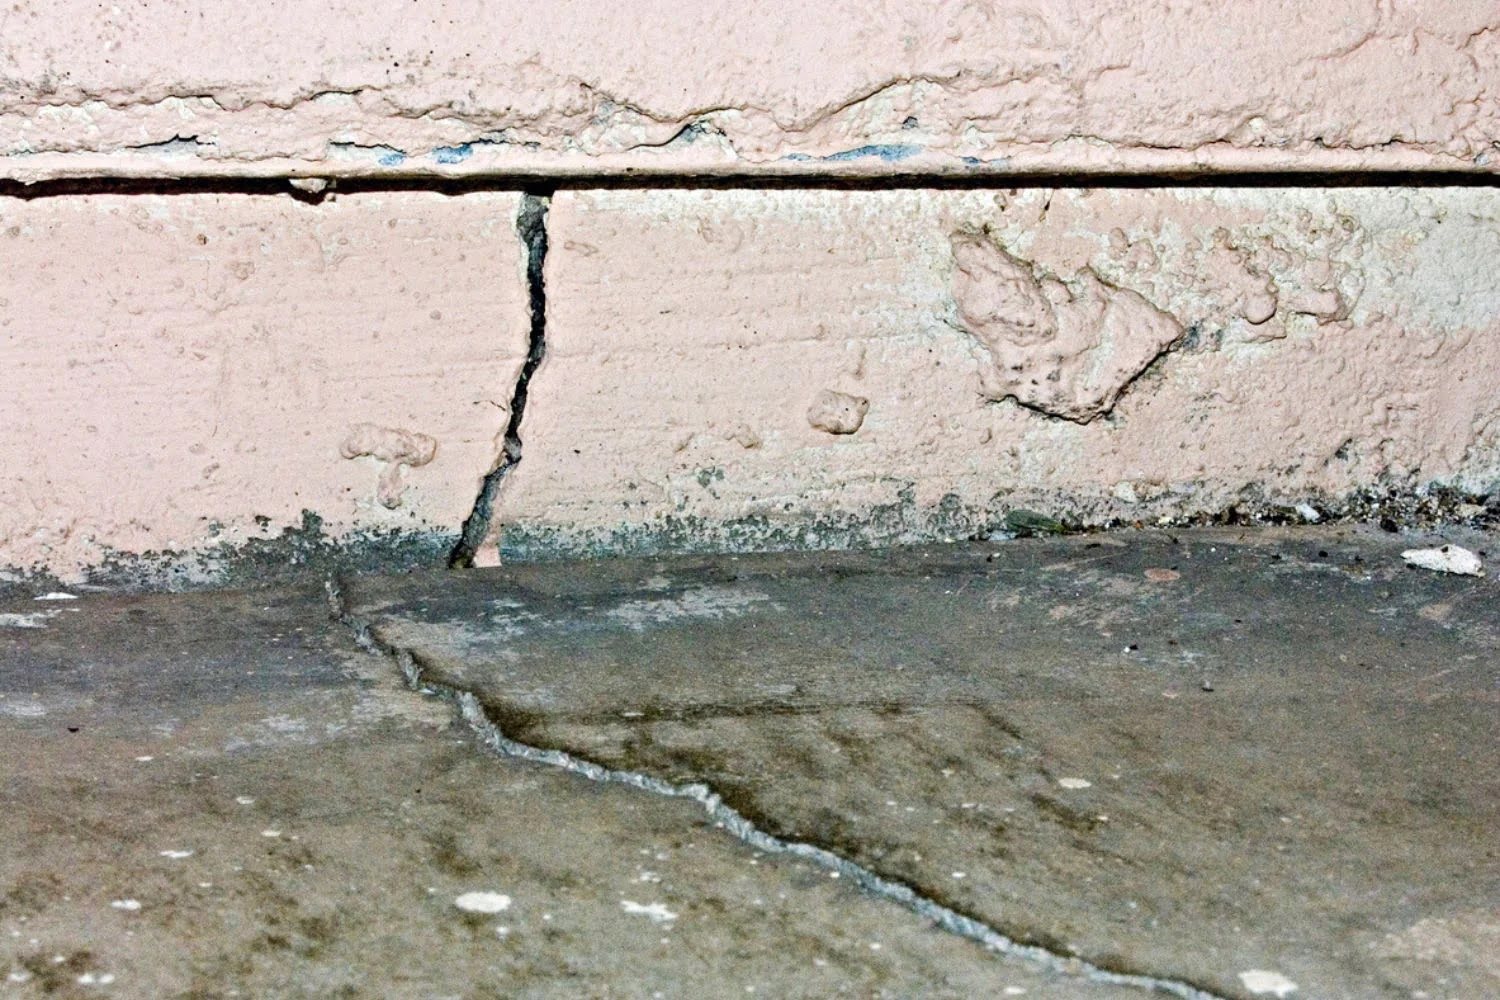
Start by examining the cracks visually. Look for any visible signs of cracking, including the size, length, and width of the cracks. Take note of any patterns or directions in which the cracks are spreading. This information will be valuable in determining the underlying cause of the cracks and the appropriate repair method.
Next, use a flashlight to inspect the cracks more closely. Shine the light into the cracks to check for any water stains, mold growth, or signs of moisture penetration. This can indicate potential water damage, which needs to be addressed alongside the crack repair.
In addition to visual inspection, it is also important to monitor the cracks for any movement. Place a piece of masking tape over the cracks, making sure to align the tape on both sides of the crack. Write the current date on the tape. Periodically check the tape to see if there are any changes in the crack size or movement. This will help you determine if the cracks are actively widening and require immediate attention.
Lastly, if you notice any other structural issues or concerns during the inspection, such as bulging or crumbling cinder blocks, it is advisable to consult a professional engineer. They will be able to assess the situation and provide expert guidance on how to address any underlying structural issues.
By thoroughly inspecting the cinder block foundation cracks, you will have a better understanding of the scope of repair work required and can proceed with confidence to the next steps of the repair process.
Step 2: Gathering the Necessary Tools and Materials
Before you can start repairing the cinder block foundation cracks, you will need to gather the necessary tools and materials. Having everything prepared beforehand will make the repair process smoother and more efficient.
Here are the essential tools and materials you will need:
- Masonry chisel: This tool will be used to clean out the cracks and remove any loose debris or old patching material.
- Wire brush: A wire brush is necessary to thoroughly clean the cracks and ensure proper adhesion of the patching compound.
- Patching compound: There are various types of patching compounds available, such as hydraulic cement or vinyl patching compound. Choose a product that is suitable for cinder block repairs.
- Epoxy injection kit: This kit will contain the epoxy resin and injection ports needed for injecting epoxy into the cracks to reinforce and seal them.
- Gloves and safety glasses: Safety should always be a priority during any repair work. Wear gloves and safety glasses to protect yourself from any potential hazards.
- Clean rags or towels: These will come in handy for wiping away excess patching compound or cleaning up the work area.
- Plastic sheeting and tape: If there is any risk of moisture or water entering the repair area, you may need plastic sheeting and tape to create a temporary barrier.
It is important to ensure you have all the necessary tools and materials on hand before starting the repair process. This will save you time and prevent any delays in the repair work.
Additionally, make sure to read and follow the instructions provided with the patching compound and epoxy injection kit. Different products may have specific mixing ratios and curing times, so it is essential to adhere to the manufacturer’s guidelines for optimal results.
With the tools and materials gathered, you are now ready to move on to the next step of preparing the work area for the repair.
Step 3: Preparing the Work Area
Before you start applying any patching compound or injecting epoxy, it is crucial to properly prepare the work area to ensure a successful repair. Here are the steps to follow when preparing the work area for repairing cinder block foundation cracks:
- Clean the surrounding area: Clear away any objects or debris around the cracks to create a clean and accessible work area. This will prevent anything from obstructing the repair process and ensure a more seamless repair.
- Protect the surrounding surfaces: Use plastic sheeting and tape to cover any adjacent surfaces or areas that you want to protect from the patching compound. This will help prevent any accidental spills or splatters from damaging surrounding materials.
- Remove loose debris: Use a masonry chisel and a wire brush to remove any loose debris, dust, or old patching material from the cracks. It is crucial to have a clean surface to ensure proper adhesion of the patching compound.
- Wet the cracked area: Lightly mist the cracks and surrounding area with water. This will help dampen the surface and improve the bond between the patching compound and the cinder blocks.
By taking the time to properly prepare the work area, you will create a clean and suitable surface for the repair. This will help ensure the longevity and effectiveness of the repair.
Once the work area is properly prepared, you can proceed to the next step of the repair process, which involves cleaning the cracks to further enhance their adhesion.
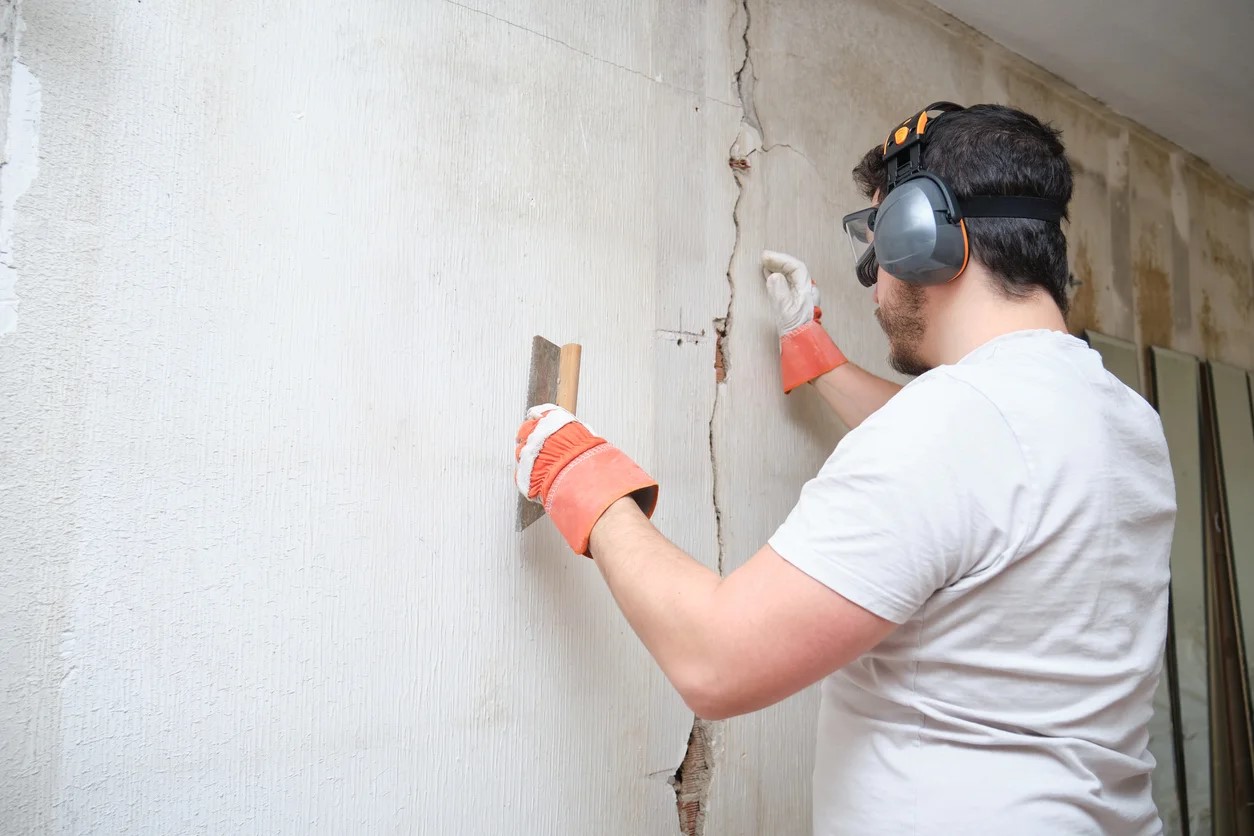
Step 4: Cleaning the Cracks
Cleaning the cracks is a crucial step in the repair process, as it ensures proper adhesion of the patching compound and helps create a durable and long-lasting repair. Follow these steps to clean the cracks effectively:
- Use a wire brush: Start by using a wire brush to scrub the cracks and remove any remaining debris or loose material. Scrub in a back-and-forth motion to ensure all surfaces of the crack are thoroughly cleaned.
- Remove stubborn debris: For stubborn debris or stains, you can use a masonry chisel to gently chip away the material. Be cautious not to widen or damage the crack further during this process.
- Blow out dust and debris: Once you have brushed and chiseled the cracks, use a shop vacuum or a handheld blower to remove any dust or debris from within the cracks. This will help create a clean surface for the patching compound.
- Wipe with a damp cloth: Take a clean, damp cloth or sponge and wipe the cracks to remove any remaining dust or residue. This step will ensure that the patching compound can fully adhere to the cinder blocks.
Properly cleaning the cracks is essential for the success of the repair. It removes any loose debris or contaminants that could hinder the bond between the cinder block and the patching compound.
After cleaning the cracks, make sure to allow them to fully dry before proceeding to the next step. This will ensure that the patching compound can cure properly and provide a strong, durable repair.
With the cracks cleaned and the work area prepared, you are now ready to move onto the next step of applying the first layer of patching compound.
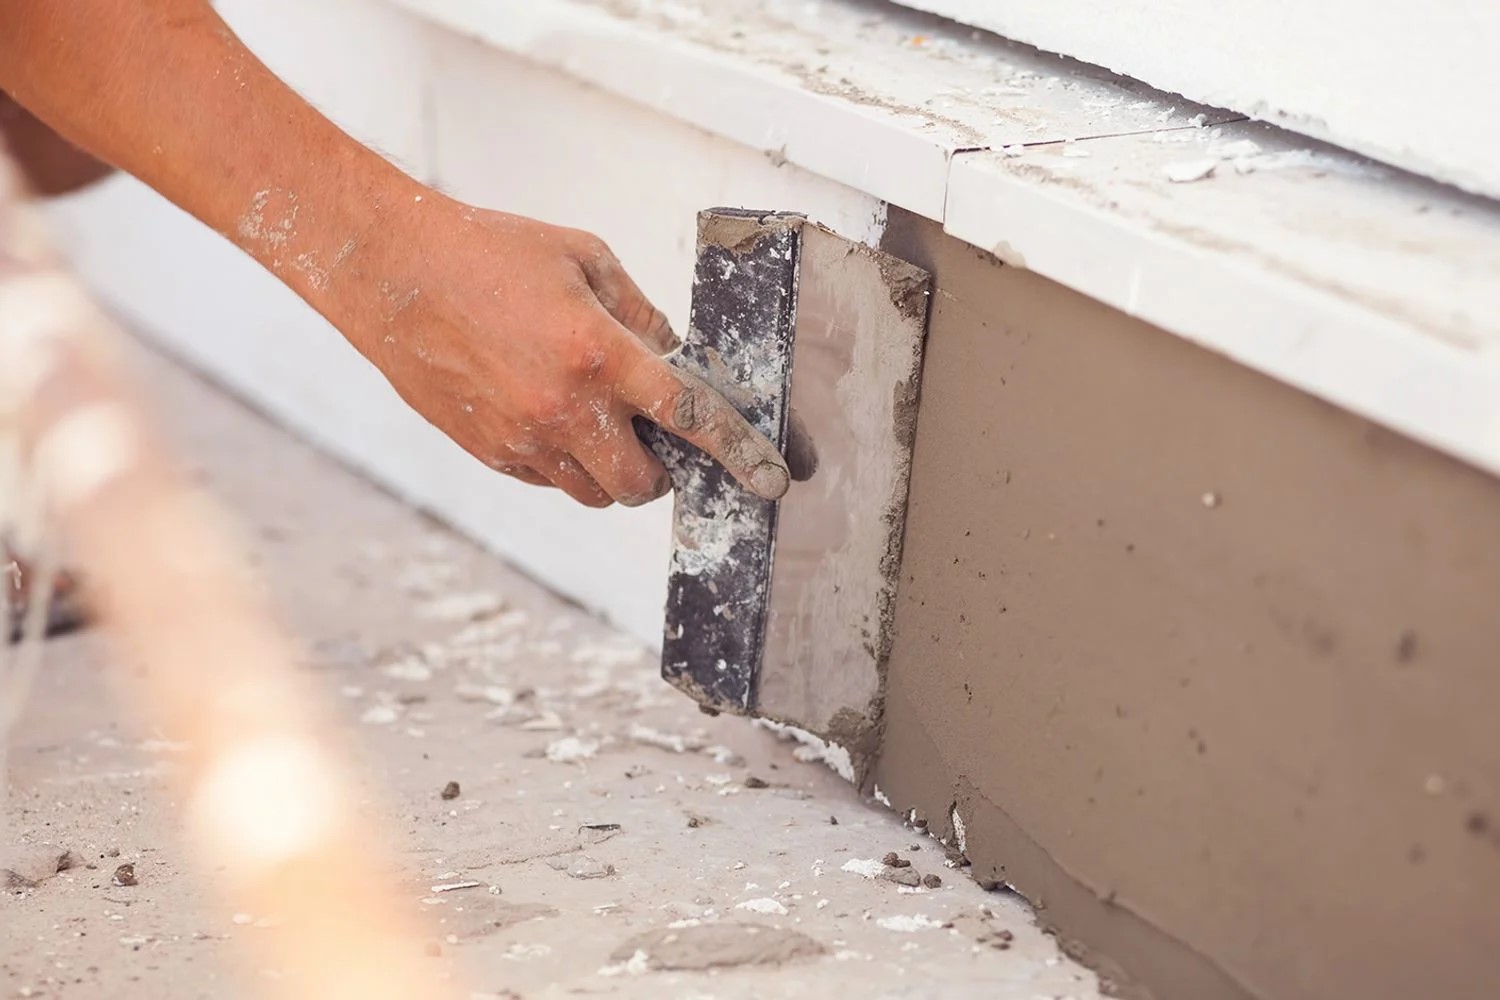
Step 5: Applying the First Layer of Patching Compound
Once the cracks are cleaned and dry, it’s time to apply the first layer of patching compound to the cinder block foundation cracks. This layer serves as a base for the repair and helps fill in the cracks. Follow these steps to apply the first layer of patching compound:
- Mix the patching compound: Follow the manufacturer’s instructions to properly mix the patching compound. Use a clean bucket and a mixing paddle to create a smooth and consistent paste. Make sure to mix only the amount of compound that you will need for this step.
- Fill the cracks: Using a trowel or a putty knife, scoop the patching compound from the bucket and press it firmly into the cracks. Work the compound into the cracks, ensuring that it fully fills the voids. Smooth the surface of the patching compound to make it flush with the surrounding area.
- Feather the edges: To blend the patching compound with the surrounding cinder blocks, lightly feather the edges of the compound. This will create a smoother transition between the repaired area and the rest of the foundation.
It is important to work efficiently when applying the patching compound, as it can start to dry and harden quickly. Focus on one crack at a time, ensuring that it is properly filled and smoothed before moving on to the next.
Once the first layer of patching compound is applied, allow it to dry according to the manufacturer’s instructions. This typically takes several hours, but it may vary depending on the product and environmental conditions. Keep in mind that curing time is crucial for the proper bonding and effectiveness of the repair.
With the first layer of patching compound applied, you are now ready to move on to the next step of the repair process: inserting epoxy injection ports.
Inspect the cracks for size and direction. Use epoxy or polyurethane injection to fill the cracks. Consider hiring a professional for larger or structural cracks.
Step 6: Inserting Epoxy Injection Ports
After the first layer of patching compound has dried, it’s time to reinforce the cinder block foundation cracks by injecting epoxy. Epoxy injection helps strengthen the cracks and prevents further damage. Follow these steps to insert epoxy injection ports:
- Locate injection points: Identify the appropriate locations along the cracks where you will insert the epoxy injection ports. These points should be evenly spaced and situated along the length of the crack.
- Prep the surface: Clean the area around the injection points with a wire brush to remove any loose debris or dust. This will ensure proper adhesion of the injection ports.
- Apply epoxy adhesive: Apply a small amount of epoxy adhesive to the base of each injection port. Press the injection ports firmly into the prepared injection points, ensuring that they fit snugly against the surface of the crack.
- Allow the epoxy to cure: Leave the epoxy adhesive to cure according to the manufacturer’s instructions. This step is crucial for ensuring the effectiveness of the epoxy injection process.
The epoxy injection ports serve as entry points for injecting the epoxy resin into the cracks. They provide a controlled pathway for the epoxy to flow and fill the cracks completely. The epoxy will bond with the cinder blocks, reinforcing and sealing the cracks from further damage.
While inserting the epoxy injection ports, be careful not to damage or widen the cracks. Treat the surface with care to maintain the integrity of the repair.
Once the epoxy adhesive has cured and the injection ports are securely in place, you are ready to proceed to the next step: injecting epoxy into the cracks to further strengthen and seal them.
Step 7: Injecting Epoxy into the Cracks
Now that the epoxy injection ports are in place, it’s time to inject epoxy resin into the cinder block foundation cracks. This step will reinforce the cracks and create a strong bond that helps prevent further damage. Follow these steps to inject epoxy into the cracks:
- Prepare the epoxy resin: Mix the epoxy resin according to the manufacturer’s instructions. Ensure that the resin is well-mixed and has a uniform consistency.
- Load the epoxy injection gun: Load the epoxy resin into an epoxy injection gun. Make sure to follow the specific instructions provided by the manufacturer for your particular injection system.
- Start injecting: Begin injecting the epoxy into the first injection port, starting from the lowest point of the crack and moving upward. Apply continuous pressure to the injection gun to force the epoxy into the cracks. Keep injecting until epoxy begins to come out from the adjacent injection port.
- Move to the next injection port: Once the epoxy starts to come out of the adjacent injection port, move on to the next port along the crack. Continue injecting epoxy in the same manner until all the injection ports have been filled.
- Monitor the injection: As you inject epoxy, observe the crack to ensure that the resin is evenly filling the voids. If necessary, adjust the injection pressure to achieve consistent epoxy flow and complete crack penetration.
- Continue injecting and sealing: Repeat the injection process for each injection port, working your way along the entire length of the crack. Pay close attention to any areas that require additional epoxy to fill the cracks completely.
Once you have finished injecting all the epoxy resin, carefully remove any excess epoxy from the surface using a putty knife or a scraper. Smooth out the surface to create a uniform appearance.
Allow the injected epoxy to cure completely according to the manufacturer’s instructions. During the curing process, avoid any disturbances or stresses on the repaired area. This will ensure the epoxy has sufficient time to bond and harden, providing a strong and durable repair.
With the epoxy injected and the curing process underway, you can now move on to the next step of the repair process: applying the final layer of patching compound to complete the repair.
Step 8: Applying the Final Layer of Patching Compound
After the epoxy has cured and strengthened the cinder block foundation cracks, it’s time to apply the final layer of patching compound. This layer will provide a smooth and seamless finish to the repair. Follow these steps to apply the final layer of patching compound:
- Mix the patching compound: Prepare a fresh batch of patching compound according to the manufacturer’s instructions. Ensure that the mixture has a smooth and workable consistency.
- Apply the compound: Use a trowel or a putty knife to apply the patching compound over the epoxy-filled cracks. Spread the compound evenly, making sure to fill any gaps or imperfections. Feather the edges of the compound to blend it with the surrounding surface.
- Smooth and shape: Use a trowel or a wet sponge to smooth and shape the patching compound, creating a seamless transition between the repaired area and the rest of the foundation. Work the compound until you achieve a uniform and flush finish.
Take your time during this step to ensure that the patching compound is applied evenly and blended smoothly. Pay attention to any areas that require additional compound to achieve a seamless finish.
After applying the final layer of patching compound, allow it to dry completely according to the manufacturer’s instructions. This drying period is essential for the compound to set and cure, providing a strong and aesthetically pleasing finish to the repaired area.
Once the patching compound is fully dry, you can proceed to the last step of the repair process: monitoring and maintaining the repaired cracks to ensure their long-term stability and durability.
Read more: How To Build A Cinder Block Outdoor Kitchen
Step 9: Allowing the Patching Compound to Cure
After applying the final layer of patching compound, it is crucial to allow it adequate time to cure and harden. Curing ensures that the compound forms a strong bond, providing long-term stability to the repaired cinder block foundation cracks. Follow these steps to allow the patching compound to cure effectively:
- Read the manufacturer’s instructions: Refer to the instructions provided by the manufacturer of the patching compound for specific curing times. Different products may have varying curing periods, so it is essential to follow the recommended guidelines.
- Create a controlled environment: Maintain a consistent temperature and humidity level in the area where the repair work was done. Extreme temperature changes or excessive moisture can affect the curing process. Consider using fans or dehumidifiers to regulate the environment if necessary.
- Avoid any disturbances: During the curing period, avoid placing any heavy objects or applying excessive pressure on the repaired surface. This can disrupt the curing process and compromise the integrity of the repair.
- Monitor the curing process: Keep an eye on the repaired area to ensure that the patching compound is drying and hardening evenly. Check for any signs of cracking, shrinking, or other abnormalities. If any issues arise, consult the manufacturer’s instructions or seek professional advice.
- Allow sufficient time for complete curing: While the patching compound may feel dry to the touch after a few hours, it is essential to allow ample time for full curing. This can range from a few days to a couple of weeks, depending on the specific compound and environmental conditions.
By patiently allowing the patching compound to cure, you ensure that it develops its maximum strength and durability. This step is crucial for the long-term stability of the repaired cinder block foundation cracks.
Once the patching compound has fully cured, you can proceed to the final step: monitoring and maintaining the repaired cracks to ensure their ongoing integrity.
Step 10: Monitoring and Maintaining the Repaired Cracks
After completing the repair process for the cinder block foundation cracks, it is important to continue monitoring and maintaining the repaired area to ensure its long-term stability and effectiveness. Follow these steps to properly monitor and maintain the repaired cracks:
- Regular inspections: Schedule periodic inspections to check the condition of the repaired cracks. Look out for any signs of cracking, shifting, or water penetration. Early detection of any issues allows for prompt remedial action.
- Address moisture concerns: Take steps to prevent excess moisture from infiltrating the repaired cracks. Ensure proper drainage around the foundation, fix any leaky pipes or plumbing issues, and maintain the surrounding landscaping to keep water away from the foundation.
- Monitor and manage soil moisture: Keep an eye on the moisture levels in the soil around the foundation. Excessive dryness or saturation can cause soil movement, which can impact the stability of the repaired cracks. Install and maintain proper irrigation systems to maintain consistent soil moisture levels.
- Address any structural issues: If you notice any signs of structural problems, such as significant cracking or shifting, consult a professional engineer or foundation specialist. They can evaluate the situation, identify the cause, and recommend appropriate remediation measures.
- Perform regular maintenance: Conduct routine maintenance to keep the repaired cracks in good condition. This may include cleaning the surface, reapplying protective coatings, or repairing any minor damages that may occur over time.
By diligently monitoring and maintaining the repaired cracks, you can ensure their long-term stability and minimize the risk of future issues. Regular inspections and proactive maintenance will help you detect and address any potential problems, enhancing the overall durability of the cinder block foundation.
Remember, the longevity of the repair relies on a combination of proper installation, regular maintenance, and addressing any underlying issues that may affect the stability of the foundation. With consistent care, your repaired cinder block foundation cracks can withstand the test of time.
With the completion of Step 10, you have successfully gone through the process of repairing cinder block foundation cracks. By following this comprehensive guide, you have taken the necessary steps to ensure the stability and durability of your building’s foundation. Congratulations!
As always, should you have any questions or encounter any concerns during the repair process, do not hesitate to seek professional guidance to ensure the best results for your specific situation.
Conclusion
Repairing cinder block foundation cracks is a crucial part of maintaining the stability and integrity of a building. By following the step-by-step guide outlined in this article, you have learned how to effectively inspect, gather the necessary tools and materials, prepare the work area, clean the cracks, apply patching compound, insert epoxy injection ports, inject epoxy, apply the final layer of patching compound, allow for proper curing, and monitor and maintain the repaired cracks.
Throughout the repair process, it is essential to pay attention to detail and follow the manufacturer’s instructions for each specific product used. This will ensure the best results and maximize the longevity of the repair.
Maintaining a solid foundation is crucial for the overall stability and safety of a building. By promptly addressing and repairing cinder block foundation cracks, you can prevent further structural damage and the potential for more extensive repairs in the future.
Remember to regularly inspect and maintain the repaired cracks, addressing any issues that may arise in a timely manner. This proactive approach will help you detect and address any potential problems, ensuring the long-term stability and durability of your building’s foundation.
Should you encounter any challenges or feel unsure about the repair process, it is always advisable to consult with a professional engineer or foundation specialist. Their expertise and guidance can provide valuable insights and ensure the best possible outcome for your specific situation.
By taking the necessary steps to repair cinder block foundation cracks, you are investing in the structural integrity and longevity of your building. A solid foundation provides a strong base for the entire structure, ensuring the safety and comfort of its occupants for years to come.
Congratulations on completing the process of repairing cinder block foundation cracks! With your newfound knowledge and careful maintenance, your building’s foundation will remain strong and secure.
Frequently Asked Questions about How To Repair Cinder Block Foundation Cracks
Was this page helpful?
At Storables.com, we guarantee accurate and reliable information. Our content, validated by Expert Board Contributors, is crafted following stringent Editorial Policies. We're committed to providing you with well-researched, expert-backed insights for all your informational needs.


0 thoughts on “How To Repair Cinder Block Foundation Cracks”