Home>Furniture & Design>Bathroom Accessories>How To Remove Window Screen Plunger Pins
Bathroom Accessories
How To Remove Window Screen Plunger Pins
Published: February 11, 2024
Learn how to easily remove window screen plunger pins with our step-by-step guide. Find the best bathroom accessories for your home.
(Many of the links in this article redirect to a specific reviewed product. Your purchase of these products through affiliate links helps to generate commission for Storables.com, at no extra cost. Learn more)
Introduction
Removing window screen plunger pins may seem like a daunting task, but with the right tools and a clear understanding of the process, it can be a straightforward and manageable endeavor. Whether you're looking to replace a damaged screen or simply need to access the window for cleaning or maintenance, knowing how to remove the plunger pins is a valuable skill for any homeowner or DIY enthusiast.
In this comprehensive guide, we will walk you through the step-by-step process of removing window screen plunger pins with ease and confidence. By following these instructions, you'll be able to tackle this task efficiently, ensuring that your window screens can be removed and reinstalled whenever necessary.
Understanding the intricacies of window screen plunger pins is essential for maintaining the functionality and appearance of your window screens. With the insights provided in this guide, you'll gain the knowledge and skills needed to navigate this process seamlessly, empowering you to take control of your home maintenance and improvement projects.
Now, let's gather the necessary tools and materials and dive into the step-by-step process of removing window screen plunger pins. With a little patience and attention to detail, you'll soon master this essential aspect of home maintenance.
Key Takeaways:
- Removing window screen plunger pins is a manageable task with the right tools and steps. By following the guide, you can confidently remove and reinstall window screens for maintenance or replacement.
- Gathering essential tools like a screwdriver and pliers is crucial for a successful removal process. Understanding plunger pin placement and using caution ensures a smooth and efficient task completion.
Read more: How To Store Window Screens
Tools and Materials Needed
Before embarking on the task of removing window screen plunger pins, it's essential to gather the necessary tools and materials to ensure a smooth and efficient process. Here's a comprehensive list of what you'll need:
Tools:
-
Flathead Screwdriver: A flathead screwdriver is a versatile tool that will aid in prying and removing the plunger pins from the window frame. Ensure that the screwdriver's tip is narrow enough to fit into the slot of the plunger pin without causing damage to the surrounding area.
-
Needle-Nose Pliers: These pliers are invaluable for gripping and extracting small components such as plunger pins. Their slim, elongated jaws provide precision and control, making them ideal for delicate tasks.
-
Safety Gloves: It's important to protect your hands during the removal process. Opt for a pair of durable, well-fitting safety gloves to shield your hands from any sharp edges or potential injuries.
-
Safety Glasses: When working with window screens and plunger pins, there's a risk of small debris or particles becoming dislodged. Wearing safety glasses will safeguard your eyes from any unexpected hazards.
-
Flashlight: A flashlight will come in handy for illuminating the area around the window frame, especially if the lighting conditions are less than optimal. This will help you to clearly see the plunger pins and ensure precision during removal.
Materials:
-
Replacement Plunger Pins (Optional): If you anticipate that the existing plunger pins may be damaged or worn, it's advisable to have replacement plunger pins on hand. This will allow you to seamlessly reinstall the window screen without any delays.
-
Container for Plunger Pins: Having a small container or a resealable plastic bag nearby is useful for safely storing the plunger pins once they have been removed. This will prevent them from getting misplaced and ensure that they are readily available for reinstallation.
-
Cleaning Cloth: A soft, lint-free cleaning cloth can be used to wipe down the window frame and screen, ensuring that any accumulated dust or debris is removed before reinstalling the screen.
By assembling these essential tools and materials, you'll be well-prepared to tackle the task of removing window screen plunger pins with confidence and efficiency. With the right equipment at your disposal, you can proceed to the next steps of the process, knowing that you have everything you need to complete the task effectively.
Step 1: Remove the Window Screen
Removing the window screen is the initial step in gaining access to the plunger pins for removal. Before proceeding, ensure that you have gathered the necessary tools and materials as outlined in the previous section. Once you're equipped and ready to begin, follow these detailed steps to safely and effectively remove the window screen:
-
Locate the Retention Clips or Springs: Examine the bottom or sides of the window screen frame to identify any retention clips or springs that may be securing the screen in place. These clips or springs are designed to hold the screen firmly within the frame, and their removal is essential for releasing the screen.
-
Release the Retention Clips or Springs: Using a flathead screwdriver, carefully pry the retention clips or springs away from the frame. Apply gentle pressure to disengage them, ensuring that you avoid using excessive force to prevent any damage to the screen or frame.
-
Lift the Screen Out of the Frame: Once the retention clips or springs have been released, gently lift the window screen out of the frame. Be mindful of any protruding edges or sharp corners to prevent accidental injuries during this process.
-
Set the Screen Aside: Place the removed window screen in a safe and secure location, ensuring that it is positioned flat to avoid any bending or warping. This will also prevent any potential damage to the screen while you proceed with the next steps.
By following these steps, you can successfully remove the window screen, allowing you to access the plunger pins with ease. With the screen safely removed, you can proceed to the next phase of the process, which involves locating and removing the plunger pins from the window frame. This seamless transition sets the stage for the subsequent steps, ensuring a well-organized and efficient approach to the overall task.
Read more: How To Remove A Car Dent With A Plunger
Step 2: Locate the Plunger Pins
With the window screen successfully removed, the next crucial step is to locate the plunger pins within the window frame. These small yet pivotal components are responsible for securing the screen in place, and identifying their precise positions is essential for their subsequent removal. Here's a detailed guide on how to effectively locate the plunger pins:
-
Examine the Window Frame: Take a close look at the interior of the window frame where the screen was previously positioned. The plunger pins are typically situated along the sides or top of the frame, and they may be partially concealed within small recesses or slots. Use a flashlight to illuminate the area and ensure clear visibility.
-
Identify the Plunger Pin Slots: Plunger pins are designed to fit into specific slots or receptacles within the window frame. These slots are strategically positioned to align with corresponding holes or notches on the window screen, creating a secure attachment. Carefully inspect the frame to pinpoint the locations of these slots, noting their arrangement and any distinguishing features that may aid in their identification.
-
Observe the Retention Mechanism: In some cases, the plunger pins may be accompanied by a retention mechanism, such as a spring-loaded latch or a small lever. These components work in tandem with the plunger pins to ensure a firm and stable hold on the window screen. As you locate the plunger pins, pay attention to any associated retention mechanisms and familiarize yourself with their operation.
-
Take Note of the Number of Plunger Pins: Depending on the size and design of the window screen, there may be multiple plunger pins distributed across the frame. Count the number of plunger pins and assess their distribution to gain a comprehensive understanding of how they secure the screen in place. This information will be valuable when it comes time to reinstall the screen.
By diligently following these steps, you can effectively locate the plunger pins within the window frame, setting the stage for their subsequent removal. Understanding the precise positioning of the plunger pins and their associated features is instrumental in ensuring a smooth and efficient removal process. With the plunger pins identified, you can confidently proceed to the next phase of the task, which involves removing these essential components to facilitate the screen's release from the frame.
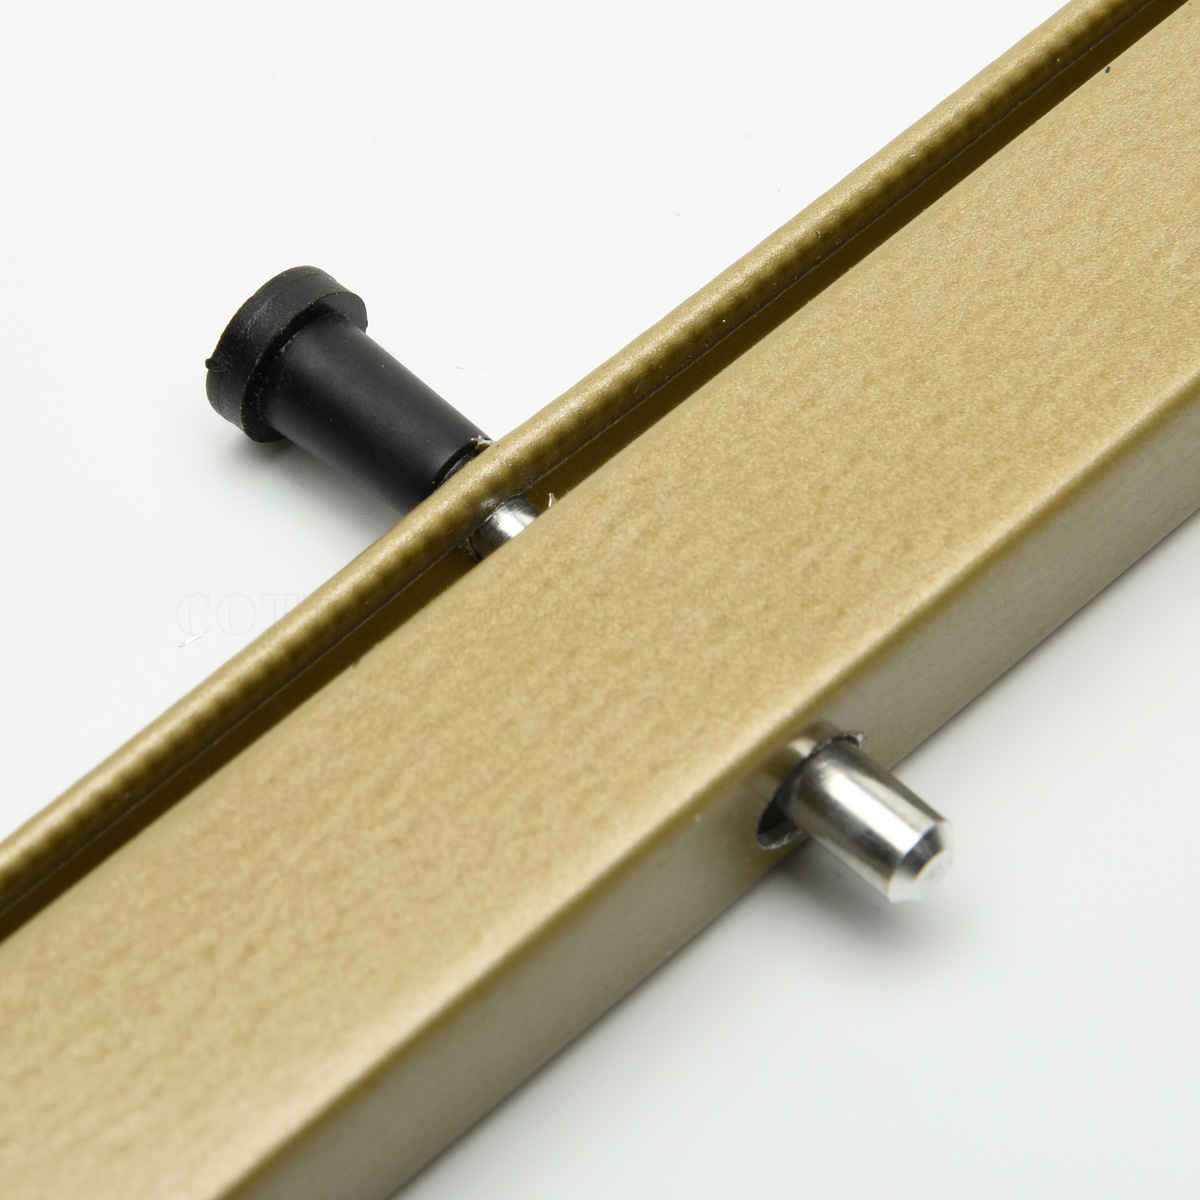
Step 3: Remove the Plunger Pins
With the plunger pins successfully located within the window frame, the next critical phase involves their careful removal to facilitate the release of the window screen. This step demands precision and attention to detail to ensure that the plunger pins are extracted without causing any damage to the frame or surrounding components. Follow these detailed steps to effectively remove the plunger pins:
-
Assess the Plunger Pin Design: Before proceeding with the removal process, take a moment to closely examine the design and configuration of the plunger pins. Some plunger pins may feature a small tab or protrusion that can be easily gripped, while others may have a smooth, cylindrical shape. Understanding the specific attributes of the plunger pins will inform the most suitable approach for their extraction.
-
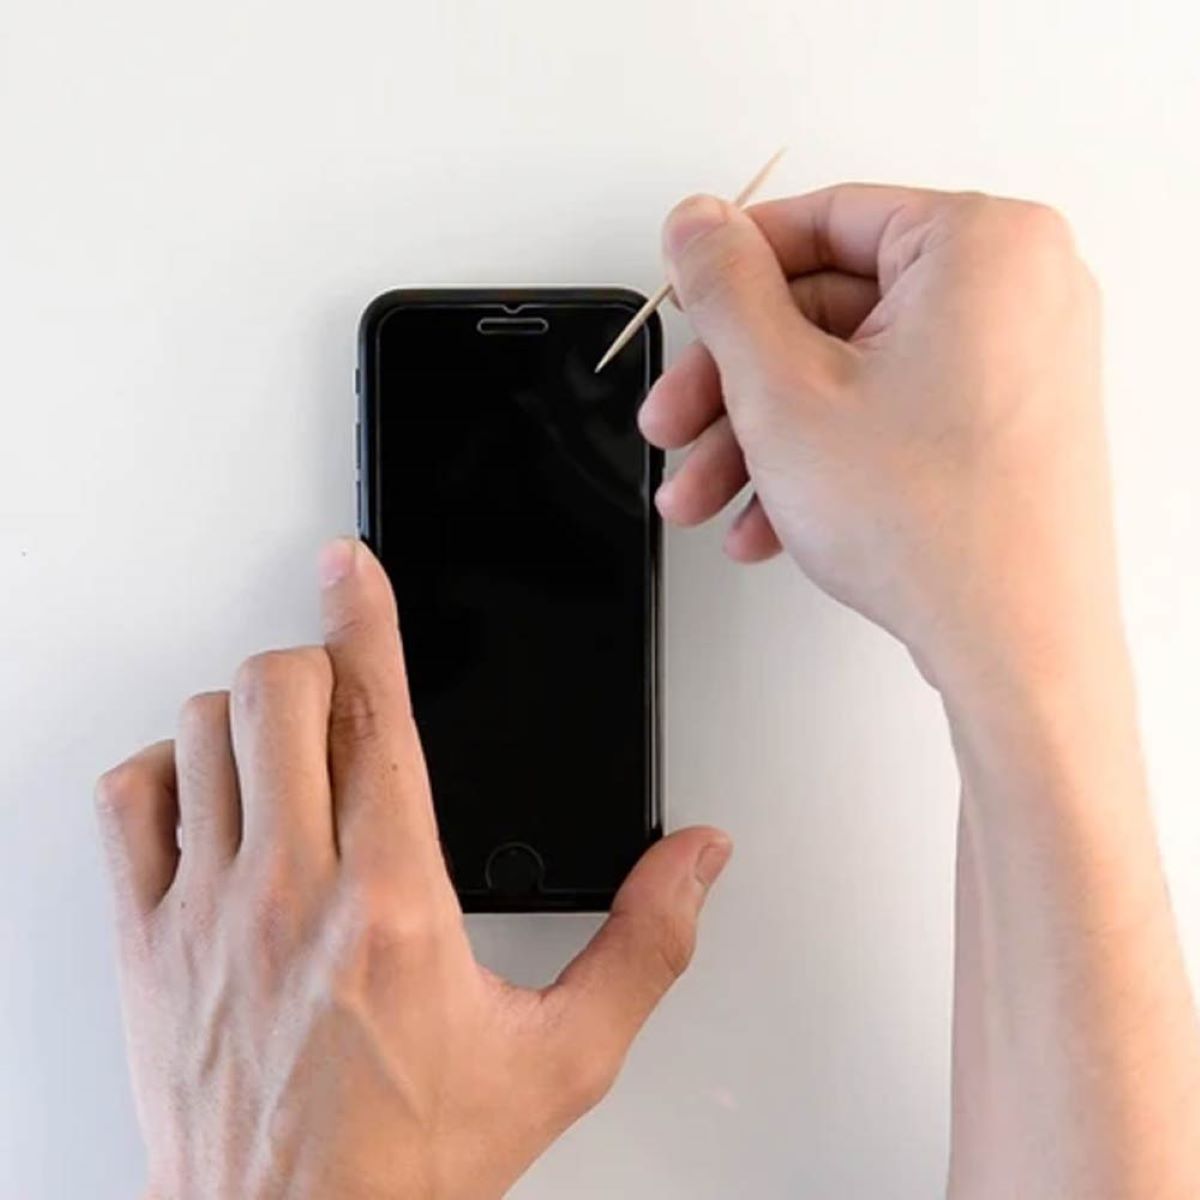
Utilize the Flathead Screwdriver: With the plunger pins clearly visible and accessible, select a flathead screwdriver with a narrow tip that can fit into the slot or recess containing the plunger pin. Position the screwdriver at the base of the plunger pin and apply gentle pressure to pry it out of the slot. Exercise caution to avoid excessive force, as this may cause damage to the frame or surrounding areas.
-
Use Needle-Nose Pliers if Necessary: In cases where the plunger pins are tightly secured or difficult to remove with a screwdriver alone, needle-nose pliers can be employed to provide additional leverage. Grip the plunger pin firmly with the pliers and apply steady, even pressure to gradually extract it from the slot. Take care to maintain a firm grip on the plunger pin to prevent it from slipping or becoming misaligned during the removal process.
-
Store the Plunger Pins Securely: As each plunger pin is removed, place it in a designated container or resealable plastic bag to prevent misplacement. Keeping the plunger pins organized and secure ensures that they will be readily available for reinstallation once the window screen maintenance or replacement is complete.
-
Inspect the Plunger Pin Slots: After removing the plunger pins, take a moment to inspect the slots or receptacles from which they were extracted. Ensure that the slots are free from any debris or obstructions that may hinder the smooth reinstallation of the plunger pins when the time comes to replace the window screen.
By meticulously following these steps, you can effectively remove the plunger pins from the window frame, paving the way for the seamless release of the window screen. With the plunger pins safely extracted and stored, you are now prepared to proceed to the final phase of the process, which involves reinstalling the window screen and ensuring its secure placement within the frame.
To remove window screen plunger pins, use a flathead screwdriver to gently pry the pin out of the frame. Be careful not to bend or damage the pin or the frame.
Step 4: Reinstall the Window Screen
With the plunger pins successfully removed and safely stored, the final phase of the process involves the careful reinstallation of the window screen. This step is crucial for ensuring that the screen is securely positioned within the frame, providing functionality and aesthetic appeal. Follow these detailed steps to effectively reinstall the window screen:
-
Position the Screen in the Frame: Carefully lift the window screen and align it with the frame, ensuring that the edges are positioned flush against the inner grooves. Take note of any retention clips or springs that need to be engaged to secure the screen in place.
-
Align the Plunger Pin Slots: As you position the screen, align the corresponding holes or notches on the screen with the plunger pin slots within the frame. Ensure that the alignment is precise, allowing the plunger pins to be smoothly inserted into their designated slots.
-
Insert the Plunger Pins: With the screen correctly positioned and the plunger pin slots aligned, gently insert each plunger pin into its respective slot. Apply even pressure to ensure that the plunger pins are securely seated within the slots, providing a stable attachment for the window screen.
-
Engage Retention Mechanisms: If the window frame features retention mechanisms such as spring-loaded latches or levers, engage these components to further secure the screen in place. Verify that the retention mechanisms are functioning as intended, providing additional stability to the installed screen.
-
Test the Screen Stability: Once the plunger pins and retention mechanisms are in place, carefully test the stability of the installed window screen. Gently press on various sections of the screen to ensure that it is firmly held within the frame, with no wobbling or movement.
-
Clean and Inspect: After reinstalling the screen, use a soft cleaning cloth to wipe down the frame and screen, removing any accumulated dust or debris. Inspect the installed screen to confirm that it is securely positioned and free from any visible defects or misalignments.
By meticulously following these steps, you can effectively reinstall the window screen, ensuring that it is securely and accurately positioned within the frame. With the screen successfully reinstalled, you have completed the comprehensive process of removing and reinstalling window screen plunger pins, empowering you to maintain and enhance the functionality of your home's windows with confidence and proficiency.
Conclusion
In conclusion, mastering the art of removing window screen plunger pins is a valuable skill that empowers homeowners and DIY enthusiasts to maintain and enhance the functionality of their windows with confidence and proficiency. By following the step-by-step process outlined in this guide, you have gained a comprehensive understanding of how to navigate this essential aspect of home maintenance, ensuring that your window screens can be removed and reinstalled with ease.
Throughout this guide, we have emphasized the importance of gathering the necessary tools and materials, including a flathead screwdriver, needle-nose pliers, safety gloves, safety glasses, and a flashlight. These essential items equip you to approach the task with confidence, knowing that you have the right tools at your disposal to tackle the removal of window screen plunger pins effectively.
The detailed steps provided in this guide have guided you through the process of removing the window screen, locating the plunger pins within the frame, extracting the plunger pins with precision, and reinstalling the window screen securely. Each step has been carefully crafted to ensure a seamless and efficient approach, allowing you to navigate the task with clarity and confidence.
By understanding the intricacies of plunger pins and their role in securing window screens, you have gained valuable insights into the maintenance and care of your home's windows. Whether you are replacing a damaged screen, performing routine cleaning, or undertaking maintenance tasks, the knowledge and skills acquired from this guide will serve you well in your home improvement endeavors.
As you reflect on the process outlined in this guide, you can take pride in your newfound ability to handle window screen maintenance with ease. The confidence and proficiency you have gained in removing and reinstalling window screen plunger pins empower you to take control of your home maintenance projects, ensuring that your windows remain functional, aesthetically pleasing, and well-maintained for years to come.
With this comprehensive guide at your disposal, you are well-equipped to tackle the task of removing window screen plunger pins with confidence and precision, enhancing the overall functionality and appearance of your home's windows. Embrace the knowledge and skills you have acquired, and approach future home maintenance tasks with the same level of confidence and proficiency.
Frequently Asked Questions about How To Remove Window Screen Plunger Pins
Was this page helpful?
At Storables.com, we guarantee accurate and reliable information. Our content, validated by Expert Board Contributors, is crafted following stringent Editorial Policies. We're committed to providing you with well-researched, expert-backed insights for all your informational needs.


0 thoughts on “How To Remove Window Screen Plunger Pins”