Home>Furniture & Design>Kitchen Furniture>How To Install A Lazy Susan Cabinet

Kitchen Furniture
How To Install A Lazy Susan Cabinet
Modified: February 18, 2024
Learn how to install a Lazy Susan cabinet in your kitchen with our step-by-step guide. Maximize space and improve functionality with this kitchen furniture and design solution.
(Many of the links in this article redirect to a specific reviewed product. Your purchase of these products through affiliate links helps to generate commission for Storables.com, at no extra cost. Learn more)
Introduction
So, you've decided to upgrade your kitchen with a Lazy Susan cabinet. Excellent choice! The Lazy Susan is a brilliant solution for making the most of corner cabinet space, providing easy access to items that tend to get lost in the back of the cabinet. Whether you're a seasoned DIY enthusiast or a newcomer to home improvement projects, installing a Lazy Susan cabinet is a manageable task that can significantly enhance the functionality and organization of your kitchen.
In this comprehensive guide, we'll walk through the process of installing a Lazy Susan cabinet, from the essential tools and materials you'll need to the step-by-step installation instructions. By the end of this article, you'll have the knowledge and confidence to tackle this project with ease. Let's roll up our sleeves and get ready to transform that inconvenient corner cabinet into a space-saving, easily accessible storage solution!
Key Takeaways:
- Upgrade your kitchen with a Lazy Susan cabinet for easy access to items in the corner cabinet. Follow the step-by-step guide to transform your space and enjoy the convenience of seamless rotations.
- Prepare and install the Lazy Susan with essential tools and materials. Test and adjust for optimal performance, bringing efficiency and organization to your kitchen routine.
Read more: How To Install Lazy Susan Cabinet
Tools and Materials
Before diving into the installation process, it’s essential to gather the necessary tools and materials. Here’s what you’ll need:
Tools:
- Power drill
- Measuring tape
- Pencil
- Screwdriver
- Level
- Clamps
- Adjustable wrench
- Hacksaw (if needed for cutting)
- Stud finder
Materials:
- Lazy Susan cabinet kit
- Screws
- Wood shims
- Wood glue
- Painter's tape
- Optional: Safety goggles and gloves
Ensure that you have all the tools and materials on hand before starting the installation. This will streamline the process and prevent interruptions as you work through the steps. With everything ready, you’ll be well-prepared to transform your corner cabinet into an efficient storage space.
Preparing the Cabinet
Before installing the Lazy Susan, it’s crucial to prepare the cabinet to ensure a seamless and stable installation. Follow these steps to get the cabinet ready:
Read more: How Big Is A Lazy Susan Cabinet
1. Clear Out the Cabinet:
Remove all items from the cabinet to create a clear workspace. This will also make it easier to maneuver during the installation process.
2. Measure and Mark:
Use a measuring tape to determine the center of the cabinet floor. Mark this spot with a pencil. This will serve as the reference point for positioning the Lazy Susan.
3. Check for Obstructions:
Inspect the interior of the cabinet for any obstructions, such as pipes or wiring, that may interfere with the installation. Clear away any obstacles to ensure a smooth process.
4. Level the Cabinet:
Use a level to ensure that the cabinet is perfectly level. If adjustments are needed, use wood shims to stabilize the cabinet and create a level surface for the Lazy Susan.
Read more: How To Organize A Lazy Susan Cabinet
5. Secure the Cabinet:
If the cabinet is not already anchored to the wall, use a stud finder to locate the wall studs and secure the cabinet in place with screws. This step is essential for stability, especially when the Lazy Susan is in use.
By meticulously preparing the cabinet, you’ll set the stage for a successful installation of the Lazy Susan. Taking the time to complete these initial steps will contribute to a sturdy and functional end result.
Installing the Lazy Susan
With the cabinet prepared, it’s time to install the Lazy Susan. Follow these steps to ensure a smooth and efficient installation:
1. Position the Base:
Place the base of the Lazy Susan assembly in the center of the cabinet, aligning it with the mark made on the cabinet floor during the preparation phase. Ensure that the base is centered and level.
2. Mark Hole Locations:
Using the pre-drilled holes in the base as a guide, mark the locations for drilling pilot holes in the cabinet floor. This will allow for secure attachment of the base to the cabinet.
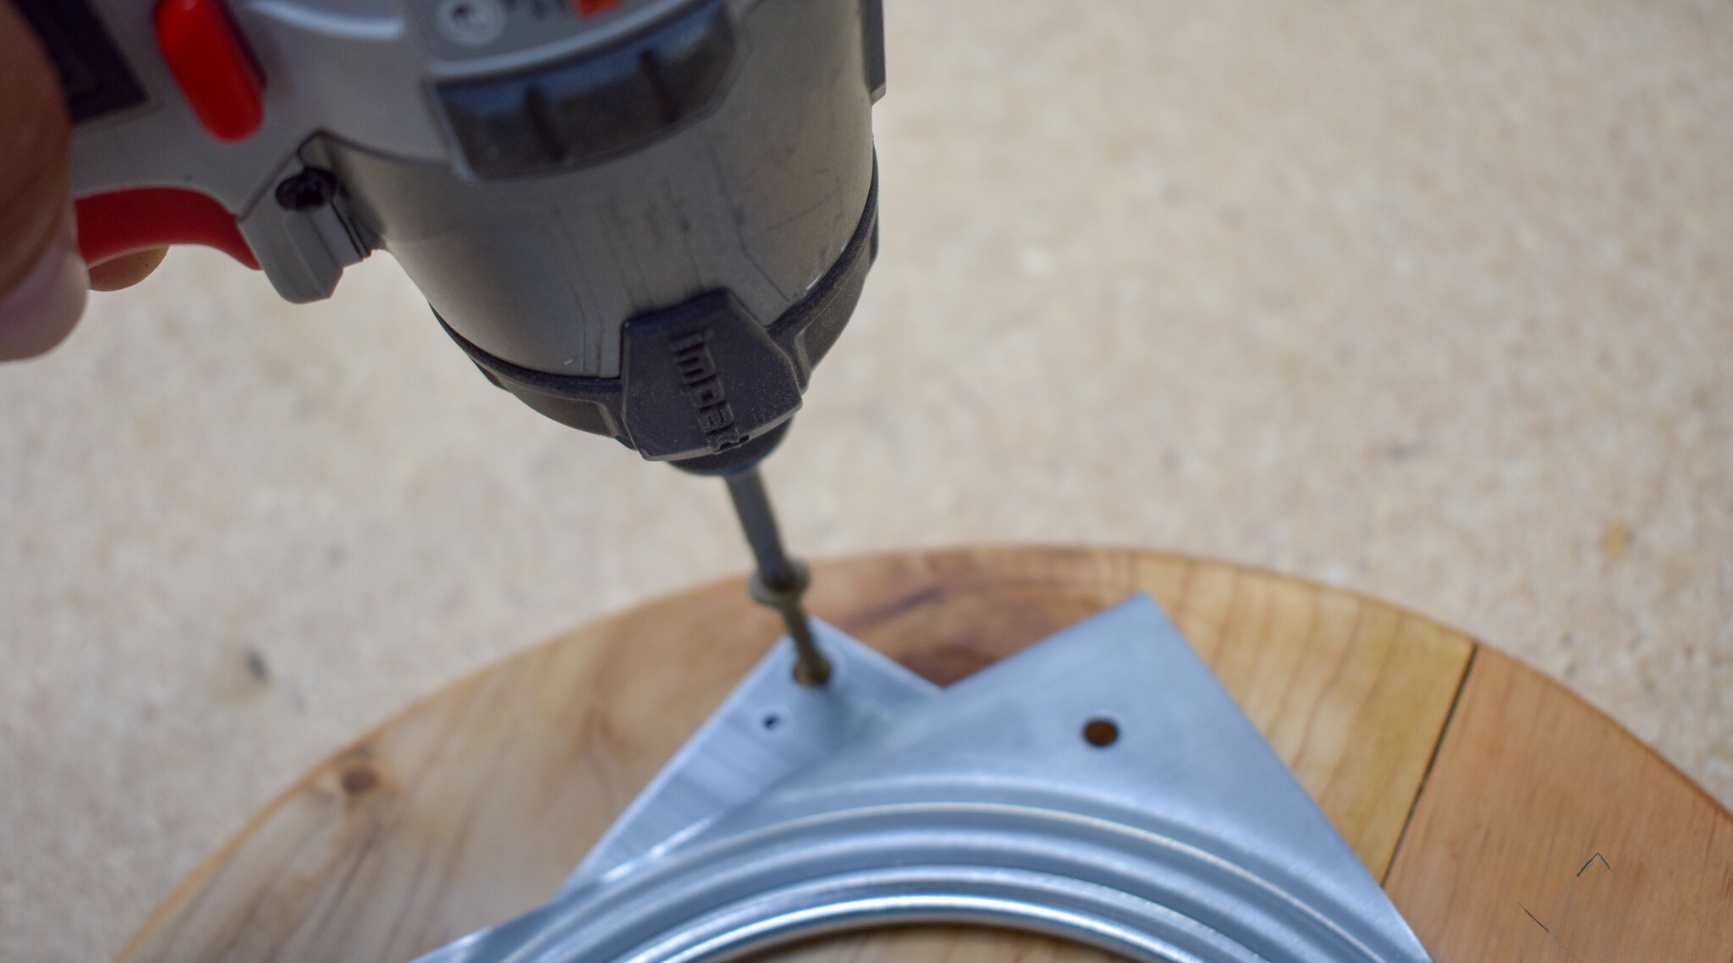
3. Drill Pilot Holes:
With a power drill, carefully drill pilot holes into the marked locations on the cabinet floor. Take care to use the appropriate drill bit size for the screws provided with the Lazy Susan kit.
4. Attach the Base:
Secure the base to the cabinet floor using the provided screws. Ensure that the base is firmly anchored and level to provide a stable foundation for the Lazy Susan assembly.
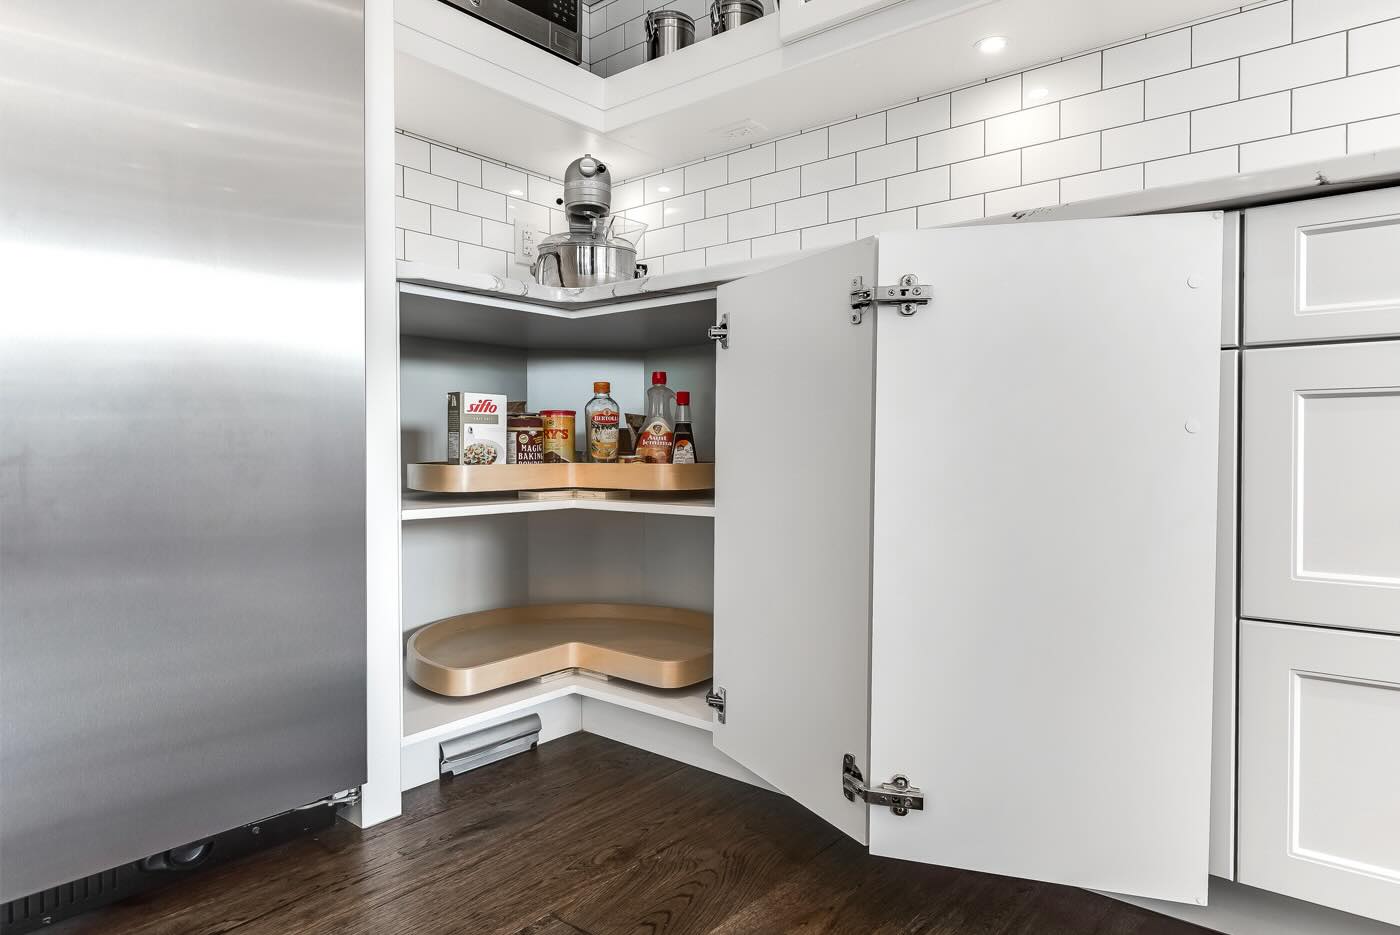
5. Install the Rotating Shelves:
Follow the manufacturer’s instructions to install the rotating shelves onto the base. Typically, this involves attaching the shelves to the base using the provided hardware, ensuring that they rotate smoothly.
6. Test the Rotation:
With the shelves installed, test the rotation of the Lazy Susan to ensure that it moves smoothly and without obstruction. Make any necessary adjustments to the shelves or base to optimize the rotation.
By following these steps, you’ll successfully install the Lazy Susan, transforming your corner cabinet into a convenient and accessible storage solution. With the Lazy Susan in place, you’ll no longer have to struggle to reach items tucked away in the depths of the cabinet.
Read more: How To Build A Lazy Susan Cabinet
Testing and Adjusting
After installing the Lazy Susan, it’s important to thoroughly test its functionality and make any necessary adjustments to ensure optimal performance. Here’s how to test and adjust the Lazy Susan:
1. Load the Shelves:
Place items on the rotating shelves to simulate real-world usage. Distribute the weight evenly to gauge how the Lazy Susan handles the load.
2. Test Rotation Under Load:
Rotate the shelves with the weighted items to ensure that the Lazy Susan operates smoothly and without strain. Pay attention to any resistance or wobbling, as these may indicate the need for adjustments.
3. Adjust Shelf Alignment:
If the rotating shelves are misaligned or rubbing against the cabinet walls, make adjustments as needed to ensure proper clearance and smooth rotation. This may involve repositioning the shelves or adjusting the base of the Lazy Susan.
Read more: How To Fix A Lazy Susan Cabinet
4. Tighten Hardware:
Check all hardware, including screws and fasteners, to ensure they are securely tightened. Loose hardware can contribute to instability and uneven rotation of the Lazy Susan.
5. Apply Lubrication:
If the rotation feels stiff, consider applying a small amount of lubricant to the rotating mechanism as recommended by the manufacturer. This can improve the smoothness of rotation.
6. Re-Test Rotation:
After making adjustments, re-test the rotation of the Lazy Susan to confirm that it operates seamlessly, even with a loaded shelf.
By conducting thorough testing and making necessary adjustments, you’ll optimize the performance of the Lazy Susan, ensuring that it functions reliably and efficiently in your kitchen. With a well-adjusted Lazy Susan, you’ll enjoy effortless access to items stored in the corner cabinet.
Conclusion
Congratulations! By following the steps outlined in this guide, you’ve successfully installed a Lazy Susan cabinet, adding functionality and convenience to your kitchen. The transformation of your corner cabinet into a space-saving storage solution is sure to make a noticeable difference in your daily kitchen activities.
With the installation complete, take a moment to appreciate the enhanced accessibility and organization that the Lazy Susan provides. No longer will you need to awkwardly reach into the depths of the corner cabinet to retrieve items—everything is now within easy reach, thanks to the smooth rotation of the Lazy Susan shelves.
As you admire your newly installed Lazy Susan, consider the impact it will have on your kitchen routine. Whether it’s retrieving pots and pans, accessing small appliances, or reaching for pantry items, the convenience of the Lazy Susan will streamline your daily tasks and bring a new level of efficiency to your kitchen.
Remember, proper maintenance and occasional checks on the hardware and rotation mechanism will ensure that your Lazy Susan continues to operate smoothly for years to come. By taking care of this valuable addition to your kitchen, you’ll enjoy its benefits for the long term.
Thank you for joining us on this installation journey. We hope this guide has empowered you to take on this DIY project with confidence and that the end result brings joy and practicality to your kitchen space. Here’s to many seamless rotations and effortless access in your newly upgraded corner cabinet!
Frequently Asked Questions about How To Install A Lazy Susan Cabinet
Was this page helpful?
At Storables.com, we guarantee accurate and reliable information. Our content, validated by Expert Board Contributors, is crafted following stringent Editorial Policies. We're committed to providing you with well-researched, expert-backed insights for all your informational needs.


0 thoughts on “How To Install A Lazy Susan Cabinet”