Home>Furniture & Design>Outdoor Furniture>How To Build Your Own Outdoor Putting Green
Outdoor Furniture
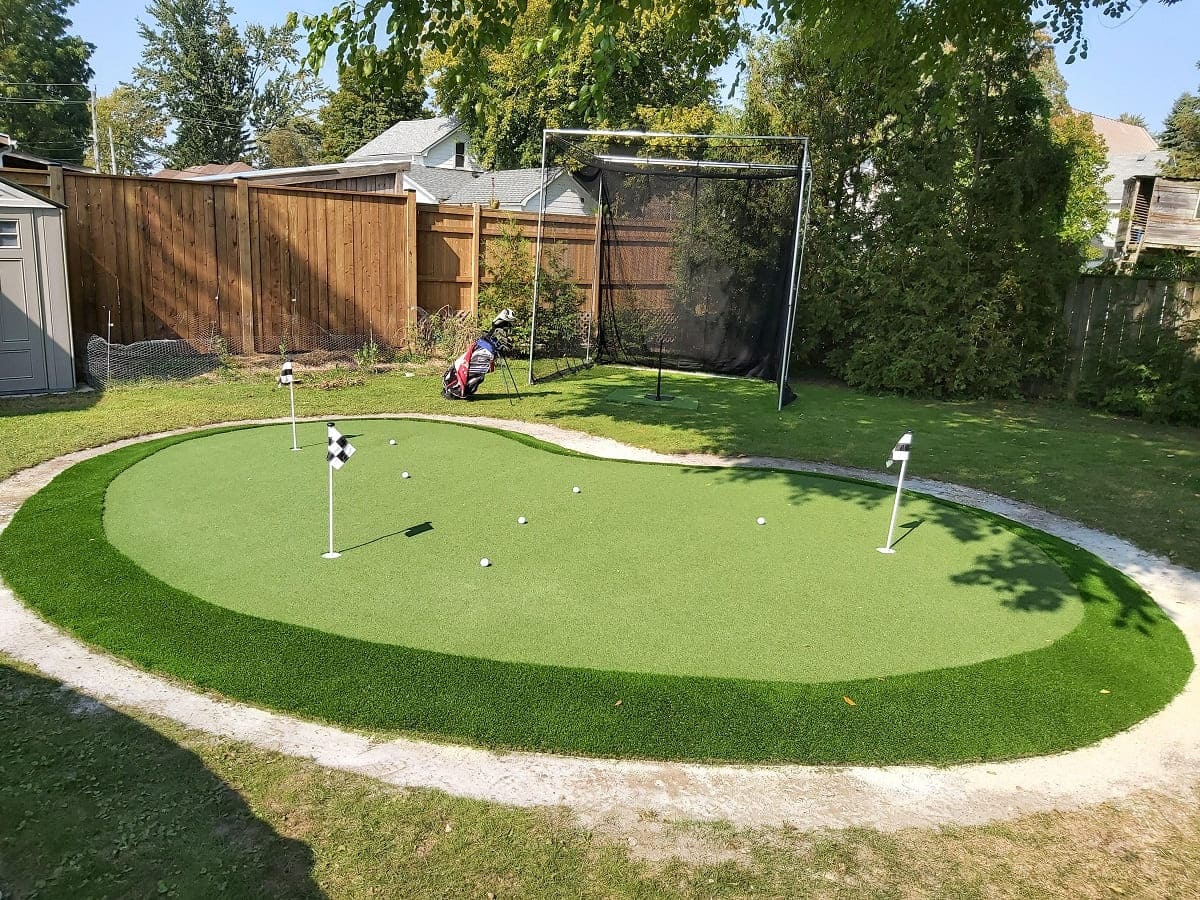
How To Build Your Own Outdoor Putting Green
Modified: January 30, 2024
Learn how to create your own outdoor putting green with our expert tips and design ideas. Transform your outdoor space with our outdoor furniture and design inspiration. Start practicing your golf game at home today!
(Many of the links in this article redirect to a specific reviewed product. Your purchase of these products through affiliate links helps to generate commission for Storables.com, at no extra cost. Learn more)
Introduction
Are you a golf enthusiast looking to elevate your game without leaving the comfort of your home? Imagine having a serene outdoor putting green where you can practice your putts and enjoy the fresh air. Building your own outdoor putting green is an exciting project that can enhance your property and provide endless hours of leisure and practice.
In this comprehensive guide, we will walk you through the step-by-step process of creating your very own outdoor putting green. Whether you are a seasoned DIY enthusiast or a novice looking to embark on your first outdoor project, this guide will equip you with the knowledge and confidence to bring your vision to life.
From selecting the ideal location to gathering materials and tools, preparing the ground, and adding the finishing touches, each step is crucial in achieving a professional-grade putting green that will be the envy of your fellow golfers. Let's dive into the details and transform your outdoor space into a golfer's paradise.
Key Takeaways:
- Creating your own outdoor putting green involves selecting the perfect location, gathering materials, preparing the ground, and adding the putting surface. It’s a fun and rewarding project that enhances your property and provides endless hours of leisure and practice.
- Maintaining your outdoor putting green involves regular care and attention to details like landscaping, seating, and drainage. It’s a space that not only enhances your golfing skills but also adds value and enjoyment to your property, creating a delightful retreat for relaxation and recreation.
Read more: How To Build Outdoor Putting Green
Step 1: Selecting the Location
The first step in building your outdoor putting green is selecting the perfect location. Consider the available space in your yard and choose an area that is relatively flat and free from obstructions such as trees, large rocks, or uneven terrain. Ideally, the location should receive ample sunlight throughout the day to promote healthy grass growth.
Take into account the natural slope of the land, as a slight incline can add an interesting challenge to your putting green. However, if the slope is too steep, it may require extensive leveling to create a suitable surface for your green.
Additionally, evaluate the drainage in the chosen area. Proper drainage is essential to prevent water from pooling on the putting green, which can lead to soggy turf and an uneven playing surface. If necessary, consider incorporating drainage solutions such as perforated pipes or strategic grading to ensure water is effectively diverted away from the green.
Furthermore, assess the accessibility of the location. Ensure that it is easily reachable from your home and other key areas of your property, making it convenient for you and your guests to enjoy the putting green without trampling through delicate landscaping.
By carefully selecting the location for your outdoor putting green, you can lay the foundation for a successful and enjoyable project. The right location will contribute to the aesthetic appeal and functionality of your green, providing a picturesque setting for honing your putting skills.
Step 2: Gathering Materials and Tools
Before diving into the construction of your outdoor putting green, it’s essential to gather all the necessary materials and tools. The following items are typically required for the project:
- Artificial turf or putting green grass seed
- Edging materials, such as plastic or metal landscape edging
- Base materials, including crushed stone and sand
- Landscaping fabric to prevent weed growth
- Drainage materials, such as perforated pipes and gravel
- Putting cups and flags
- Adhesive for securing the turf
- Tools: shovel, rake, wheelbarrow, compacting equipment, utility knife, and measuring tape
When selecting artificial turf, opt for high-quality putting green turf designed specifically for golfing purposes. If you prefer natural grass, choose a putting green grass seed blend suitable for your climate and soil conditions.
Edging materials are essential for defining the boundaries of the putting green and preventing the turf from shifting over time. Choose durable and weather-resistant edging that complements the overall aesthetic of your landscape.
The base materials, such as crushed stone and sand, provide a stable foundation for the putting green. Ensure that these materials are properly compacted to create a level and firm surface for the turf installation.
Landscaping fabric serves as a barrier against weed growth, helping to maintain the pristine appearance of the putting green. Additionally, proper drainage materials and techniques are crucial for preventing water accumulation and maintaining the longevity of the green.
Lastly, investing in high-quality putting cups and flags will add a professional touch to your green, enhancing the overall playing experience.
Equipped with the right materials and tools, you are ready to move on to the next steps of preparing the ground and bringing your outdoor putting green to life.
Step 3: Preparing the Ground
With the materials and tools at hand, it’s time to prepare the ground for the installation of your outdoor putting green. This crucial step lays the foundation for a smooth and durable surface that will support the turf and provide an optimal playing experience.
Begin by clearing the selected area of any existing vegetation, rocks, and debris. Use a shovel and a rake to level the ground, removing any bumps or depressions that could impact the quality of the putting surface. It’s essential to achieve a uniform and level base to ensure the even distribution of the base materials and turf.
Next, install the edging materials to define the boundaries of the putting green. This step helps contain the base materials and turf, preventing them from shifting over time. Secure the edging firmly in place, ensuring that it follows the desired shape and contours of the putting green.
Once the edging is in place, lay down landscaping fabric over the entire area. This fabric acts as a weed barrier, inhibiting the growth of unwanted vegetation that could compromise the appearance and integrity of the putting green.
After the fabric is secured, it’s time to add the base materials. Begin by spreading a layer of crushed stone over the fabric, using a rake to distribute it evenly. Once the crushed stone is in place, use compacting equipment to firmly pack it down, creating a solid and stable base for the putting green.
Following the compacted crushed stone, add a layer of sand over the surface. Again, use the rake to ensure an even distribution of the sand, and compact it thoroughly to achieve a level and smooth foundation for the turf installation.
By meticulously preparing the ground in this manner, you are setting the stage for the successful installation of the putting green turf or grass, ensuring that it will be supported by a solid and well-structured base.
With the ground prepared, you are now ready to move on to the exciting phase of installing the base layer for your outdoor putting green.
Choose the right type of grass for your putting green, such as Bermuda or Bentgrass, as they are ideal for putting surfaces due to their fine texture and ability to tolerate low mowing heights.
Step 4: Installing the Base Layer
As you progress with the construction of your outdoor putting green, the installation of the base layer is a critical phase that significantly influences the performance and longevity of the green. This step involves carefully laying down the base materials to create a stable and resilient foundation for the putting surface.
Begin by thoroughly wetting the sand layer that was compacted during the ground preparation phase. This moisture helps to settle the sand and prepares it for the next steps of the installation process.
Next, carefully roll out the putting green turf or spread the putting green grass seed, following the manufacturer’s instructions for proper alignment and orientation. If you are using artificial turf, ensure that the pieces are accurately positioned to minimize seams and achieve a seamless appearance. If you opt for natural grass seed, evenly distribute the seed over the prepared surface and gently rake it into the soil.
Once the turf or seed is in place, use a stiff broom or brush to work the material into the sand, ensuring that it makes good contact and settles securely. For artificial turf, this step helps the blades stand upright and provides a natural look and feel. For natural grass seed, it facilitates proper seed-to-soil contact, promoting germination and healthy growth.
After the turf or seed is integrated with the sand, carefully compact the entire surface using a roller or compacting equipment. This step is crucial for establishing a firm and level base, ensuring that the putting surface is uniform and free of any irregularities that could affect ball roll and playability.
Once the base layer is installed and compacted, take the time to inspect the entire surface, addressing any visible seams, wrinkles, or uneven areas. Making any necessary adjustments at this stage will contribute to the overall quality and aesthetics of your outdoor putting green.
With the base layer successfully installed, you are now ready to proceed with the next steps of adding the putting surface and bringing your outdoor putting green one step closer to completion.
Read more: How To Build Your Own Outdoor Kitchen
Step 5: Adding the Putting Surface
Adding the putting surface is a pivotal stage in the construction of your outdoor putting green, as it brings the project one step closer to its completion. Whether you have opted for artificial turf or natural grass seed, this step focuses on establishing the lush and resilient surface that will define the playability and visual appeal of your green.
If you have chosen artificial turf, carefully roll out the turf over the compacted base layer, ensuring a precise fit and minimal seams. Trim any excess turf as needed, and secure the edges using adhesive to prevent shifting or curling. As the turf settles, use a stiff broom to brush the fibers against the grain, promoting an upright and natural appearance that emulates the texture of a professional putting green.
For those who have selected natural grass seed, this step involves diligently watering and nurturing the seeded area to encourage germination and healthy growth. Follow the recommended watering schedule and provide the necessary nutrients to support the development of a dense and resilient putting surface.
Regardless of the chosen material, it’s essential to maintain the putting surface with regular grooming and maintenance. For artificial turf, use a specialized putting green brush or broom to keep the fibers upright and evenly distributed. Natural grass requires mowing, watering, and occasional aeration to ensure optimal playing conditions.
Once the putting surface is in place and properly maintained, consider adding the final touches that will elevate the aesthetics and functionality of your outdoor putting green. Install putting cups at strategic locations, and place flags to mark each cup, adding a professional and authentic touch to the green. These additions not only enhance the visual appeal but also provide targets for honing your putting skills.
By carefully adding the putting surface and attending to its ongoing maintenance, you are bringing your outdoor putting green to life, creating a space where you can enjoy countless hours of leisure and practice while refining your golfing prowess.
Step 6: Finishing Touches and Maintenance
As you near the completion of your outdoor putting green, the final step involves adding the finishing touches that will enhance the overall appeal and functionality of the space. Additionally, establishing a comprehensive maintenance routine is crucial for preserving the pristine condition of your putting green and ensuring its long-term enjoyment.
One of the essential finishing touches is the addition of landscaping elements around the putting green. Consider incorporating decorative features such as low-maintenance plants, ornamental rocks, or pathway lighting to complement the green and create a visually appealing backdrop for your practice sessions. These elements can contribute to the overall ambiance of the space while adding a touch of personalization to your outdoor putting green.
Furthermore, consider installing seating or shaded areas near the putting green to provide comfort and convenience for yourself and your guests. A cozy bench or a small pergola can create a welcoming atmosphere, encouraging relaxation and socialization amidst the tranquil setting of your putting green.
When it comes to maintenance, establishing a regular care routine is essential for preserving the quality and playability of your putting green. For artificial turf, routinely brush the fibers to maintain their upright position and remove debris. Natural grass requires mowing, watering, fertilizing, and periodic aeration to promote healthy growth and maintain an optimal putting surface.
Additionally, be diligent in inspecting the edging, drainage, and overall condition of the putting green. Address any signs of wear, shifting, or drainage issues promptly to prevent potential complications and preserve the integrity of the green.
Finally, embrace the opportunity to enjoy your outdoor putting green to the fullest. Invite friends and family to share in the experience, organize friendly putting competitions, and savor the satisfaction of honing your putting skills in the comfort of your own backyard. Your outdoor putting green is not only a functional space for practice but also a delightful retreat that adds value and enjoyment to your property.
By adding the finishing touches and committing to a comprehensive maintenance regimen, you are ensuring that your outdoor putting green remains a cherished and enduring feature of your outdoor living space, providing countless moments of leisure and recreation for years to come.
Conclusion
Embarking on the journey of building your own outdoor putting green has not only transformed your outdoor space but has also enriched your recreational pursuits and elevated your property’s allure. The meticulous process of selecting the location, gathering materials and tools, preparing the ground, installing the base layer, adding the putting surface, and attending to the finishing touches and maintenance has culminated in the creation of a captivating and functional oasis for golf enthusiasts.
As you stand on the immaculate surface of your outdoor putting green, envision the countless hours of enjoyment and improvement that await. Whether you are refining your putting technique, hosting friendly competitions, or simply basking in the tranquility of your private golf retreat, your outdoor putting green embodies the perfect fusion of leisure and luxury.
Moreover, the pride and satisfaction derived from constructing your own putting green are unparalleled. The dedication and attention to detail invested in every phase of the project have yielded a space that reflects your passion for golf and your commitment to enhancing your surroundings.
Beyond the boundaries of your putting green, the impact extends to your entire outdoor area, infusing it with a sense of elegance and functionality. The harmonious integration of landscaping elements, seating, and thoughtful details has transformed your yard into a haven for relaxation and recreation, beckoning you and your guests to indulge in the pleasures of outdoor living.
As you look forward to the days ahead, envision the memories waiting to be made on your outdoor putting green – the laughter shared, the skills honed, and the moments of pure enjoyment. Your putting green stands as a testament to your vision and dedication, and it will continue to inspire and delight for years to come.
So, take a moment to savor the accomplishment, to revel in the beauty of your outdoor putting green, and to anticipate the countless experiences that lie on the horizon. Your journey from conception to completion has yielded a remarkable space that embodies the joy of golf and the art of outdoor living – a space that is truly your own.
Frequently Asked Questions about How To Build Your Own Outdoor Putting Green
Was this page helpful?
At Storables.com, we guarantee accurate and reliable information. Our content, validated by Expert Board Contributors, is crafted following stringent Editorial Policies. We're committed to providing you with well-researched, expert-backed insights for all your informational needs.


0 thoughts on “How To Build Your Own Outdoor Putting Green”