Home>Furniture & Design>Outdoor Furniture>How To Install An Outdoor Sump Pump

Outdoor Furniture
How To Install An Outdoor Sump Pump
Published: January 12, 2024
Learn how to install an outdoor sump pump with our comprehensive guide. Protect your outdoor furniture with proper drainage solutions and design tips.
(Many of the links in this article redirect to a specific reviewed product. Your purchase of these products through affiliate links helps to generate commission for Storables.com, at no extra cost. Learn more)
Introduction
Welcome to the world of outdoor furniture, where the perfect blend of functionality and aesthetic appeal creates an inviting outdoor oasis. Whether you are a design enthusiast, a homeowner looking to revamp your outdoor space, or a professional in the furniture and design industry, this comprehensive guide will provide valuable insights into outdoor furniture, covering everything from materials and styles to maintenance and design tips.
Outdoor furniture serves as an extension of your indoor living space, allowing you to create a cozy, stylish, and functional environment for relaxation, entertainment, and al fresco dining. With a wide array of materials, designs, and features available, choosing the right outdoor furniture can be an exciting yet daunting task. This guide aims to simplify the process by offering expert advice and practical tips to help you make informed decisions and elevate your outdoor living experience.
From timeless classics like wicker and teak to modern marvels crafted from aluminum and synthetic materials, outdoor furniture comes in a diverse range of options to suit various preferences and settings. Understanding the unique characteristics of each material, such as durability, weather resistance, and maintenance requirements, is crucial in selecting furniture that will withstand the elements and retain its beauty for years to come.
In addition to exploring the technical aspects of outdoor furniture, we will delve into the realm of design, discussing ways to create cohesive outdoor living spaces that reflect your personal style and enhance the overall ambiance of your home. Whether you prefer a sleek and contemporary look, a rustic and natural feel, or a vibrant and eclectic atmosphere, we will explore design principles and styling techniques to help you achieve your desired outdoor aesthetic.
Furthermore, we will address the importance of proper maintenance and care to preserve the longevity and appeal of outdoor furniture. From cleaning and storage tips to seasonal maintenance guidelines, this guide will equip you with the knowledge and best practices necessary to protect your investment and keep your outdoor furniture looking pristine year after year.
Join us on this journey through the world of outdoor furniture, where we will uncover the secrets to selecting, styling, and maintaining outdoor furniture that elevates your outdoor living spaces and transforms them into inviting retreats for relaxation and entertainment. Let's embark on this adventure together and unlock the potential of your outdoor oasis.
Key Takeaways:
- Choosing the right location for your outdoor sump pump is crucial. Consider water accumulation, accessibility, and structural integrity to ensure optimal performance and easy maintenance.
- After installing your outdoor sump pump, conduct thorough testing to verify its functionality. Regular maintenance and testing will help keep your outdoor space safe from water-related issues.
Read more: How Much To Install Sump Pump In Basement
Step 1: Choose the Right Location
Before installing an outdoor sump pump, it’s essential to carefully select the optimal location for the sump pit. The location should be strategically chosen to ensure efficient water drainage and prevent water accumulation in the designated area. Here are key considerations to keep in mind when choosing the right location:
- Water Accumulation: Identify areas in your outdoor space where water tends to accumulate, especially during heavy rain or snowmelt. These are prime locations for installing a sump pump to effectively manage excess water and prevent potential water damage.
- Proximity to Problem Areas: Assess the proximity of the chosen location to problem areas such as low-lying spots, basements, or areas prone to flooding. Installing the sump pump close to these areas can help mitigate water-related issues and provide targeted drainage solutions.
- Accessibility: Consider the accessibility of the location for maintenance and servicing. Ensure that the chosen spot allows for easy access to the sump pump and pit, facilitating regular inspections, cleaning, and repairs as needed.
- Electrical Accessibility: Verify the availability of a nearby electrical outlet to power the sump pump. Adequate electrical supply is crucial for the seamless operation of the pump, so choosing a location with convenient access to power is essential.
- Structural Integrity: Evaluate the structural integrity of the chosen location to support the installation of the sump pit and pump. The ground should be stable and capable of accommodating the pit without risk of shifting or settling over time.
By carefully considering these factors, you can pinpoint the most suitable location for installing the sump pit, ensuring that it effectively addresses water drainage needs while being easily accessible for maintenance and upkeep. Once the ideal location is determined, you can proceed with the next steps of the installation process, confident in the knowledge that your sump pump will be positioned for optimal performance and reliability.
Step 2: Dig the Sump Pit
Once you have identified the ideal location for installing the sump pit, the next crucial step is to dig the pit to accommodate the sump pump system. Proper excavation and preparation of the sump pit are essential for the efficient operation of the sump pump and the successful management of excess water. Here’s a detailed guide on how to dig the sump pit:
- Marking the Pit Area: Begin by marking the perimeter of the sump pit using spray paint or stakes. The pit’s dimensions should allow sufficient space for the pump, including clearance around the unit for maintenance and repairs.
- Excavation Process: Using a shovel, excavator, or other appropriate digging tools, carefully remove the soil within the marked area to create the sump pit. The depth of the pit will depend on the water table level and the intended functionality of the sump pump.
- Debris Removal: As you dig, periodically remove excavated soil and debris from the pit to maintain a clear and workable area. Proper debris removal ensures a clean and well-prepared space for the subsequent installation steps.
- Smoothing the Base: After reaching the desired depth, smooth and level the base of the pit to provide a stable foundation for the sump pump. A flat and even base promotes proper pump placement and helps prevent shifting or instability during operation.
- Installing Perforated Liner (Optional): In areas with high water tables or excessive groundwater infiltration, consider installing a perforated liner at the base and sides of the sump pit. The liner facilitates water collection and directs it towards the sump pump for efficient removal.
By following these steps, you can effectively dig and prepare the sump pit, setting the stage for the seamless installation of the sump pump system. The careful excavation process ensures that the sump pit is optimally configured to facilitate effective water drainage and support the reliable performance of the sump pump in managing water accumulation in your outdoor space.
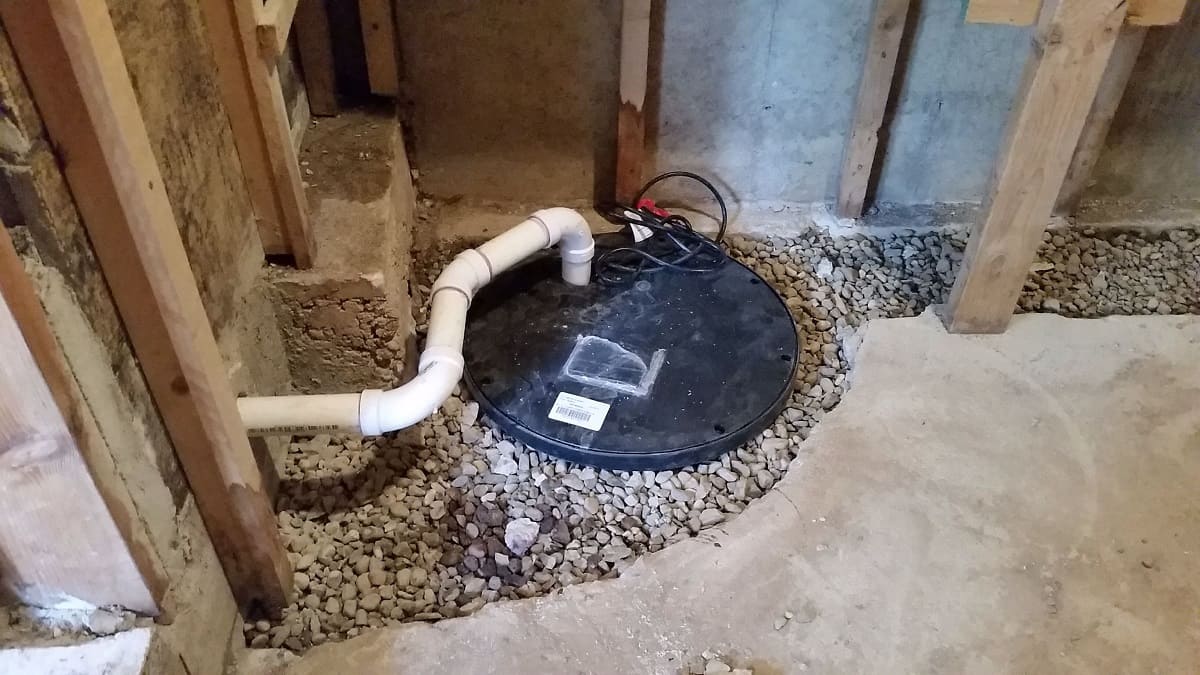
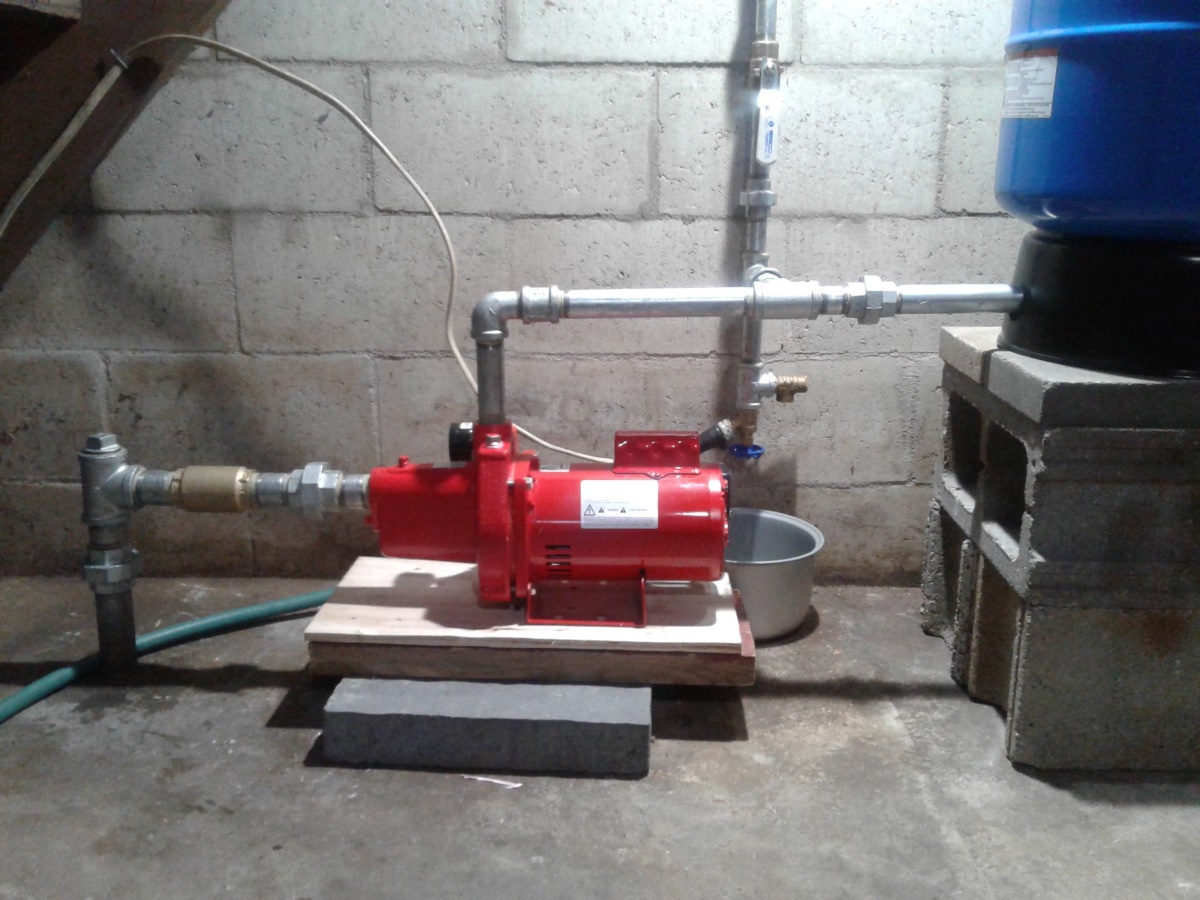
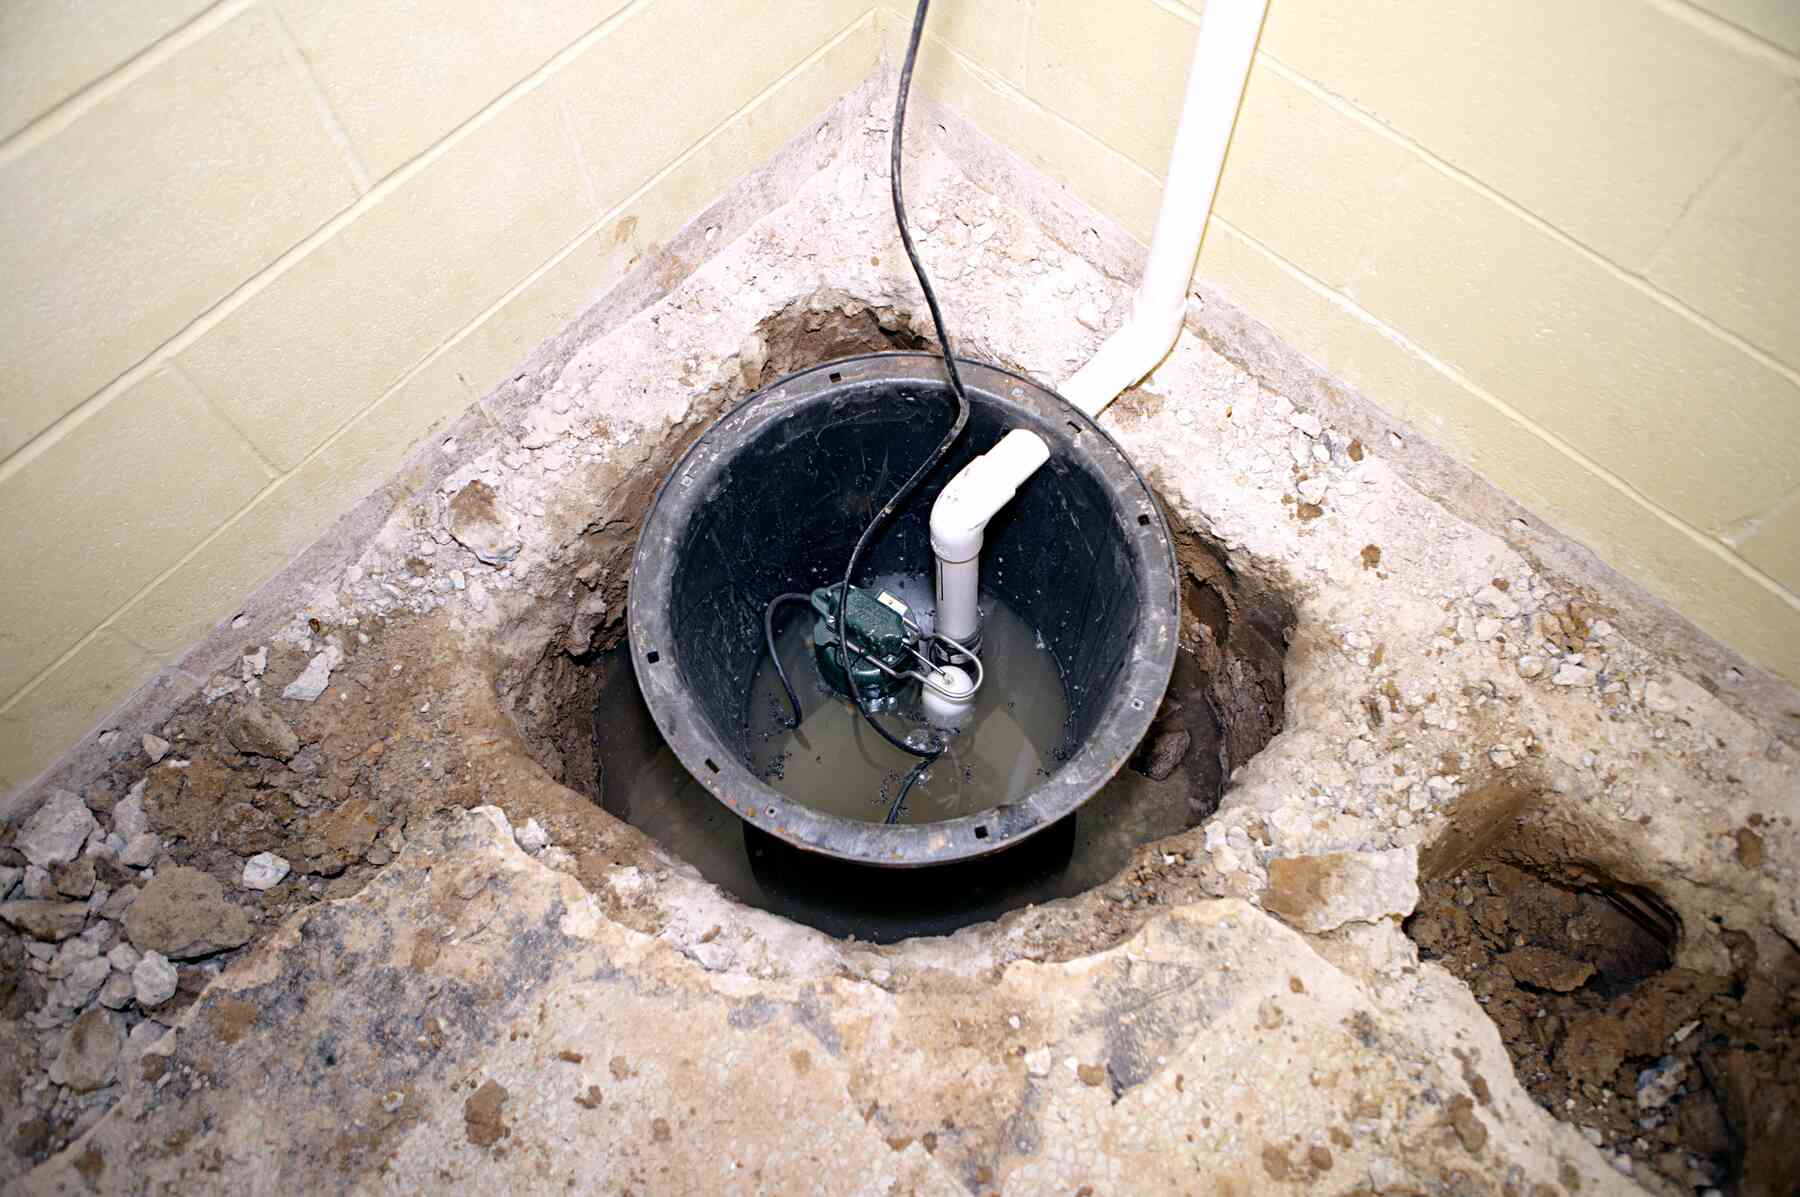
Step 3: Install the Sump Pump
With the sump pit prepared, the next critical phase of the installation process involves positioning and installing the sump pump within the designated pit. Proper installation is essential to ensure the pump’s functionality and its ability to effectively manage excess water in your outdoor environment. Here’s a comprehensive guide on how to install the sump pump:
- Positioning the Pump: Carefully lower the sump pump into the prepared pit, ensuring that it is centrally positioned and securely seated on the leveled base. The pump should be oriented to facilitate easy access to the power cord and the discharge pipe connection.
- Securing the Pump: Once the pump is in place, secure it to prevent displacement during operation. Some pumps feature mounting brackets or securing mechanisms to anchor the unit in position, providing stability and minimizing movement or vibration.
- Connecting the Power Cord: Extend the pump’s power cord towards the nearest electrical outlet, ensuring that it is safely routed to prevent tripping hazards or damage. Use appropriate extension cords or electrical conduits if needed to reach the power source while maintaining safety and compliance with electrical standards.
- Installing Check Valve: Connect a check valve to the discharge pipe of the sump pump to prevent backflow of water into the pit after the pump cycles off. The check valve helps maintain the integrity of the drainage system and prevents potential flooding or water backup issues.
- Testing the Pump: Prior to completing the installation, conduct a test of the sump pump to verify its operational readiness. Pour water into the sump pit to activate the pump and observe its performance, ensuring that it effectively removes the water and discharges it through the designated outlet.
By following these installation steps, you can effectively position and install the sump pump, setting the stage for reliable and efficient water management in your outdoor space. With the pump securely in place and operational, you can proceed to the next phase of the installation process, confident in the knowledge that your sump pump is poised to effectively address water accumulation and safeguard your outdoor environment from potential water-related issues.
Make sure to install the sump pump in a location where water naturally flows, and where the discharge pipe can easily carry water away from your home’s foundation.
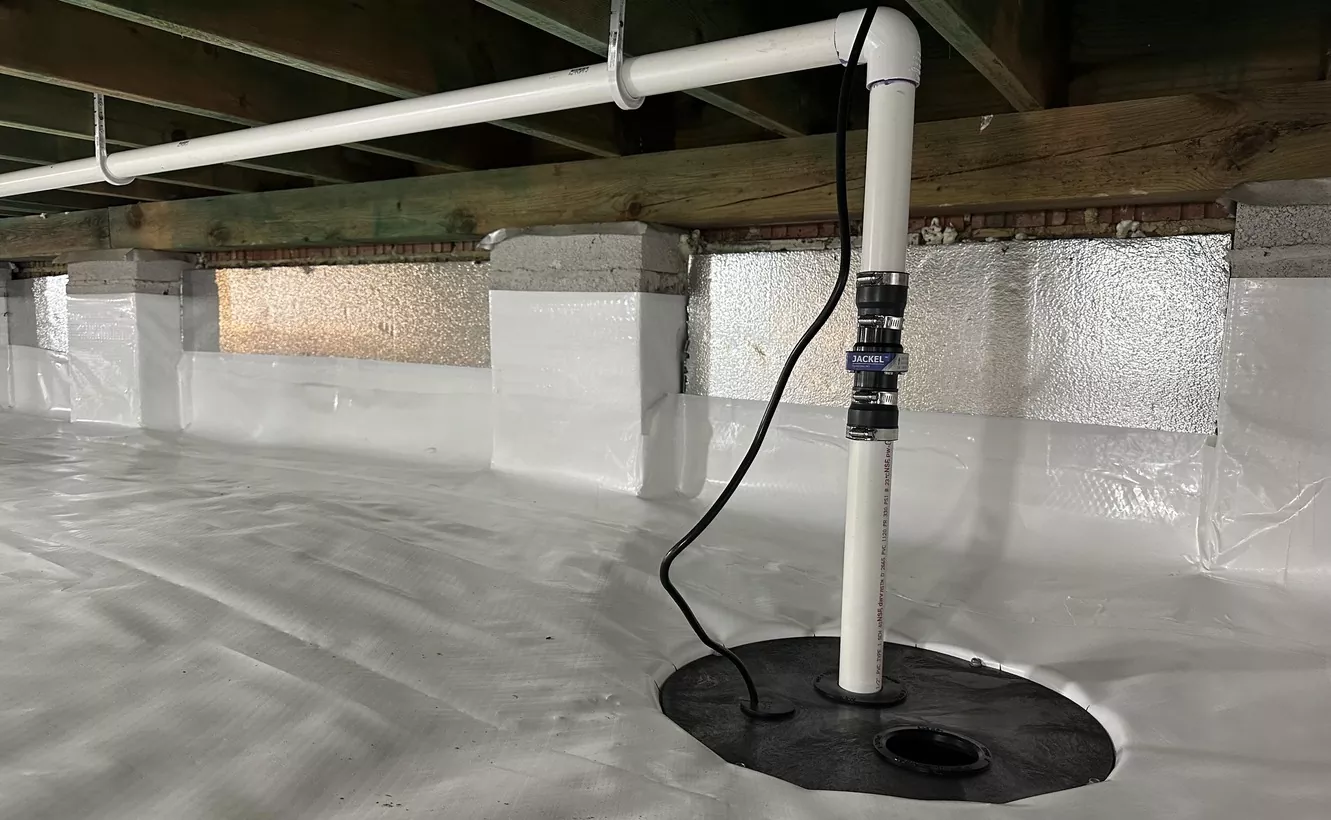
Step 4: Connect the Discharge Pipe
Connecting the discharge pipe is a crucial step in completing the installation of an outdoor sump pump system. The discharge pipe serves as the conduit for directing the pumped water away from the sump pit and the surrounding area, effectively preventing water accumulation and potential water damage. Here’s a detailed guide on how to connect the discharge pipe to the sump pump:
- Choosing the Pipe Material: Select a durable and corrosion-resistant pipe material suitable for outdoor use, such as PVC, ABS, or polyethylene. Ensure that the chosen pipe material can withstand exposure to varying weather conditions and effectively channel water away from the sump pit.
- Measuring and Cutting: Measure the required length for the discharge pipe, accounting for the distance from the sump pit to the desired discharge point. Use a pipe cutter or appropriate tools to cut the pipe to the precise length, ensuring a proper fit and seamless connectivity.
- Attaching the Pipe to the Pump Outlet: Connect one end of the discharge pipe to the outlet port of the sump pump, ensuring a secure and watertight connection. Use appropriate fittings, couplings, or clamps to fasten the pipe to the pump outlet, minimizing the risk of leaks or disconnections.
- Routing the Pipe: Route the discharge pipe towards the designated discharge point, ensuring that it slopes away from the sump pit to facilitate proper drainage. Secure the pipe along the designated path, using pipe hangers, straps, or brackets to prevent sagging or misalignment.
- Establishing the Discharge Point: Direct the discharge pipe towards an appropriate discharge point, such as a storm drain, a designated drainage area, or a location that ensures the expelled water does not flow back towards the property or cause potential water-related issues.
- Securing the Discharge Point: If necessary, install an elbow or extension at the discharge point to direct the water away from the property and minimize the risk of water pooling near the foundation or outdoor living spaces.
By following these steps, you can effectively connect the discharge pipe to the sump pump, establishing a reliable and efficient drainage system for managing excess water in your outdoor environment. The proper installation of the discharge pipe ensures that pumped water is effectively directed away from the property, mitigating the risk of water accumulation and potential water-related damage.
Read more: How To Hide Sump Pump In Basement
Step 5: Test the System
After completing the installation of the outdoor sump pump and connecting the discharge pipe, it is essential to conduct a thorough test of the system to ensure its functionality and readiness to manage water accumulation effectively. Testing the sump pump system allows you to verify its performance, identify any potential issues, and make necessary adjustments before relying on it to safeguard your outdoor environment. Here’s a comprehensive guide on how to test the sump pump system:
- Powering Up the Pump: Ensure that the sump pump is properly connected to the power source and that the electrical supply is stable and functional. Power up the pump and verify that it activates without any issues, indicating that it is receiving power and ready for operation.
- Simulating Water Influx: Pour a sufficient amount of water into the sump pit to trigger the activation of the pump. Observe the pump’s response as it begins to remove the water from the pit, effectively demonstrating its ability to manage water influx and prevent potential flooding or water accumulation.
- Monitoring the Discharge: As the pump operates, monitor the discharge pipe to ensure that the expelled water flows smoothly and consistently away from the property. Verify that the discharge point effectively channels the water to a designated drainage area, preventing water from pooling near the property.
- Checking for Proper Cycling: Observe the pump as it cycles on and off during the testing process. The pump should activate in response to rising water levels in the pit and deactivate once the water is effectively pumped out, demonstrating proper cycling and efficient water management.
- Inspecting for Leaks or Malfunctions: Thoroughly inspect the sump pump, the sump pit, and the discharge pipe for any signs of leaks, malfunctions, or irregularities during the testing process. Address any identified issues promptly to ensure the system’s reliability and effectiveness.
- Conducting Regular Test Runs: Establish a schedule for conducting regular test runs of the sump pump system to verify its ongoing functionality and address any emerging issues proactively. Regular testing helps maintain the system’s readiness and ensures its ability to manage water effectively.
By following these steps, you can effectively test the sump pump system, confirming its operational readiness and its ability to manage water accumulation in your outdoor space. Thorough testing and monitoring are essential for maintaining a reliable and efficient sump pump system that safeguards your property from potential water-related issues and provides peace of mind during adverse weather conditions.
Conclusion
Congratulations on completing the installation of your outdoor sump pump system! By following the comprehensive steps outlined in this guide, you have taken proactive measures to effectively manage water accumulation and protect your outdoor environment from potential water-related issues. As you reflect on the installation process and the functionality of your sump pump system, it’s important to consider the long-term benefits and the peace of mind it brings.
With a strategically positioned sump pump and a well-connected discharge system, you have established a reliable defense against water infiltration, ensuring that your outdoor space remains dry, safe, and resilient in the face of adverse weather conditions. The careful selection of the sump pit location, the precise excavation and installation of the sump pump, and the seamless connection of the discharge pipe have collectively contributed to a robust water management solution that enhances the integrity of your outdoor environment.
As you move forward, it’s essential to prioritize regular maintenance and testing of your sump pump system to uphold its performance and address any emerging concerns promptly. By conducting routine inspections, cleaning the sump pit, and testing the pump’s functionality, you can maintain the system’s readiness and proactively mitigate potential issues, ensuring that it remains a reliable safeguard for your property.
Furthermore, consider integrating additional protective measures, such as backup power sources, alarm systems, and periodic professional inspections, to fortify the resilience of your sump pump system and enhance its capacity to manage water effectively in various scenarios.
In closing, the successful installation and testing of your outdoor sump pump system exemplify your commitment to preserving the integrity and functionality of your outdoor space. By implementing these proactive measures, you have empowered your property to withstand water-related challenges and maintain its allure and functionality for years to come. Embrace the confidence and security that your sump pump system provides, knowing that your outdoor environment is well-equipped to weather any storm.
Thank you for embarking on this journey to enhance the resilience of your outdoor space through the installation of a reliable sump pump system. May your outdoor oasis thrive, free from the concerns of water infiltration and equipped to offer endless enjoyment and tranquility.
Frequently Asked Questions about How To Install An Outdoor Sump Pump
Was this page helpful?
At Storables.com, we guarantee accurate and reliable information. Our content, validated by Expert Board Contributors, is crafted following stringent Editorial Policies. We're committed to providing you with well-researched, expert-backed insights for all your informational needs.


0 thoughts on “How To Install An Outdoor Sump Pump”