Home>Furniture & Design>Outdoor Furniture>How To Install Outdoor Step Lights
Outdoor Furniture
How To Install Outdoor Step Lights
Modified: October 20, 2024
Learn how to install outdoor step lights to enhance your outdoor furniture and design. Follow our step-by-step guide for a well-lit and stylish outdoor space.
(Many of the links in this article redirect to a specific reviewed product. Your purchase of these products through affiliate links helps to generate commission for Storables.com, at no extra cost. Learn more)
Introduction
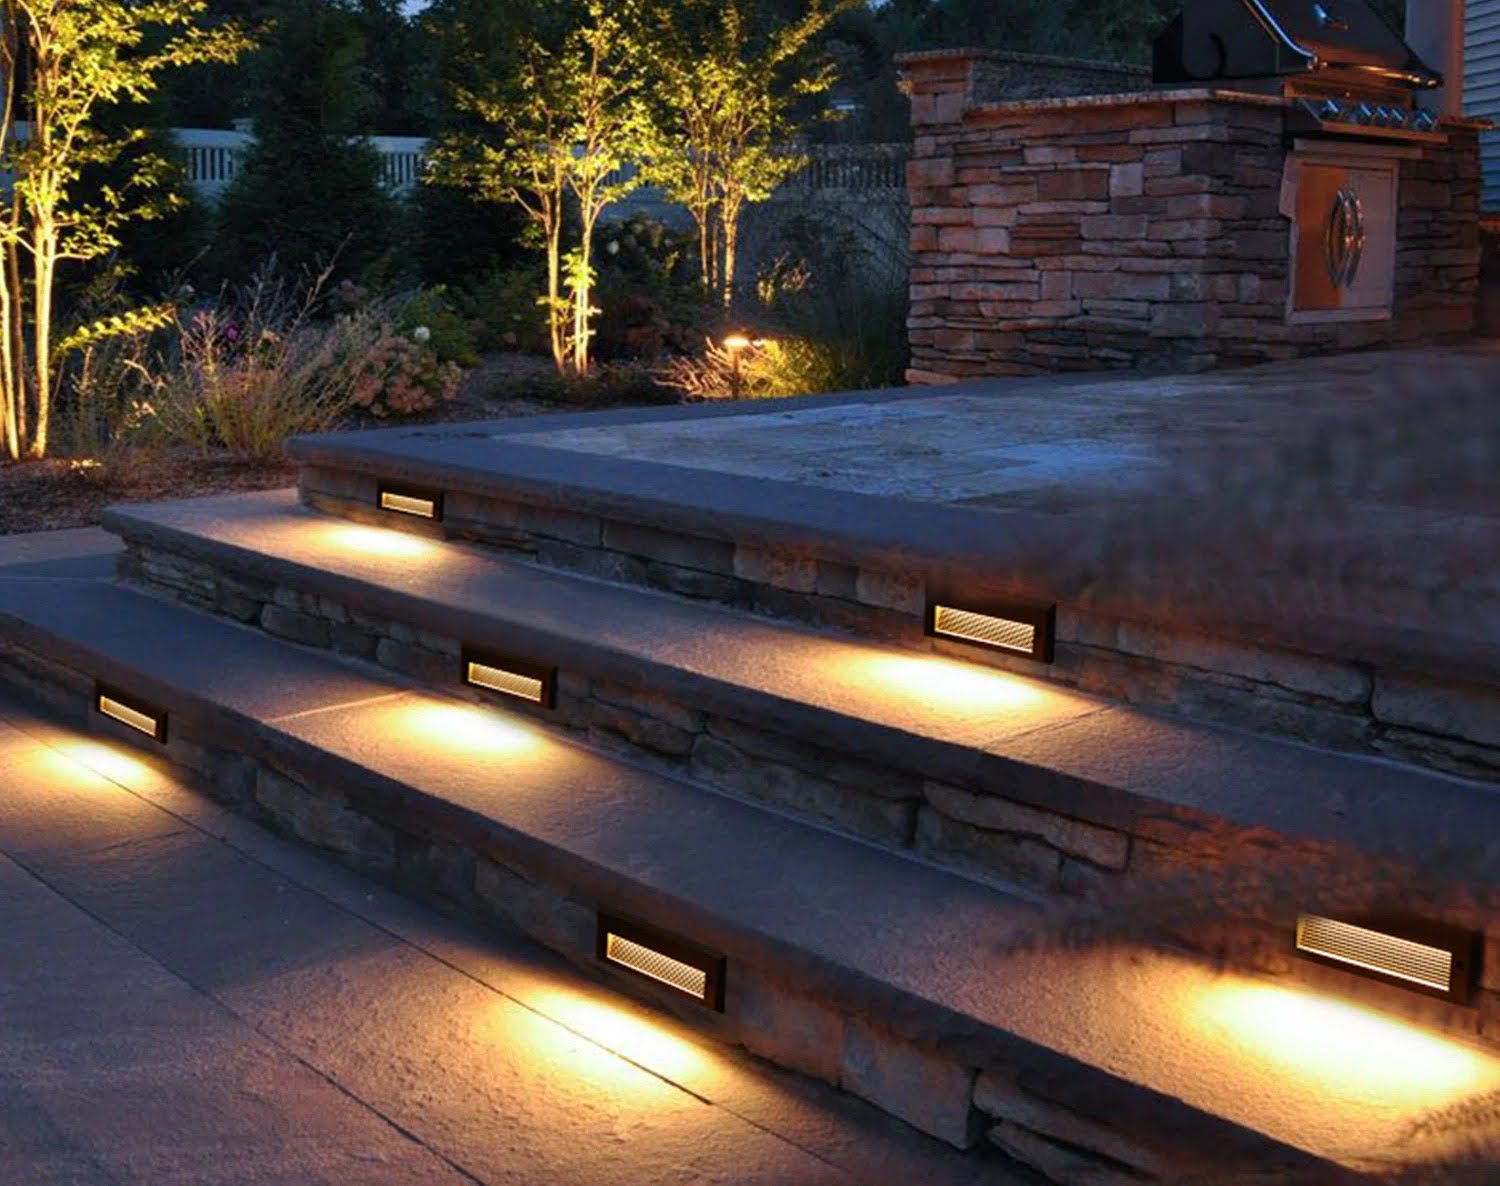
When it comes to enhancing the ambiance and safety of your outdoor space, installing step lights can make a significant difference. These small but impactful lighting fixtures not only illuminate pathways and steps but also add a touch of elegance to your outdoor area. Whether you want to create a welcoming atmosphere for guests or simply ensure that your family and visitors can navigate your outdoor living space safely, outdoor step lights are a practical and stylish solution.
In this guide, we will walk you through the step-by-step process of installing outdoor step lights. From gathering the necessary materials and tools to testing the lights, you'll gain valuable insights into the installation process. By the end of this guide, you'll feel confident and equipped to illuminate your outdoor steps and enhance the overall appeal of your outdoor space.
So, let's roll up our sleeves and delve into the world of outdoor step lights. Whether you're a seasoned DIY enthusiast or a novice looking to embark on your first outdoor lighting project, this guide is designed to provide you with the knowledge and guidance you need to bring your outdoor lighting vision to life. Let's get started!
Key Takeaways:
- Illuminate outdoor spaces with step lights for safety and elegance. Gather materials, choose the right location, prepare the area, install the lights, connect the wiring, and test the lights for a successful DIY project.
- Enhance outdoor ambiance and safety with carefully installed step lights. From gathering tools to testing the lights, follow the step-by-step process for a rewarding and transformative lighting project.
Read more: How To Light Up Outdoor Steps
Step 1: Gather Materials and Tools
Before diving into the installation process, it’s essential to gather all the necessary materials and tools. By ensuring that you have everything at your disposal, you can streamline the installation and minimize interruptions. Here’s a comprehensive list of materials and tools you’ll need to install outdoor step lights:
Materials:
- Outdoor step lights
- Low-voltage electrical wire
- Wire connectors
- Waterproof wire nuts
- Electrical tape
- Concrete or paver blocks (if necessary)
- Wire staples
- Transformer
- Wire nuts
- Marker or chalk (for marking the installation spots)
- Waterproof sealant
Tools:
- Drill with masonry bit (if installing on concrete)
- Screwdriver
- Wire strippers
- Hammer
- Work gloves
- Safety goggles
- Tape measure
- Level
- Adjustable wrench
- Shovel (if burying wires)
By having these materials and tools on hand, you’ll be well-prepared to tackle the installation process. Additionally, it’s crucial to ensure that the outdoor step lights you’ve selected are suitable for outdoor use and are designed to withstand the elements. Opt for high-quality, weather-resistant lights that will provide long-lasting illumination and durability.
Once you’ve gathered all the necessary materials and tools, you’re ready to move on to the next step: choosing the right location for your outdoor step lights.
Step 2: Choose the Right Location
When it comes to installing outdoor step lights, selecting the right location is crucial for achieving both aesthetic appeal and functional illumination. Here are some key considerations to keep in mind as you determine the placement of your outdoor step lights:
Visibility and Safety:
The primary purpose of outdoor step lights is to enhance safety by illuminating pathways and steps. As such, it’s important to install the lights in areas where visibility is limited, especially during the evening or nighttime. Focus on illuminating steps, transitions, and potential tripping hazards to ensure safe navigation in low-light conditions.
Aesthetics:
In addition to safety, outdoor step lights can also contribute to the overall aesthetics of your outdoor space. Consider how the lights will complement the existing design elements and landscaping features. Whether you prefer subtle, recessed lights or fixtures that make a statement, the placement of the lights should enhance the visual appeal of your outdoor area.
Power Source and Wiring:
Assess the proximity of a power source and the feasibility of running wiring to the desired locations. If you’re incorporating multiple step lights, plan the wiring layout to ensure a seamless and professional installation. Additionally, consider the type of terrain or surface where the lights will be installed, as this may impact the method of wiring and anchoring the fixtures.
Orientation and Angles:
Take into account the orientation and angles of the steps and pathways to determine the most effective placement of the lights. Ensuring that the lights illuminate the entire step and adjacent walking areas is essential for optimal functionality. Experiment with different placements and angles to find the configuration that best serves both practical and visual purposes.
By carefully evaluating these factors, you can strategically position the outdoor step lights to achieve a harmonious balance between safety, aesthetics, and functionality. Once you’ve identified the ideal locations for the lights, you can proceed to the next step: preparing the installation area.
Read more: How To Install Outdoor Flood Lights
Step 3: Prepare the Area
Before installing outdoor step lights, it’s essential to prepare the installation area to ensure a smooth and successful process. This step involves assessing the site, making necessary adjustments, and creating the groundwork for the installation. Here’s a comprehensive guide to preparing the area for your outdoor step lights:
Clear the Area:
Begin by clearing the designated installation area of any debris, vegetation, or obstacles that may impede the installation process. Ensure that the surface is clean and free of any obstructions to facilitate the placement of the lights and associated wiring.
Mark the Locations:
Using a marker or chalk, carefully mark the precise locations where the outdoor step lights will be installed. Take measurements and use a level to ensure accuracy and uniformity, especially if you’re installing multiple lights along a pathway or staircase.
Prepare the Mounting Surface:
Depending on the surface material, such as concrete, wood, or pavers, you may need to prepare the mounting surface to accommodate the lights. This may involve drilling pilot holes, creating recessed areas, or installing mounting brackets to ensure secure and flush placement of the lights.
Read more: How To Install Wainscoting Step-by-Step
Plan the Wiring Route:
Determine the most practical and discreet route for the wiring, taking into account the location of the power source and the connectivity of multiple lights. If burying the wiring underground, use a shovel to create a shallow trench, ensuring that the wiring is positioned securely and protected from potential damage.
Consider Waterproofing:
Given the outdoor environment, it’s crucial to implement waterproofing measures to protect the wiring connections and ensure the longevity of the lights. Use waterproof sealant and appropriate enclosures to shield the wiring and connections from moisture and environmental elements.
By meticulously preparing the area for the installation of outdoor step lights, you can lay the groundwork for a seamless and professional outcome. Once the area is prepped and the necessary adjustments are made, you’ll be ready to proceed with the installation of the lights themselves.
Step 4: Install the Lights
With the area prepared and the groundwork laid, it’s time to proceed with the installation of the outdoor step lights. This step involves securely mounting the lights in their designated locations, ensuring proper alignment, and making any necessary adjustments to achieve the desired aesthetic and functional outcome. Here’s a detailed guide to installing the lights:
Secure Mounting:
Depending on the type of outdoor step lights you’ve selected, follow the manufacturer’s instructions to securely mount the fixtures in the marked locations. This may involve using screws, anchors, or mounting brackets to ensure that the lights are firmly positioned and flush with the mounting surface.
Read more: How To Install Outdoor Landscape Lighting
Alignment and Leveling:
Use a level to ensure that the lights are aligned horizontally and vertically, especially if you’re installing multiple lights in a uniform configuration. Proper alignment not only enhances the visual appeal but also ensures consistent and effective illumination across the steps and pathways.
Adjust for Orientation:
If the lights feature adjustable orientation or angling, take the time to adjust the positioning to achieve the desired lighting spread and coverage. Experiment with different angles to optimize the illumination while complementing the architectural features and landscaping elements.
Test Fit and Function:
Before finalizing the installation, conduct a test fit of the lights to ensure that they fit securely and function as intended. This is an opportune time to make any necessary adjustments or refinements to the positioning and alignment of the lights.
Fasten Wiring Connections:
If the lights require wiring connections, carefully fasten the electrical wires according to the manufacturer’s specifications. Use wire connectors and waterproof wire nuts to create secure and weather-resistant connections, safeguarding the electrical components from environmental elements.
Read more: How To Install Outdoor Recessed Lighting
Seal Mounting Holes:
To prevent water intrusion and maintain the integrity of the mounting surface, apply waterproof sealant around the mounting holes or recessed areas where the lights are installed. This additional measure helps protect the installation from moisture and enhances the longevity of the lights.
By following these steps, you can ensure a meticulous and professional installation of the outdoor step lights. Once the lights are securely mounted and the wiring connections are in place, you’ll be ready to proceed with the next crucial step: connecting the wiring to power the lights.
Step 5: Connect the Wiring
Connecting the wiring is a pivotal step in the installation process of outdoor step lights. This phase involves establishing the electrical connections, ensuring proper insulation and protection, and integrating the lights with a power source. Here’s a comprehensive guide to connecting the wiring for your outdoor step lights:
Prepare the Electrical Wires:
If the lights require wiring connections, carefully strip the insulation from the ends of the electrical wires, exposing the conductors for secure and reliable connectivity. Use wire strippers to remove the appropriate length of insulation, allowing for efficient and safe wiring connections.
Utilize Wire Connectors:
Employ wire connectors to join the electrical wires, following the manufacturer’s guidelines and color-coding specifications. Securely fasten the connectors to create durable and dependable electrical connections, safeguarding against potential wire slippage or disconnection.
Read more: How To Install Outdoor Wall Lights
Weatherproof the Connections:
Given the outdoor environment, it’s imperative to weatherproof the wiring connections to protect them from moisture and environmental elements. Use waterproof wire nuts to encapsulate the wire connectors, providing a reliable barrier against water intrusion and ensuring the longevity of the electrical connections.
Integrate the Transformer:
If your outdoor step lights operate on low-voltage power, integrate a transformer into the wiring system to convert the standard household voltage to the appropriate low voltage required for the lights. Follow the manufacturer’s instructions to install and configure the transformer, ensuring seamless compatibility with the lights.
Bury or Conceal the Wiring:
If the wiring extends across the outdoor area, bury it in a shallow trench or conceal it within protective conduits to minimize visibility and reduce the risk of accidental damage. Ensure that the wiring is positioned securely and is shielded from potential hazards such as foot traffic or landscaping activities.
Test the Electrical Connections:
Once the wiring is connected and integrated with the power source, conduct a thorough test of the electrical connections to verify proper functionality. Test each light individually to ensure consistent illumination and assess the overall performance of the integrated wiring system.
By meticulously connecting the wiring and integrating the electrical components, you can establish a robust and reliable electrical system for your outdoor step lights. With the wiring in place and the electrical connections secured, you’re ready to move on to the final step: testing the lights to ensure optimal functionality and performance.
Read more: How To Install A Motion Sensor Outdoor Light
Step 6: Test the Lights
Testing the lights is the conclusive step in the installation process of outdoor step lights. This phase involves verifying the functionality, assessing the illumination, and ensuring that the lights operate as intended. By conducting a comprehensive test, you can address any potential issues and fine-tune the lighting system for optimal performance. Here’s a detailed guide to testing the lights:
Power On the Lights:
Activate the power source to energize the outdoor step lights, allowing them to illuminate and provide visibility along the designated pathways and steps. Observe the initial illumination to ensure that all lights are operational and emitting consistent light output.
Assess Illumination Quality:
Evaluate the quality and intensity of the light emitted by each fixture, paying attention to the coverage, color temperature, and overall illumination effect. Ensure that the lights effectively illuminate the steps and pathways while complementing the surrounding environment.
Check for Uniformity:
Verify that the light output is uniform across all installed fixtures, especially if you’ve incorporated multiple lights to illuminate an extended pathway or staircase. Consistent illumination enhances safety and visual appeal, creating a cohesive and harmonious lighting scheme.
Read more: How To Install A Carpet On Steps
Adjust Lighting Angles:
If necessary, make adjustments to the orientation and angling of the lights to optimize the lighting spread and coverage. Fine-tune the positioning to address any areas of inadequate illumination or to enhance the visual impact of the lights within the outdoor space.
Test Different Scenarios:
Experiment with the lights in various lighting scenarios, such as dusk, nighttime, or low-light conditions, to assess their performance across different ambient light levels. This comprehensive testing approach ensures that the lights deliver consistent and reliable illumination regardless of the time of day.
Address Any Issues:
If you encounter any issues during the testing phase, such as uneven illumination, flickering lights, or connectivity issues, address them promptly. Troubleshoot any potential issues and make necessary adjustments to optimize the performance and functionality of the outdoor step lights.
By thoroughly testing the lights and addressing any potential issues, you can ensure that the installation of the outdoor step lights is a resounding success. Once the lights have been tested and their performance has been verified, you can step back and admire the transformative impact they have on your outdoor space.
Conclusion
Congratulations! By following this comprehensive guide, you’ve gained valuable insights into the meticulous process of installing outdoor step lights. From gathering the necessary materials and tools to testing the lights, you’ve embarked on a journey to enhance the safety, functionality, and visual appeal of your outdoor living space. As you stand back and admire the illuminated pathways and steps, you can take pride in the transformative impact of your DIY lighting project.
Outdoor step lights not only contribute to the safety and navigation of your outdoor area but also add a touch of elegance and sophistication to the landscape. The careful selection of locations, meticulous preparation of the installation area, and precise installation of the lights have culminated in a harmonious integration of practicality and aesthetics.
As you bask in the gentle glow of the lights, envision the countless evenings and gatherings that will be enriched by the inviting ambiance and secure pathways created by your outdoor step lights. Whether guiding guests to your outdoor entertaining area or providing a tranquil evening ambiance for relaxation, the impact of these lights extends far beyond their functional purpose.
Furthermore, the satisfaction of completing a DIY project that not only enhances your outdoor space but also reflects your creativity and attention to detail is truly rewarding. Your outdoor step lights stand as a testament to your dedication to creating a welcoming and safe environment for yourself, your family, and your guests.
With the installation process complete and the lights seamlessly integrated into your outdoor space, take a moment to appreciate the transformative power of lighting in shaping the ambiance and functionality of your surroundings. Your outdoor step lights are not merely fixtures; they are beacons that illuminate the path to unforgettable moments and cherished memories in your outdoor sanctuary.
As you revel in the enhanced beauty and practicality of your outdoor space, you can take pride in the knowledge that your DIY endeavor has left a lasting impression, both visually and experientially. Your outdoor step lights are more than just a lighting installation – they are a reflection of your commitment to creating an inviting, safe, and captivating outdoor oasis.
Frequently Asked Questions about How To Install Outdoor Step Lights
Was this page helpful?
At Storables.com, we guarantee accurate and reliable information. Our content, validated by Expert Board Contributors, is crafted following stringent Editorial Policies. We're committed to providing you with well-researched, expert-backed insights for all your informational needs.


0 thoughts on “How To Install Outdoor Step Lights”